
How To Configure Static IP On Ubuntu Server
Network configuration on Ubuntu 16 and older versions were done simply by editing the interface file. But from Ubuntu 17, a new network configuration system called NetPlan was created. In this article, we are going to create or edit the Ubuntu 18 server network with the Netplan command.
Netplan is a new command-line tool for network configuration introduced in Ubuntu 17.10 for easy management and configuration of network settings on Ubuntu systems. This tool allows you to set up a network interface using the YAML concept. Netplan works as Kernel interfaces in combination with NetworkManager and Systemd-networkd services (used as renderers, you can choose any of them to use).
The Netplan tool reads the network settings described in /etc/netplan/*.yaml, and you can save the settings for all your network interfaces in these files. In this article, we will explain how to configure Static IP address for a network interface in Ubuntu 18.04 using the Netplan tool.

What Is YAML Definition?
YAML is a data serialization language that was first developed by Clark Evans in 2001. This language, like the XML language, is used to organize and describe information. YAML is based on another popular format called JSON. Like the Python language, YAML uses indentation to specify blocks. YAML stands for YAML Ain’t Markup Language and refers to the differences between this language and a language like HTML. The format of files written in this language is .yaml.
List All Active Network Interfaces On Ubuntu 18
First, you need to specify the network interfaces you want to configure. You can list all network interfaces on your system using the ifconfig or ip addr show command as below.
# ifconfig -aOr
# ip addr show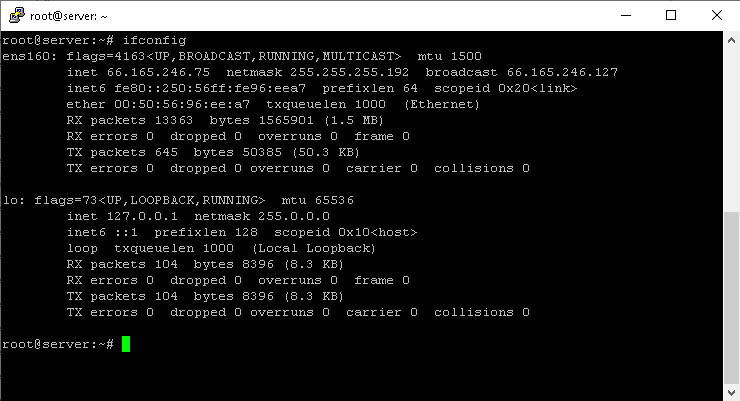
It is clear from the output of the above command that we have two interfaces connected to the Ubuntu system. An ethernet interface and a loopback interface, where the ens160 interface is configured and have a static IP address. Now we try to edit the ens160 interface and set or edit our static IP address.
Note: Also, you can find more information about Netplan files on the Ubuntu website.
Define Static IP address In Ubuntu 18.04
In this example, we will define a static IP address for the ens160 interface. Open the Netplan config file using your text editor.
Note: In case the YAML file was not created when installing Linux VPS, you can use the following command to create the settings needed for the renderer.
# netplan generateThe file that was created automatically may have a different name on the Desktop, Server, or Cloud version, etc. (for example 01-network-manager-all.yaml or 01-netcfg.yaml), but all files are in the / etc / directory. netplan / *. yuml will be readable by Netplan.
# sudo vim /etc/netplan/01-network-manager-all.yamlOr
# vim /etc/netplan/01-netcfg.yamlThen add the following settings in the ethernet section.
# This file describes the network interfaces available on your system
# For more information, see netplan(5).
network:
version: 2
renderer: networkd
ethernets:
ens160:
addresses: [ 66.165.246.75/26 ]
gateway4: 66.165.246.66
nameservers:
search: [ domain.com ]
addresses:
- "8.8.8.8"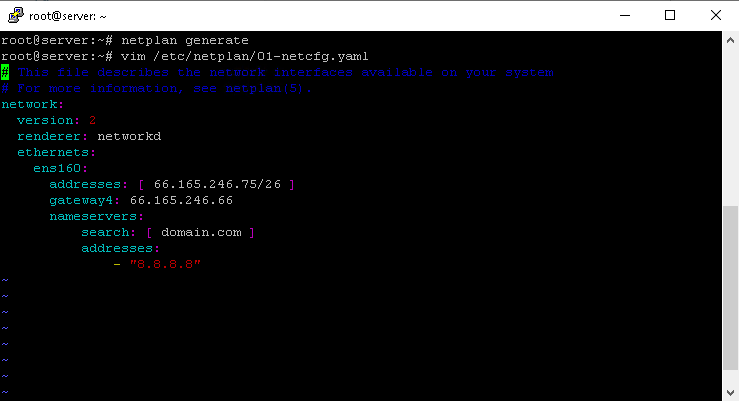
Options Defined In The Network Setting
- ens160: The name of the network interface.
- Addresses: The IP static address associated with this interface.
- Gateway4: IPv4 address for Default Gateway.
- Nameservers: IP addresses associated with nameserver.
Save the file and exit it. You can do it in vim editor by pressing
Esc and typing :wq
Then apply the above changes using the Netplan command as below.
# netplan applySummary
As you can see, we were able to easily create or modify the Ubuntu 18 server network. We hope you find this short but important tutorial useful.
If you have any problems or questions in this regard, please do not hesitate to inform us through the comments section.