How To Configure Static IP on Ubuntu Server
Administrators configure static IP on Ubuntu server to achieve stable connectivity, predictable remote access, and reliable firewall or routing rules that persist after reboot.
Modern Ubuntu uses Netplan YAML configuration with either systemd-networkd or NetworkManager, while older releases relied on /etc/network/interfaces.
That shift, along with cloud-init overrides and predictable network interface naming, often confuses even seasoned sysadmins.
In this guide, we will cover both the method of command-line Netplan configuration and a GUI-based approach with Network Settings:
- CMD: set
dhcp4: falsein/etc/netplan/*.yamland defineaddresses,gateway4, andnameservers, then runnetplan apply. - GUI: Open Settings → Network → Wired → IPv4 and switch to “Manual” to assign static IP details.
Understanding the Networking Stack on Modern Ubuntu Servers
Ubuntu no longer relies on the old /etc/network/interfaces file. Since 17.10, it uses Netplan configuration stored in /etc/netplan/.
These YAML files define settings such as addresses, gateway4, and nameservers, and the chosen renderer determines how the config is applied.
- systemd-networkd is the default renderer for most headless and minimal server images. It provides stable, lightweight handling of persistent IP and predictable network interface naming.
- NetworkManager is typically used on desktop or GUI environments, where you can switch between DHCP vs static address with a few clicks.
For cloud images, you will often encounter cloud-init network config.
If not disabled, cloud-init can override your Netplan YAML and reset settings on reboot.
This is a common pitfall for VPS and remote server users, leading to lost static IP assignments.
Preparing for Static IP Configuration
If you are provisioning an Ubuntu VPS for production, ensure you follow these steps to configure a static IP on Ubuntu before enabling remote services.
The official Ubuntu Server uses Netplan (YAML files in /etc/netplan/) to declaratively configure the network.
If you are on a desktop image or using NetworkManager, the procedure differs slightly.
The examples below assume Ubuntu 20.04 / 22.04 / 24.04 style systems.
Preliminary checks
First, confirm OS version and netplan presence:
lsb_release -ds
ls /etc/netplan || echo "/etc/netplan missing"
Identify active interface name(s) and current addressing:
ip link show
ip addr show
ip route show
Here, inspect existing Netplan files and whether they’re auto-generated:
sudo sed -n '1,6p' /etc/netplan/*.yaml 2>/dev/null
# Look for comments like "generated from information provided by ..."
Predictable network interface naming (ens33, enp3s0) and whether the YAML is cloud-generated will change how you proceed.
Backup + remote-safe testing
For safety, back up the current netplan config:
sudo mkdir -p /root/netplan-backup
sudo cp /etc/netplan/*.yaml /root/netplan-backup/
Then, use a safe environment (tmux/screen) and always prefer netplan try on remote machines:
sudo netplan trynetplan try applies the config temporarily and auto-rolls back if you don’t confirm; this prevents permanent SSH lockout.
After you are happy, run sudo netplan apply.
Steps to Configure Static IP on Ubuntu using Netplan [CMD Method]
This is the canonical method to Configure Static IP on Ubuntu server installations that use Netplan + systemd-networkd recommended for servers.
Step 1: Create/Edit a Netplan YAML
Open a new file (use the existing filename pattern if present):
network:
  version: 2
  renderer: networkd
  ethernets:
    enp3s0:
      dhcp4: false
      addresses:
        - 192.0.2.10/24          # <--- your static IP/prefix
      gateway4: 192.0.2.1        # <--- your gateway
      nameservers:
        addresses: [8.8.8.8,1.1.1.1]  # <--- DNS servers
Step 2: Save, set safe permissions, and validate
sudo chmod 600 /etc/netplan/01-static-ip.yaml
sudo netplan generate    # validate and generate backend configs
If netplan generate shows no errors, proceed.
Step 3: Try (safe) then apply
sudo netplan try     # temporary apply + rollback protection
# If it works and you confirm, then:
sudo netplan apply
If you are local to the machine you can skip try, but never skip it on remote servers unless you have console access.
netplan try protects against SSH lockouts by automatically rolling back after the timeout.
Step 4: Verify networking and DNS
ip addr show enp3s0
ip route show
resolvectl status           # checks systemd-resolved and nameservers
ping -c3 8.8.8.8
ping -c3 example.com
If name resolution fails but ping to IP works, double-check nameservers and systemd-resolved settings.
Configure Static IP on Ubuntu Server using GUI Method
This method is useful if your server uses NetworkManager or you are running Ubuntu Desktop with the GNOME Settings panel.
GNOME Settings (graphical desktop)
The steps below are the most visual, user-friendly way to configure a static IP on Ubuntu on desktop/server images with a GUI.
- Open Settings → Network
Click the network icon in the top bar or open Settings from the application menu. Under Network, you will see wired/wireless interfaces.
Note: If nothing appears, NetworkManager may not be active.
- Select the connection and click the gear/⚙️ icon
For a wired connection, choose the entry (e.g., “Wired”) then the gear. This opens the connection properties where IPv4/IPv6 are configured.

- Switch IPv4 to Manual
In the IPv4 tab choose Manual (not Automatic/DHCP). You will see fields for Address, Netmask/Prefix, Gateway, and DNS.
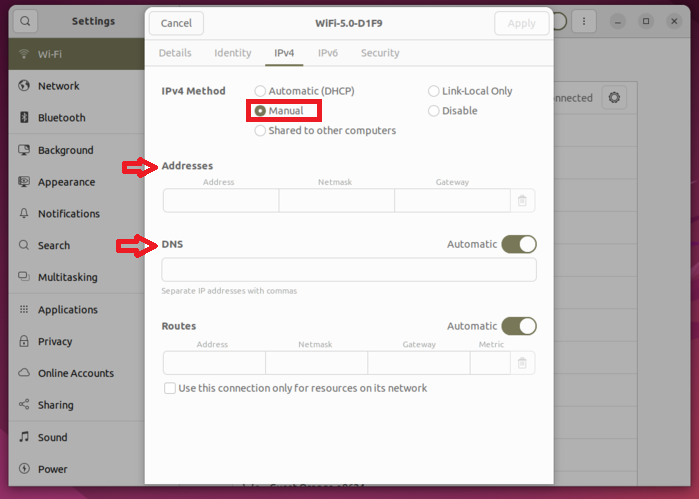
Enter your static values (for example 192.0.2.10 and 24 for /24), the gateway (e.g., 192.0.2.1), and nameservers (8.8.8.8, 1.1.1.1).
This maps directly to addresses, gateway4, and nameservers used by backend config.
- Save and toggle the connection off/on (or Restart Network).
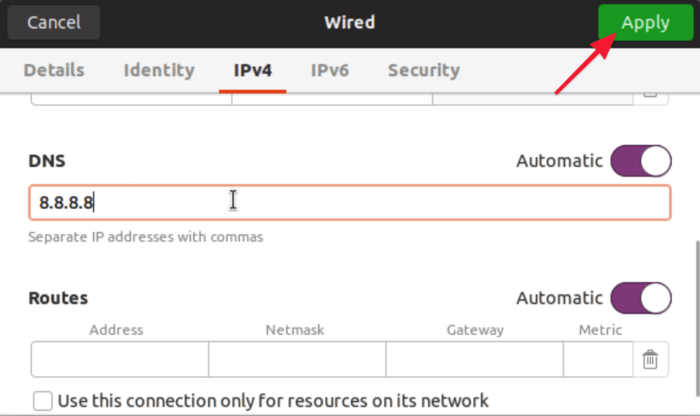
Hit Save (or Apply), then disable and re-enable the connection in the top bar, or reboot if you prefer.
The GUI does not provide a timed rollback; confirm you have console access if this is a remote server.
- Verify (quick checks)
Open Terminal and run:
ip addr show <interface>
ip route show
resolvectl status
These confirm the static IP, default route, and DNS. If name resolution fails but IP ping works, recheck the DNS entries.
Conclusion
Learning how to configure static IP on Ubuntu Server is a cornerstone of stable and secure operations. A static IP ensures consistent routing, reliable DNS resolution, and uninterrupted remote access, which are critical for both production servers and cloud instances.
By mastering the Netplan command-line method and the GUI-based Network Settings approach, administrators gain flexibility across environments while avoiding common pitfalls like YAML errors, cloud-init overrides, or DNS misconfigurations.
Always validate changes with netplan try, back up configurations, and confirm connectivity before deploying in production.
Ultimately, a properly configured static IP strengthens network reliability, supports stricter security policies, and lays the groundwork for scalable infrastructure.