Install and Setup Zabbix on Ubuntu 20.04
Install and Setup Zabbix on Ubuntu 20.04 is the process of deploying an open-source monitoring tool to track servers, applications, and network devices. It involves installing the Zabbix server, configuring a database, setting up the web interface, and installing agents on monitored hosts to collect and secure performance data.
🤖AI Overview:
Install and Setup Zabbix on Ubuntu 20.04 enables monitoring of applications, servers, and network devices by collecting performance data securely. The process involves installing Zabbix server, setting up a MySQL database, configuring web interface and PHP, and deploying Zabbix agents on monitored machines. This setup helps track system health and troubleshoot issues effectively.
Prerequisites to Install Zabbix on Ubuntu 20.04
To let this installation work correctly, consider the below prerequisites and then move on to learn to Install and Setup Zabbix on Ubuntu 20.04 in the following of this article.
- A system running Ubuntu 20.04.
- TLS/SSL certificate installed (Optional but recommended)
- A non-root user with
sudoprivileges and firewall configured withufw. - A server with Apache httpd, MySQL/MariaDB database, Zabbix, and PHP version 7.2+ or > installed.
Note: PHP and httpd must be installed on the Zabbix server, but MySQL/MariaDB can be a remote server.
Tutorial Install and Setup Zabbix on Ubuntu 20.04
Installing Zabbix on your server guarantees the health of your IT infrastructure to clarify potential problems. Also, Zabbix enables information to be stored in a database to let you analyze data over time. In this way, the quality of provided services would be improved, and upgrading your equipment can be planned. Zabbix employs a variety of methods for gathering metrics, including client-server architecture and agentless monitoring of user services. It employs a small agent on the monitored client to acquire data and send it to the Zabbix server to collect server metrics. Your data is protected as it is transferred over insecure networks thanks to Zabbix’s support for encrypted communication between the server and connected clients.
Stay with us to go through this guide and review all the required steps to install and set up Zabbix on your Ubuntu server if you have provided all mentioned prerequisites. Install and Setup Zabbix on Ubuntu 20.04 helps you to monitor remote servers securely.
Step 1
Once you log in to your machine as your non-root server, run the following command to install the Zabbix server.
ssh opera@zabbix_server_ip_addressWhile the available Zabbix in the package manager of Ubuntu is outdated, you need to install the latest stable version which exists on the Official Zabbix repository. To download and install the repository configuration package, run:
wget https://repo.zabbix.com/zabbix/5.0/ubuntu/pool/main/z/zabbix-release/zabbix-release_5.0-1+focal_all.deb
sudo dpkg -i zabbix-release_5.0-1+focal_all.deb
Now, you need to update the package index and install Zabbix server packages.
sudo apt update
sudo apt install zabbix-server-mysql zabbix-frontend-php
sudo apt install zabbix-agent
In this way, the Zabbix server and web frontend with MySQL database support will be installed. And the installing Zabbix agent helps you to collect data about the Zabbix server status.
Step 2
To start using Zabbix, you need to set up a database to hold the data that the Zabbix server collects from its agents. To do this, we are going to create a new MySQL database. So, create a specific user for this database and its required basic information. This account should not be logged in to MySQL with the root account.
To set up the MySQL database for Zabbix, log in to MySQL as the root user and type:
sudo mysqlThen, use the command below to create the Zabbix database with UTF-8 characters support.
create database zabbix character set utf8 collate utf8_bin;It is time to create a user that the Zabbix server can use it. Also, give it access to the new database, and set the password for the user.
create user zabbix@localhost identified by 'your_zabbix_mysql_password';
grant all privileges on zabbix.* to zabbix@localhost;
In this way, the user and the database will be protected. Then, exit out of the database console.
quit;When Zabbix is installed, you will have a file that sets the initial schema and data. So, to set up the schema and import the data into the Zabbix database.
zcat /usr/share/doc/zabbix-server-mysql*/create.sql.gz | mysql -uzabbix -p zabbixzcat is used because the data in the file is compressed.
Now, you need to enter the password for zabbix MySQL user. Set the database password in the Zabbix server configuration file to let the Zabbix server use the database. To do this, open the configuration file in your favorite text editor. Here, we use nano.
sudo nano /etc/zabbix/zabbix_server.confThe following section of the file must be shown.
/etc/zabbix/zabbix_server.conf
...
### Option: DBPassword
#       Database password. Ignored for SQLite.
#       Comment this line if no password is used.
#
# Mandatory: no
# Default:
# DBPassword=
...
Set the DBPassword value in the file to the password for your database user. Commands in the file explain the way you can connect to the database. To set up the database, Add this line after those commands.
/etc/zabbix/zabbix_server.conf
...
DBPassword=<span style="color: #0000ff;">your_zabbix_mysql_password</span>
...
If you used nano too, press CTRL+X , followed by Y, and then ENTER to save and close zabbix_server.conf .
Step 3
In this step, you are ready to set up Nginx for Zabbix. To do this automatically, you need to install the automatic configuration package. So, run:
sudo apt install zabbix-nginx-confOnce you get the configuration file, make changes to that. So, open it to do this.
sudo nano /etc/zabbix/nginx.confAn automatically generated Nginx server block configuration is present in the file. Two lines in it specify the server name and the port on which it is listening:
/etc/zabbix/nginx.conf
server {
<span style="color: #0000ff;">#        listen          80;</span>
<span style="color: #0000ff;">#        server_name     example.com;
</span>...
Uncomment the two lines and substitute your domain name for example.com. Your settings will appear as follows:
/etc/zabbix/nginx.conf
server {
        listen          80;
        server_name     <span style="color: #0000ff;">your_domain</span>;
...
Save the document, then exit. Next, verify that none of your Nginx files contain syntax problems, then reload the configuration:
sudo nginx -t
sudo nginx -s reload
You will need to adjust your PHP configuration after setting up Nginx to serve the Zabbix frontend for the web interface to function properly.
Step 4
It is time to Set up/Configure PHP for Zabbix. The PHP-based Zabbix web interface needs particular PHP server settings. These settings are stored in a PHP-FPM configuration file that was created during the Zabbix installation procedure. It is loaded automatically by PHP-FPM and can be found in the directory/etc/zabbix. This file needs a minor modification, so open it by doing the following:
sudo nano /etc/zabbix/php-fpm.confThe PHP configurations in the file are appropriate for the Zabbix web interface. The timezone option, however, is by default uncommented. You must select the proper timezone for Zabbix for it to use the correct time:
/etc/zabbix/php-fpm.conf
...
php_value[max_execution_time] = 300
php_value[memory_limit] = 128M
php_value[post_max_size] = 16M
php_value[upload_max_filesize] = 2M
php_value[max_input_time] = 300
php_value[max_input_vars] = 10000
<span style="color: #0000ff;">; php_value[date.timezone] = Europe/Riga</span>
Uncomment the timezone line that was marked in the code block before it, then replace it with your timezone. Then save and close the file.
To apply these new settings, restart PHP-FPM.
sudo systemctl restart php7.4-fpm.serviceTo start the Zabbix server, run:
sudo systemctl start zabbix-serverThen verify the appropriate operation of the Zabbix server to view active (running) in your output. In the end, enable the server to start at boot time, set up the server, and connect to the database.
sudo systemctl enable zabbix-serverStep 5
When the required steps to install and Setup Zabbix on Ubuntu 20.04 are complete, you can set up settings for the Zabbix web interface. The web interface requires some basic setup before you can use it, but it allows you to view reports and add hosts that you want to monitor. Open your browser and navigate tohttp://zabbix server nameorhttps://zabbix server name if Let’s Encrypt has been configured. An introduction message will appear on the first screen. To proceed, select Next.
You may find the table with a list of all the requirements to run Zabbix on the next screen.
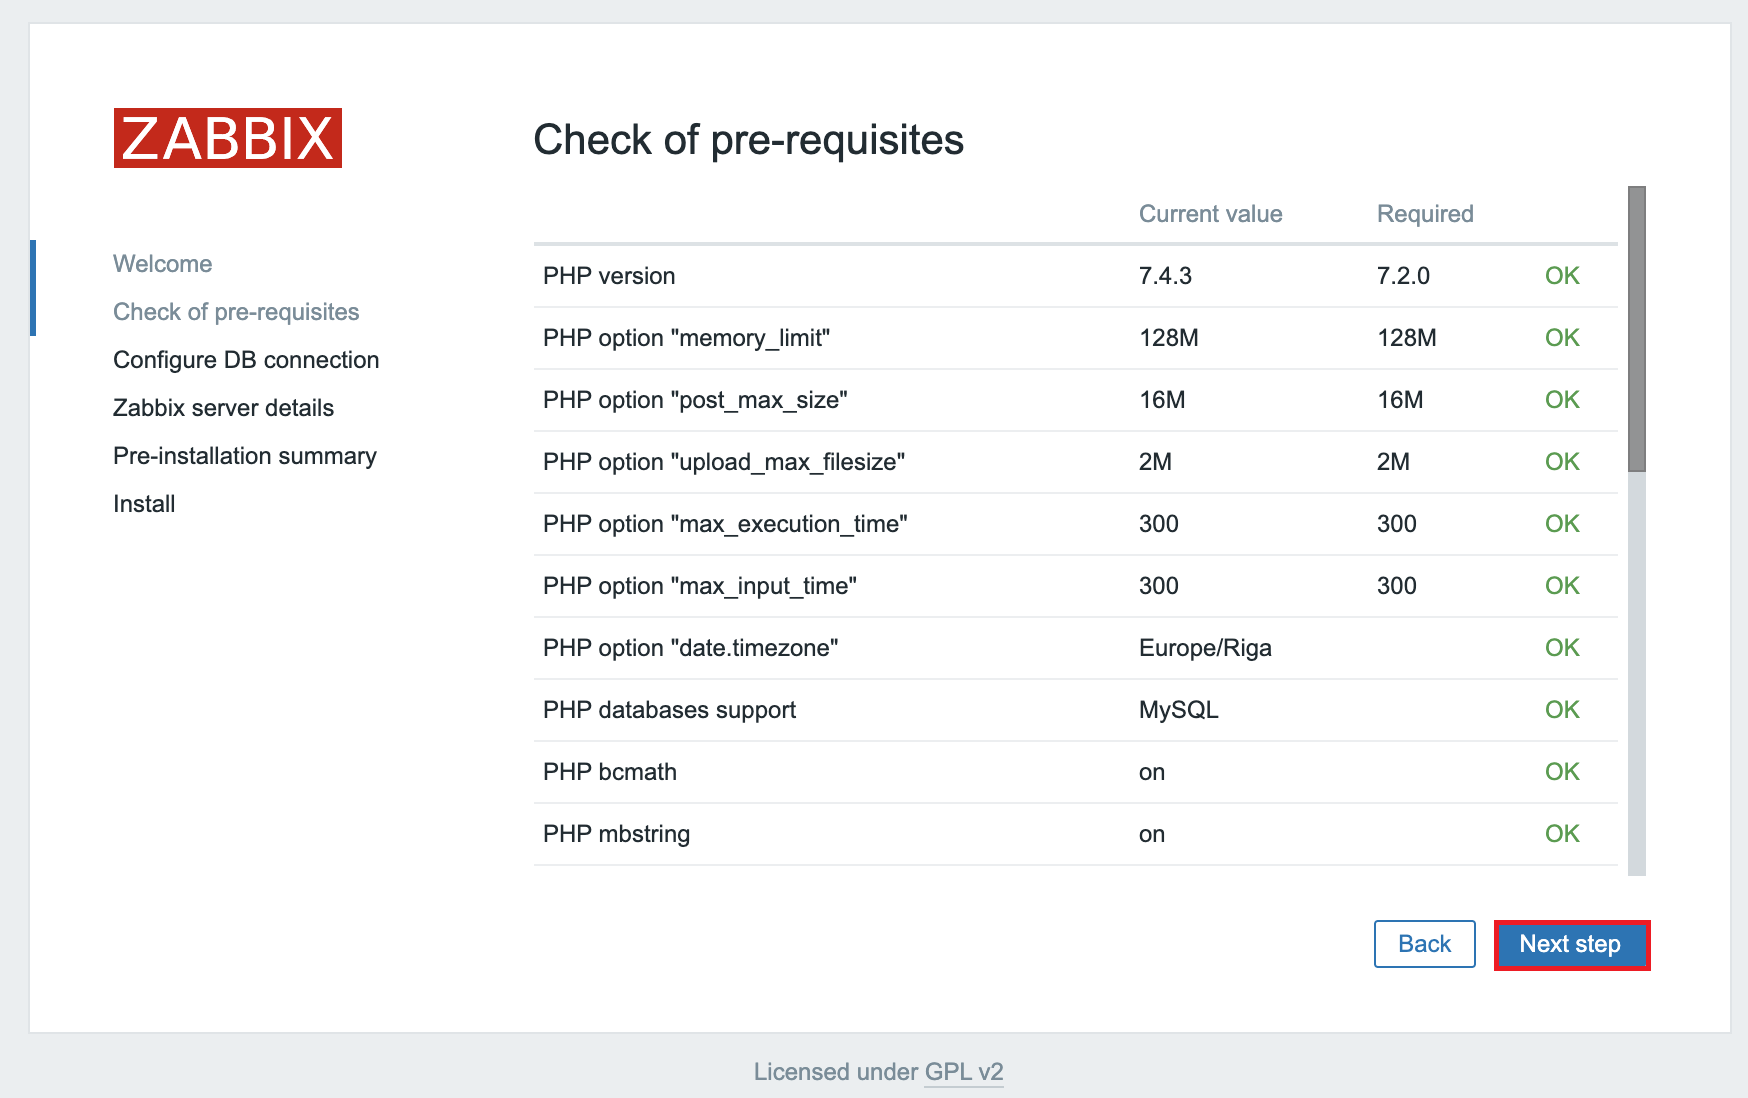
Verify that all the values in this table are OK. Make sure to scroll down and review each need. After making sure everything is prepared, move on by clicking the Next step.
On the following screen, a database connection request is made.
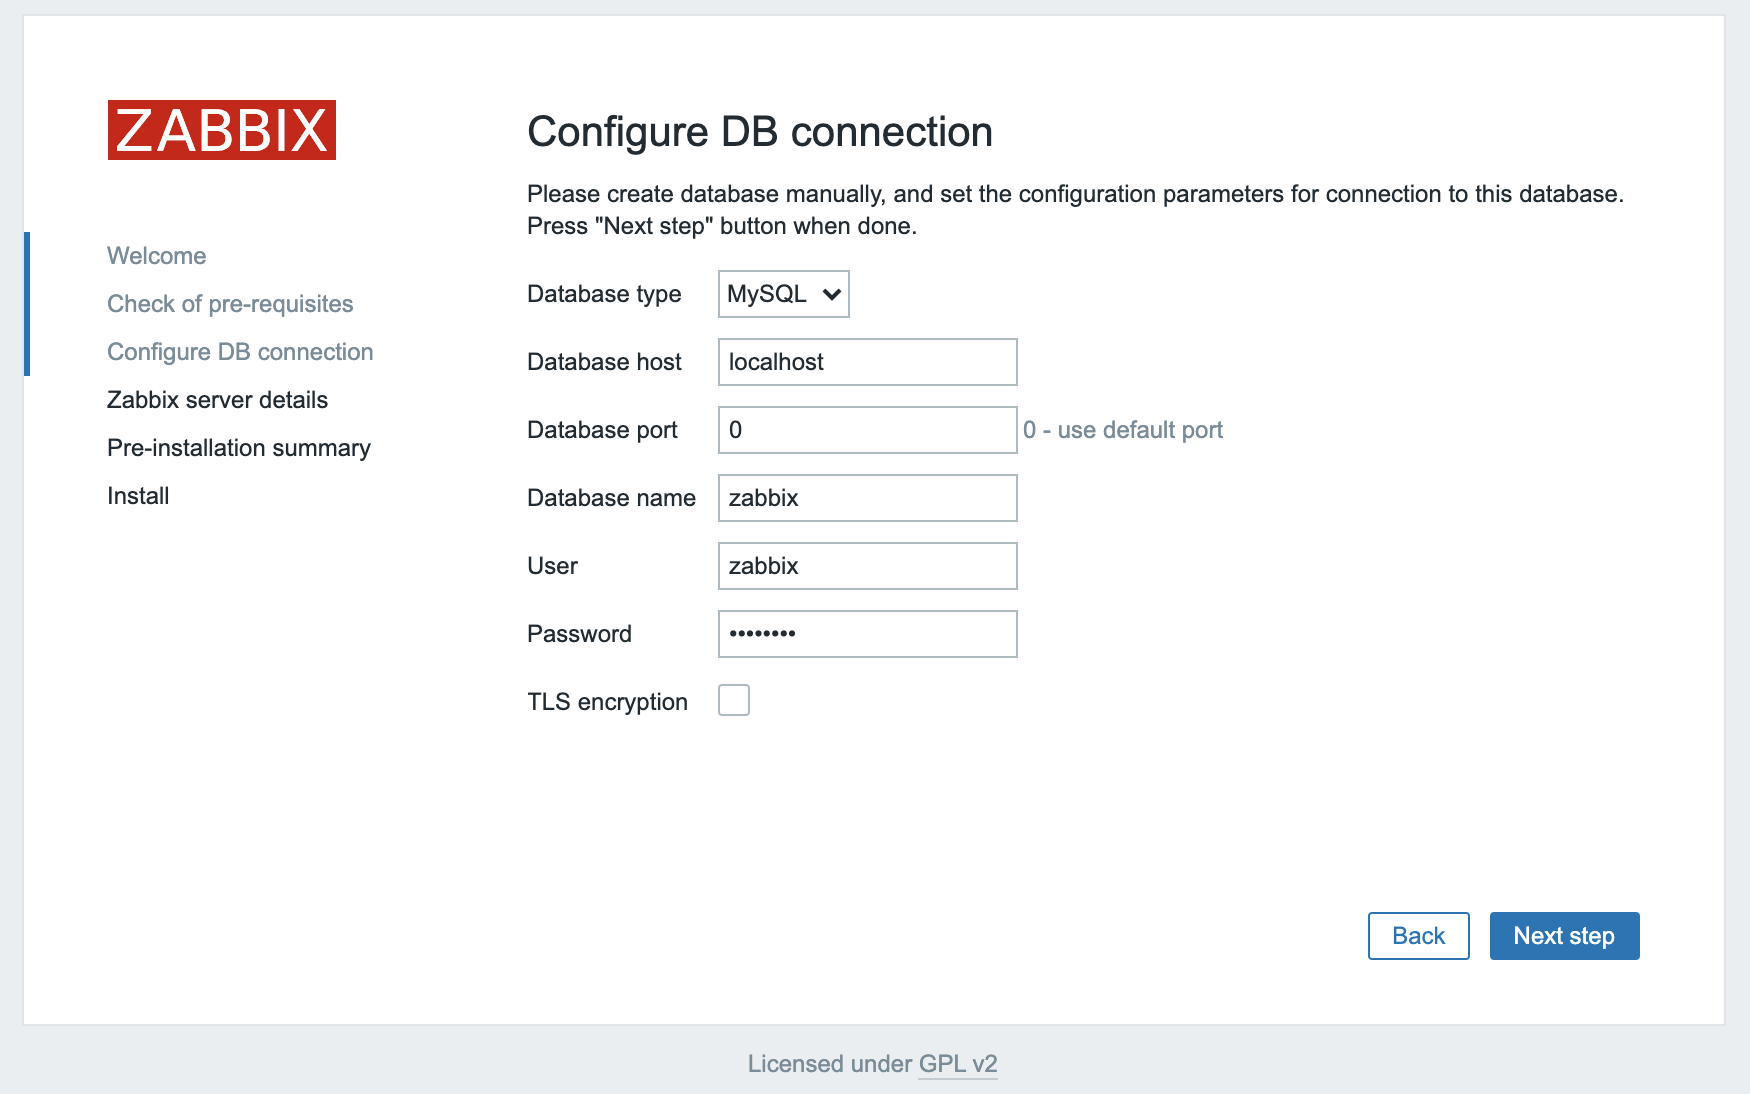
Although you informed the Zabbix server about your database, the web interface for managing hosts and reading data also requires access to the database. Enter the MySQL login information that you set up in Step 2 as a result. To continue, click Next step.
You can leave the selections on the following screen’s default values.
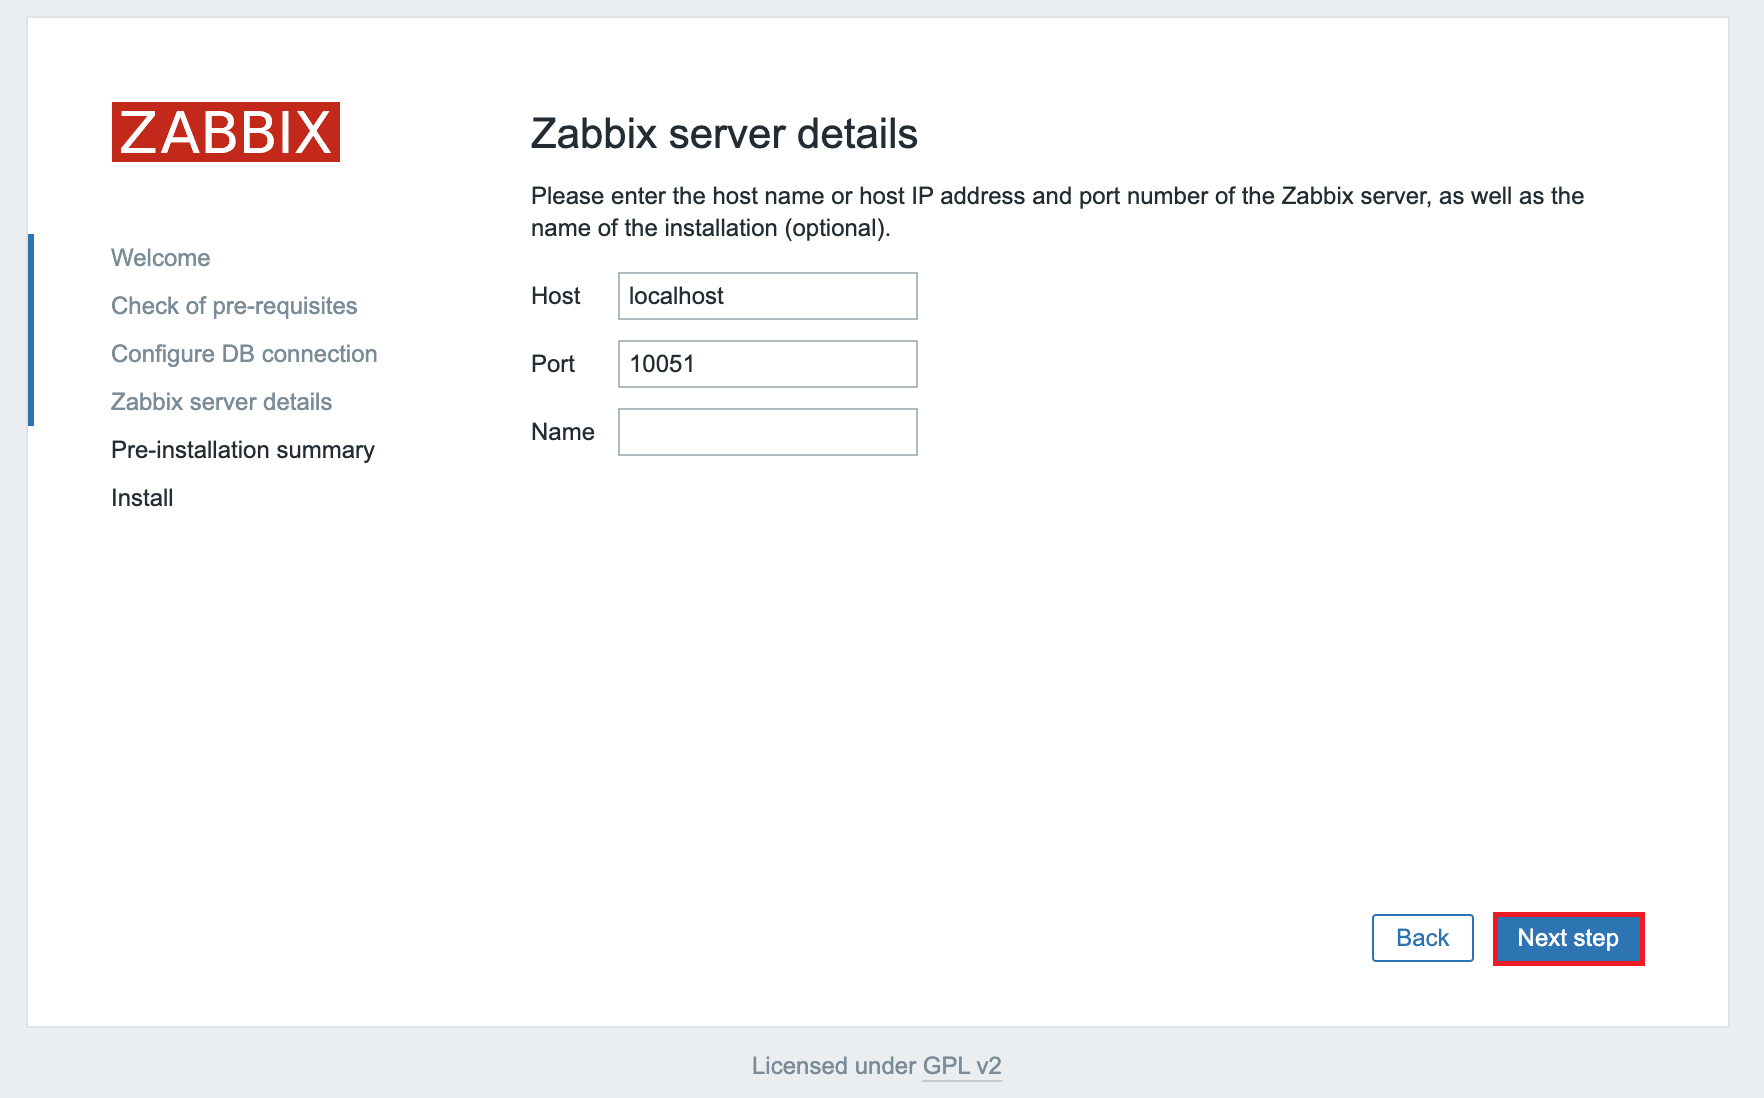
To advance to the last screen, click Next step. The time zone and Zabbix GUI theme can be defined when we click Next Step (the timezone was previously changed in the apache.conf file).
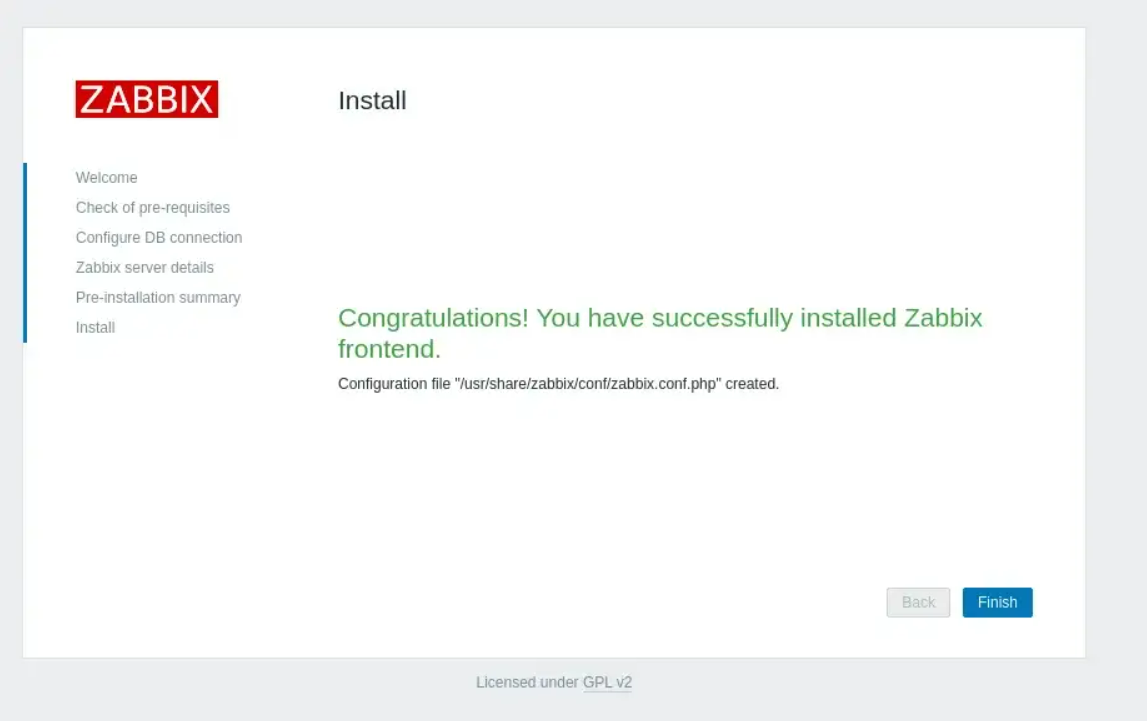
Before we begin the installation, we get to examine all previous configurations after selecting Next Step.
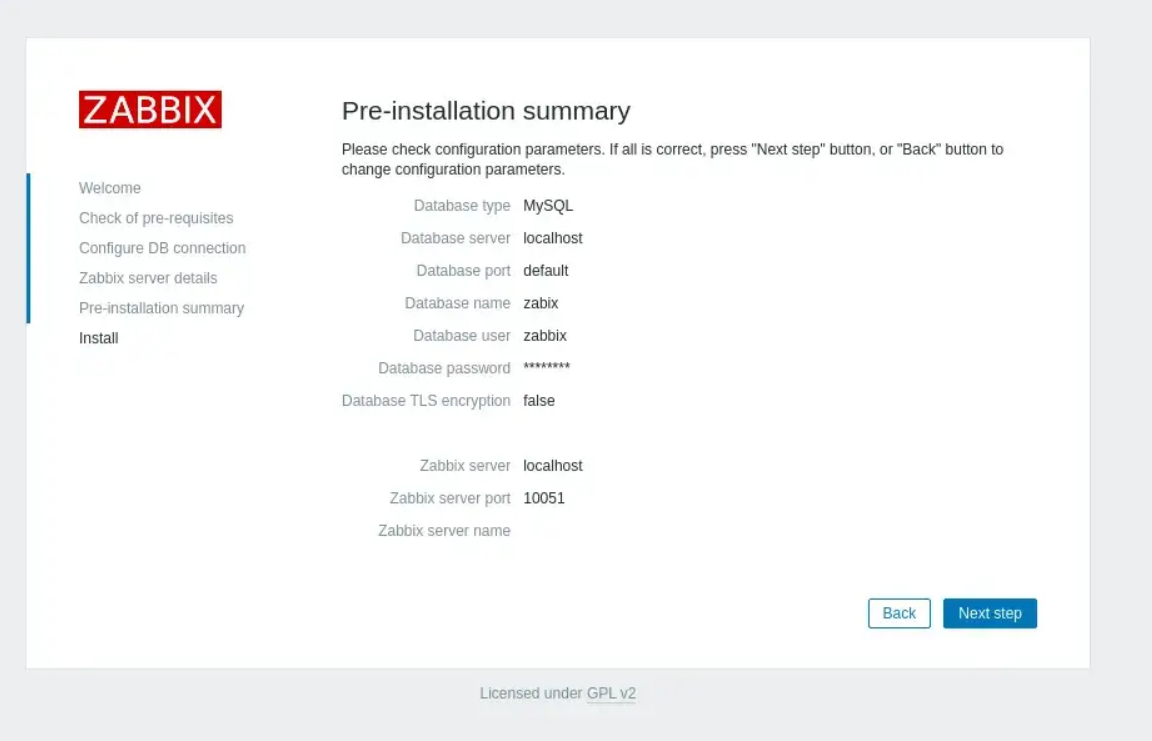
Once you do everything correctly, the installation is complete. After the installation, a screen with a congratulations message will appear. The procedure for installing Zabbix on Ubuntu 20.04 was as follows.
After that, we will be directed to the Zabbix monitoring login screen, where we must enter the password Zabbix and the username Admin.
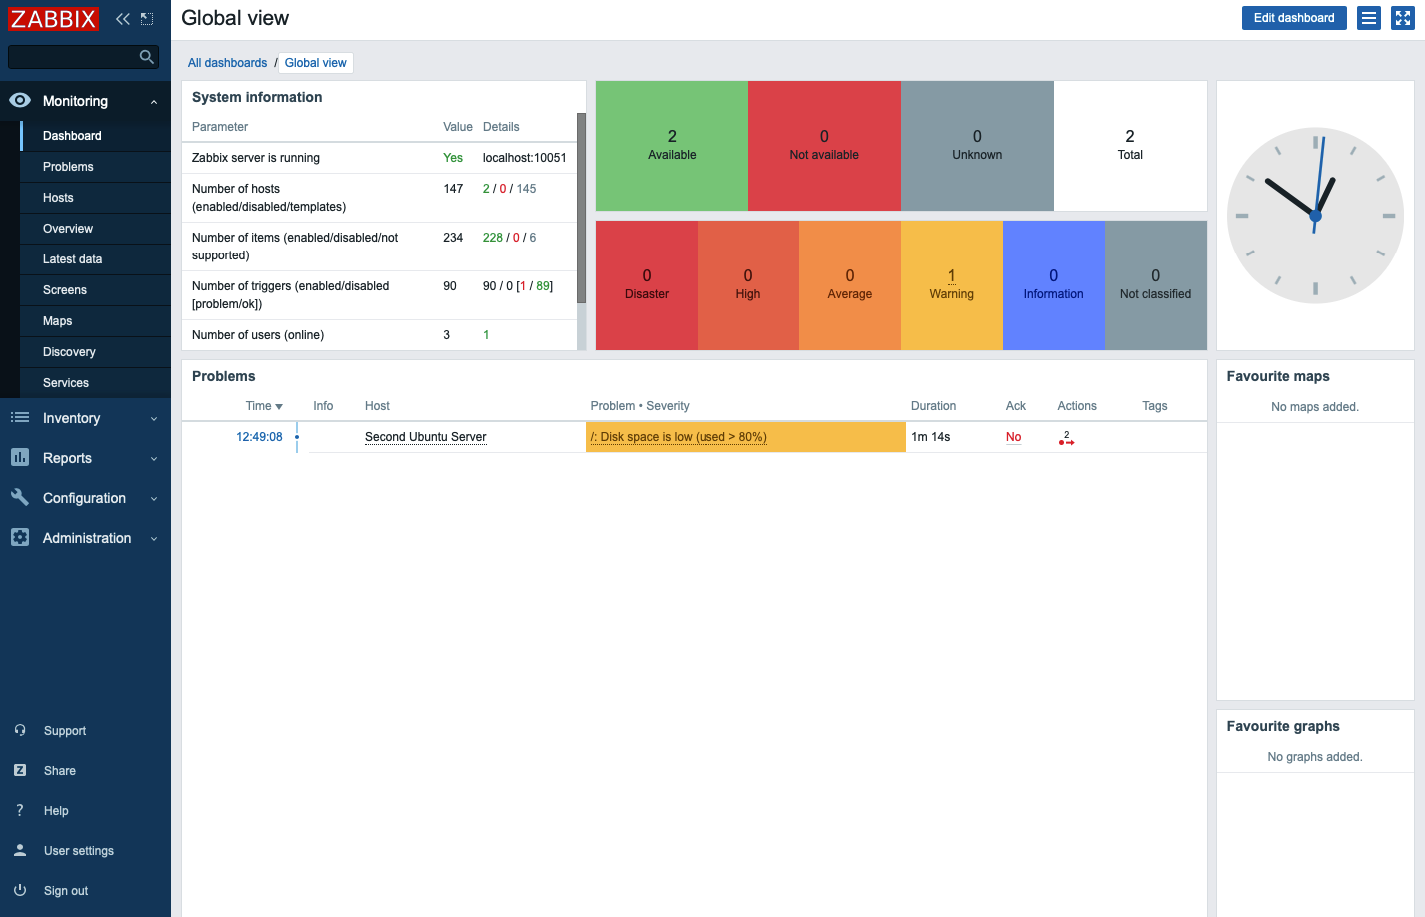
Create a new user with admin privileges, or change a default password for the Admin account to begin exploring and configuring Zabbix.
The destination path is Administration->Users and there you change the password or create a new user.
Step 6
Here is the last step to need to pass to Install and Setup Zabbix on Ubuntu 20.04. Since this step asks you to install and set up the Zabbix agent, you need to configure the agent software that will send monitoring data to the Zabbix server. To do this, log in to the second Ubuntu server first.
ssh opera@second_ubuntu_server_ip_addressRun the commands listed below to install the repository configuration package, the same as you would on the Zabbix server:
wget https://repo.zabbix.com/zabbix/5.0/ubuntu/pool/main/z/zabbix-release/zabbix-release_5.0-1+focal_all.deb
sudo dpkg -i zabbix-release_5.0-1+focal_all.deb
And, to update the package index:
sudo apt updateThen, use the command below to install the Zabbix agent:
sudo apt install zabbix-agentAlthough Zabbix supports certificate-based encryption, this tutorial does not cover how to set up a certificate authority. Pre-shared keys (PSK), however, can be used to secure the link between the server and the agent.
Create a PSK first:
sudo sh -c "openssl rand -hex 32 > /etc/zabbix/zabbix_agentd.psk"Show the key by using cat, so you can copy it somewhere:
cat /etc/zabbix/zabbix_agentd.pskSave the output to use it to configure the host later.
Edit the Zabbix agent settings to set up its secure connection to the Zabbix server. To do this, open the agent configuration file in your favorite text editor:
sudo nano /etc/zabbix/zabbix_agentd.confThen, edit the IP address of the Zabbix server and change the default value to the IP of your Zabbix server:
/etc/zabbix/zabbix_agentd.conf
...
### Option: Server
#       List of comma delimited IP addresses, optionally in CIDR notation, or DNS names of Zabbix servers and Zabbix proxies.
#       Incoming connections will be accepted only from the hosts listed here.
#       If IPv6 support is enabled then '127.0.0.1', '::127.0.0.1', '::ffff:127.0.0.1' are treated equally
#       and '::/0' will allow any IPv4 or IPv6 address.
#       '0.0.0.0/0' can be used to allow any IPv4 address.
#       Example: Server=127.0.0.1,192.168.1.0/24,::1,2001:db8::/32,zabbix.example.com
#
# Mandatory: yes, if StartAgents is not explicitly set to 0
# Default:
# Server=

Server=127.0.0.1
...
Change the default value to the IP of your Zabbix server:
/etc/zabbix/zabbix_agentd.conf
...
Server=<span style="color: #0000ff;">zabbix_server_ip_address</span>
...
The Zabbix server connects to the agent by default, but for monitoring the logs you need a reverse connection. Specify the Zabbix server address and a unique hostname for correct operation.
/etc/zabbix/zabbix_agentd.conf
...
##### Active checks related

### Option: ServerActive
#       List of comma delimited IP:port (or DNS name:port) pairs of Zabbix servers and Zabbix proxies for active checks.
#       If port is not specified, default port is used.
#       IPv6 addresses must be enclosed in square brackets if port for that host is specified.
#       If port is not specified, square brackets for IPv6 addresses are optional.
#       If this parameter is not specified, active checks are disabled.
#       Example: ServerActive=127.0.0.1:20051,zabbix.domain,[::1]:30051,::1,[12fc::1]
#
# Mandatory: no
# Default:
# ServerActive=

ServerActive=<span style="color: #0000ff;">zabbix_server_ip_address
</span>
### Option: Hostname
#       Unique, case sensitive hostname.
#       Required for active checks and must match hostname as configured on the server.
#       Value is acquired from HostnameItem if undefined.
#
# Mandatory: no
# Default:
# Hostname=

Hostname=<span style="color: #0000ff;">Second Ubuntu Server</span>
...
At this part, you need to, find the section that configures the secure connection to the Zabbix server and enables pre-shared key support. To find TLSConnect section, have a look at the below screen.
/etc/zabbix/zabbix_agentd.conf
...
### Option: TLSConnect
#       How the agent should connect to server or proxy. Used for active checks.
#       Only one value can be specified:
#               unencrypted - connect without encryption
#               psk         - connect using TLS and a pre-shared key
#               cert        - connect using TLS and a certificate
#
# Mandatory: yes, if TLS certificate or PSK parameters are defined (even for 'unencrypted' connection)
# Default:
# TLSConnect=unencrypted
...
Add this line to configure pre-shared key support:
/etc/zabbix/zabbix_agentd.conf
...
TLSConnect=<span style="color: #0000ff;">psk</span>
...
If you locate the TLSAcceptsection, it will look like this:
/etc/zabbix/zabbix_agentd.conf
...
### Option: TLSAccept
#       What incoming connections to accept.
#       Multiple values can be specified, separated by comma:
#               unencrypted - accept connections without encryption
#               psk         - accept connections secured with TLS and a pre-shared key
#               cert        - accept connections secured with TLS and a certificate
#
# Mandatory: yes, if TLS certificate or PSK parameters are defined (even for 'unencrypted' connection)
# Default:
# TLSAccept=unencrypted
...
Configure incoming connections to support pre-shared keys by adding this line:
/etc/zabbix/zabbix_agentd.conf
...
TLSAccept=<span style="color: #0000ff;">psk</span>
...
Then, find the TLSPSKIdentity section as it is shown below.
/etc/zabbix/zabbix_agentd.conf
...
### Option: TLSPSKIdentity
#       Unique, case sensitive string used to identify the pre-shared key.
#
# Mandatory: no
# Default:
# TLSPSKIdentity=
...
Choose a unique name to identify your pre-shared key by adding this line:
/etc/zabbix/zabbix_agentd.conf
...
<span style="color: #0000ff;">TLSPSKIdentity=PSK 001</span>
...
When you add your host through the Zabbix web interface, you will use this as the PSK ID. So, set the option that points to your previously created pre-shared key. Locate the TLSPSKFileoption:
/etc/zabbix/zabbix_agentd.conf
...
### Option: TLSPSKFile
#       Full pathname of a file containing the pre-shared key.
#
# Mandatory: no
# Default:
# TLSPSKFile=
...
To point the Zabbix agent to the PSK file you created, add this line.
/etc/zabbix/zabbix_agentd.conf
...
TLSPSKFile=<span style="color: #0000ff;">/etc/zabbix/zabbix_agentd.psk</span>
...
Now, you can save and close the file. Then, restart the Zabbix agent and set it to start at boot time:
sudo systemctl restart zabbix-agent
sudo systemctl enable zabbix-agent
Use the command below to check whether the Zabbix agent is running properly or not. Once you view the active (running) in the output, you’re all set.
sudo systemctl status zabbix-agentThe agent will listen on port 10050 for connections from the server. Configure UFW to allow connections to this port:
sudo ufw allow 10050/tcpConclusion
This guide described step-by-step how to install and setup Zabbix on Ubuntu 20.04 to provide robust IT infrastructure monitoring.
By carefully following each step, beginners can successfully deploy Zabbix, secure it, and start monitoring their network and server environments effectively.
The key to successful monitoring lies in proper installation, initial configuration, and continuous maintenance.
By mastering the installation and setup of Zabbix on Ubuntu 20.04, you empower yourself with a vital skill to manage and maintain modern IT infrastructures confidently and proactively.
FAQ
2. How do I install Zabbix server and agent on Ubuntu 20.04?
You install the Zabbix server, frontend, and agent by first adding the official Zabbix repository, updating package lists, and then using apt commands to install zabbix-server-mysql, zabbix-frontend-php, and zabbix-agent packages.
3. How can I set up the database for Zabbix on Ubuntu 20.04?
Create a MySQL database with UTF-8 support, then create a dedicated MySQL user with privileges for the Zabbix database. Import the initial schema and data using zcat and set the database password in the Zabbix server configuration file.
4. What steps are needed to configure the Zabbix web interface on Ubuntu 20.04?
Configure your web server (Apache or Nginx) properly, set the correct PHP timezone in the Zabbix PHP configuration file, then access the Zabbix frontend in a browser to complete the web-based setup wizard with database and server details.
5. How do I secure the communication between Zabbix server and agents?
Zabbix supports encrypted communication using TLS and pre-shared keys (PSK). You generate a PSK on the agent machine, configure the agent with this key and the Zabbix server IP, and enable TLS settings for secure data transfer.
6. How do I install and configure the Zabbix agent on a remote Ubuntu 20.04 server?
Add the official Zabbix repository, install the agent package, edit the agent configuration file to point to your Zabbix server IP, configure TLS with PSK if desired, and then start and enable the agent service.
7. What common issues might I face when installing and setting up Zabbix on Ubuntu 20.04?
Common issues include incorrect database credentials, firewall blocking required ports like 10050, PHP misconfiguration, and web server setup errors. Verifying configuration files and logs helps identify and resolve these problems.
8. How do I manage users and security in Zabbix after installation?
Use the Zabbix web frontend to change the default Admin password or create new users with specific privileges. This ensures secure access and management of your monitoring environment.
9. Can I monitor remote servers securely with Zabbix on Ubuntu 20.04?
Yes, by installing and configuring Zabbix agents on remote servers and securing connections with TLS and pre-shared keys, you can monitor remote Ubuntu 20.04 servers securely using Zabbix.
10. Why should I use Zabbix for monitoring on Ubuntu 20.04?
Zabbix is an open-source, enterprise-grade monitoring tool that helps track hardware, software, network, and system metrics on Ubuntu 20.04. It offers encrypted data transfer, multiple monitoring methods, and a user-friendly web interface to ensure your IT infrastructure runs smoothly.