Install CloudLinux Easily on Your Server [Complete Guide]
Install CloudLinux by preparing a clean Linux system, then download and run the DirectAdmin installation script to complete setup. This ensures efficient web hosting management on your CloudLinux server.
🤖AI Overview:
Install CloudLinux with DirectAdmin to manage web hosting easily on a Linux-based server. This setup supports multiple user accounts and offers a lightweight, accessible control panel suitable for various Linux distributions. The installation process is straightforward, making CloudLinux a reliable choice for hosting environments.
Pre-Requirements Of CloudLinux Installation
- A Linux VPS Server With at least 1 GB of RAM
- ISO file of the CloudLinux OS Version 8.4.2
- An IP based license or a trial license code
Note: We are installing CloudLinux on a VPS. If you are installing it on a VMware workstation or your own desktop, so you have access to the console but if you are using a VPS, ask your provider to mount the ISO file and give you console access. If you have a dedicated server, you can ask for IPMI access to mount the ISO file and to have console access.
Installing CloudLinux
If you create the virtual machine yourself, the configuration should be something like this.
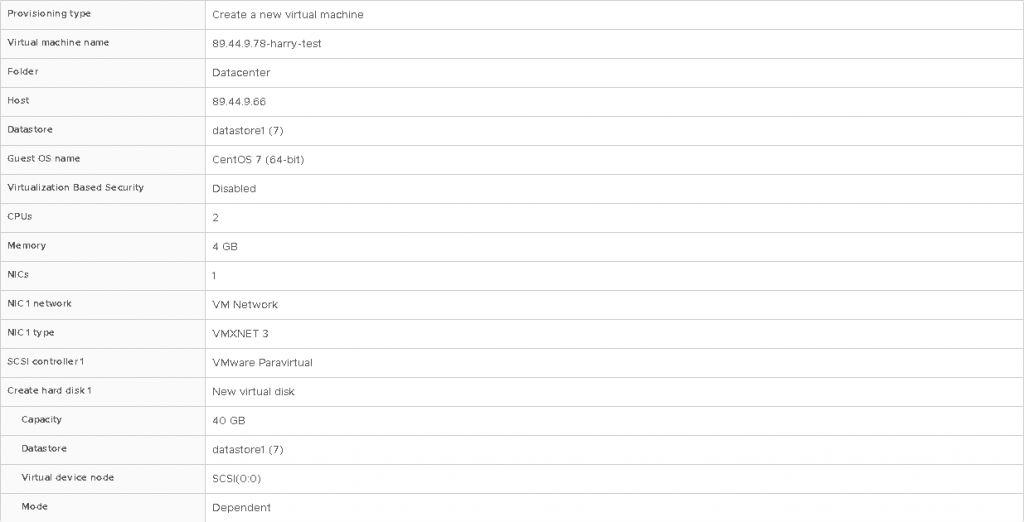
Note: When you wish to buy VPS, you should consider how many resources do you need to install CloudLinux and your control panel properly without facing any issues.
Hardware Requirements
After installing CloudLinux, you will have to install cPanel so you should consider the hardware requirements that cPanel needs. Please check the following table for more details.
| Operating system and version | Processor | RAM | DISK Space | Architecture |
|---|---|---|---|---|
| CentOS 8 | 1.1 GHz | Minimum: 1 GB Recommended: 2 GB | Minimum: 20 GB Recommended: 40 GB | 64-bit |
| CentOS 7 or RHEL 7 | 1.1 GHz | Minimum: 1 GB Recommended: 2 GB | Minimum: 20 GB Recommended: 40 GB | 64-bit |
| AlmaLinux 8 | 1.1 GHz | Minimum: 1 GB Recommended: 2 GB | Minimum: 20 GB Recommended: 40 GB | 64-bit |
Note: CloudLinux 7.9 needs the resources as same as CentOS 7 for cPanel.
Step 1 – Choose To Install Or Test CloudLinux
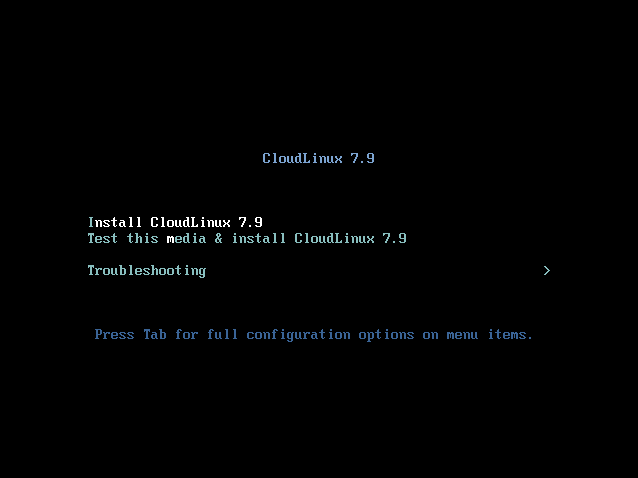
In the first step of the installation of CloudLinux, you will be asked to install CloudLinux or to test it. Choose install CloudLinux 7.9 and press Enter button and wait until the script load.
Step 2 – Choose Language
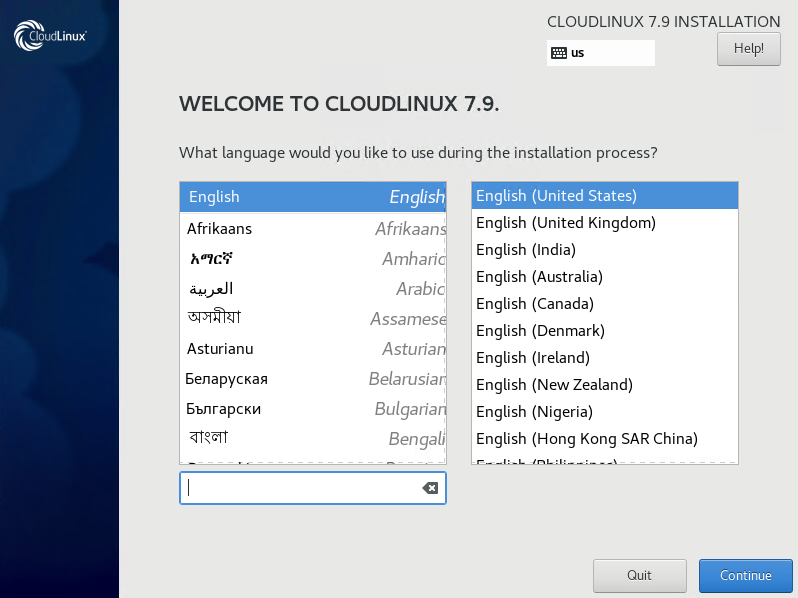
Choose the language that you wish to use during the installation and press Continue.
Step 3 – Partition Configuration
In this section, you are asked to choose the partitioning type that you wish to have. Also, you have an error that says you have to complete the items marked before you can proceed to the next step.
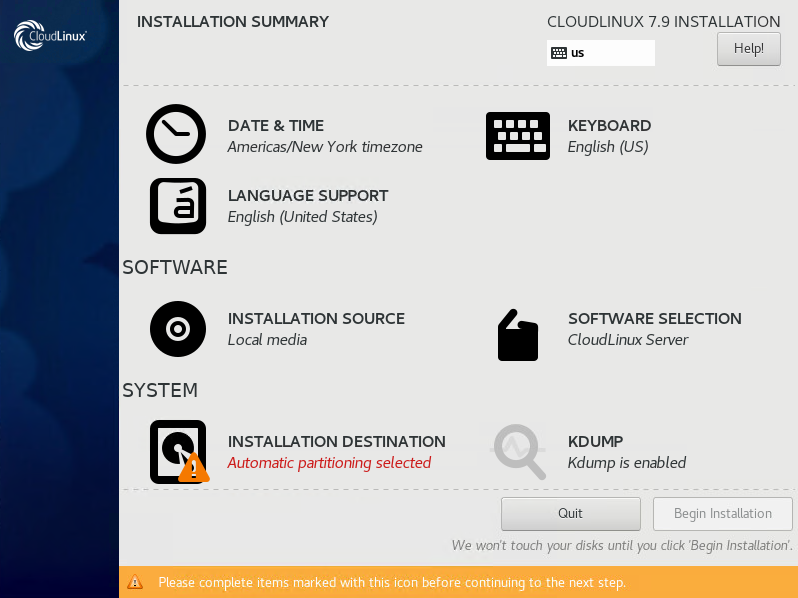
Click on the “Installation Destination” to choose the partitioning type. Consider that you can choose automatic partitioning but it is not recommended especially because we will install cPanel on our CloudLinux OS later.
So put the partitioning type on “I will configure partitioning” and press Done.
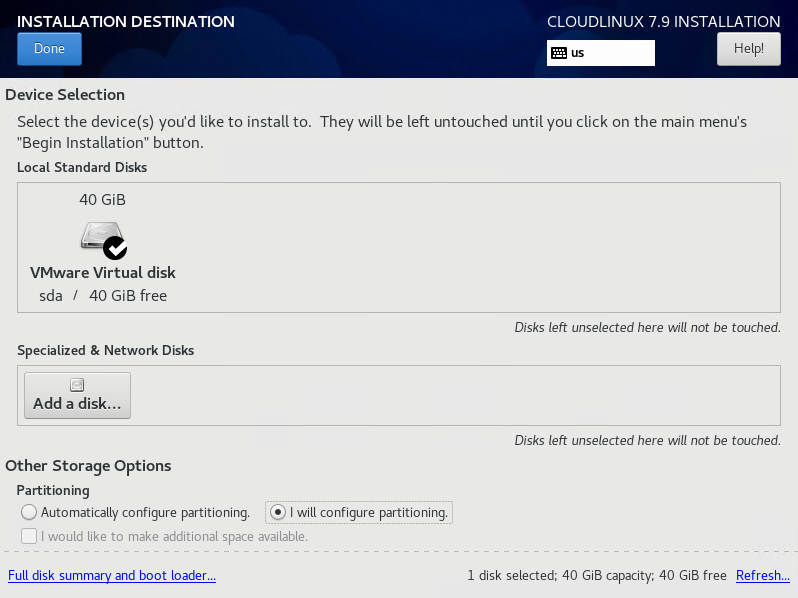
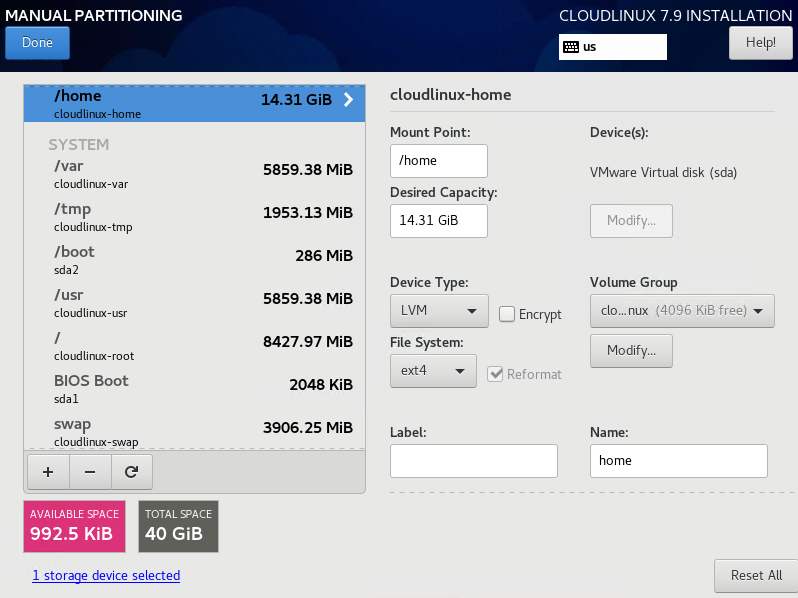
As you can see, I have 40 GB of storage. In this step, we will create 7 partitions. Consider that the amounts that I have used are optional and you can use different amounts according to your storage amount.
| Partition | Description | Recommended Size | Sizes For 40 GB |
|---|---|---|---|
| / | Root directory is the home directory of the Root account | According to storage space | 5844 MB |
| /Swap | Swap helps RAM to manage processes if you were out of RAM | 2 GB or less — Two times the amount of RAM on the server. 2 GB to 4 GB — The same as the amount of RAM on the server. 4 GB or more — 4 GB | 4096 MB |
| /usr | It contains all binary files related to user programs | Accord | 8192 MB |
| /var | Is used to place database tables and logs | According to storage space | 6144 MB |
| /tmp | Is the place to store temporary files | According to storage space | 2048 MB |
| /Home | Home is used to stored user data like public_html and emails | As much as possible. | 14335 MB |
| /boot | It contains boot related files such as Grub, vmlinuz, and kernel. | 100 MB to 512 MB | 300 MB |
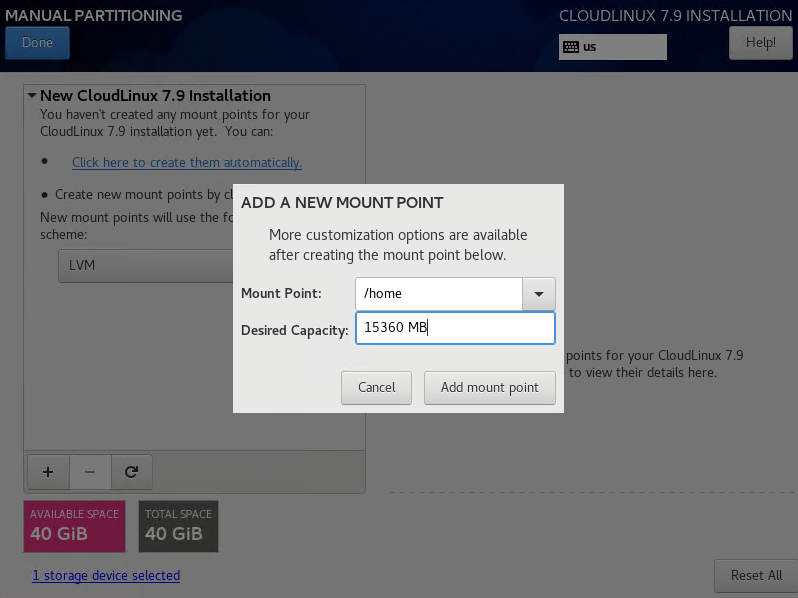
In the next section, click on plus + button to add a new mount point. Create all of the partitions one by one. Consider choosing each mount point that you can see in the list and once they were finished, you should add new mount points by yourself which are not in the list of mount points like /usr and /tmp mount points.
Once finished, you will have a view like the following image.
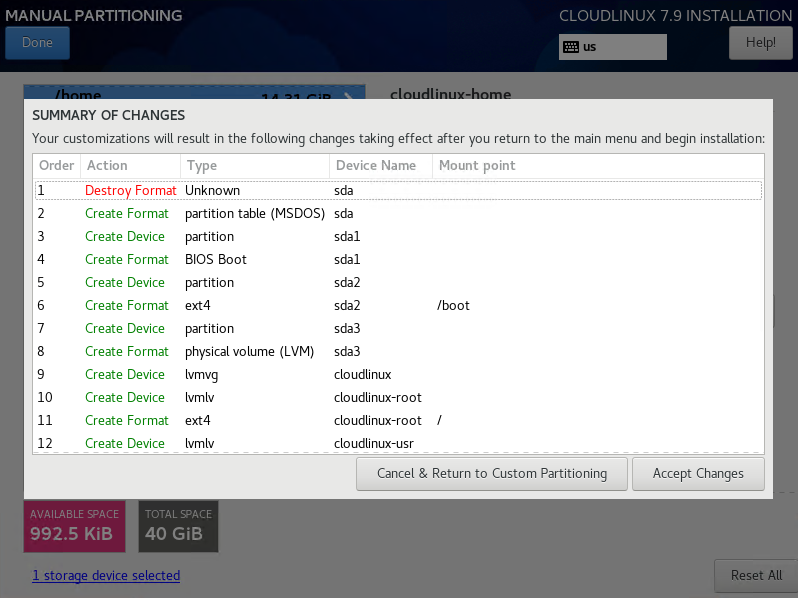
In the next section, you will have a summary of the changes that you made, click on accept to complete the changes.
Step 4 – Network Configuration
Now we are back again to the main page. Scroll down and click on Network & Hostname to configure the network of our CloudLinux Server. Here I have a Linux VPS Server with static IPV4 so I will configure manual IPV4. You can change your configuration according to your situation.
Choose Configure, navigate to the IPV4 section, click on Method and choose Manual then choose the Add option to add an IP address. Then a DNS Server and tik the option to “Require IPV4 addressing for this connection to complete” and click Save.
Important Note: Also In General Tab, Tik the option “Automatically connect to this network when it is available“.
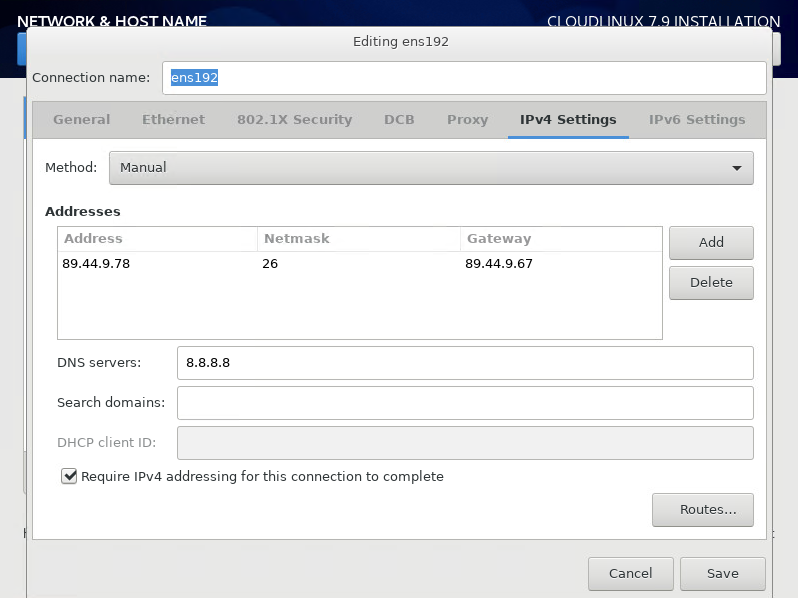
Now you will be back on the same page. Turn On the ethernet by dragging Off To On on the up-left section of the page and also choose a hostname for your server and click Done. By doing this you will go back to the first installation section. Now, we are done so we can choose to Begin the Installation.
Step 5 – Installation Process
Now the installation is under process. Meanwhile, you can see 2 options which are Root Password And User Creation. Choose a strong password for your root account and another user creation is optional because the Root user will be active from the first.
Once the installation was finished, you will have a message that says the installation is completed and you should reboot the server. Reboot the server and wait for it to come up. Put the username to login to the server as root and you have set the password when installing the server.
Step 6 – License Activation
If you have an IP-based license, it is not needed to activate the license but if you don’t have, you should get a license code from CloudLinux and run the following. Consider putting your own license key instead of <activation key> in the following command.
/usr/sbin/rhnreg_ks --activationkey=<activation key> --forceConclusion
Installing CloudLinux is a valuable step toward creating a secure and stable shared hosting environment. By following the step-by-step process outlined here, including system preparation, proper licensing, running the installer script, and configuring key CloudLinux features, even beginners can successfully install and start benefiting from CloudLinux.
Proper installation brings benefits such as improved security with CageFS, resource management with LVE Manager, and a kernel designed to maintain server stability under heavy loads. Remember to adhere to best practices like performing backups, maintaining updates, and monitoring resource usage continuously.
For more advanced use cases or specific control panel integrations, refer to official CloudLinux resources or consult with technical support to tailor the setup to your needs.
FAQ
2. What are the benefits of installing a control panel like DirectAdmin on CloudLinux?
Installing DirectAdmin on CloudLinux provides a lightweight, user-friendly interface for managing hosting accounts, domains, emails, databases, and server settings easily and efficiently.
3. What are the system requirements to install DirectAdmin on CloudLinux?
You need a clean CloudLinux OS version 6.x or higher, at least 1 GB RAM (2 GB recommended), 2 GB swap, 2 GB disk space, 1 core CPU with 500 MHz or more, a static IP address, SSH access, and a valid DirectAdmin license.
4. How do I prepare my CloudLinux server before installing DirectAdmin?
Ensure your system is updated, install necessary packages like wget and psmisc, disable the firewall temporarily, and have your DirectAdmin license and hostname ready.
5. What are the basic steps to install DirectAdmin control panel on CloudLinux?
Update your system, install wget and required packages, disable firewall, download the DirectAdmin setup script, make it executable, run the installation script, and follow prompts to complete installation.
6. How do I access DirectAdmin after installing it on CloudLinux?
Open your web browser and visit your server's IP address followed by port 2222 (e.g., http://your-ip:2222). Make sure port 2222 is open in your firewall to access the login page.
7. Do I need a license to install DirectAdmin on CloudLinux?
Yes, you must purchase a valid Client ID and License ID from DirectAdmin to complete the installation and activate the control panel.
8. Can I use DirectAdmin on CloudLinux for managing multiple user accounts?
Yes, DirectAdmin offers multi-level access with Admin, Reseller, and User roles allowing you to create and manage accounts, domains, emails, and databases easily.
9. What should I do if I encounter errors during DirectAdmin installation on CloudLinux?
Check that all prerequisites are met and your firewall is configured properly. If issues persist, contact DirectAdmin support or your hosting provider for assistance.
10. Is DirectAdmin compatible with other Linux distributions besides CloudLinux?
Yes, DirectAdmin supports several Linux distributions including CentOS, Ubuntu, Debian, Fedora, FreeBSD, and Red Hat, making it versatile for different server environments.