How to Install Samba in Ubuntu
If you are a team member and connected to a network where devices are running different operating systems, sharing files, printers, and various resources between different computers on the network is likely to be challenging for you. Undoubtedly, this problem has been annoying for you, and you have made many efforts to find a solution. This article permanently solves your problem, and after spending just 5 minutes of your time, you can install and configure an independent Samba file network server and access and share files, printers, and Active Directory among computers running different operating systems, including Windows, Linux, etc. Yes, you read it right, Samba is an open-source implementation of the Server Message Block (SMB) and Common Internet File System (CIFS) protocols, allowing files, printers, and other resources to be shared among clients on the network through these protocols. Samba enables collaboration between Windows and Linux servers and provides a seamless way to share various resources.
In this article, you will learn how to install Samba in Ubuntu, as well as how to share files and various resources between Windows and Linux. This will enable you to effortlessly share files among devices on the network by configuring the Samba server share on Ubuntu 20.04 or 22.04 or 18.04. So stay with us until the end of this article.
Why Install Samba in Ubuntu?
Installing and configuring Samba in Ubuntu is an efficient solution for sharing files and various resources between different systems in heterogeneous network environments, including Windows and Linux. Here are some common reasons to install Ubuntu Samba :
- Sharing files and directories between Linux and Windows machines to address the need for exchanging and accessing files on different operating systems.
- Enabling printer sharing and simplifying printer management in a heterogeneous network.
- Providing collaboration capabilities between Linux and Windows systems.
- Integration with Windows networks and enhanced participation in Windows environments, including features such as domain authentication and access to shared resources.
- Offering centralized authentication services similar to Microsoft’s Active Directory.
- Controlling access to ensure authorized user access to shared resources and supporting encryption for secure data transmission.
- Supporting SMB/CIFS Protocols to ensure compatibility with Windows operating systems.
- Providing a solution for backup and storage.
Prerequisites for Installing Samba on Ubuntu
- Ubuntu system or Ubuntu VPS with versions 18.04, 20.04, or 22.04.
- User account with sudo privileges.
- Meeting the RAM and CPU requirements on the server (minimum 1 gigabyte).
- Allowing incoming TCP connections on port 445 (if using a firewall).
- Using a text editor.
- Access to the Linux terminal.
Quick Guide to Install and Configure Samba in Ubuntu
Fortunately, Ubuntu’s official repository supports Samba, so you can easily install it from the official repository. Follow the steps below to install Samba on Ubuntu:
1. Update Package Lists
Start the Samba installation process by updating the available packages and the Ubuntu repository. Open the terminal and ensure that your package lists and the Ubuntu system are up-to-date by executing the following command:
sudo apt update2. Install Samba
To install Samba from the Ubuntu repository, use the apt package manager. Execute the following command to install ubuntu Samba once the package lists are updated:
sudo apt install samba -yThe “-y” argument is used to accept all requests automatically during installation.
3. Verify Samba installation
To ensure the successful installation of Samba in Ubuntu, run the following command:
whereis sambaOr
samba -VThe previous commands, via displaying a directory containing Samba or information about the installed version of Samba, assure you of the successful installation of Samba on Ubuntu.
To confirm that Samba is running, use the following command:
systemctl status smbdDisplaying the green-texted phrase “Active: active (running)” indicates the active status of the smbd service.
Note: By running the Samba installation command, both the Samba server smbd and the Samba NetBIOS server nmbd are executed. Since you currently do not need nmbd, it is recommended to stop and disable the nmbd service using the following commands to prevent security issues:
sudo systemctl stop nmbd.service
sudo systemctl disable nmbd.service
As a result, the Samba service has been successfully installed and is ready for configuration.
4. Samba Configuration in Linux Ubuntu
To configure Samba, you must navigate to the configuration file of this service, located at /etc/samba/smb.conf. Before making any changes, create a backup of the original configuration file:
sudo cp /etc/samba/smb.conf /etc/samba/smb.conf.bakNext, open the Samba configuration file with your preferred text editor (our preference is to use the Nano editor):
sudo nano /etc/samba/smb.confDefinition and configuration of Samba server behavior is possible by editing the /etc/samba/smb.conf file. The content of this file consists of two sections: [global] and [shares]. Configuring the [global] section leads to configuring the behavior of the Samba server (including name, role, network interfaces, and other details). However, if you aim to configure sharing, you should edit and configure the [shares] section.
Let’s start with configuring the Global Settings section, as this allows you to define the behavior of the Samba server.
/etc/samba/smb.conf
[global]
server string = samba_server
server role = standalone server
interfaces = lo your_network_interface
bind interfaces only = yes
disable netbios = yes
smb ports = 445
log file = /var/log/samba/smb.log
max log size = 10000- server string: Provides necessary information for identifying your server for user connections, such as the server name.
- server role: Indicates the server type (servers can have various types, including standalone, domain member servers, or domain controllers).
- interfaces: Displays the network interface to which the Samba server is connected.
- bind interfaces only: Ensures Samba’s connection and compliance to the interfaces specified in the interfaces line.
- disable netbios: Deactivates NetBIOS functions to facilitate SMB traffic transfer and the server name resolution process.
- smb ports: Configures the ports that the Samba server listens to (the default Samba port is port number 445).
- log file: Specifies the name and location of the Samba log file.
- max log size: Sets the maximum size for the log file in bytes.
To change settings in the Samba configuration file, you must uncomment specific settings. For configuring Samba’s Global options, reviewing and modifying key parameters as needed is advisable. These parameters are as follows:
Browsing/Identification: This section includes parameters like workgroup and server string. You should verify the accuracy of these settings. Ensure that the workgroup setting in your server matches the Windows server with which you intend to share files. Also, confirm the correctness of the server string setting for identifying the Samba server. To configure settings in the Browsing section, simply remove the default values and add the new ones.
Networking: The network interfaces to which Samba is connected are configurable under the Networking subsection. As mentioned earlier, you need to set the network interface field to the interface to which the Samba server is connected and ensure its correctness. Set the parameter bind interfaces only to yes to ensure that Samba only connects to the interfaces listed in the Samba configuration file. Checking the available interfaces through the following command can be helpful for configuring the Interfaces parameter:
ip linkDebugging: The parameters log file, max log size, panic action, and logging fall under the Debugging section and should be configured correctly.
Authentication: The most crucial factor in configuring the Authentication section is the server role parameter, indicating the type of Samba server. Typically, the standalone server value is set for the server role parameter.
Domain: Leave the Domain section unchanged.
Misc: In the Misc section, configure values as follows:
usershare allow guests = yesRecommendation: We recommend not altering the global options, and if necessary, you can edit them.
To enhance security regarding logging and user authentication during Samba server configuration, you can modify the default values in the global section. For this purpose, you can add the following expressions to the content of the Samba configuration file to increase the reporting level from the default value of 1. Also, set higher values, such as 5, for passdb and auth debug classes:
log level = 3 passdb:5 auth:5Then, save the changes and close the file.
After editing the Samba configuration file, you can check for syntax errors by running the Samba utility testparm:
testparmOutput:
Load smb config files from /etc/samba/smb.conf
Loaded services file OK.
Server role: ROLE_STANDALONE
Press enter to see a dump of your service definitions
If the testparm command outputs “Loaded services file OK,” it means there are no syntax errors that would prevent the Samba server from starting. Configuring ubuntu Samba server is enough to configure the Global section, but the configuration of the Samba server doesn’t end here, as its functionality is limited without creating and setting up shares and user accounts.
5. User Account Configuration
For sharing, you need to create user accounts authorized to share and authenticate with Samba for logging in, reading, and writing access to the file system. To add a user to the system, you must first create a home directory for each user. For ease of administrative tasks, it is recommended to use Samba directories located in /samba/ instead of standard home directories at /home/user. To create the /samba/ directory for storing Samba data at the root of the file system, execute the following commands:
sudo mkdir /samba/
sudo chown :sambashare /samba/
This command creates the /samba/ directory and sets the ownership of the group created when installing samba to sambashare. Then, to create a directory for your desired user, for example, with the name “Opera,” under the /samba/ directory, execute the following command:
sudo mkdir /samba/ OperaAfter creating the directory, you can add your desired user (in our example, “Opera”) as a system user using the following command:
sudo adduser --home /samba/ Opera--no-create-home --shell /usr/sbin/nologin --ingroup sambashare OperaAfter executing this command, you will be prompted to enter a password. Set a strong and complex password. After creating the directory and adding the new user as a system user, it’s time to set the ownership and permissions required for the newly added user in the Samba home directory:
sudo chown Opera:sambashare /samba/Opera /
sudo chmod 2770 /samba/Opera /
By setting the directory’s permissions to 2770, any file or directory created under /samba/Opera / will be under the group ownership of the parent directory. Therefore, even if an administrator creates a new file in the Opera user’s directory, the Opera user has permission to read and write to that new file.
To allow a user to access the Samba server, you need to add and enable the user on the Samba server. The Samba server ubuntu stores user information, including usernames and passwords, in its database and authenticates logins using this information. Therefore, adding a user to the Samba server is essential. Execute the following commands to achieve this goal:
sudo smbpasswd -a  your_username
sudo smbpasswd -e your_usernameNote: The username should belong to the system user, so in our example, replace “your_username” with the system user you added, which is “Opera” in our case.
Note: To enable a user added to the Samba server, the” -e” option is used, while the “-a” option adds the user to the server but does not enable it. Therefore, after running the previous commands, you will be prompted to set a unique password for the specified user to access the Samba share.
As a result, you have created a system user (in our case, “Opera”) that is registered and enabled as a Samba user, authorized to access the Samba share, and has a home directory in /samba/.
6. Configuring Samba Share
You must create and configure a share to access files and resources and test that Samba is configured correctly. The Samba configuration file (/etc/samba/smb.conf) contains unique sections for each share dedicated to a user. By editing the Samba configuration file, you can add a new section for a share dedicated to a user. For this purpose, first open the Samba configuration file with your preferred text editor (we prefer to use Nano):
sudo nano /etc/samba/smb.confScroll to the end of the file and add a new section for a simple share to the file content:
[share_name]
comment = My Samba Share
path = /path/to/your/share
browseable = yes
read only = no
writable = yes
guest  ok = no
valid users = your_username
By adding a Samba share configuration block, you have defined specific permissions for your intended user to access a particular share.
share_name: Choose a name for the share that you will use this name when accessing the share.
comment: Provides a description for the share.
path: Specifies the path and location of the sharing directory in the file system.
browseable: Activates or deactivates the ability of other users to view the share. If set to “yes,” other machines on the network, if aware of the exact name and path of the share, will be able to view it.
read only: This parameter determines whether users are allowed to write to the share or not.
writeable: If this parameter is set to “yes,” it indicates that the user is allowed to read and write to the share.
guest ok: This parameter determines whether guest users have access to the share or not.
valid users: This parameter allows you to specify valid users who have permission to access this share.
After configuring, save and close the file. To ensure the correctness of the configuration, rerun the following command:
testparmOutput:
Load smb config files from /etc/samba/smb.conf
Loaded services file OK.
Server role: ROLE_STANDALONE
Press enter to see a dump of your service definitions
By receiving this output, you can be sure of the Samba configuration.
After ensuring the correct Samba configuration, restart the Samba service for the configuration to take effect:
sudo systemctl restart smbd7. Adjust Firewall Rules (if necessary)
If you have an active firewall on your Ubuntu system, ensure that Samba traffic is allowed. For example, if you are using the UFW firewall, execute the following commands for this purpose:
sudo ufw allow 139/tcp
sudo ufw allow 445/tcp
sudo ufw allow 137/udp
sudo ufw allow 138/udp
8. Accessing the shared folder from another computer using the Samba server
Now, you can connect to the Samba server from other computers on the network and test the configured settings. Follow the steps below to connect to the Samba share from another machine:
On Linux through the GUI:
- To connect to a Ubuntu Samba share from another Ubuntu/Linux machine, open the file manager (e.g., Nautilus) and click the “Other Locations” option.
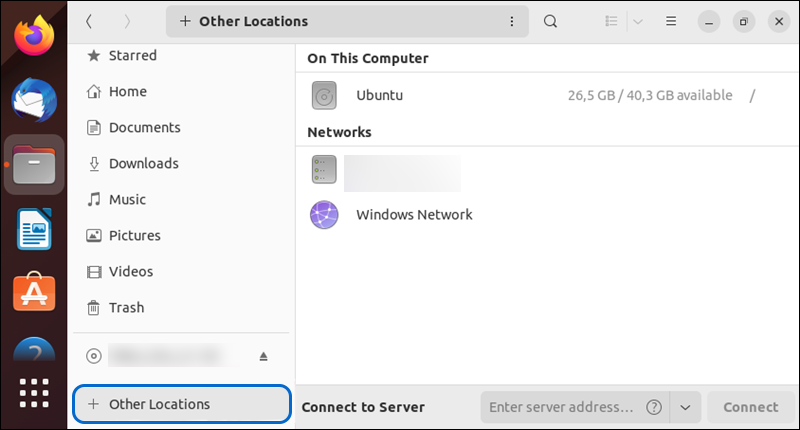
- In the address bar, type the following address to connect to the server:
smb://your_ubuntu_server_ip/share_nameReplace your_ubuntu_server_ip with the IP address of your Ubuntu server and share_name with the name of your Samba share.
- At this step, the Samba username and password that you configured during the setup will be prompted. Type the Credentials information in the respective fields and click the “connect” button.
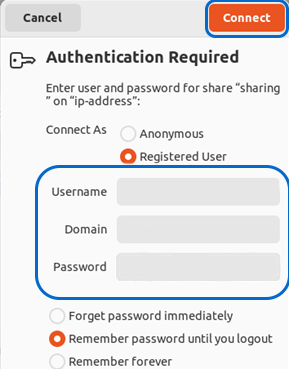
- Now, you should be able to access the shared files.
On Linux via the Terminal:
The smbclient command-line tool helps you connect to Samba through the terminal.
1. Installation of smbclient: Therefore, you can install this tool on Linux distributions using your local package manager:
- For Debian/Ubuntu:
sudo apt-get install smbclient- For CentOS:
sudo yum install samba-client- For Fedora:
sudo samba-client2. Access the Samba Share: Use the following command to connect to the Samba share:
smbclient //your_ubuntu_server_ip/share_name -U your_usernameReplace your server’s IP or hostname, which you have defined in the smb.conf file for accessing the file share, in the above command. For example, to access Opera’s share on the Samba server, use the following command:
smbclient //192.168.1.100/Opera -U Opera3. Enter Credentials: If prompted, enter the password for the specified Samba user.
4. Navigate and Interact: As a result, you can access files that have been shared. Use various commands to navigate and interact with the Samba shared in the terminal. For example, the ‘ls‘ command is helpful for listing files, downloading a file, and placing it for upload, etc.
On Windows via GUI:
On the Windows 10 desktop, to access a Samba share, you need to go to File Explorer. Follow these steps to connect to a Samba share:
- Open File Explorer from the Windows Start menu.
- Right-click “This PC” in the left-hand menu and select the “Add a network location” option from the opened menu.
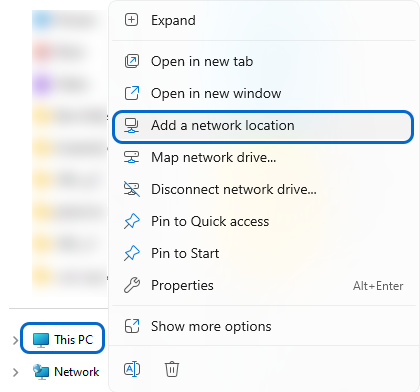
- Click on “Next“.
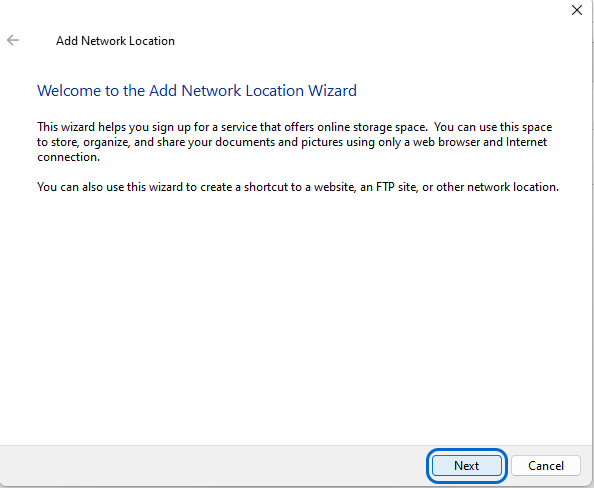
- Choose a “Custom network location.”
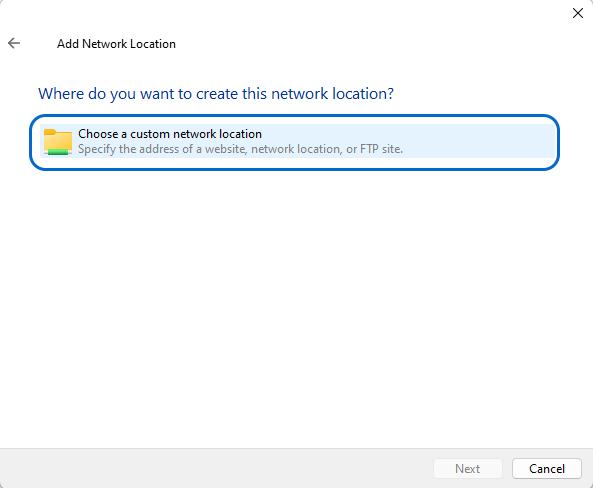
- In the address bar, enter the Samba server address and share name as follows and click “Next“:
\\your_ubuntu_server_ip\share_nameReplace your_ubuntu_server_ip with the actual IP address of your Ubuntu server and share_name with the name of the Samba share you configured.
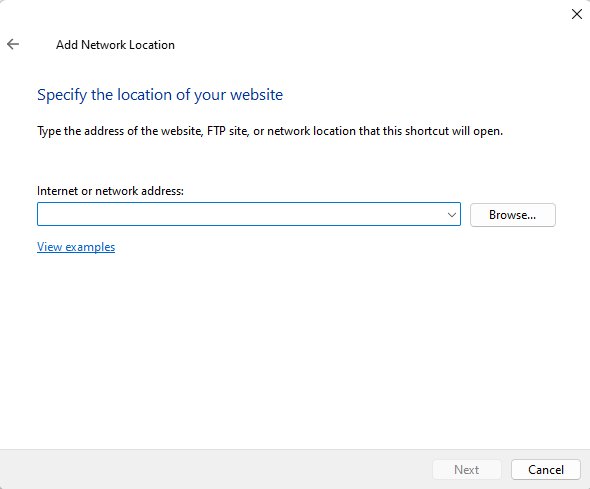
- Then, enter the Samba username and password that you configured when setting up the Samba user.
- After authentication, you will be authorized to access the files and shared directories as if you were local.
On Windows using Command Prompt:
The’ net use‘ command is used to connect to a Samba share via Command Prompt. For example, after opening the Command Prompt, run the following command:
net use X: \\your_ubuntu_server_ip\share_name /user:your_usernameReplace your_ubuntu_server_ip with the IP address of your Ubuntu server, share_name with the name of your Samba share, and your_username with your Samba username.
After running this command, you will be prompted to enter the Samba user’s password. As a result, you can access the shared file through the mapped drive letter (in this case, X:).
If the command is successful, you should now be able to access and interact with the Samba shared via the command line.
9. Check the Samba logs
Checking Samba logs assists you in troubleshooting. By executing the following command, you can inspect Samba logs and gain insight into the overall configuration in the smb.conf file:
sudo journalctl -xe | grep smbdTips for Samba Configuration
Considerations for using Samba to share resources across platforms:
- Assign a personal file share for each employee.
- All users should have permission to read and write to the shared file.
- Each user must own the shared and have no read and write restrictions to their private shared.
Removing Samba from Ubuntu
You may not need Samba on Ubuntu, and you can uninstall it by executing the following commands using sudo privileges. To achieve this, first, you need to stop the Samba service on the Ubuntu server:
sudo systemctl stop smbd
sudo systemctl stop nmbd
Then uninstall Samba using the apt package manager:
sudo apt remove sambaTo remove Samba along with configuration files, you can use the “–purge” option in the previous command or run the following command to remove configuration files:
sudo apt purge sambaThen, use the following command to delete the configuration files:
sudo rm -rf /etc/sambaIf you want to clean up any residual dependencies that you no longer need after removing Samba, execute the following command:
sudo apt autoremoveFor your changes to take effect, restart your system:
sudo rebootConclusion
In general, setting up an Ubuntu server with Samba improves collaboration and resource sharing between Windows and Linux systems, making the management and integration of various machines in a network environment easy and efficient. By following the guidelines in this article and installing Samba on your Ubuntu server, you’ve created a file server on a Linux machine that is accessible by Windows computers and vice versa. As a result, your Ubuntu server now plays a crucial role in establishing seamless communication and resource sharing across different types of systems in a network.
We hope the content of this article has been valuable and instructive for you. If you have any questions, feel free to share them with us in the comments section.