Remote Desktop Credentials Did Not Work Issue
Remote Desktop Credentials Did Not Work indicates login failures caused by incorrect username formats, security policies, or network issues. Troubleshoot by verifying credentials, adjusting group policies, editing registry keys, and ensuring the RDP port is accessible.
🤖AI Overview:
The Remote Desktop Credentials Did Not Work error occurs when users cannot authenticate to a remote machine despite providing credentials. Common causes include improper username formats, restrictive group policies, blocked ports, and incompatible security settings. Correcting these factors typically restores successful Remote Desktop connections.
If you’re facing the error “remote desktop your credentials did not work,” there are several proven solutions to help resolve this frustrating issue:
- Ensure Correct Username Format for Remote Desktop Login.
- Modify Group Policy and Registry Settings for Secure Authentication.
- Check and Configure Registry Settings for Remote Desktop Access.
- Verify and Open RDP Port for Connectivity.
- Modify Windows Security Policy for Remote Desktop Permissions.
For users looking to enhance their RDP Server experience, troubleshooting these common credential issues can ensure secure and seamless access to your remote servers.
1. Correcting Username Format for Remote Desktop Login
When attempting to connect via Remote Desktop Protocol, using the proper username format is crucial depending on whether you’re authenticating with a local or domain account.
If you’re logging in with a local account on a domain-joined machine, use the correct prefix, such as .\username or localhost\username, to ensure the system knows you’re authenticating locally.
For domain accounts, use the format DOMAIN\useraccount or [email protected], which directs the credentials to be validated through the domain controller.
Additionally, ensure that the machine can communicate with the domain controller and that you are connecting to the target machine’s Fully Qualified Domain Name (FQDN), such as server1.operavps.com.
Reverting the Username to Solve Login Issues
If you’ve recently changed your username, whether due to a system update or mistake, this can disrupt the Remote Desktop login process. Sometimes, even though the username appears correct, the server may not recognize the new one.
Reverting the username to its previous form can resolve this issue, as Remote Desktop may still retain old login details. Returning to the original username realigns the credentials with what the server expects, enabling a successful login.
This approach is especially helpful if the problem starts after a Windows update or reinstallation.
2. Adjusting Group Policy and Registry Settings
When encountering the “your credentials did not work remote desktop” error, modifying the Local Group Policy can help resolve the issue.
By ensuring that authorized users have the necessary permissions and adjusting how your system handles specific security protocols, you can effectively troubleshoot and fix Remote Desktop access problems:
- Press
Windows Key + Rto open the Run dialog. Typegpedit.mscand hit Enter. - Go to the following path:
Computer Configuration > Administrative Templates > System > Credentials Delegation. - Double-click the policy labeled Allow delegating default credentials with NTLM-only server authentication.
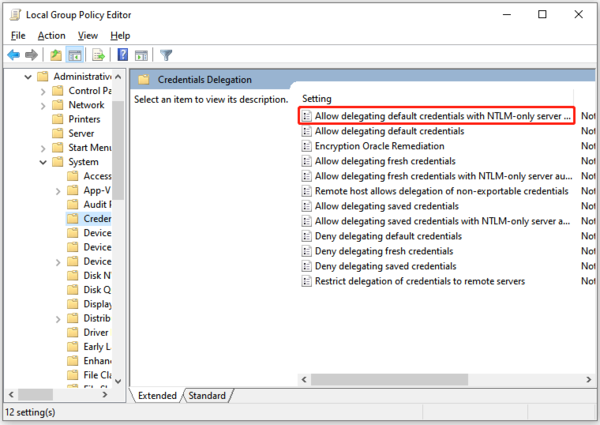
- Set this policy to Enabled, then click Show.
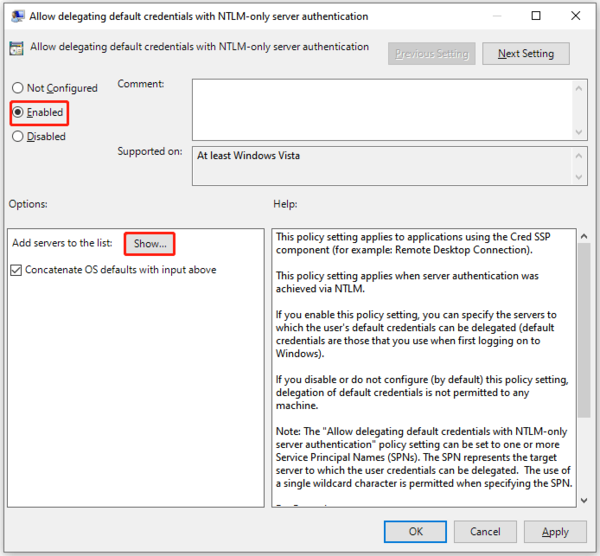
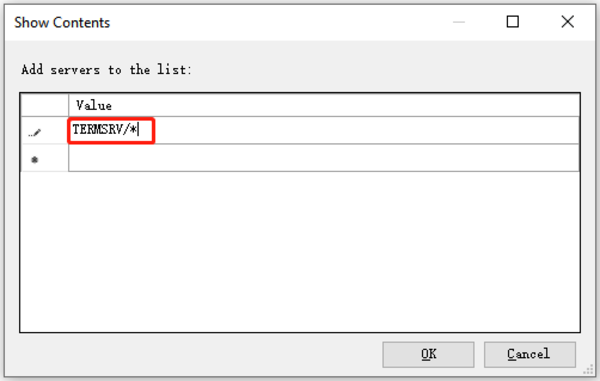
- In the value field, type
TERMSRV/*and click OK.
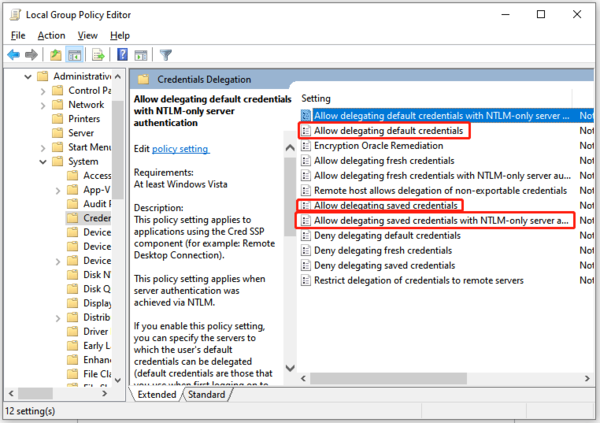
- Make the same adjustments for the following policies: Allow delegating default credentials, Allow delegating saved credentials, and Allow delegating saved credentials with NTLM-only server authentication.
- After making these changes, exit the Local Group Policy Editor and restart your system. Check if the issue persists.
3. Edit Registry Settings
If modifying the Local Group Policy doesn’t resolve the problem, you can adjust the Registry settings related to security protocols used by Remote Desktop.
This issue often arises when the system’s handling of security protocols for Remote Desktop is misconfigured, particularly after a system update.
By ensuring the correct settings in the Registry, you can enhance the authentication process and resolve credential verification problems.
To do this, consider following the below steps:
- Press
Windows + Rto open the Run dialog. Typeregeditand press Enter. - Go to the following path:
Computer\HKEY_LOCAL_MACHINE\SYSTEM\CurrentControlSet\Control\Lsa.
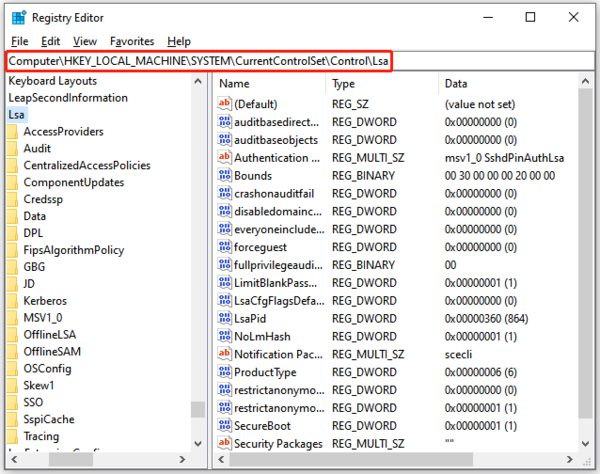
- Find the LsaCompatibilityLevel option and double-click it.
- Change the REG_DWORD value to
1and click OK. - Close the Registry Editor and restart your computer to apply the changes. After rebooting, check if the Remote Desktop issue has been resolved.
Final Notes:
- After adjusting the Registry, it’s important to check if the issue persists. Restart your computer to apply the changes, and then attempt to reconnect using Remote Desktop.
- Ensure you are logged in locally on the machine rather than through an RDP session when making these changes. If you attempt this modification while logged in via Remote Desktop, two-factor authentication may interfere with the desired outcome.
4. Ensuring Port Accessibility
One common issue when encountering “Remote Desktop credentials did not work” messages is related to network connectivity and firewall settings, particularly the accessibility of the RDP port.
If the network or port is blocked, you may not receive accurate credential error messages. Therefore, it’s crucial to verify that the RDP port (default is 3389) is open and reachable on the target endpoint.
Let’s see how to check port accessibility and configure firewall settings to enable Remote Desktop connections:
Step 1: Check Port Accessibility
To determine if the RDP port is open on the target machine, you can use PowerShell from a client computer:
- Press
Windows + Xand select Windows PowerShell. - Run the following command and press Enter:
Test-NetConnection <operavps> -Port 3389Note: Replace <operavps> with the actual IP address of the target machine you are trying to connect to.
- If the command returns the message “TcpTestSucceeded: True,” it indicates that the network and port are reachable. If not, it may suggest that the port is blocked or the target machine is inaccessible.
Step 2: Verify Firewall Profile
If you know the target machine is online but still encounter issues, the problem might stem from firewall configurations.
Windows Firewall categorizes network connections into three profiles:
Domain: Used for computers in Active Directory.
Private: For home networks, small office/home office (SOHO) networks, or workgroup networks.
Public: For connections in public spaces.
- To check which profile a machine is using, run the following command in PowerShell:
Get-NetConnectionProfileThis command will display the active network profiles and their statuses.
Step 3: Configure Windows Firewall for RDP
If the appropriate firewall profile is blocking RDP connections, you can create a rule to allow RDP traffic:
- Run the following command in PowerShell, adjusting the
-Profileparameter to the appropriate profile (Domain, Private, or Public):
New-NetFirewallRule -DisplayName "AllowRDP" -Direction Inbound -Protocol TCP -LocalPort 3389 -Action Allow -Profile DomainFor example, if your machine is on a Public network, you would replace -Profile Domain with -Profile Public.
- You can also check if the rule has been added successfully by running the command below:
Get-NetFirewallRule -DisplayName "AllowRDP"5. Edit Windows Security Policy
One of the most effective solutions to resolve Remote Desktop credential errors is adjusting the Windows Security Policy. Incorrect security settings can block authentication attempts, especially after system updates or changes to group policies.
By configuring the appropriate security policies, you ensure that the necessary permissions are in place for Remote Desktop Protocol (RDP) to function correctly.
Let’s follow the below steps to modify the Windows Security Policy to fix your credentials did not work on remote desktop issue.
Step 1: Access the Local Security Policy
The Local Security Policy editor tool allows you to manage security-related settings and controls access to your computer, including Remote Desktop access:
- Press
Windows + Rto open the Run dialog box. - Type
secpol.mscand press Enter to launch the Local Security Policy editor.
Step 2: Navigate to Local Policies
Once the Local Security Policy editor is open, you need to locate the settings that control login permissions and delegation of credentials for RDP:
- In the left panel, click on Local Policies and then select User Rights Assignment.
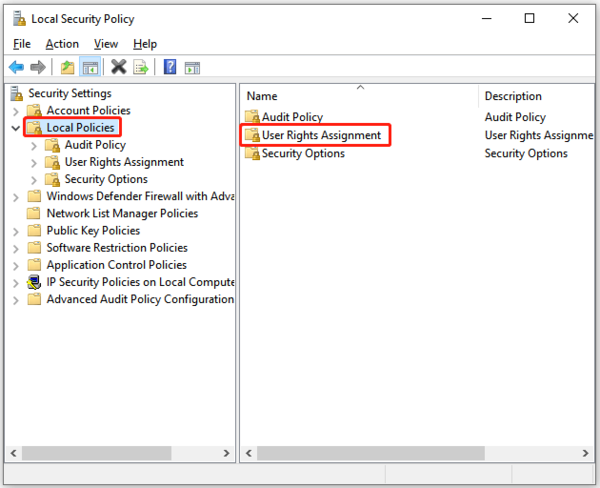
- Look for the policy titled “Allow log on through Remote Desktop Services” in the right pane.
Step 3: Modify Remote Desktop Access Policy
Now, adjust the Remote Desktop Services policy to allow the appropriate users or groups to log in remotely:
- Double-click on “Allow log on through Remote Desktop Services” to open the policy.
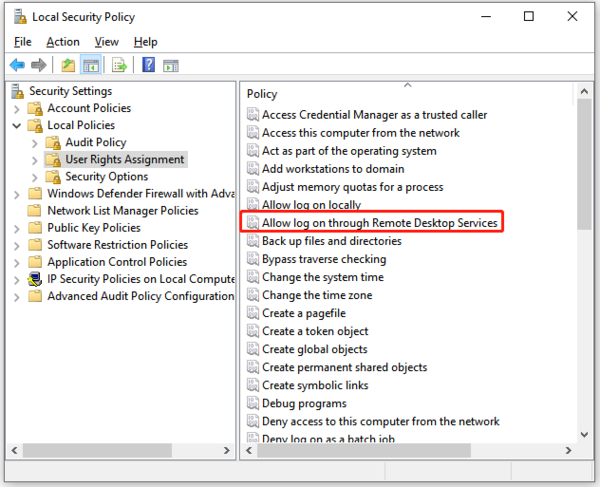
- If the necessary users or groups are missing (such as Administrators or Remote Desktop Users), click Add User or Group.
- Type the username or group name (e.g., Administrators or Remote Desktop Users) and click OK.
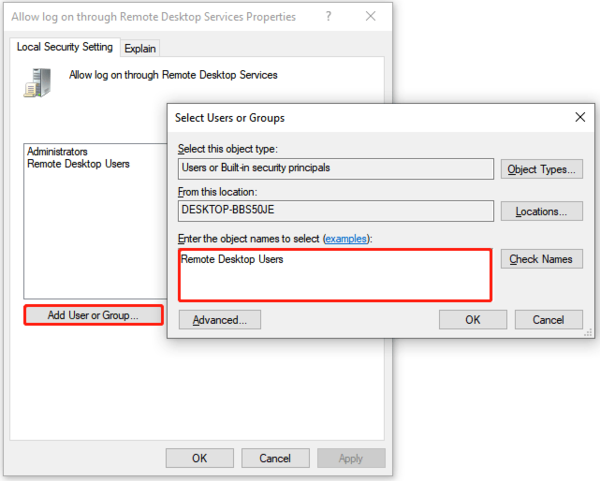
- Ensure the correct accounts have access, then click Apply and OK to save the changes.
Step 4: Verify Deny Access Policies
It’s also important to ensure that no users or groups are explicitly denied access:
- In the same User Rights Assignment section, find the policy “Deny log on through Remote Desktop Services”.
- Double-click on the policy to view which users or groups are listed.
- If necessary, remove any accounts mistakenly added here, as this will block them from logging in via RDP.
- Click Apply and OK after making adjustments.
Step 5: Restart the Computer
After editing the security policies, restart your system to apply the changes. This ensures that your updated settings take effect and allows you to test the connection again.
Addressing Two-Factor Authentication (2FA) Issues with Remote Desktop
If you are using two-factor authentication (2FA) or multi-factor authentication (MFA) for enhanced security, it may interfere with your Remote Desktop login and result in the “credentials did not work remote desktop” error.
2FA setups often require a separate authentication step, such as a code or push notification, after entering your credentials. However, if RDP is not configured to handle this, it could fail the credential validation.
To troubleshoot this issue, consider:
- Check if 2FA/MFA is enabled for your remote desktop access.
- If so, ensure that your RDP client supports 2FA, or disable it temporarily to troubleshoot the issue.
- Alternatively, use RDP gateways that integrate 2FA/MFA solutions for secure connections.
Adding this step ensures that 2FA is properly considered and eliminates potential confusion during remote access.
What if RDP port 3389 does not respond?
Check if the port is open using PowerShell:
Test-NetConnection -ComputerName <IP_Address> -Port 3389If the port is blocked, configure the firewall to allow RDP traffic and ensure network configurations are correct.
Conclusion
The issue “Remote Desktop Credentials Did Not Work” can significantly disrupt business operations if left unresolved. Through methodical validation of credentials, network checks, permission reviews, and adherence to security best practices, businesses can swiftly restore remote access functionality while safeguarding their resources.
Business owners must recognize the critical role of accurate remote authentication in maintaining productivity and security in a digitally connected workplace. Proactive troubleshooting and consistent security measures will ensure that Remote Desktop remains a reliable and secure tool for your organization’s remote work needs.
FAQ
2. How should I format my username to fix Remote Desktop login issues?
Use ".\\username or localhost\\username for local accounts", and "DOMAIN\\useraccount or [email protected]" for domain accounts. Proper format ensures credentials validate correctly.
3. Can group policy settings cause Remote Desktop Credentials Did Not Work errors?
Yes. Incorrect Local Group Policy configurations can block delegation of credentials. Enabling policies like Allow delegating default credentials with NTLM server authentication often resolves this issue.
4. How do registry settings affect Remote Desktop authentication failures?
Registry keys like LsaCompatibilityLevel control security protocol handling. Setting this value correctly (e.g., to 1) can fix credential verification problems often caused by updates.
5. What role does firewall and RDP port 3389 play in credential errors?
If the RDP port is blocked or inaccessible on the remote machine, login attempts may fail with credential errors. Ensuring port 3389 is open and reachable is critical for Remote Desktop access.
6. How can Windows Security Policy adjustments resolve Remote Desktop credential errors?
Allowing proper user groups access in policies like Allow log on through Remote Desktop Services and removing denied users helps ensure permissions are correctly set to avoid credential rejections.
7. Does two-factor authentication impact Remote Desktop login with credentials that do not work?
Yes. Improperly configured 2FA can block Remote Desktop authentication. Ensure the RDP client supports 2FA or use gateways that integrate multi-factor authentication for seamless access.
8. What should I do if changing my username causes Remote Desktop credential failures?
Revert to the previous username if recent changes caused login issues. Remote Desktop servers may still reference old credentials, so reverting can re-enable access.
9. How can I test if the Remote Desktop port is open and accessible?
Use PowerShell command "Test-NetConnection <IP_Address> -Port 3389" to verify port accessibility. A successful result confirms network and firewall settings allow RDP connections.
10. After applying fixes, why should I restart my system when Remote Desktop credentials do not work?
Restarting applies changes to group policy, registry, and security settings ensuring that updated configurations take effect and credential authentication can succeed.