No Remote Desktop License Servers Available
The “No Remote Desktop License Servers Available” error occurs when a Remote Desktop Session Host can’t locate a valid license server, which is needed for managing Client Access Licenses (CALs) and enabling remote connections.
This issue is typically due to incorrect licensing settings, compatibility mismatches between Windows Server versions and CALs, or blocked network ports.
Configuring the correct license mode, ensuring server-CAL compatibility, and allowing necessary network traffic are key steps to resolving this error and restoring Remote Desktop functionality.

At the end of this tutorial, you will know 10 methods to fix this error.
Prerequisites to Fix No Remote Desktop License Servers Available Error
To prepare for troubleshooting the “No Remote Desktop License Servers Available” error, it’s essential to confirm that your setup meets some key requirements.
If you’re using a Windows VPS for remote access, these prerequisites will help ensure a smooth, license-ready environment for optimal performance and connectivity.
- Check License Availability: Ensure the Remote Desktop License Server has sufficient valid Client Access Licenses (CALs) for all intended users to avoid connection issues.
- Verify Network Connectivity: Confirm that essential network ports, like TCP 135 and UDP 137-138, are open to allow proper communication between the RDSH and the license server.
- Ensure Windows Server Compatibility: Verify that the Windows Server version and CALs are compatible (e.g., using Windows Server 2019 CALs with Server 2019) to prevent mismatches.
- Administrator Access: Make sure you have full administrative rights to adjust RDS settings on the license server and session host for successful configuration.
- Set the Right Licensing Mode: Confirm the licensing mode on the RDS server aligns with the mode required by your licenses (Per User or Per Device).
Method 1. Activating Remote Desktop License Server
Configuring the license server correctly is crucial for uninterrupted Remote Desktop connectivity, particularly on setups like Windows Server RDSH environments and Windows VPS.
Step 1: Open Server Manager
Start by opening Server Manager on your Windows Server. Navigate to the Manage menu and select Add Roles and Features.
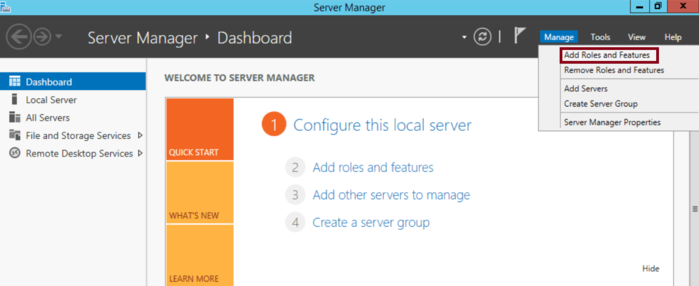
This will guide you through adding the necessary features for Remote Desktop licensing.
Step 2: Install Remote Desktop Licensing
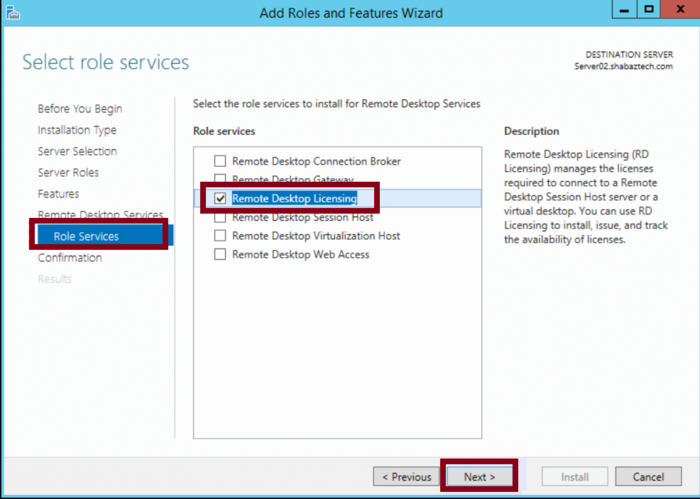
In the Roles and Features Wizard, find and select Role Services.
Choose to install Remote Desktop Licensing and complete any required fields with your information once the installation is finished.
Step 3: Access Remote Desktop Services
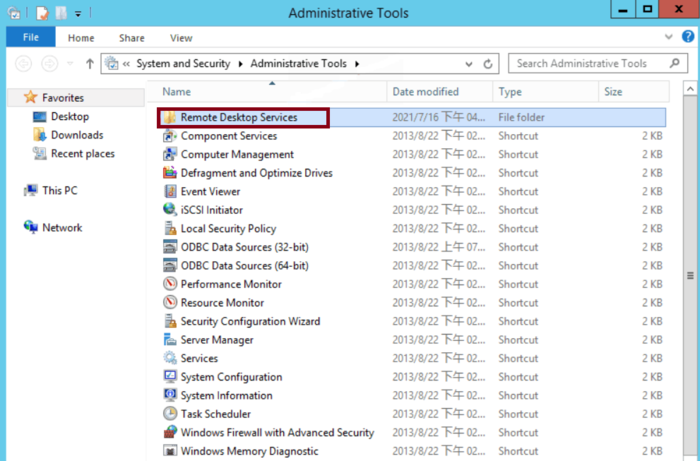
After the licensing feature is installed, return to the Administrative Tools section in Server Manager.
Select Remote Desktop Services from the available management tools to set up and monitor Remote Desktop features.
Step 4: Open the Licensing Manager
Open Remote Desktop Licensing Manager from the Remote Desktop Services settings.
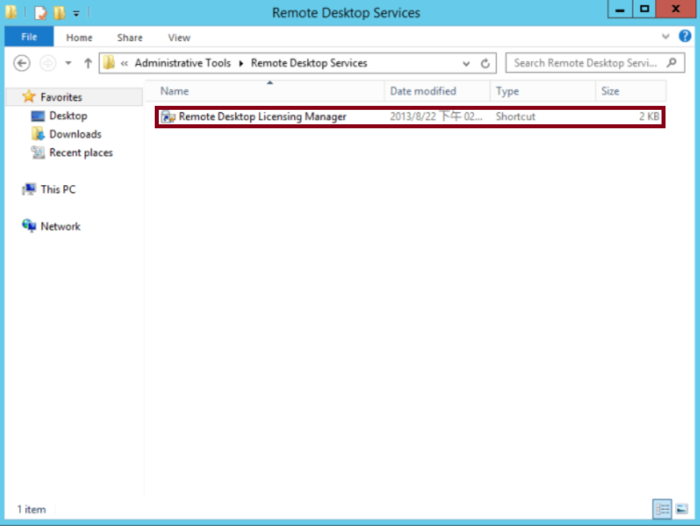
This tool enables you to manage and troubleshoot licenses for your Remote Desktop Session Host.
Step 5: Activate the License Server
In the Licensing Manager, right-click your server’s name and choose Activate Server.
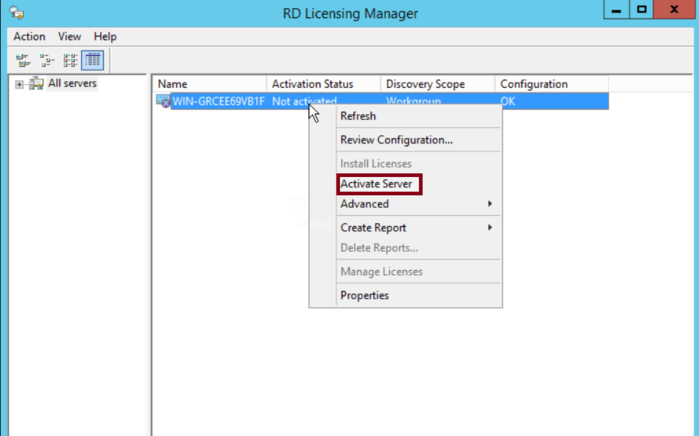
This step officially activates the licensing server to recognize and allocate licenses properly.
Step 6: Complete the Activation Wizard
The Activate Server Wizard will prompt you with instructions.
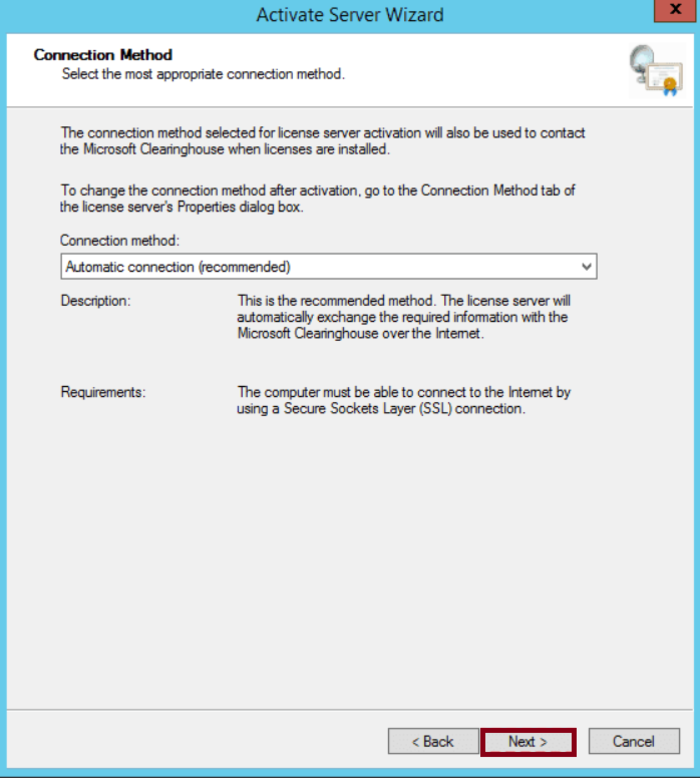
Click Next through the setup steps, following each prompt to finalize the licensing configuration.
Through this method, you can solve No Remote Desktop License Servers Available error.
Method 2. Adjusting the Registry Editor Grace Period
Adjusting the grace period can often resolve licensing issues, allowing your Remote Desktop Services to function correctly.
This solution is essential for users relying on Windows Server environments and those managing RDSH setups.
Important Note:
Before making any changes to the Registry, it’s crucial to back it up first to prevent any potential issues arising from incorrect modifications.
Additionally, these steps are suitable for testing environments using RDS Server 2016. For production environments, purchase the appropriate Remote Desktop Client Access Licenses (RD CALs).
Step 1: Open the Registry Editor
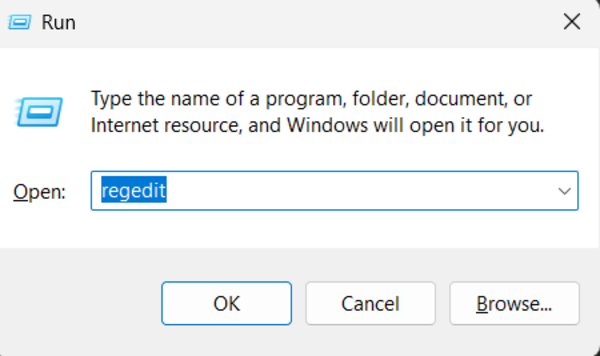
Press WIN + R to open the Run dialog. Type “regedit” and hit Enter. This action opens the Registry Editor, where system settings are stored.
Step 2: Navigate to the GracePeriod Key
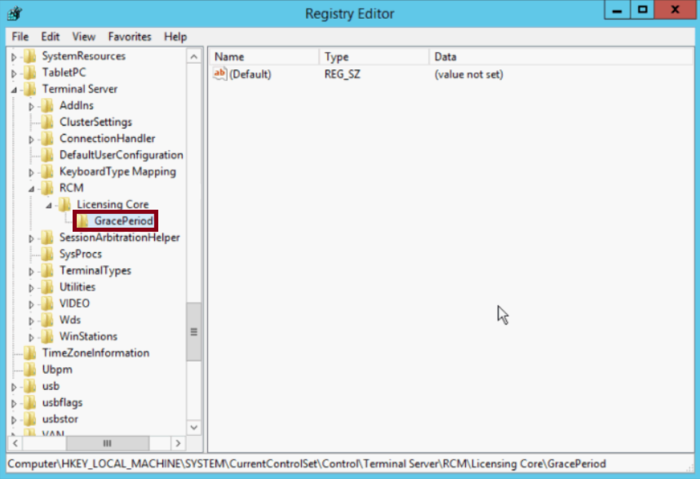
In the Registry Editor, navigate to the following path:
HKEY_LOCAL_MACHINE > SYSTEM > CurrentControlSet > Control > Terminal Server > RCM > Licensing Core > GracePeriodOnce you reach the GracePeriod key, right-click on it.
Step 3: Adjust Permissions
In the Permissions for GracePeriod window, select the Administrator group. Ensure you check the box for Full Control, then click OK.
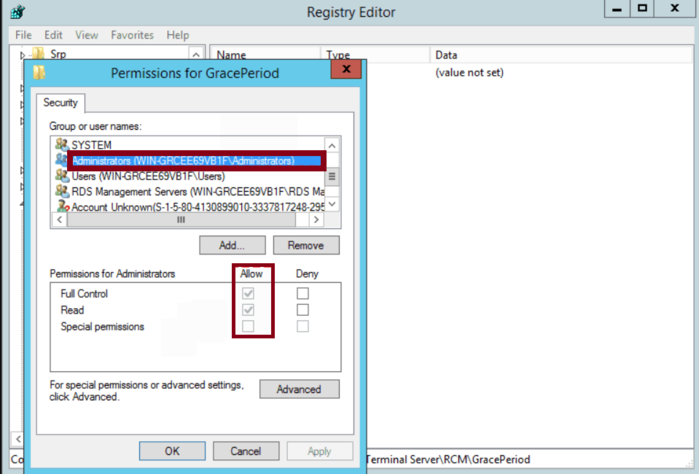
This step allows you to make changes to the key.
Step 4: Delete the GracePeriod Key
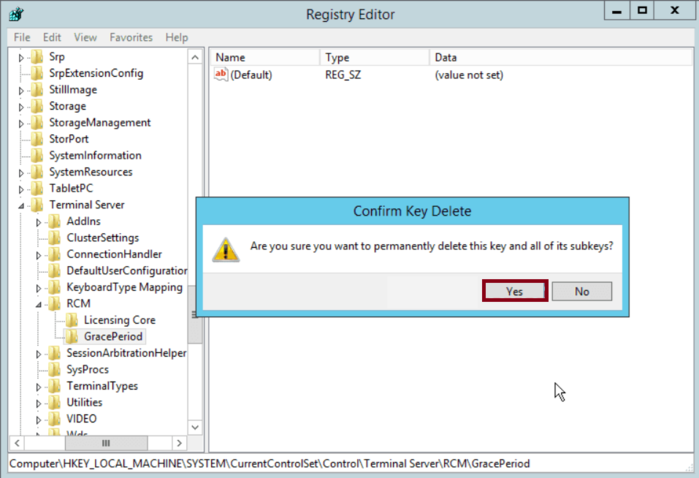
With Full Control granted, right-click the GracePeriod key again and select Delete.
Confirm the deletion when prompted by clicking Yes on the Confirm Key Delete dialog.
Step 5: Restart Your System
After deleting the GracePeriod key, restart your system to apply the changes. This action ensures that the modified settings take effect.
Method 3. Configuring Licensing Model and Server Name via Group Policy
Implementing the below steps can help resolve issues related to the “Remote Session was Disconnected” error, especially when using Windows Server 2012 R2, 2016, 2019, or 2022.
Properly configuring the licensing model is crucial to prevent license agreement errors, which can lead to serious server stability issues.
Step 1: Access the Local Group Policy Editor
Press WIN + R to open the Run dialog, then type “gpedit.msc” and hit Enter.
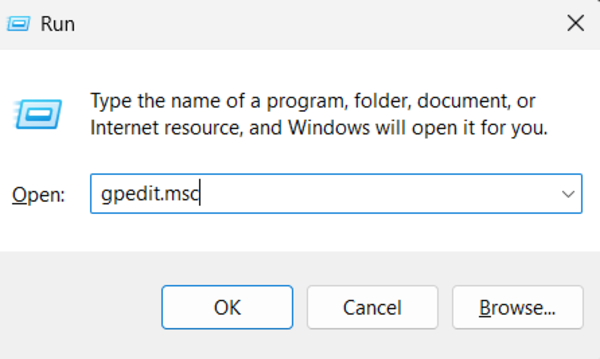
This action opens the Local Group Policy Editor, where you can adjust system settings.
Step 2: Navigate to Remote Desktop Services
In the left pane, expand the following path:
Computer Configuration > Administrative Templates > Windows Components > Remote Desktop Services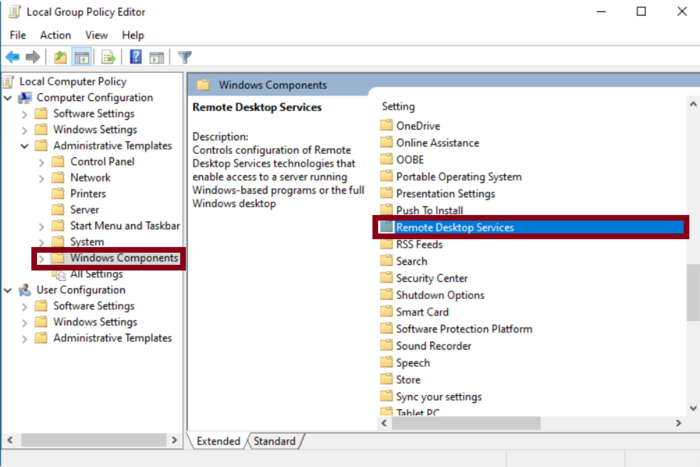
Here, you’ll find various settings related to Remote Desktop functionalities.
Step 3: Open Remote Desktop Session Host Settings
Within the Remote Desktop Services folder, locate Remote Desktop Session Host and click to open it.
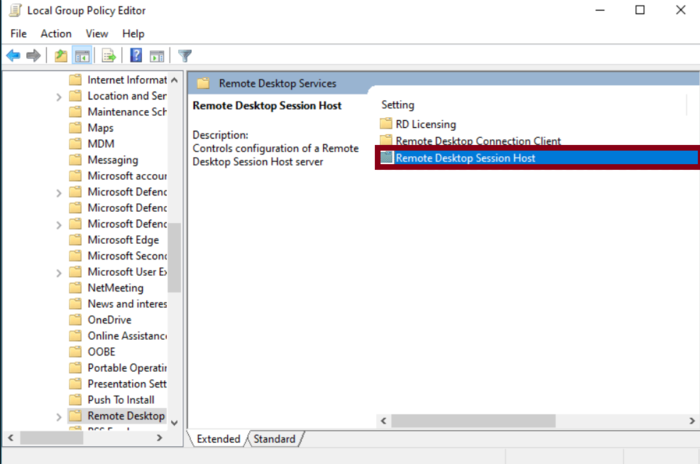
This section contains critical configurations for managing remote sessions.
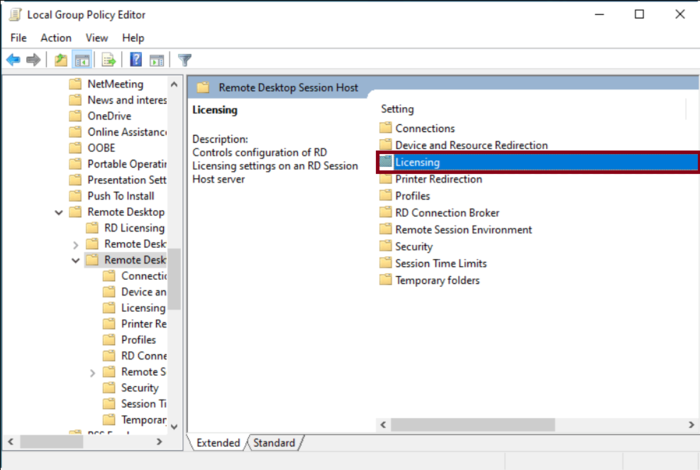
Step 4: Configure Licensing Settings
On the right pane, look for Licensing and double-click it to access the licensing options.
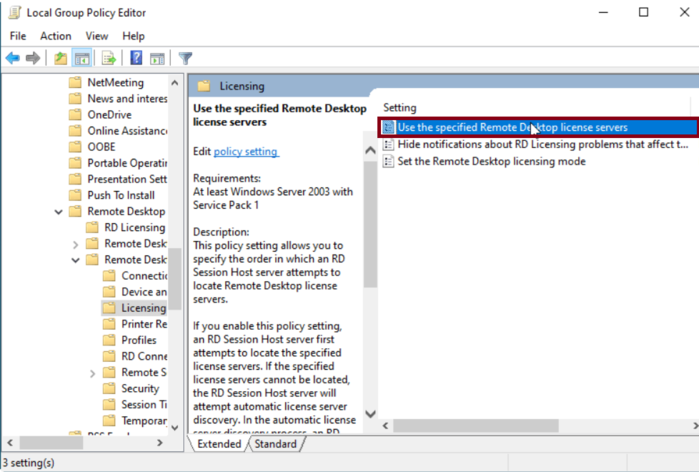
Step 5: Specify License Servers
Find the setting titled Use the specified Remote Desktop license servers and double-click to open it.
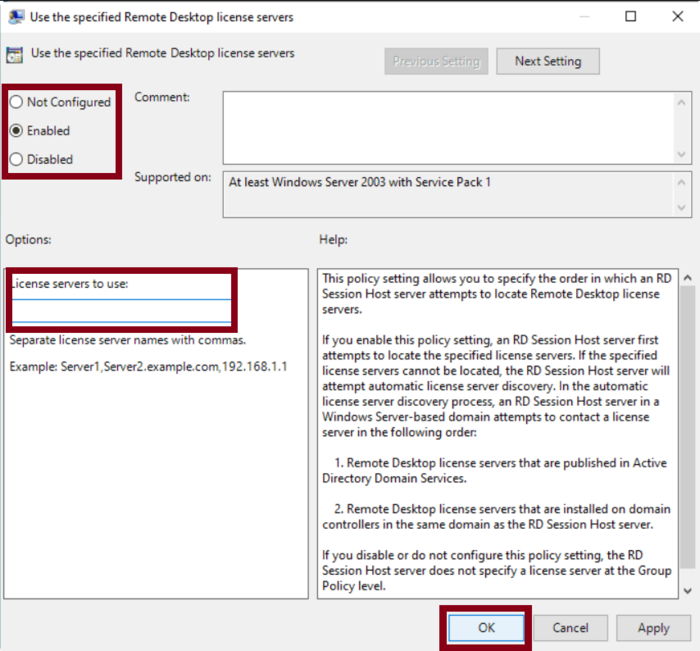
Switch the option from Not Configured to Enabled.
Enter the appropriate license server name in the License servers to use field, and click OK to save your changes.
By ensuring your Remote Desktop Services are correctly configured, you enhance the overall reliability of your Windows VPS environment and streamline remote connectivity.
Method 4. Ensure Network Connectivity
In this step, you will learn how to ensure that there is a stable network connection between the client and the server to fix No Remote Desktop License Servers Available error.
This is crucial for Remote Desktop functionality:
Step 1: Check Internet Connection
Check your internet connection to make sure it’s active and stable. Use a browser to access a website.
Step 2: Ping the Server
If you are on a corporate network, confirm that the server is reachable by using the ping command. Open the Command Prompt and type ping <server-ip>, replacing <server-ip> with the IP address of your server.
Step 3: Troubleshoot Network Settings
If the ping fails, troubleshoot your network settings or consult with your network administrator.
You may need to check firewalls or other security settings that could be blocking access to the server.
Method 5. Verify Remote Desktop Services Status
If the Remote Desktop Services aren’t running, you won’t be able to connect. Follow the below steps to resolve it:
Step 1: Open Services Management Console
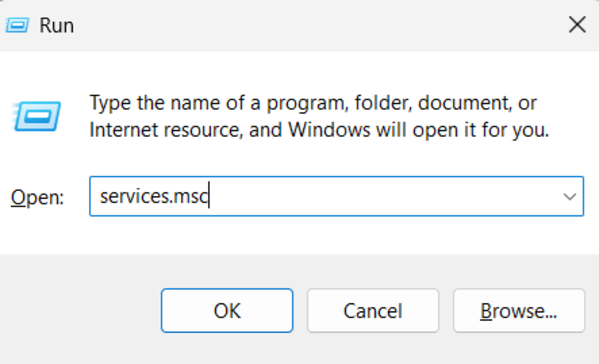
Press Windows + R, type ”services.msc”, and hit Enter. This opens the Services management console.
Step 2: Locate Remote Desktop Services
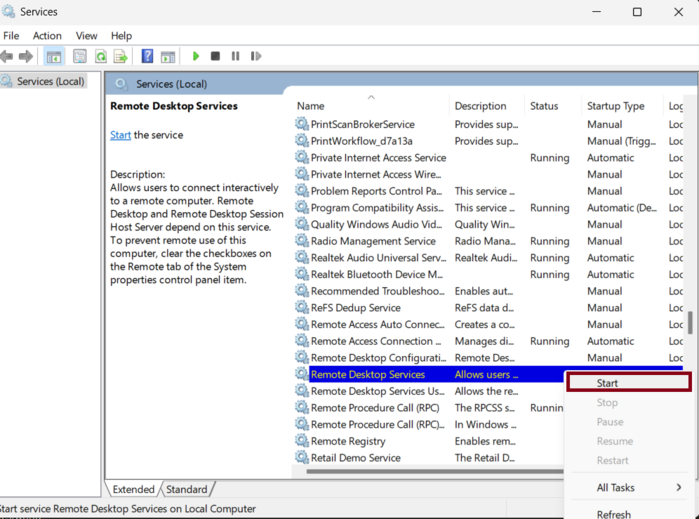
Find “Remote Desktop Services” in the list. If it’s not running, right-click and select “Start.” If it’s running, select “Restart.”
Method 6: Check RDP Port Configuration
The Remote Desktop Protocol (RDP) typically operates over a default port of 3389.
If this port is blocked or misconfigured, it can lead to connection issues, including the “No Remote Desktop License Servers Available” error.
Ensuring that this port is accessible is a crucial troubleshooting step:
Step 1: Open PowerShell
Start by pressing Windows + X, which opens a quick-access menu. From there, select Windows PowerShell (or Windows Terminal, depending on your version).
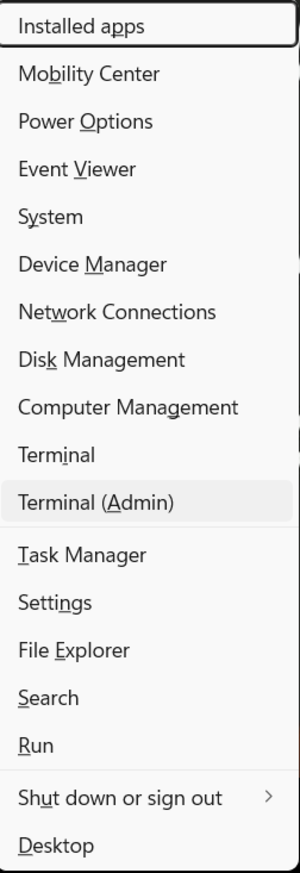
This opens a command-line interface where you can run various commands to check and configure system settings.
Step 2: Test RDP Port Accessibility
In the PowerShell window, type the command Test-NetConnection -ComputerName <server-ip> -Port 3389, replacing <server-ip> with the actual IP address of your server.
Press Enter to execute the command.
This command will check if the specified port is open and accessible from your current location.
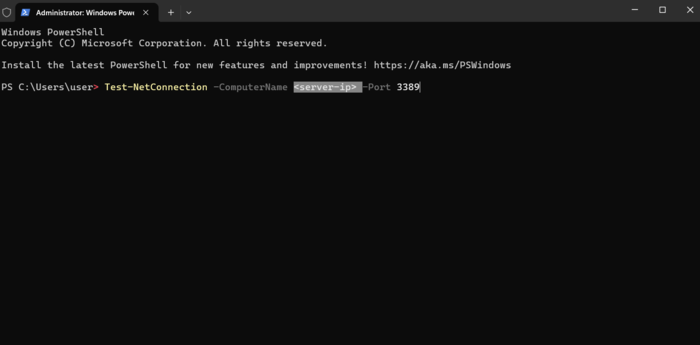
If the connection succeeds, you’ll receive confirmation that the RDP port is reachable.
If it fails, PowerShell will provide details indicating that the port is blocked or not responding.
Step 3: Address Blocked Ports
If the port is found to be blocked, you will need to investigate your firewall settings. Open Windows Defender Firewall by searching for it in the Start menu.
Click on “Advanced settings” to access the advanced configuration options.
Here, check the inbound rules for Remote Desktop. Make sure that there is a rule allowing traffic on port 3389.
If not, you may need to create a new rule:
- Select Inbound Rules in the left panel.
- Click on New Rule… on the right.
- Choose Port, then click Next.
- Ensure TCP is selected, and input 3389 in the specific local ports field. Click Next.
- Choose Allow the connection, and continue through the prompts to name your rule and finish the setup.
After making these adjustments, it’s advisable to try reconnecting to your Remote Desktop again.
This thorough check of the RDP port configuration can help eliminate connectivity issues stemming from firewall or port settings
Method 7: Update Remote Desktop Client Settings
Updating the Remote Desktop client settings is vital to ensure that the client can connect to the server smoothly without any licensing issues.
Step 1: Open Remote Desktop Connection App
Start by clicking the Windows icon and typing “Remote Desktop Connection” in the search bar.
Launch the application from the search results. This tool allows you to connect to other computers remotely and needs proper configurations to work effectively.
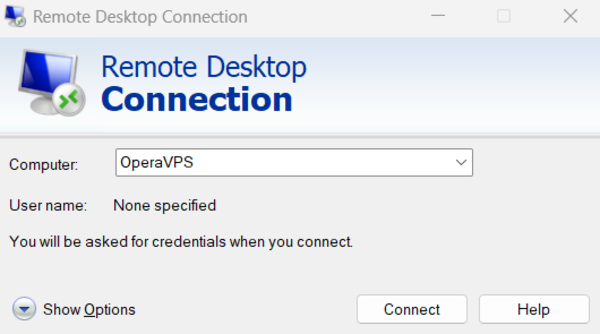
Step 2: Access Options
In the Remote Desktop Connection window, you will see a button labeled “Show Options.
Click on it to expand the menu.
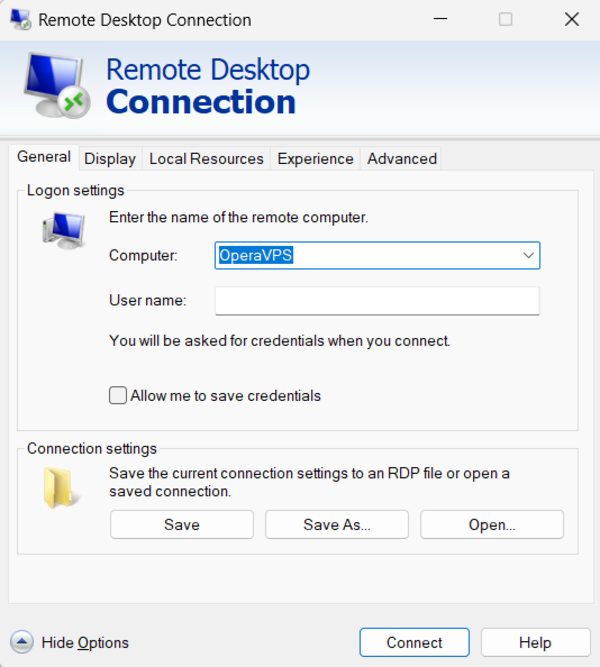
This area contains various settings that control how your connection is made, which is essential for troubleshooting.
Step 3: Configure Gateway Settings
Navigate to the “Advanced” tab. Here, you will find the option to configure how the connection is routed. Click on “Settings” under the “Connect from anywhere” section.
If your organization uses a Remote Desktop Gateway, ensure that the server name is entered correctly.
This step is crucial because incorrect settings can lead to connection failures. After making changes, click “OK” to save your settings.
You’re now ready to try connecting again.
Method 8. Adjust Windows Firewall Settings
Firewalls are designed to protect your computer from unauthorized access, but they can sometimes block legitimate connections like Remote Desktop Protocol (RDP).
Step 1: Navigate to Firewall Settings
Open the Control Panel by searching for it in the Start menu.
Click on “System and Security,” and then select “Windows Defender Firewall.”
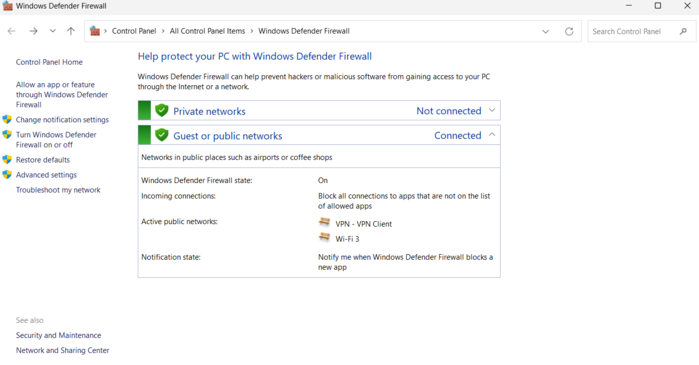
This will take you to the firewall settings, where you can manage rules for incoming and outgoing connections.
Step 2: Allow Remote Desktop
On the left pane, click on “Allow an app or feature through Windows Defender Firewall.”
This section allows you to manage which applications are permitted to communicate through the firewall.
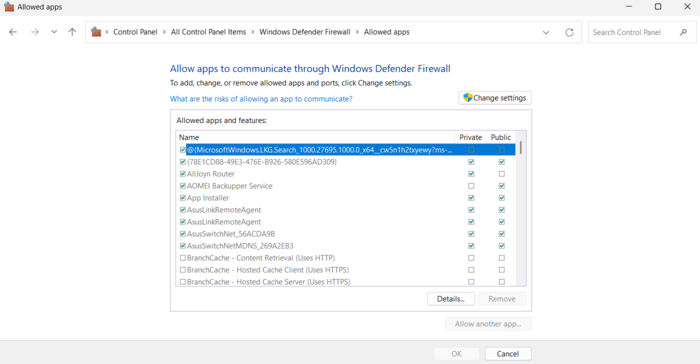
Step 3: Check RDP Options
Look for “Remote Desktop” in the list that appears. Ensure that both the “Private” and “Public” boxes are checked.
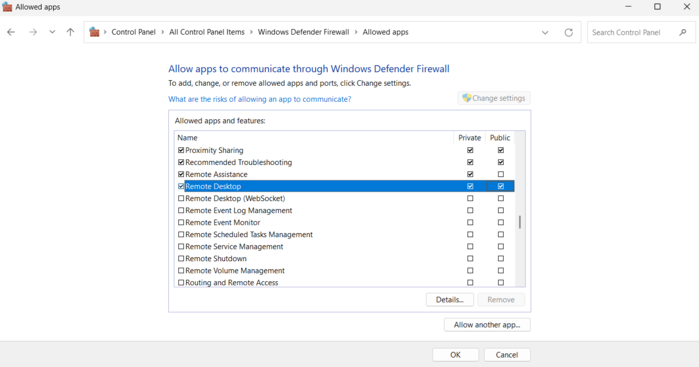
This is important because RDP connections may occur in different network profiles, and blocking it on either could prevent connections.
If you need to make adjustments, click “Change settings,” then check the relevant boxes and confirm your choices. Once done, close the settings window and try reconnecting.
Method 9. Reinstalling Remote Desktop Services
If the previous methods have not resolved the issue, reinstalling the Remote Desktop Services role can help restore proper functionality.
Follow the below steps to do this:
Step 1: Open Server Manager
Launch Server Manager on your Windows Server.
Step 2: Remove Remote Desktop Services
Navigate to the “Manage” menu, select “Remove Roles and Features,” and follow the prompts to remove the Remote Desktop Services role.
Ensure to back up any configurations or licenses before proceeding.
Step 3: Reboot the Server
After the role has been removed, reboot the server to clear any cached settings and ensure a clean slate for the reinstallation.
Step 4: Reinstall Remote Desktop Services
Once the server has restarted, return to Server Manager. Select “Add Roles and Features” and follow the prompts to reinstall Remote Desktop Services.
Be sure to configure the licensing settings appropriately during this process.
Step 5: Activate License Server Again
After reinstallation, access the Remote Desktop Licensing Manager and activate the License Server again, following the activation steps outlined in Method 1.
This will help re-establish the connection to valid licenses.
Method 10. Checking Event Viewer for Errors
The Event Viewer can provide critical insights into any errors or warnings related to Remote Desktop Services, helping you pinpoint the root cause of the “No Remote Desktop License Servers Available” error.
Step 1: Open Event Viewer
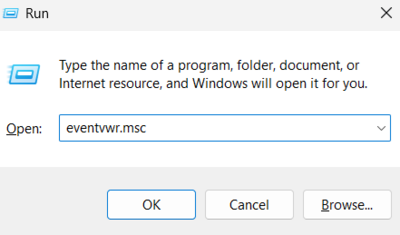
Press WIN + R to open the Run dialog, type “eventvwr.msc,” and hit Enter. This action opens the Event Viewer window.
Step 2: Navigate to Remote Desktop Services Logs
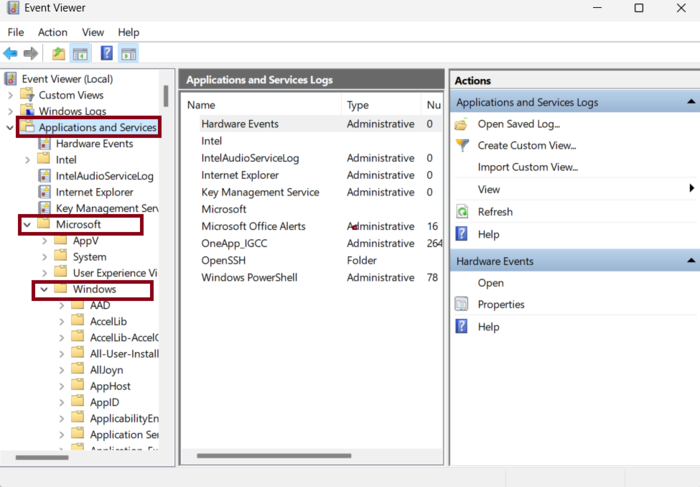
In the Event Viewer, expand the “Applications and Services Logs” folder on the left pane.
Then, navigate to “Microsoft” > “Windows” > “TerminalServices-RemoteConnectionManager.”
Step 3: Review Event Logs
Check the logs for any errors or warnings related to Remote Desktop connections. Look for specific error codes or messages that can provide insight into the licensing issue.
Step 4: Address Logged Issues
Take note of any relevant errors and consult Microsoft documentation or support resources for guidance on addressing those specific issues.
Resolving the underlying problems logged in the Event Viewer may restore Remote Desktop functionality.
How to Use Remote Desktop Licensing Diagnoser?
The Remote Desktop Licensing Diagnoser is a troubleshooting tool that helps identify issues related to Remote Desktop licensing, making it a valuable resource when dealing with licensing errors.
Follow the below steps to open RD Licensing Diagnoser:
Step 1: Open the Licensing Diagnoser
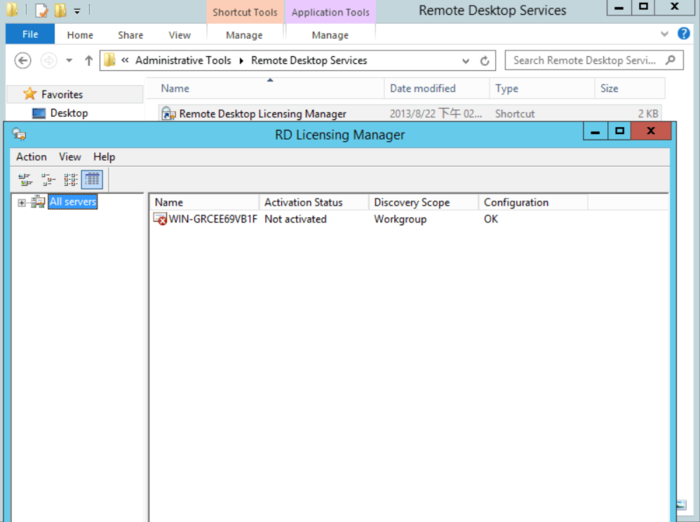
Go to the Start menu, type Remote Desktop Licensing Diagnoser, and hit Enter. This will open the tool.
Step 2: Review Diagnostic Information
Once the tool is open, it will automatically scan the licensing configuration and display any detected issues.
Step 3: Interpret Results
Pay attention to any warnings or errors indicated by the tool. This information can guide you in resolving issues such as missing licenses or misconfigurations.
Step 4: Take Action
Based on the diagnostic results, take the necessary steps to resolve any identified issues, such as adjusting licensing settings or ensuring proper connectivity to the license server.
What causes the “No Remote Desktop License Servers Available” error?
The “No Remote Desktop License Servers Available” error typically occurs due to issues such as incorrect licensing settings, compatibility mismatches between Windows Server versions and Client Access Licenses (CALs), or blocked network ports.
Ensuring that the Remote Desktop Session Host (RDSH) can communicate with the license server is crucial for resolving this error.
How to check the status of my Remote Desktop License Server?
Check the status of your Remote Desktop License Server by opening the Remote Desktop Licensing Manager.
Navigate to Administrative Tools in the Control Panel, select Remote Desktop Services, and open Licensing Manager.
Here, you can view the license status, availability of CALs, and any issues that may need attention.
What are the network ports required for Remote Desktop Services?
For Remote Desktop Services to function properly, ensure that the following network ports are open: TCP port 3389 for RDP connections, TCP port 135 for RPC Endpoint Mapper, and UDP ports 137-138 for NetBIOS services.
Blocked ports can lead to connectivity issues, including the “No Remote Desktop License Servers Available” error.
How to activate my Remote Desktop License Server?
To activate your Remote Desktop License Server, open Remote Desktop Licensing Manager, right-click on your server name, and select Activate Server.
Follow the prompts in the Activation Wizard to complete the activation process. Properly activating the license server is essential for managing Client Access Licenses (CALs) and resolving connectivity issues
Why is my Remote Desktop client unable to connect?
If your Remote Desktop client is unable to connect, it may be due to several factors, including network connectivity issues, blocked RDP ports, or misconfigured firewall settings.
Check your internet connection, ensure TCP port 3389 is accessible, and verify that your Windows Firewall allows Remote Desktop traffic.
Conclusion
Encountering the “No Remote Desktop License Servers Available” error can be frustrating, but with the right troubleshooting steps, you can restore remote connectivity effectively.
By following the ten methods outlined in this tutorial, from configuring the Remote Desktop License Server to checking network connectivity and firewall settings, you can ensure that your Remote Desktop Services function smoothly.
Always remember to verify your license availability, maintain compatibility between your server and CALs, and monitor network traffic for potential issues.
With these strategies in place, you can prevent and resolve licensing errors, providing a stable and secure remote access experience for all users.