Complete tutorial to install Let’s Encrypt SSL on CentOS 8
Securing a website using Certbot is one of the key factors you need to your website can survive. Using HTTPS via Security Certificate (SSL Certificate) to secure the traffic sent from web browsers to web servers is essential. As a result, users will be completely secure in communicating with your website in order to exchange data. And the traffic sent from the secure platform must be transferred.
In most cases, you should renew the security certificates monetary and annually. Let’s Encrypt Certificate is an automatic, open-source, and free certificate that you can use to encrypt your site. The certificate expires after 90 days and the renewal is free of charge.
Let’s Encrypt can be easily installed on all servers like Linux VPS and cPanel VPS machines.
Steps to install Let’s Encrypt
- Installing Pre-requirements
- Install and configure a Certbot in CentOS 8
- Creating a virtual host in Apache
- Installing Let’s Encrypt SSL Certificate on CentOS 8
- Testing Let’s Encrypt SSL Certificate after installation
- Automatic renew or Let’s Encrypt certificate
In this article, we will teach you how to install the Let’s Encrypt SSL Certificate using the Certbot tool. And we will do this on the Apache webserver, as well as how to configure automatic SSL updates on CentOS 8.
1- Pre-requirements to install Let’s Encrypt SSL on CentOS 8
- Make sure you have a registered domain name that has been bound to the IP address of your server.
- You should Buy Linux VPS machine with CentOS 8 operating system and with Apache webserver (httpd service) that is installed and running on the system. You can make sure your Apache is installed and running using the following commands. If the httpd service is not running, you can start it with the “systemctl start httpd” command.
$ sudo yum install httpd
$ sudo systemctl start httpd
$ sudo systemctl status httpd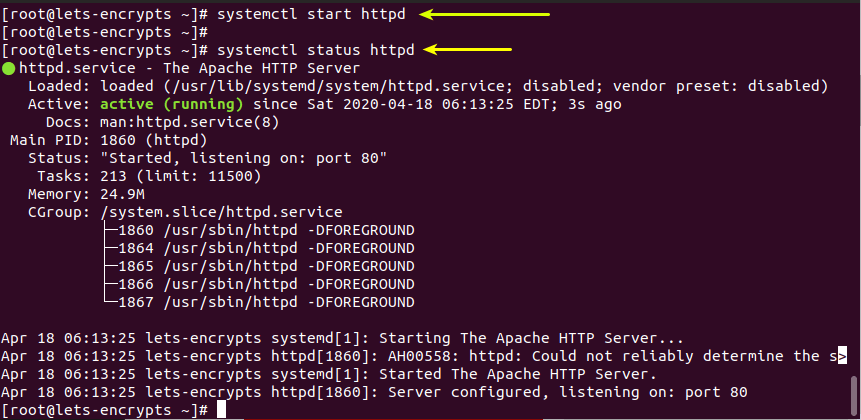
Next, you need to open access to ports 80 and 443 on the firewall. And you can use the following commands to do this.
$ sudo firewall-cmd --permanent --add-port=80/tcp --zone=public
success
$ sudo firewall-cmd --permanent --add-port=443/tcp --zone=public
success
$ sudo firewall-cmd --reload
success
2- Install and configure a Certbot in CentOS 8
Certbot is a client that automatically performs security certificate installation steps. As a result, the program receives the certificate from the official Let’s Encrypt website and installs it on your website without any hassle.
Certbot is completely free and allows you to install the certificate in a very simple way by creating configuration instructions according to your web server settings.
Note: Before downloading Certbot, please install the packages needed to create and configure an encrypted connection.
$ sudo yum install mod_ssl openssl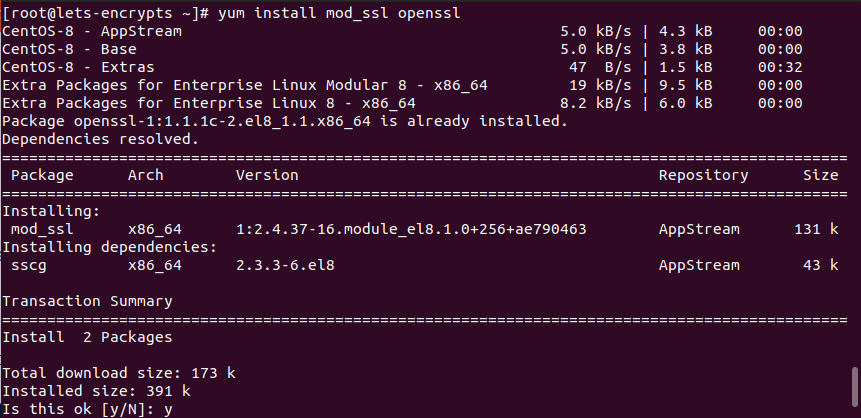
Use the curl command as below to download Certbot.
$ sudo curl -O https://dl.eff.org/certbot-auto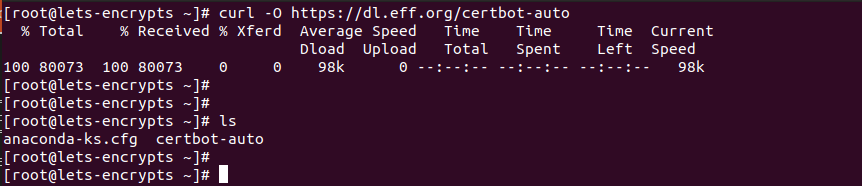
Then, transfer the Certbot file to the usr /local/bin/ folder and assign the executable permissions to the file using the chmod command.
$ sudo mv certbot-auto /usr/local/bin/certbot-auto
$ sudo chown root /usr/local/bin/certbot-auto
$ sudo chmod 0755 /usr/local/bin/certbot-auto
3- Create a virtual host in the Apache webserver.
The next step is to create a virtual host file for our domain operavps.com. For example, suppose your root webserver is in the following path (where you put your HTML files) which we create a directory with the following command.
$ sudo mkdir /var/www/operavps.comWe create the index.html file as shown below in the path above.
$ sudo echo "<h1>Welcome to Apache HTTP server</h1>" > /var/www/operavps.com/index.htmlThen, we create a virtual host file as shown below.
$ sudo vim /etc/httpd/conf.d/operavps.com.confAnd we add the following settings to it.
<VirtualHost *:80>
ServerName operavps.com
ServerAlias www.operavps.com
DocumentRoot /var/www/operavps.com/
<Directory /var/www/operavps.com/> Options -Indexes +FollowSymLinks
AllowOverride All
</Directory>
ErrorLog /var/log/httpd/www.operavps.com-error.log
CustomLog /var/log/httpd/www.operavps.com-access.log combined
</VirtualHost>
<VirtualHost *:443>
ServerName operavps.com
ServerAlias www.operavps.com
DocumentRoot /var/www/operavps.com/
<Directory /var/www/operavps.com/>
Options -Indexes +FollowSymLinks
AllowOverride All
</Directory>
ErrorLog /var/log/httpd/www.operavps.com-error.log
CustomLog /var/log/httpd/www.operavps.com-access.log combined
</VirtualHost>Save the changes and exit.
We assign the required permissions to the root folder of the webserver as follows.
$ sudo chown -R apache:apache /var/www/operavps.comReset the Apache service to make changes.
$ sudo systemctl restart httpd4- Installing Let’s Encrypt SSL Certificate on CentOS 8
At this point, run Certbot as below to install Let’s Encrypt certification.
$ sudo /usr/local/bin/certbot-auto --apacheBy running this command, a number of python packages will be installed.
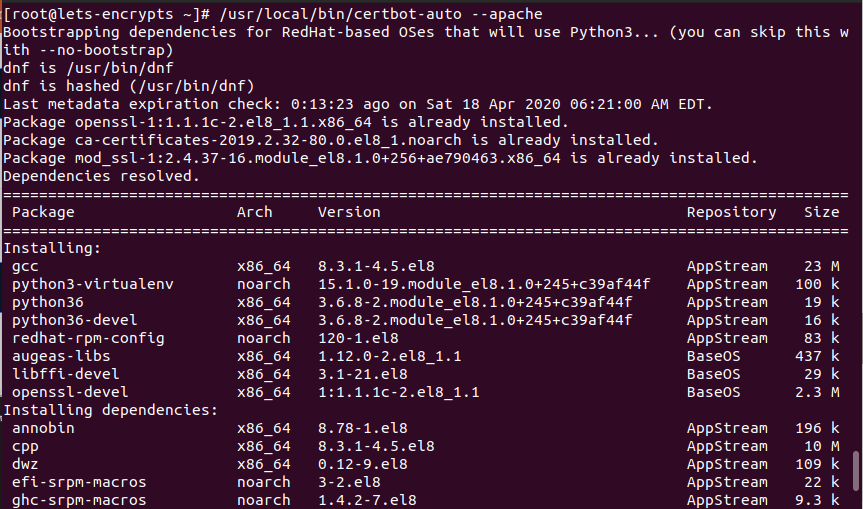 After the successful installation of the packages, the Certbot that we run will ask a series of questions, as well as tips for answering. The questions that will guide you to complete the installation of the Let’s Encrypt certificate.
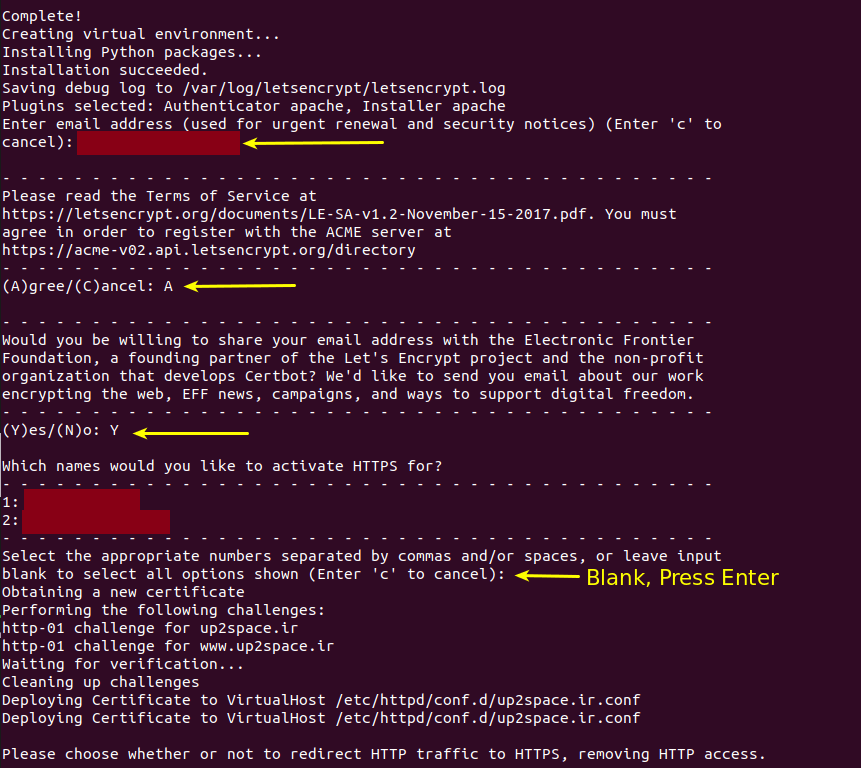
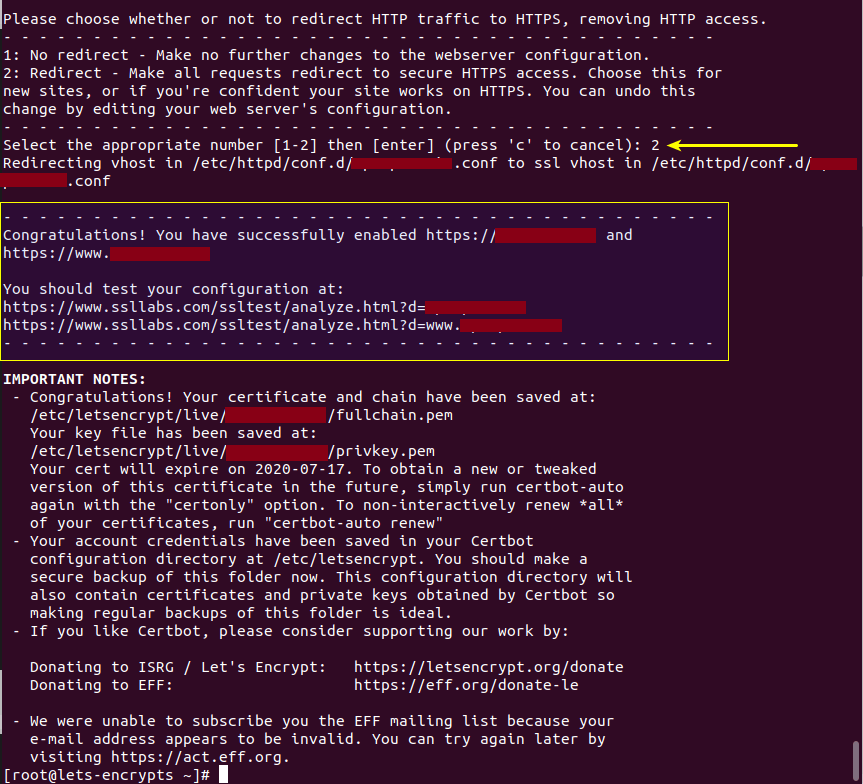
If all goes well, you will receive a message stating that the security of your website has been established using the Let’s Encrypt certificate. Certificate validity is for 90 days which you will see it. (after receipt of the certificate).
Now go back to your VirtualHost file and add the following lines to its configuration.
SSLEngine On
SSLCertificateFile /etc/letsencrypt/live/operavps.com/fullchain.pem
SSLCertificateKeyFile /etc/letsencrypt/live/operavps.com/privkey.pem
Save the file and exit.
After all the file changes should be something like the following.
<VirtualHost *:80>
ServerName operavps.com
ServerAlias www.operavps.com
DocumentRoot /var/www/operavps.com/
<Directory /var/www/operavps.com/>
Options -Indexes +FollowSymLinks
AllowOverride All
</Directory>
ErrorLog /var/log/httpd/www.operavps.com-error.log
CustomLog /var/log/httpd/www.operavps.com-access.log combined
</VirtualHost>
<VirtualHost *:443>
ServerName operavps.com
ServerAlias www.operavps.com
DocumentRoot /var/www/operavps.com/
<Directory /var/www/operavps.com/>
Options -Indexes +FollowSymLinks
AllowOverride All
</Directory>
ErrorLog /var/log/httpd/www.operavps.com.info-error.log
CustomLog /var/log/httpd/www.operavps.com-access.log combined
SSLEngine On
SSLCertificateFile /etc/letsencrypt/live/operavps.com/fullchain.pem
SSLCertificateKeyFile /etc/letsencrypt/live/operavps.com/privkey.pem
</VirtualHost>
Restart the Apache service.
$ sudo systemctl restart httpd5- Testing Let’s Encrypt SSL Certificate
To check that everything is working properly, open your website on the browser, and view the server address. Now you should see the green lock mark at the beginning of your URL.
To get more details, click on the lock icon and click Certificate on the drop-down menu.
6- Automatic renewal of Let’s Encrypt
Let’s Encrypt certification is only valid for 90 days. The renewal process is usually done by the Certbot package, whose Renew script has been added to the /etc/cron.d directory. The script runs twice a day and will automatically renew any certificate remaining 30 days from the expiration date.
To test the automatic renewal process, just run the following command to test Certbot.
$ sudo /usr/local/bin/certbot-auto renew --dry-run
If you don’t get any errors, be sure that the renewal process will be done without problems.
We have reached the end of the article. In this post, we show you how to use Certbot to install the Let’s Encrypt certification on the Apache webserver on CentOS 8 operating system. Don’t forget to share your questions and comments with us.
very useful, tanks a lot! It would also very useful an article on how to manage more LET'S_ENCRYPT certificates on several virtual host on same Apache. best wishes Pietro
Hi. Thank you for the article. I am not too sure if certbot adds renew script into /etc/cron.d automatically. At least I was not able to reproduce that. There are no cronjobs added into /var/spool/cron folder ether. Could you please confirm that? How to organize auto-renew incorrect way? Cheers
Awesome gift to the coding community and of course to humanity. Saved me tones of trouble, it is good to note, always check your DNS propagation status and all that
Please ignore my previous comment Harry. I restored my VPS and made sure I replace all occurrences of "operavps" with my domain but still, I got these errors. Hope you can help me fix these errors, please.\\ =================== Installing Python packages... Installation succeeded. Saving debug log to /var/log/letsencrypt/letsencrypt.log Error while running apachectl configtest. \\ AH00526: Syntax error on line 85 of /etc/httpd/conf.d/ssl.conf: SSLCertificateFile: file '/etc/pki/tls/certs/localhost.crt' does not exist or is empty \\ The apache plugin is not working; there may be problems with your existing configuration. The error was: MisconfigurationError("Error while running apachectl configtest.\n\nAH00526: Syntax error on line 85 of /etc/httpd/conf.d/ssl.conf:\nSSLCertificateFile: file '/etc/pki/tls/certs/localhost.crt' does not exist or is empty\n",)
me again. please ignore both my comments. I found the solution here https://github.com/certbot/certbot/issues/7397
Hey Neil First, try this command to restart the Apache:
systemctl restart httpdAnd then this command to regenerate the Cert:/usr/libexec/httpd-ssl-gencertsHope this help you to resolve the issue.Hi, Harry good job on your work here on this site you so concise in work I really to say something good to you for your work as a IT person really good work everything is dead on so please just keep up with excellence. Thank you, Carl
Hi Carl, I'm glad you found this article useful. Your feedback is very energetic and makes me publish better quality content. Thanks for your comment.