Disable Windows Automatic Updates Easily
Disable Windows Automatic Updates gives users control over when updates install, preventing unexpected slowdowns. Use Settings for temporary pauses or advanced methods like Registry Editor and Group Policy for permanent disabling.
🤖AI Overview:
Disable Windows Automatic Updates allows users and administrators to manage update installations on Windows 10, 11, and Windows Server. It helps prevent unexpected restarts by pausing or stopping updates through Settings, Registry Editor, Windows Update Service, or Group Policy Editor, improving system stability.
Below are the methods to disable Windows automatic update across Windows different versions:
- Settings App (Windows 10 and 11): Easily pause updates for 7 to 35 days through the Update & Security settings.
- Registry Editor (Windows 10, 11, and Windows Server 2008 and later): Modify the registry to permanently disable automatic updates by setting the No Auto Update value.
- Windows Update Service (Windows 10, 11, and Windows Server 2008 and later): Stop and disable the Windows Update service to prevent automatic updates.
- Group Policy Editor (Windows 10/11 Pro, Enterprise, Education, and Windows Server 2008 and later): Use the Group Policy Editor to disable Windows Automatic Updates across multiple systems.
Prerequisites to Disable Windows Automatic Updates
Before disabling Windows Automatic Updates, ensure you meet the following requirements:
- Administrative access to the system.
- For Windows 10 and Windows 11, make sure you’re using a Pro, Enterprise, or Education edition for certain methods.
- For Windows Server 2008 or later, ensure you have access to the Group Policy Editor or Services Manager.
- A backup of your system is recommended before making significant changes.
- Consider purchasing a Windows VPS for better control over updates and system settings.
Method 1: Using the Settings App [Simplest Way]
The simplest way for newbies how to disable Windows update will be the Settings app.
It provides instant access to your Windows update settings and allows you to disable Windows automatic updates with minimal technical knowledge.
Great, but this does NOT stop Windows 10 from updating!
Step 1: Open Windows Update Settings
To do this, go to Start > Settings > Update & Security > Windows Update.
This is where you can manage Windows update settings conveniently.
Step 2: Pause Updates Temporarily
Click Pause updates for 7 days to stop automatic updates Windows 10 for a short period.
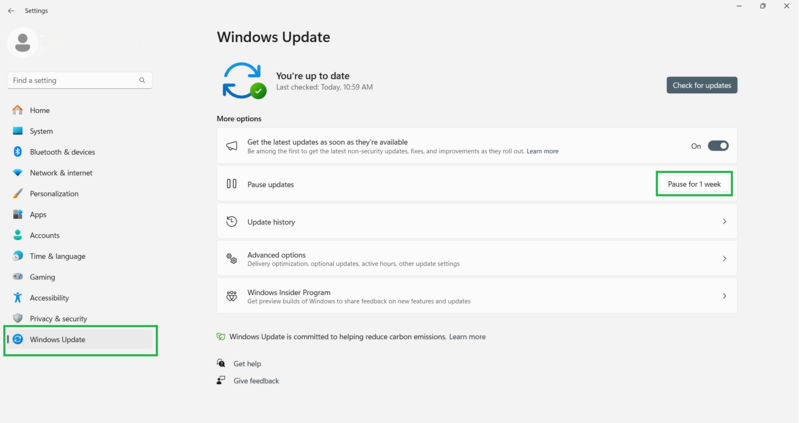
Step 3: Advanced Options for Longer Pauses
Under Advanced Options, extend the pause to delay updates and prevent automatic updates in Windows for up to 35 days.
Note: When ready again, click Resume updates to re-enable them.
Method 2: Using Registry Editor [Advanced and Precise Control]
The Registry Editor is another useful option for disabling how to disable updates Windows 10, Windows 11, and Windows Server,
It enables new fine-tuning options to prevent automatic updates in both versions of Windows.
However, care must be taken with this method because incorrect edits that break these relationships can cause the system to fail to boot or otherwise behave incorrectly or inconsistently.
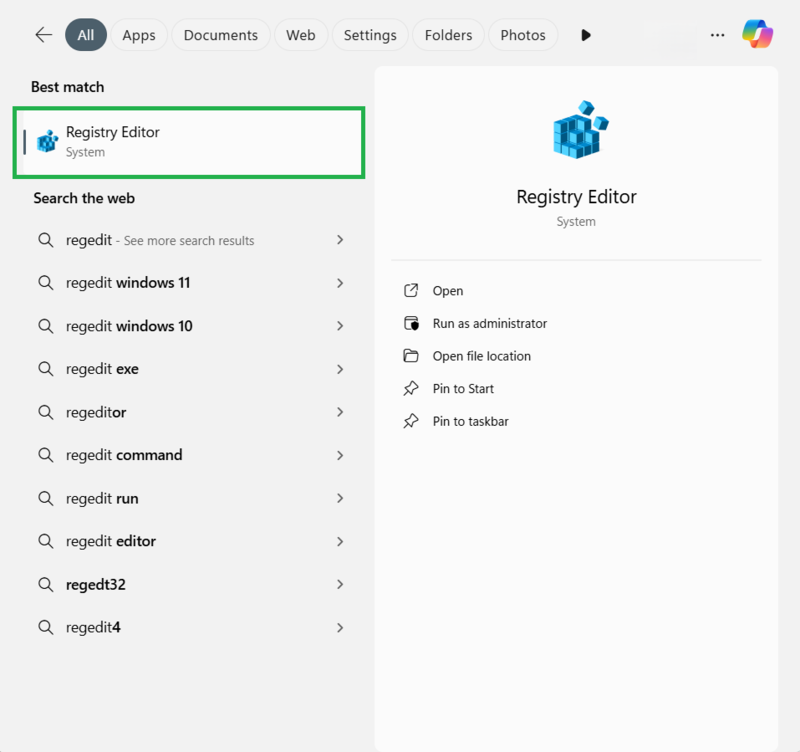
Step 1: Open the Registry Editor
Press the Start button, type regedit in the search bar, and click on the Registry Editor to open it.
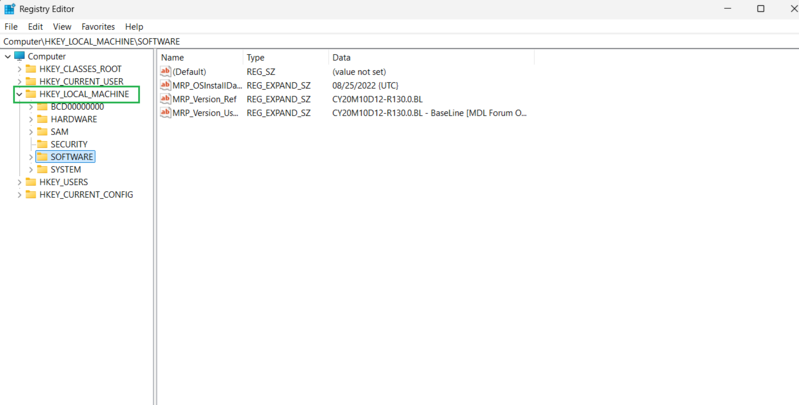
Step 2: Navigate to the Windows Update Key
In the Registry Editor, go to the following location:
HKEY_LOCAL_MACHINE\SOFTWARE\Policies\Microsoft\WindowsIf you don’t see the Windows folder, you will need to create it.
Step 3: Create the Windows Update Key
Right-click the Windows folder, select New, then choose Key. Name the new key Windows Update and press Enter.
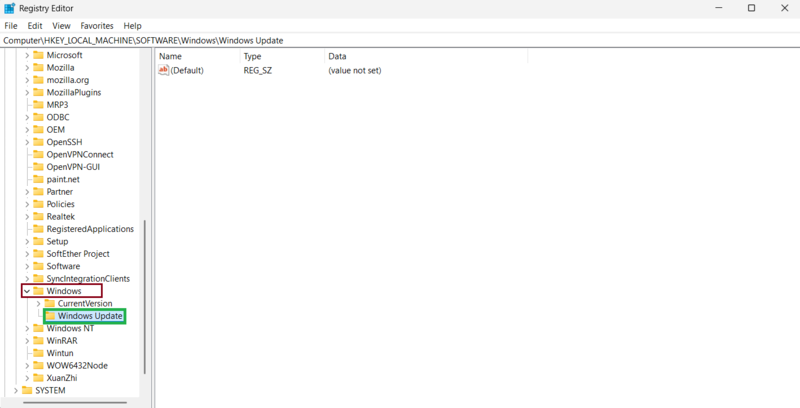
Step 4: Create the AU Subkey
Right-click the Windows Update key, select New, then choose Key again. Name this key AU and press Enter.
Step 5: Add the No Auto Update Value
Right-click the AU key, select New, and choose DWORD (32-bit) Value. Name the new value No Auto Update and press Enter.

Step 6: Modify the No Auto Update Value
Double-click the No Auto Update value and change the Value data from 0 to 1.
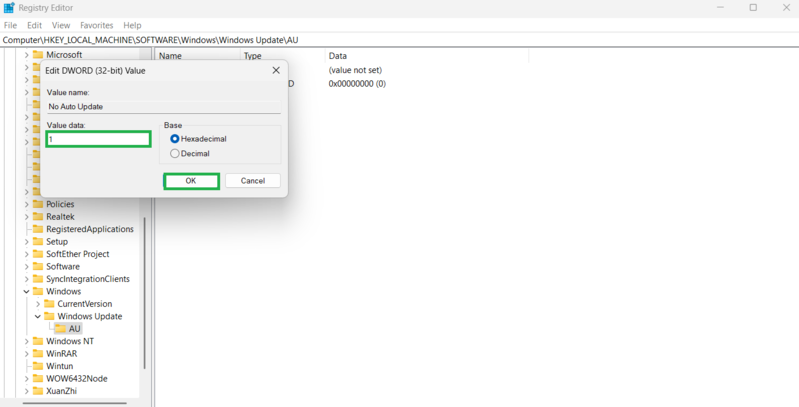
Click OK to apply the changes.
Step 7: Restart the Computer
Close the Registry Editor and restart your computer.
Once the system reboots, you will have successfully disable auto update Windows 10, Windows 11, and Windows Server and prevented Windows 11 from automatically downloading updates.
However, you can still manually check for updates through the Settings app if needed.
This process provides an effective solution for those wondering how to disable automatic updates Windows 10, 11, and Windows Server while maintaining control over when updates are installed.
Method 3: Using Windows Update Service [Administrators and IT Professionals]
Let’s go through the steps on how to disable Windows update by turning off the Windows Update Service.
This will completely block updates via the above methods, making it an effective way to turn off auto update on windows 10, 11, and Windows Server.
Note: The method is technical, and casual users should not use it.
Step 1: Open Services Manager
Press Win + R, type services.msc, and press Enter to open the services panel.
Step 2: Locate the Windows Update Service
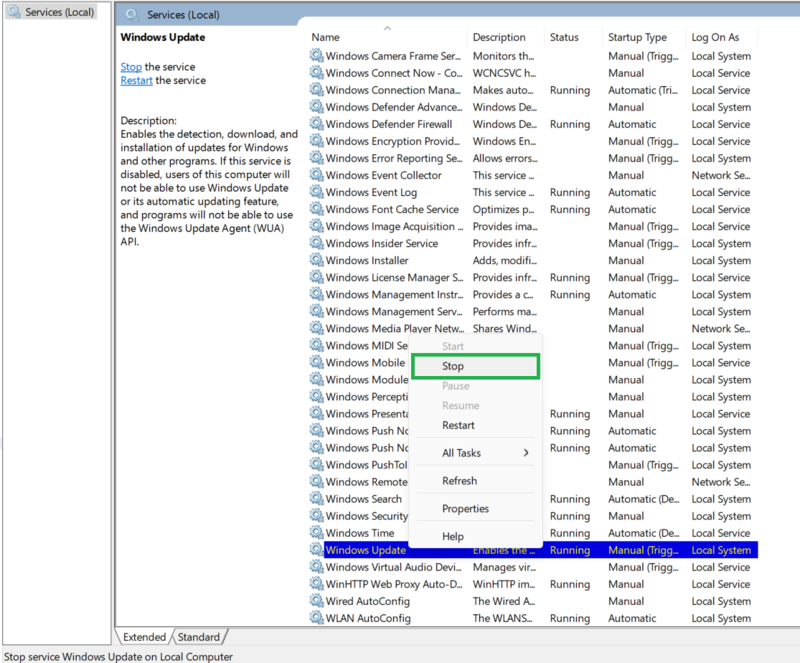
Scroll to find Windows Update in the list to turn off Windows automatic updates.
Step 3: Stop the Service
Right-click Windows Update, select Stop, and apply changes to stop Windows updates.
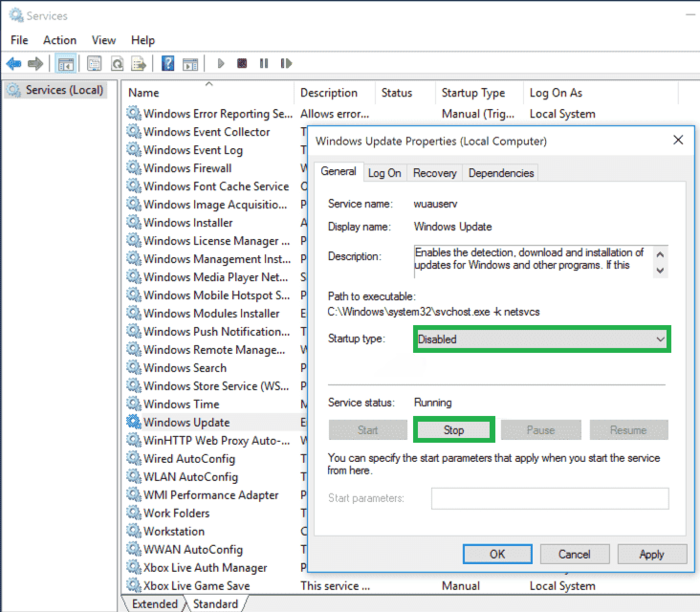
Step 4: Disable the Service Permanently
Set the Startup Type to Disabled to prevent automatic updates on Windows entirely.
Method 4: Using Group Policy Editor [IT Professionals & Advanced Users]
The Group Policy Editor is a more advanced option that educates users on how to turn off Windows auto update in a more permanent manner.
This approach is particularly well-suited for IT admins maintaining numerous devices, and efficiently managing updates across Windows 10, Windows 11, and Windows Server.
Step 1: Launch Group Policy Editor
Press Win + R, type gpedit.msc, and press Enter to open the editor.
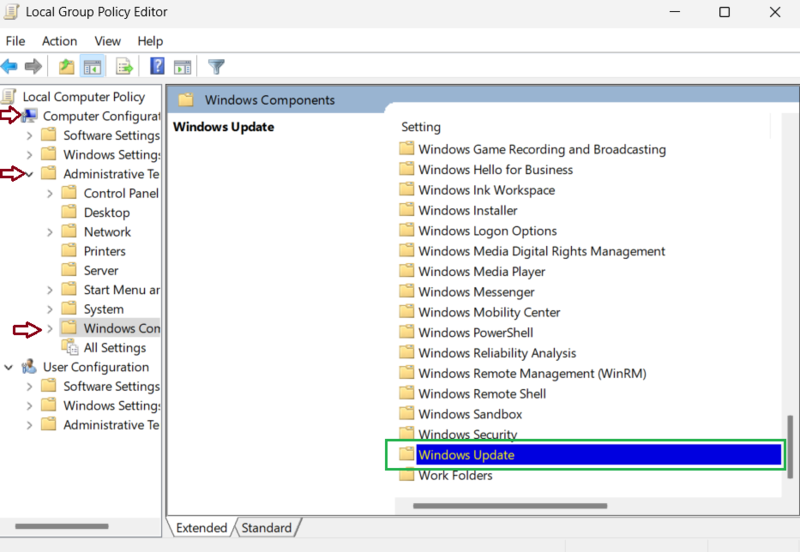
Step 2: Navigate to Update Policies
Go to: Computer Configuration > Administrative Templates > Windows Components > Windows Update.
Step 3: Configure Automatic Updates
Double-click Configure Automatic Updates on the right. Select Disabled to completely turn off Windows automatic updates and click OK.

Conclusion
Business owners who wish to disable Windows automatic updates have several methods at their disposal, ranging from simple temporary pauses in the Settings app to advanced registry and group policy configurations suitable for enterprise environments. Each method balances control, complexity, and permanence differently, allowing you to choose the best fit based on your technical expertise and business needs.
Disabling automatic updates prevents unwanted disruptions, supports stability, and ensures that update deployments fit your operational requirements. However, maintaining security through timely manual updates is crucial to protecting your business infrastructure.
By following the outlined methods and best practices, you can effectively disable Windows automatic updates across your devices, enhancing your control over your IT environment and minimizing unforeseen interruptions.
FAQ
2. What prerequisites should I meet before disabling Windows Automatic Updates?
You need administrative access to the system, and for certain methods, a Windows Pro, Enterprise, or Education edition is required. Creating a system backup is also recommended to safeguard data.
3. How can I temporarily pause Windows Automatic Updates using Windows Settings?
Navigate to Start > Settings > Update & Security > Windows Update. Use the Pause updates option to delay updates for up to 35 days without permanently disabling the feature.
4. What is the Registry Editor method to disable Windows Automatic Updates, and who should use it?
This advanced method involves modifying system registry keys to permanently disable updates. It is suitable for advanced users or IT professionals due to the risk of system issues if applied incorrectly.
5. How can IT administrators disable automatic updates across multiple business computers?
IT administrators can use the Group Policy Editor to disable automatic updates across multiple devices, ensuring consistent update management and system stability within the organization.
6. Is there a way to completely stop Windows Automatic Updates via Windows services?
Yes, by stopping and disabling the Windows Update service through the Services Manager (services.msc), but this method is technical and recommended only for IT professionals.
7. Will disabling Windows Automatic Updates affect my ability to install important updates later?
No. Disabling automatic updates prevents updates from installing automatically but still allows manual updates through the Settings app when desired.
8. What risks should business owners consider when disabling Windows Automatic Updates?
Disabling automatic updates may expose systems to security risks if critical patches are not installed timely. Thus, manual updates and proper update policies are essential.
9. Can disabling Windows Automatic Updates improve system performance for business users?
Yes, it can help avoid unexpected system slowdowns during update installations, improving overall productivity and reducing downtime in a business environment.
10. Are these methods applicable to all Windows versions used in businesses?
These methods apply to Windows 10, Windows 11, and Windows Server editions from 2008 and later, with some variations depending on the Windows edition and user privileges.