Enable Microphone on Windows Server and Windows 10
Enable microphone on Windows systems including Windows Server and Windows 10 by configuring Remote Desktop settings, adjusting privacy permissions, and ensuring audio services are active. This guide covers step-by-step instructions for optimal microphone use locally and remotely.
🤖AI Overview:
This comprehensive guide explains how to enable and configure a microphone on Windows operating systems, including Windows Server and Windows 10. It details key system settings adjustments, Remote Desktop configurations, privacy permissions, and troubleshooting tips to ensure effective microphone use in local and remote scenarios.
To ensure your microphone works seamlessly, you need to follow the below steps:
On Windows Server:
- Check RDP client settings.
- Configure local resources.
- Enable microphone recording for remote desktop use.
- Install Remote Desktop Services roles
- Enable Windows Audio Service
- Adjust microphone privacy settings.
On Windows 10:
- Connect your microphone.
- Open Sound settings.
- Choose your input device.
- Test and adjust microphone sensitivity.
- Ensure apps have access by configuring privacy settings.
Complete Guide to Enable Microphone on Windows Server
Follow these step-by-step instructions to complete the necessary actions after purchasing Windows VPS to enable the microphone and setting up communication apps.
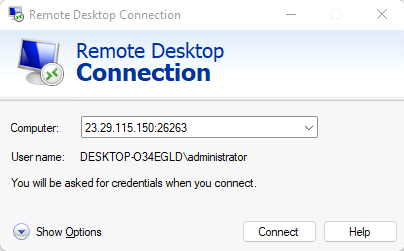
Step 1: Check RDP Client Settings
- Launch the Remote Desktop Connection application on your local machine.
- Click Show Option in the bottom left corner for the advanced settings menu.
Step 2: Configure Local Resources
- Click on the Local Resources tab in the Remote Desktop Connection window.
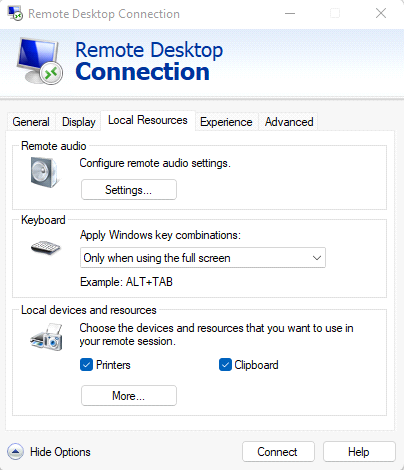
- Press the Settings… button under the Remote audio section.
Step 3: Enable Microphone Recording
- Ensure that the Play on this computer option is ticked in the Remote audio settings.
- Set the Record from this computer option to enable microphone input.
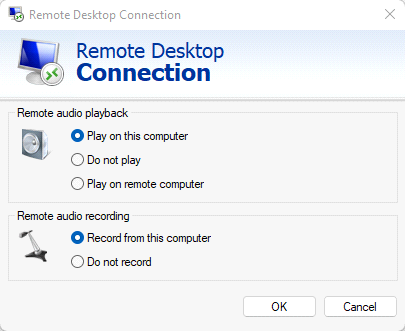
- Click OK to save your settings and then connect to the remote desktop.
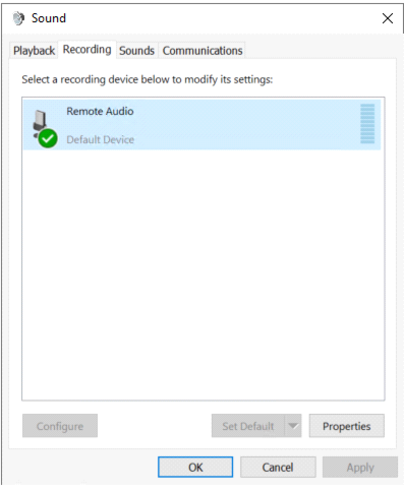
- On the remote desktop, right-click the sound icon in the taskbar and select Sounds. Navigate to the Recording tab and check for “Remote Audio.”
Step 4: Install Roles and Features (For Windows Server)
- In your server, click on Add roles and features under the Configure this local server heading.
- Select Role-based or feature-based installation and then choose your server.
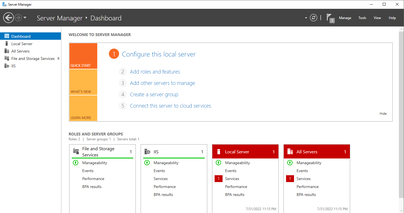
- On the Server Roles screen, find and tick Remote Desktop Services. Click Next three times.
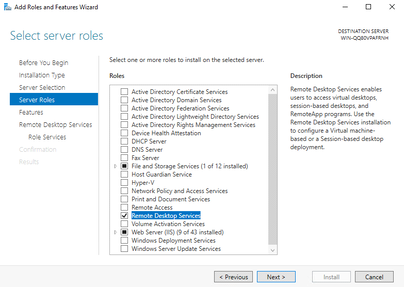
Step 5: Install Remote Desktop Service Roles
To ensure optimal microphone and sound performance, select the following:
- Remote Desktop Connection Broker.
- Remote Desktop Gateway.
- Remote Desktop Session Host.
- Remote Desktop Web Access.
Then, click Next until you can click the Install button. After installation, restart your server.
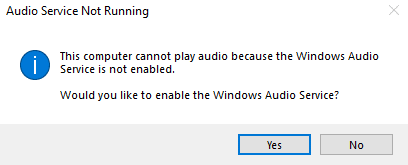
Step 6: Enable Windows Audio Service
- If you see a red cross on the sound icon in the taskbar, right-click it and check the audio service status.
- Windows Server may prompt you to enable the Windows Audio Service. Click Yes to proceed.
Step 7: Configure Microphone Privacy Settings
- To adjust Microphone permissions, search for Microphone privacy settings in the server settings.
- Ensure that Allow apps to access your microphone is turned on.
That’s it! By following these steps, you should now have your microphone enabled and operational on your Windows Server or Windows 10 machine.
Whether you are using VoIP applications or other audio features, these configurations will enhance your remote desktop experience.
Steps to Set Up and Configure a Microphone in Windows 10
Setting up a microphone in Windows 10 is simple, but it’s essential to follow each step to ensure everything is working correctly.
Below is a step-by-step guide to help you enable and configure your microphone on your system.
Step 1: Connect Your Microphone
Before configuring your microphone settings, ensure that your microphone is properly connected to your computer.
Most microphones connect via USB, 3.5mm audio jack, or Bluetooth (for wireless models). Make sure it’s plugged in securely or paired if using a wireless microphone.
Step 2: Open Sound Settings
- Click the Start button, which is the Windows icon typically located in the bottom-left corner of your screen.
- Once you click on the Start menu, select the “Settings” option (the gear icon)
- Within the Settings window, select “System.” This will open the system settings for your PC.
- From the left-hand menu, click on “Sound.” This section manages all audio input and output devices connected to your PC.
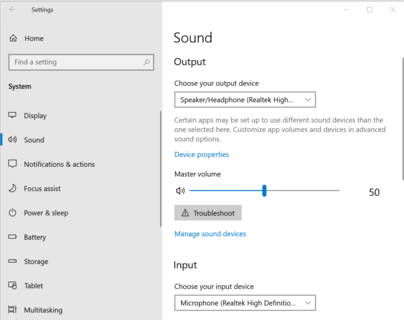
Step 3: Choose Your Input Device (Microphone)
- In the Sound settings window, scroll down to the “Input” section.
- In the “Choose your input device” dropdown list, select the microphone you wish to use. This list will show all available recording devices connected to your PC.
Note: If your microphone doesn’t appear in the list, ensure it’s correctly connected, and check your drivers.
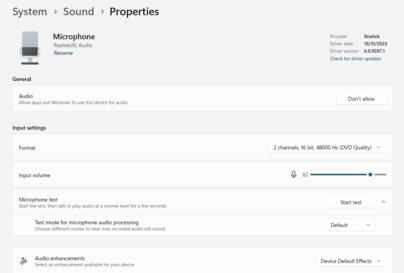
Step 4: Test Your Microphone
Testing your microphone ensures that it’s functioning correctly before you start using it for applications like voice recording, video calls, or streaming.
- After selecting your microphone, you will see an option to “Test your microphone” below the input device list.
- Speak into your microphone and watch for the blue bar that rises and falls as you talk. This indicates that Windows is detecting sound input from your microphone.
- If the bar doesn’t move when you speak, it means the microphone isn’t detecting any input.
- In this case, proceed to troubleshoot the issue by clicking on the “Troubleshoot” button provided. This will open a diagnostic tool that helps you resolve hardware or software issues preventing your microphone from working.
Step 5: Adjust Microphone Settings for Better Performance (Optional)
Once your microphone is working, you may want to adjust its sensitivity or volume.
- To rename the device and adjust the microphone volume, click on “Device properties” under the Input section.
- You can increase or decrease the volume depending on how sensitive you want your microphone to be.
- Under “Related Settings,” click on “Additional device properties.”
- This will open a window with advanced settings for your microphone, where you can fine-tune the input levels or enable sound enhancements.
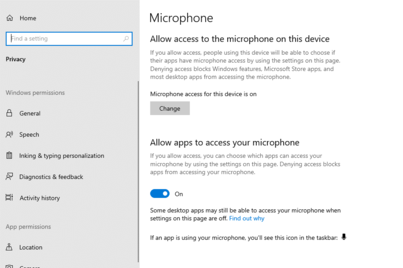
Step 6: Grant Microphone Access to Apps (If Necessary)
Some apps may require explicit permission to use your microphone, especially if you’re using communication software like Zoom, Skype, or Microsoft Teams.
- From the Settings window, select “Privacy.
- Under the “App permissions” section on the left-hand side, click on “Microphone.”
- Make sure the “Allow apps to access your microphone” setting is turned ON.
- Below, you can enable or disable microphone access for individual apps. Make sure the apps you want to use are granted permission to access your microphone.
How to troubleshoot Microphone Issues
If your microphone still isn’t working properly, here are a few additional troubleshooting steps:
- Check Physical Connection:
Ensure the microphone is correctly plugged into the appropriate port or paired properly via Bluetooth.
- Update or Reinstall Drivers:
Go to Device Manager (right-click the Start button > Device Manager), find your microphone under “Audio inputs and outputs,” right-click on it, and select “Update driver” or “Uninstall device” followed by reinstalling it.
- Ensure No Hardware Issues:
Test the microphone on another device to rule out hardware failure.
Reasons to Enable Microphone on Windows Server & Windows 10
Enabling the microphone on Windows Server and Windows 10 is crucial for various use cases.
Windows 10 allows users to participate in voice calls, video conferencing, and voice recording for communication apps like Skype, Zoom, or Teams.
For Windows Server, enabling the microphone can enhance remote desktop sessions by allowing users to interact with audio-intensive applications like VoIP software or voice recognition tools.
Additionally, this setup is essential for businesses relying on cloud-based virtual desktops, improving productivity and user experience by enabling:
- VoIP communication in remote environments.
- Audio streaming and recording for webinars or meetings.
- Voice-enabled applications such as transcription or AI-driven software.
Why isn’t my microphone showing up in Windows 10?
To troubleshoot this issue, ensure the microphone is correctly connected and check that it appears in the “Input” section of Sound settings.
If not, verify that the device is not disabled, and try updating the microphone drivers via Device Manager.
Why can’t I hear any sound when using my microphone on Windows Server?
Check if the Windows Audio Service is enabled. Right-click the sound icon, select “Sounds,” and ensure your audio devices are active.
If you’re using Remote Desktop, ensure the microphone settings are properly configured under “Local Resources” in the RDP client.
How to fix low or poor microphone quality?
Navigate to Settings > Sound > Device properties and adjust the microphone volume or levels.
In “Additional device properties,” disable any unnecessary sound enhancements or increase the input level for better clarity.
Why does my microphone work in some apps but not others?
This is usually due to app-specific permissions. Go to Settings > Privacy > Microphone and make sure the affected apps have access to your microphone.
Conclusion
For business owners, the ability to enable microphone on Windows accurately and efficiently is a cornerstone of modern communication infrastructure. By following the outlined steps—verifying hardware, enabling settings within Windows, updating drivers, checking privacy permissions, and troubleshooting issues—businesses can ensure their teams remain connected through clear, reliable voice communication.
Emphasizing best practices in microphone management further safeguards operational continuity and data security. Enabling and maintaining microphone functionality on Windows systems supports a professional environment where productivity and client interactions thrive.
By investing time in these configurations and oversight, business owners optimize their technology assets, foster smoother communications, and sustain a competitive edge in today’s digitally driven marketplace.
FAQ
2. What steps are required to enable the microphone on a Windows Server through Remote Desktop Protocol?
On Windows Server, open the Remote Desktop Connection client, go to Local Resources, click Settings under Remote Audio, enable Record from this computer, and ensure Windows Audio Service is active on the server. Install necessary Remote Desktop Services roles if needed.
3. How can I grant microphone access to apps on Windows to improve communication?
Navigate to Settings, select Privacy, click on Microphone, and turn on Allow apps to access your microphone. Then enable access for individual apps you use for business communication like Zoom or Skype.
4. Why is my microphone not showing up in Windows Sound settings, and how can I fix it?
If the microphone is not listed, verify the physical connection, update or reinstall drivers via Device Manager, and ensure the device is enabled. Testing on another device can rule out hardware failure.
5. How do I troubleshoot no sound or poor microphone quality on Windows?
Check that the Windows Audio Service is enabled and properly configured. Adjust microphone volume and sensitivity in Device Properties under Sound settings. Disable unnecessary sound enhancements to improve clarity.
6. What should I do if my microphone works in some apps but not others on Windows?
This usually indicates app-specific permission settings. Confirm that the affected applications have microphone access enabled in the Privacy > Microphone settings on your Windows system.
7. How does enabling the microphone on Windows Server benefit remote desktop sessions for businesses?
Enabling the microphone allows audio input for VoIP applications, voice recognition, and multimedia collaboration during remote sessions, enhancing communication and productivity in virtual environments.
8. Are there any additional server roles to install to optimize microphone use on a Windows Server?
Yes, installing Remote Desktop Services roles such as Connection Broker, Gateway, Session Host, and Web Access helps optimize audio and microphone performance in remote environments.
9. What security or privacy settings should business owners configure when enabling microphones on Windows?
Ensure microphone privacy settings allow necessary apps to access the microphone without exposing it to untrusted applications, maintaining data security while enabling functional communication.
10. Can I adjust microphone sensitivity or volume on Windows to suit different business environments?
Yes, you can fine-tune microphone input levels and volume in the Additional Device Properties under Sound settings to optimize recording quality and minimize background noise for professional use.