Enable Remote Desktop Audio Easily in Windows
Enable Remote Desktop Audio allows sound from a remote Windows PC to play on your local device. Configure Remote Desktop audio settings and ensure the Windows Audio service is running on both machines.
🤖AI Overview:
Enable Remote Desktop Audio lets users hear sound from a remote Windows computer during a Remote Desktop session. It requires enabling audio redirection in Remote Desktop settings and ensuring the Windows Audio service is active on both the local and remote computers. Proper audio driver configuration is also essential for full functionality.
Quick Steps to Enable Remote Desktop Audio
If you’re having trouble with RDP audio, especially on servers, RDP VPS service can be the final solution.
Let’s go through the steps of this guide to Enable Audio over a remote desktop connection:
Step 1: Fire up Remote Desktop
- Click on the Start menu or the Windows icon.
- To launch the Remote Desktop Connection application, in the search bar, type:
mstsc.exe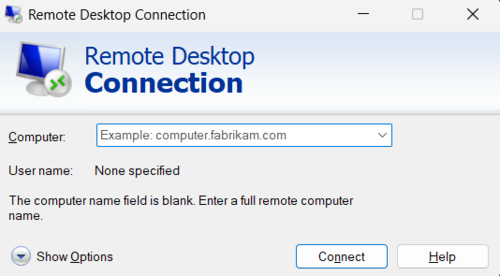
You’ll also need to enter your username (usually administrator) and password.
You should find this information in the setup email you received after your VPS was activated.
Step 2: Double-check the Windows Audio Service
Let’s see if the Windows Audio service is running on your VPS.
- Go to the Start menu, type “Services.msc” and press enter.
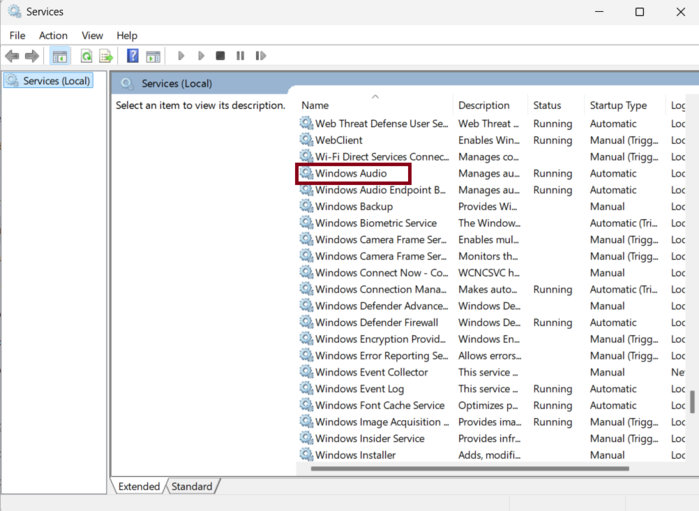
- Find “Windows Audio” on the list and double-click on it.
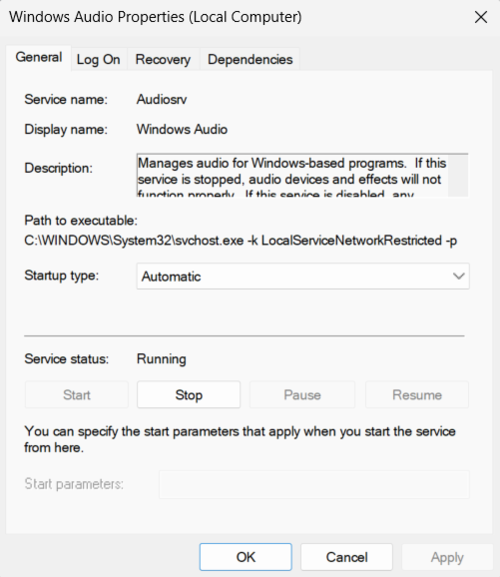
- If it’s not already set to “Automatic“, change the “Startup type” to that and click “OK“.
- Then, hit the “Start” button to get the service running right away.
- Try playing some audio on your VPS.
- If you hear it, then great! If not, move on to the next step.
Step 3: Turn on Remote Desktop Audio
- Open Remote Desktop and click “Show Options“.
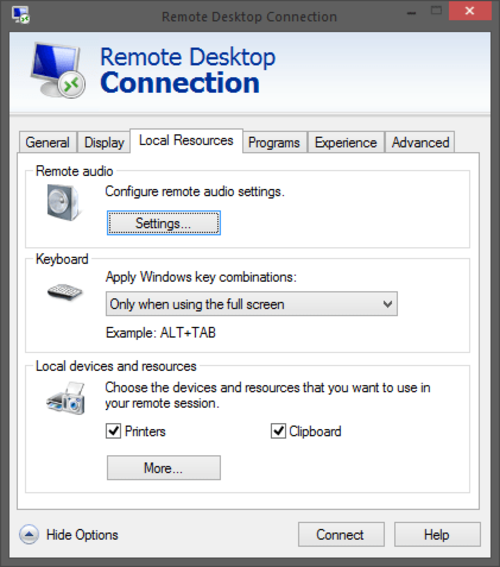
- Go to the “Local Resources” tab and click “Settings” under “Remote Audio“.

- Make sure “Remote Audio Playback” is set to “Play on this computer“.
- If you want to use the microphone on the remote computer, enable “Remote audio recording” as well.
- If you hear the startup sound when you log in to the VPS, you can skip to the next step of application configuration. If not, keep reading.
Step 4: Adjust Remote Desktop Properties (for remote computer):
- On the remote computer, open “tscc.msc“.
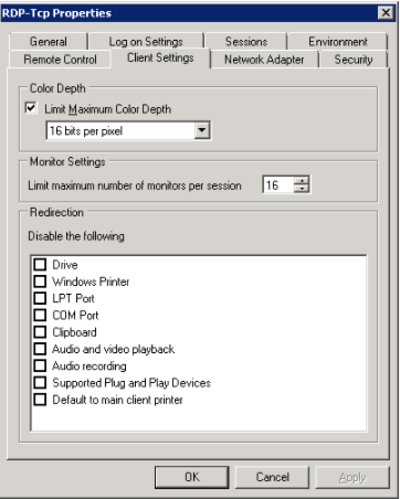
- In the left panel, find the “Connections” folder and right-click on “RDP-Tcp“.
- Choose “Properties” and then click on the “Client Settings” tab.
- There’s a checkbox for “Audio Mapping“.
- Make sure it’s checked. By default, audio is disabled on Remote Desktop, so you’ll want to enable it here.
- Click “OK” and then close the window.
- You might see a message saying this change won’t affect existing connections.
- Just click “OK” on that message, log out, and log back in.
- You should hear the startup sound now. If not, move on to the last step.
Step 5: Configure Audio for Applications
Let’s make sure all your applications on the VPS are set up for audio properly:
- Open the sound control panel on the VPS and go to the “Audio” tab.
- If it’s not already selected, choose “Microsoft RDP Audio Driver” as the default playback device.
- There’s a checkbox at the bottom that says “Use Default Devices Only“.
- Make sure that’s checked. Then go to the “Voice” tab and pick “Microsoft RDP Audio Driver” as the default playback system here as well.
- Click “OK” to save these changes.
That’s it! You should now be able to hear audio from your VPS through your local computer whenever you use Remote Desktop.
Remote Desktop audio not working
Remote Desktop audio issues can be caused by a few things.
To solve it:
- Check if the Windows Audio service is running on both the local and remote machines.
- Enable “Remote Audio Playback” on your local machine’s Remote Desktop settings.
- If you need microphone access, enable “Remote Audio Recording” as well.
- Finally, ensure audio is configured correctly within your VPS applications.
If you’re still having trouble, consider restarting your computer or updating audio drivers.
Why is there no sound on my Remote Desktop connection?
There are several reasons why you might not hear audio:
Windows Audio Service: Ensure this service is running on both your local and remote machines.
Remote Audio Settings: Check if “Remote Audio Playback” is enabled in your local machine’s Remote Desktop settings.
Microphone access requires enabling “Remote Audio Recording” as well.
Application Audio Configuration: Make sure applications on the remote machine are set to use the “Microsoft RDP Audio Driver” for playback and recording.
How do I enable audio playback on Remote Desktop?
On your local machine, open Remote Desktop settings, go to “Local Resources,” and under “Remote Audio,” select “Play on this computer” for “Remote Audio Playback.”
How do I enable microphone access on Remote Desktop?
In the same Remote Desktop settings as above, under “Remote Audio,” enable the option “Remote Audio Recording.”
However, this feature might be limited on server versions of Windows.
Conclusion
Enabling Remote Desktop audio is a crucial step for business owners aiming to foster effective remote work environments.
By properly configuring both client and server settings, optimizing performance, and adhering to security best practices, organizations can provide remote users with a rich multimedia experience that supports communication and collaboration.
This leads to increased productivity and user satisfaction, ultimately benefiting business operations. Following the detailed steps outlined in this guide, business owners can confidently enable Remote Desktop audio, ensuring their teams stay connected and engaged regardless of location.
FAQ
2. How can I confirm the Windows Audio Service is active for Remote Desktop Audio?
Open the Services application (services.msc) on the remote computer, locate Windows Audio service, set its Startup type to Automatic, and start the service if it is not running.
3. How do I enable microphone access during a Remote Desktop session?
In Remote Desktop settings under Local Resources and Remote Audio, enable Remote Audio Recording to allow microphone use. Note that this feature may not be available or fully functional on some Windows server versions.
4. What Remote Desktop Properties must be configured to allow audio redirection?
On the remote system, open Terminal Services Configuration (tscc.msc), locate the RDP-Tcp connection properties, and ensure the audio mapping option is enabled on the Client Settings tab to permit audio.
5. How can I ensure audio applications use Remote Desktop Audio correctly?
Set the default playback and recording devices on the remote computer to Microsoft RDP Audio Driver within the sound control panel. Check the Use Default Devices Only option for consistent audio output.
6. What are common reasons for no sound on a Remote Desktop connection?
Audio may fail if the Windows Audio service is stopped, Remote Audio Playback is disabled locally, audio drivers are outdated, or the audio settings on the remote machine are misconfigured.
7. What troubleshooting steps can help if Remote Desktop Audio is not working?
Verify the Windows Audio service status on both local and remote machines, confirm audio playback and recording settings in Remote Desktop, restart both computers, and update sound drivers on all systems.
8. Can audio redirection issues be caused by group policy settings?
Yes, group policy configurations on the remote server might restrict audio redirection. Administrators should review related policies to ensure audio is not blocked.
9. Is Remote Desktop Audio supported on all versions of Windows?
Most personal and server Windows versions support Remote Desktop Audio, but functionality may vary, especially microphone recording features on server editions.
10. How does enabling Remote Desktop Audio benefit business owners using remote servers?
It allows seamless audio playback and recording during remote sessions for video conferences, presentations, or multimedia applications, improving communication and operational efficiency.