How to Install GO on Ubuntu
Go (Golang) is a statically typed, compiled programming language designed by Google.
It’s known for its simplicity, efficiency, and concurrency features, making it well-suited for building scalable and reliable applications.
On Linux Ubuntu, Go’s performance, cross-platform compatibility, and strong community support make it an excellent choice for a wide range of projects.
To install Go on Ubuntu, 5 easy steps are required:
- Download the Go Binary.
- Unzip the Tarball File.
- Set the Environment Variables.
- Verify the Installation.
- Start Go on Ubuntu.
There are also two more methods you can choose for Go installation on Ubuntu that are explained in this tutorial.
Prerequisites to Install Go on Ubuntu
Before installing Go on Ubuntu, make sure your system is meeting the below specifications:
- A Linux VPS running Ubuntu.
- A non-root user with
sudoprivileges.
5 Easy Steps to Install Go on Linux Ubuntu
For web development and system programming to data science and machine learning, Go is a popular programming language.
Let’s go through the quick steps of this guide to learn how to Install Go on Ubuntu.
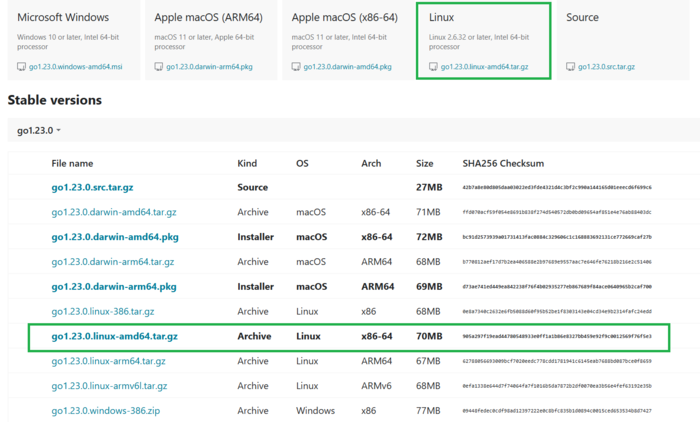
Step 1: Download the Go Binary Package
To download the Go binary, visit the official Go website and download the appropriate binary for your system architecture.
Here, we choose Linux-amd64.
Step 2: Extract the archive
Once the download process is finished, move the downloaded archive to your desired location (e.g., /usr/local).
Then, run the command below to extract the archive:
sudo apt updatetar -xvf go1.xx.x.linux-amd64.tar.gzNote: Replace go1.xx.x.linux-amd64.tar.gz with the actual filename of the downloaded archive.
Step 3: Set the Environment Variables
Open your shell’s configuration file (e.g., .bashrc or .zshrc):
$ nano ~/.bash_profileThen, add the following lines to the end of the file:
export PATH=$PATH:/usr/local/go/binNote: Replace /usr/local/go with the actual path where you extracted the Go binary.
Once you are done, save the file and close your shell.
Step 4: Verify the Installation
Go must have been installed successfully by this step.
Open a new terminal window, run the command below, and press Enter to check the installation status and version:
go versionIf the installation was successful, you should see the installed Go version.
Once Install latest Go version Ubuntu is finished, you are ready to use Go on Ubuntu.
Step 5: Start Using Go
You can now create and run Go programs using the go command.
For example, to create a new Go project, type:
go mod init myprojectUse the following command to run a Go program:
go run main.goThat’s it! You have successfully installed Go on your Linux Ubuntu system.
Quick Guide to Install Go on Ubuntu via APT Package Manager
Using APT Package Manager (while enabled), you can install Go on Ubuntu. If you prefer this method which is most recommended, follow the below steps:
Step 1: Update APT Repository Cache
Run the command below to ensure that the APT package manager has the latest information about available packages:
sudo apt updateStep 2: Add Go’s APT Repository
Once Go is not included in the default Ubuntu repositories, use the following command to add its official repository to make the Go packages available for installation:
sudo add-apt-repository ppa:golang/golang-1.20Note: Replace 1.20 with the desired Go version if you want a specific one.
Step 3: Update APT Repository Cache Again
Updates the APT cache again to include the packages from the newly added repository:
sudo apt updateStep 4: Install Go
Now, install Go using the apt package manager.
Run the command below to install the golang-go package, which contains the Go compiler, tools, and libraries:
sudo apt install golang-goStep 5: Installation Verification
To check if Go is installed correctly, run:
go versionOnce you use the check Go version Ubuntu command, you should see the installed Go version.
How to Install Go on Ubuntu from Snap Package
To install Go on Linux Ubuntu using Snap, the Snap package manager must have been enabled. If it is not enabled on your system, run:
sudo apt install snapdThen, you are ready to Install Go via Snap. to do this, run the command below and Install Go from the Snap Store:
sudo snap install goOnce you are finished, you can verify the installation by running the command below:
go versionif Go is installed correctly, you should see the installed Go version.
Note: Snap automatically updates packages to the latest versions.
How to Uninstall Go on Linux Ubuntu
According to the method you have used to Install Go on Ubuntu, refer to the related method to uninstall it.
Method 1: Manual Removal [Binary Installation]
If you installed Go manually by downloading and extracting the binary, you can remove it by following the below path:
- Locate the Go installation directory that is typically
/usr/local/go. - Delete the directory using the following command to remove the directory and its contents:
sudo rm -rf /usr/local/go- Remove environment variables. If you set environment variables for Go, remove them from your shell’s configuration file (e.g.,
.bashrc,.zshrc).
Method 2: Using APT Package Manager
If you installed Go using APT, you can uninstall it using the following command:
sudo apt remove golang-goThis will remove the Go package and its dependencies.
Method 3: Using Snap Package Manager
If you installed Go using Snap, you can uninstall it using the following command:
sudo snap remove goThis will remove the Go package and its associated files.
Is it possible to Install multiple versions of Go on the same Ubuntu system?
Yes, you can use different package managers or manual installations to manage multiple Go versions.
However, be cautious about environment variable conflicts and ensuring you use the correct version for your projects.
How to fix ”go: cannot find main.go” Error?
To troubleshoot the Go installation on Ubuntu, consider:
- Ensure you’re in the correct directory containing your Go source code.
- Verify that the main package file is named
main.go.
What is ” go: tool not found: govet” Error?
Govet is a tool that requires additional installation. Use the following command to install it:
go get golang.org/x/tools/go/analysis/passes/vetHow to Troubleshoot ”go: cannot find package” Error?
To solve this issue:
- Verify that the package name is correct and that it’s in your module’s
go.modfile. - Use
go getto download the package if it’s missing.
Conclusion
In this article, we’ve explored three distinct methods to install Go on Ubuntu: Manual Installation, APT, and Snap.
Each approach offers its advantages and considerations, allowing you to choose the method that best suits your preferences and specific project requirements.
Once Go is installed, you can leverage its powerful features to develop a wide range of applications, from web servers and command-line tools to data analysis pipelines and more.