How to Install Hadoop on Ubuntu?
Hadoop is a distributed computing framework for processing and storing massive datasets. It runs on Ubuntu and offers scalable data storage and parallel processing capabilities.
Installing Hadoop enables you to efficiently handle big data challenges and extract valuable insights from your data.
To Install Hadoop on Ubuntu, the below steps are required:
- Install Java.
- Create a User.
- Download Hadoop.
- Configure Environment.
- Configure Hadoop.
- Start Hadoop.
- Access Web Interface.
Prerequisites to Install Hadoop on Ubuntu
Before installing Hadoop on Ubuntu, make sure your system is meeting below specifications:
- A Linux VPS running Ubuntu.
- A non-root user with
sudoprivileges. - Access to Terminal/Command line.
Complete Steps to Install Hadoop on Ubuntu
Once you provided the above required options for Hadoop installation Ubuntu including buying Linux VPS, you are ready to follow the steps of this guide.
In the end, you will be able to leverage its capabilities to efficiently manage and analyze large datasets.
Step 1: Install Java Development Kit (JDK)
- Since Hadoop requires Java to run, use the following command to install the default JDK and JRE:
sudo apt install default-jdk default-jre -y- Then, run the command below to Verify the installation by checking the Java version:
java -versionOutput:
java version "11.0.16" 2021-08-09 LTS
OpenJDK 64-Bit Server VM (build 11.0.16+8-Ubuntu-0ubuntu0.22.04.1)
As you see, if Java is installed, you’ll see the version information.
Step 2: Create a dedicated user for Hadoop & Configure SSH
- To create a new user, run the command below and create the Hadoop user:
sudo adduser hadoop- To add the user to the sudo group, type:
sudo usermod -aG sudo hadoop- Run the command below to switch to the Hadoop user:
sudo su - hadoop- To install OpenSSH server and client, run:
sudo apt install openssh-server openssh-client -y- Then, generate SSH keys by running the following command:
ssh-keygen -t rsaNotes:
Press Enter to save the key to the default location.
You can optionally set a passphrase for added security.
- Now, you can add the public key to authorized_keys:
cat ~/.ssh/id_rsa.pub >> ~/.ssh/authorized_keys- To set permissions on the authorized_keys file, run:
sudo chmod 640 ~/.ssh/authorized_keys- Finally, you are ready to test SSH configuration:
ssh localhostNotes:
If you didn’t set a passphrase, you should be logged in automatically.
If you set a passphrase, you’ll be prompted to enter it.
Step 3: Download the latest stable release
- To download Apache Hadoop, visit the Apache Hadoop download page. Find the latest stable release (e.g., 3.3.4) and copy the download link.
- Also, you can download the release using wget command:
wget https://downloads.apache.org/hadoop/common/stable/hadoop-3.3.4.tar.gz- Then, extract the downloaded file:
tar -xvzf hadoop-3.3.4.tar.gz- To move the extracted directory, run:
sudo mv hadoop-3.3.4 /usr/local/hadoop- Use the command below to create a directory for logs:
sudo mkdir /usr/local/hadoop/logs- Now, you need to change ownership of the Hadoop directory. So, use:
sudo chown -R hadoop:hadoop /usr/local/hadoopStep 4: Configure Hadoop Environment Variables
- Edit the .bashrc file using the command below:
sudo nano ~/.bashrc- Add environment variables to the end of the file by running the following command:
export HADOOP_HOME=/usr/local/hadoop
export HADOOP_INSTALL=$HADOOP_HOME
export HADOOP_MAPRED_HOME=$HADOOP_HOME
export HADOOP_COMMON_HOME=$HADOOP_HOME
export HADOOP_HDFS_HOME=$HADOOP_HOME
export YARN_HOME=$HADOOP_HOME
export HADOOP_COMMON_LIB_NATIVE_DIR=$HADOOP_HOME/lib/native
export PATH=$PATH:$HADOOP_HOME/sbin:$HADOOP_HOME/bin
export HADOOP_OPTS="-Djava.library.path=$HADOOP_HOME/lib/native"- To save changes and source the .bashrc file, type:
source ~/.bashrc- When you are finished, you are ready for Ubuntu Hadoop setup.
Step 5: Configure Hadoop Environment Variables
- First, edit the
hadoop-env.shfile by running the command below:
sudo nano $HADOOP_HOME/etc/hadoop/hadoop-env.sh- Now, you must add the path to Java. If you haven’t already added the
JAVA_HOMEvariable in your.bashrc file, include it here:
export JAVA_HOME=/usr/lib/jvm/java-11-openjdk-amd64
export HADOOP_CLASSPATH+=" $HADOOP_HOME/lib/*.jar"
Save changes and exit when you are done.
- Then, change your current working directory to
/usr/local/hadoop/lib:
cd /usr/local/hadoop/lib- The below command lets you download the javax activation file:
sudo wget https://jcenter.bintray.com/javax/activation/javax.activation-api/1.2.0/javax.activation-api-1.2.0.jar- When you are finished, you can check the Hadoop version:
hadoop version- If you have passed the steps correctly, you can now configure Hadoop Core Site. To edit the core-site.xml file, run:
sudo nano $HADOOP_HOME/etc/hadoop/core-site.xml- Add the default filesystem URI:
<configuration>
  <property>
    <name>fs.default.name</name>
    <value>hdfs://0.0.0.0:9000</value>
    <description>The default file system URI</description>
  </property>
</configuration>
Save changes and exit.
- Use the following command to create directories for NameNode and DataNode:
sudo mkdir -p /home/hadoop/hdfs/{namenode,datanode}- Then, change ownership of the directories:
sudo chown -R hadoop:hadoop /home/hadoop/hdfs- To change the ownership of the created directory to the hadoop user:
sudo chown -R hadoop:hadoop /home/hadoop/hdfs- To edit the
hdfs-site.xmlfile, first run:
sudo nano $HADOOP_HOME/etc/hadoop/hdfs-site.xml- Then, paste the following line to set the replication factor:
<configuration>
  <property>
    <name>dfs.replication</name>
    <value>1</value>
  </property>
</configuration>
Save changes and exit.
- At this point, you can configure MapReduce. Run the command below to edit the
mapred-site.xmlfile:
sudo nano $HADOOP_HOME/etc/hadoop/mapred-site.xml- To set the MapReduce framework, paste the following line:
<configuration>
  <property>
    <name>mapreduce.framework.name</name>
    <value>yarn</value>
  </property>
</configuration>
Save changes and exit.
- To configure YARN, run the command below and edit the
yarn-site.xmlfile:
sudo nano $HADOOP_HOME/etc/hadoop/yarn-site.xml- Paste the following to enable the MapReduce shuffle service:
<configuration>
  <property>
    <name>yarn.nodemanager.aux-services</name>
    <value>mapreduce_shuffle</value>
  </property>
</configuration>
Save changes and exit.
- Format the NameNode by running the following command:
hdfs namenode -formatThis initializes the Hadoop Distributed File System (HDFS).
Step 6: Start the Hadoop Cluster
- Run the command below to start the NameNode and DataNode:
start-dfs.sh- To start the ResourceManager and NodeManager, run:
start-yarn.sh- Check running processes by running the command below:
jpsYou should see processes like NameNode, DataNode, ResourceManager, and NodeManager running.
If all is correct, you are ready to access the Hadoop Web Interface.
Step 7: Open the web interface
- While you know your IP, navigate to http://localhost:9870 in your web browser:
http://Your-server-IP:9870You should see the Hadoop web interface.

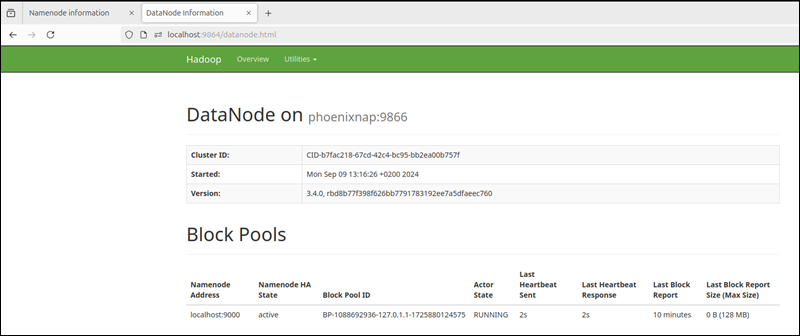
- To access the DataNodes, use the URL
http://your-server-ip:9864to view the below screen:
- Also, you can use the URL
http://your-server-ip:8088to access the YARN Resource Manager as you see below:
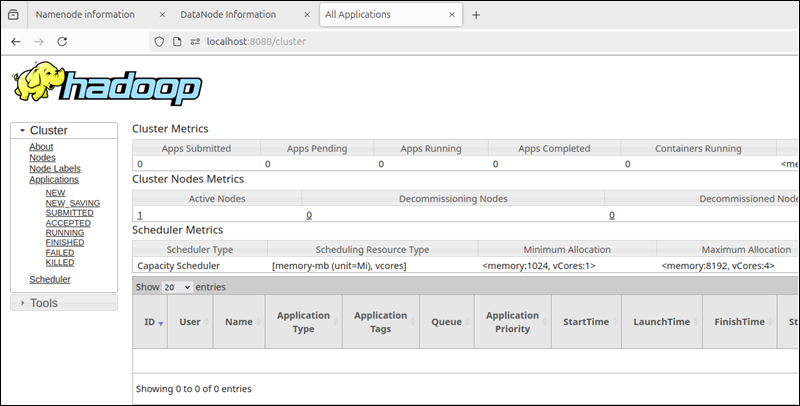
The Resource Manager is an indispensable tool for monitoring all the running processes within your Hadoop cluster.
What is Hadoop and Why Install it on Linux Ubuntu?
Hadoop is a distributed computing framework designed to process and store massive amounts of data efficiently.
It runs on various operating systems, including Ubuntu, and offers scalable data storage and parallel processing capabilities.
Installing Hadoop on Ubuntu empowers you to handle big data challenges, extract valuable insights, and perform complex data analysis tasks that would be impractical on a single machine.
What are the best Features and Advantages of Hadoop on Ubuntu?
- Scalability: Easily scale Hadoop clusters to handle growing data volumes by adding more nodes.
- Fault Tolerance: Data is replicated across multiple nodes, ensuring data durability and availability.
- Parallel Processing: Hadoop distributes data processing tasks across multiple nodes, accelerating performance.
- Cost-Effective: Hadoop can run on commodity hardware, making it a cost-effective solution for big data processing.
- Open Source: Hadoop is freely available and has a large, active community providing support and development.
- Integration with Other Tools: Hadoop integrates seamlessly with other big data tools like Spark, Hive, and Pig, expanding its capabilities.
- Flexibility: Hadoop supports various data formats and can be customized to meet specific use cases.
What to do after Installing Hadoop on Ubuntu?
- Configure and start the Hadoop cluster: Set up Hadoop services like the NameNode, DataNode, ResourceManager, and NodeManager.
- Load data into HDFS: Upload your data files to the Hadoop Distributed File System (HDFS) for storage and processing.
- Run MapReduce jobs: Use MapReduce to perform data processing tasks, such as word counting, filtering, and aggregation.
- Use other Hadoop components: Explore tools like Hive, Pig, and Spark for more advanced data analysis and machine learning tasks.
- Monitor and manage the cluster: Use the Hadoop web interface to monitor resource usage, job execution, and troubleshoot issues.
- Integrate with other systems: Connect Hadoop to other applications and databases for data pipelines and workflows.
How to Monitor the Performance of the Hadoop Cluster?
Use the Hadoop web interface to monitor resource usage, job execution, and other metrics.
You can also use tools like Ganglia or Nagios for more advanced monitoring.
Why Hadoop Services are Not starting on Ubuntu?
There could be several reasons for this. To troubleshoot, consider:
- Configuration errors: Verify that your configuration files (core-site.xml, hdfs-site.xml, etc.) are correct and contain the necessary properties.
- NameNode format: Ensure that you’ve formatted the NameNode using
hdfs namenode -format. - Port conflicts: Check if other applications are using the ports specified in your Hadoop configuration (e.g., 9000 for NameNode).
- Firewall issues: Make sure your firewall is configured to allow Hadoop services to communicate.
How to Troubleshoot issues with HDFS?
Use the hdfs dfs -ls command to list files and directories in HDFS.
If you encounter errors, check the logs for clues. You can also use the hdfs dfs -tail <filename> command to view the latest lines of a log file.
Why My MapReduce jobs are failing?
There could be several reasons for job failures, including:
- Input/output errors: Ensure that your input and output paths are correct and that the data format is compatible with your MapReduce job.
- Job configuration issues: Check your job configuration for errors or inconsistencies.
- Resource limitations: If your cluster is under heavy load, your job might fail due to insufficient resources.
- Programming errors: Review your MapReduce code for logical errors or bugs.
Conclusion
The steps of this guide help you to successfully install and configure Hadoop, enabling you to efficiently process and store massive datasets.
By successfully following the steps outlined in this tutorial, you’ve unlocked the potential of Hadoop on your Ubuntu system.
To optimize Hadoop performance, consider tuning your Hadoop configuration based on your specific workload and hardware.