Install and Set Up MongoDB on CentOS
Install and Set Up MongoDB on CentOS involves adding the official MongoDB repository, installing the mongodb-org package, and starting the service. This enables efficient management of flexible NoSQL databases on CentOS servers.
🤖AI Overview:
Install and Set Up MongoDB on CentOS involves configuring the official MongoDB repository, installing the latest mongodb-org package, and enabling the MongoDB service on startup. MongoDB is a NoSQL database using JSON-like documents and supports flexible data schemas. Secure setup includes enabling authorization and creating an administrative user for controlled access.
Prerequisites to Install MongoDB on CentOS
To let this tutorial works correctly, provide the options below and move on.
- A system running Linux VPS.
- A non-root user with
sudoprivileges.
Tutorial Install and Set up MongoDB on CentOS
Previously, you got familiar with MongoDB as a popular DBMS in Database Management Systems article. MongoDB is highly available, horizontally scaled, and easy to use as a distributed database. Developers can learn and use the document model of MongoDB easily since it provides all the capabilities needed to meet the most complex requirements at any scale. With indexing, ad hoc queries, and real-time aggregation, MongoDB enables you to access and analyze your data in powerful ways.
Let’s go through the steps of this guide to learn how to install and configure MongoDB on your CentOS server.
Step1. Enable MongoDB Repository
Since the official MongoDB package is not available in the standard CentOS repositories, you need to add the MongoDB repository first. To do this, open your preferred text editor to create a new YUM repository file. Here, we use vim to create a configuration ”mongodb-org.repo” file inside the /etc/yum.repos.d/ directory.
sudo vi /etc/yum.repos.d/mongodb-org.repoThen, add the following information to the file you have just created.
/etc/yum.repos.d/mongodb-org.repo
[mongodb-org-6.0]
name=MongoDB Repository
baseurl=https://repo.mongodb.org/yum/redhat/$releasever/mongodb-org/6.0/x86_64/
gpgcheck=1
enabled=1
gpgkey=https://www.mongodb.org/static/pgp/server-6.0.asc
Obviously, you must replace your considered version of MongoDB if you prefer to install an older version of MongoDB. Finally, press the ESC key and type :wq, and hit ENTER to save the recent changes to the file.
Use the following command to check if the MongoDB repository exists within the yum tool and view the list of enabled repositories.
yum repolistStep 2. Install MongoDB
In the previous step, you enabled the repository. So, you are ready to install the mongodb-org meta-package. Before that, you are recommended to update your packages.
sudo yum -y updateNow, run the command below to install MongoDB on CentOS using the yum utility:
sudo yum install mongodb-orgDuring the installation, you will view two prompts that you should choose [y/n]. The first prompt lets the MongoDB packages be installed and the second prompt imports a GPG key. On both of them, type y and then hit the ENTER key.
In this way, the mongodb-org-server, mongodb-org-mongos, mongodb-org-shell, and mongodb-org-tools, will be installed as a part of the mongodb-org package.
Step 3. Enable MongoDB Start on Boot
When you are done with the installation procedure, use the commands below to start the MongoDB service.
sudo systemctl start mongod
sudo systemctl enable mongod
You can also use some commands to change the state of the MongoDB service. For example, the following command requests that the mongod process reads the confirmation file /etc/mongod.conf. In this way, changes will be applied with no need to restart.
sudo systemctl reload mongodTo stop all running mongod processes run:
sudo systemctl stop mongodStep 4. Verify Installation and start Using MongoDB
It makes sense to verify the installation. To do this, connect to the MongoDB database server to view the server version using the mongoutility.
mongoNow that you are inside the MongoDB shell, you can run the following command to view the MongoDB version.
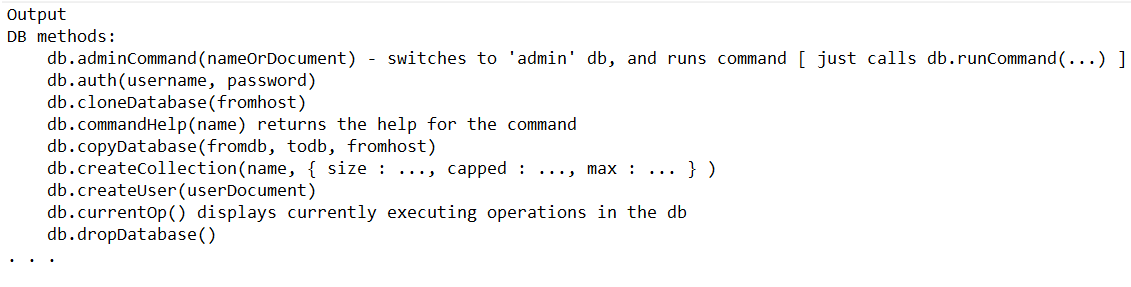
db.version()If you are concerned about the interaction with MongoDB from the shell, use the command below to have a list of methods for the db object.
db.help()The output will look like the following:
Finally, you can quit the shell while the mongod process is being run in the background.
exitStep 5. Set up MongoDB
Although the default settings of MongoDB are trustable, you can configure your MongoDB. Especially, for production environments, you are recommended to enable authorization and edit the /etc/mongod.conf configuration file which is written in YAML.
/etc/mongod.conf
security:
  authorization: enabled
RBAC which limits users’ access to database resources and actions, is enabled via the authorization option. Each user will have access to every database and be able to perform any operation if this option is disabled. Restart the mongod service after making modifications to the MongoDB configuration file:
sudo systemctl restart mongodHow to Create Administrative MongoDB User
When MongoDB authentication is enabled, you can create one administrative MongoDB user. In this way, you will be able to access and manage your MongoDB instance. As you learned, you can use the command below to access the mongo shell:
mongoRun the command below after entering the MongoDB shell to connect to the admin database.
use admin
Once the output says that you are switched to db admin, you are ready to create a new user with the userAdminAnyDatabase role which is called mongoAdmin. However, you can name it as you prefer.
db.createUser(
  {
    user: "mongoAdmin",
    pwd: "changeMe",
    roles: [ { role: "userAdminAnyDatabase", db: "admin" } ]
  }
)
Then, you can exit the MongoDB shell:
quit()Test the Administrative User
To check the changes you have made recently, use the administrative user to access the mongo shell that you have created in the above part.
mongo -u mongoAdmin -p --authenticationDatabase adminuse adminYou can also see if you can list the users using the same commands by entering the mongo shell directly (simply type mongo).
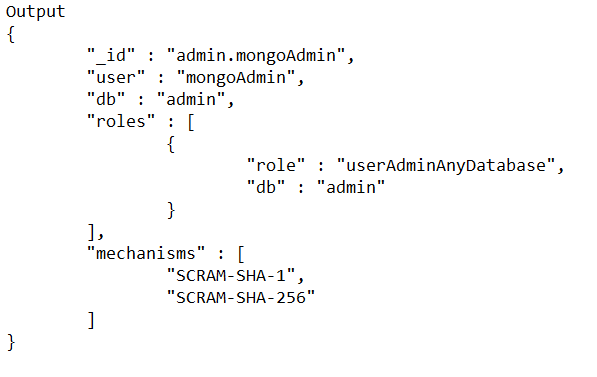
Again, once you are switched to db admin, print the users with:
show usersThe output would be like this:
How to Uninstall MongoDB & Remove MongoDB Packages
The MongoDB applications themselves, the configuration files, and any directories containing data and logs must all be deleted from a system in order for MongoDB to be fully uninstalled. First, stop the mongod process:
sudo service mongod stopThe below command enables you to remove any MongoDB packages that you had previously installed.
sudo yum erase $(rpm -qa | grep mongodb-org)Also, you can remove MongoDB databases and log files by running:
sudo rm -r /var/log/mongodb
sudo rm -r /var/lib/mongo
Conclusion
Installing and setting up MongoDB on CentOS can be straightforward when following the right steps. This guide provided you with a comprehensive yet beginner-friendly walkthrough starting from adding MongoDB repository to securing your database and testing basic functionalities. MongoDB’s adaptability combined with CentOS’s stability forms a robust environment for developing modern applications.
By adhering to security best practices and regular maintenance, you ensure your MongoDB instance remains reliable and performant.
By following this guide to install and set up MongoDB on CentOS, you have now established a powerful database foundation to build scalable and flexible applications. Keep exploring advanced MongoDB features as you grow more comfortable managing your data and server environments.
FAQ
2. How do I add the MongoDB repository on CentOS?
Create a repo file at "/etc/yum.repos.d/mongodb-org.repo" with official MongoDB repository URLs.
3. What are the installation steps for MongoDB on CentOS?
Update packages with "sudo yum -y update", then install using "sudo yum install mongodb-org".
4. How do I start and enable MongoDB service on CentOS?
Run "sudo systemctl start mongod" and "sudo systemctl enable mongod" to start and enable on boot.
5. How to verify a successful MongoDB installation?
Access the MongoDB shell with mongo and check the version using "db.version()".
6. How to configure MongoDB security?
Enable authorization in "/etc/mongod.conf" under security section and restart the service.
7. How to create an administrative user in MongoDB?
Use the mongo shell to run "db.createUser()" in the admin database with appropriate roles.
8. How do I uninstall MongoDB from CentOS?
Stop the service, remove packages and delete MongoDB data and logs directories.
9. Can MongoDB schema be changed after installation?
Yes, MongoDB supports dynamic schemas allowing document structure changes anytime.
10. What common installation problems may occur?
Issues often involve repository setup, permissions, or service failures. Check logs and commands carefully for troubleshooting.