Install WSL on Windows Easily A Step by Step Beginner Guide
Install WSL on Windows lets you run Linux tools directly on your PC. To install WSL on Windows, open Command Prompt as administrator and enter wsl install. Restart your computer to finish.
🤖AI Overview:
Install WSL on Windows allows users to run a Linux environment directly on their Windows computer. This process enables access to Linux tools and command line utilities without needing a separate Linux machine. The main goal is to make it easier for users to use both Windows and Linux software on the same device. It is a practical option for developers, students, and anyone interested in using Linux features within Windows.
This guide will walk you through the easiest installation methods to Install WSL on Windows 10 and Windows 11.
- Automated Installation: Simply run
wsl --installin an elevated terminal, which automatically enables required Windows features, downloads the Linux kernel update, sets WSL 2 as default, and installs the default Linux distribution (usually Ubuntu). - Manual Installation via DISM and PowerShell: Use DISM and PowerShell commands to enable WSL and Virtual Machine Platform, manually install the Linux kernel update, and then set WSL 2 as default for full control over each installation step.
- Installation via the Microsoft Store: Launch the Microsoft Store to download and install your preferred Linux distribution through a user-friendly graphical interface that automatically applies necessary updates.
- CLI Manual Deployment: Utilize command-line tools like curl and Add-AppxPackage to download and install a specific Linux distribution package manually, ideal for customized or automated deployments.
Choose the method that aligns best with your expertise and needs to seamlessly integrate Linux capabilities into your Windows environment.
Quick Steps
- Open the Start menu and search for PowerShell.
- Right-click PowerShell and select Run as administrator.
- Type wsl –install and press Enter to begin installation.
- Restart your computer when prompted.
- Open the Microsoft Store and search for your preferred Linux distribution.
- Click Get to download and install your chosen distribution.
- Launch the installed Linux app from the Start menu.
- Create a user account and password to complete setup.
Prerequisites to Install WSL on Windows
Before installing WSL on Windows 10 & Windows 11, ensure your system meets the following prerequisites:
- Administrator rights to run PowerShell commands and enable Windows features.
- Buy Windows VPS operating on Windows 10 or a more recent version.
- Ensure your system has the latest Windows updates installed to avoid compatibility issues.
- Confirm that your PC supports virtualization.
- Download and install the latest Linux kernel update package from Microsoft’s official website.
Method 1. Using wsl –install Command [Automated]
This automated approach simplifies the installation process by configuring Windows features and downloading the latest Linux kernel update.
It also sets WSL2 as the default version and installs a preconfigured Linux distribution, typically Ubuntu.
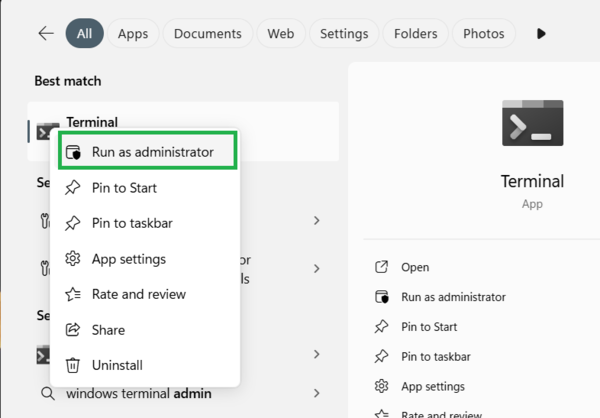
Step 1: Open an Elevated Terminal
Press the Windows key and type Windows Terminal or Command Prompt. Right-click the application and select Run as administrator.
Step 2: Run the Installation Command
In the terminal, run the command below to install WSL on Windows 10:
wsl --install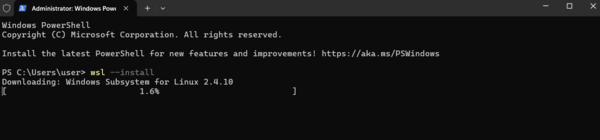
This command also enables the Windows Subsystem for Linux and the Virtual Machine Platform, downloads the Linux kernel update package, and installs the default Linux distribution.
Step 3: Restart Your Computer
When prompted, reboot your system to allow the changes to take effect.
Step 4: Complete the Linux Setup
After the restart, the default distribution (typically Ubuntu) launches.
Follow the on-screen instructions to create a user account and set a password as the primary steps you must do after installing Ubuntu.
This automated method is the most widely used and is recommended for both Windows 10 (version 2004 and later) and Windows 11 due to its simplicity and efficiency.
Method 2. Using DISM and PowerShell [Manual]
Manually enabling WSL and related features using DISM and PowerShell provides a more detailed method for users who desire greater control over the installation process.
This approach is also beneficial for those who need to troubleshoot specific issues.
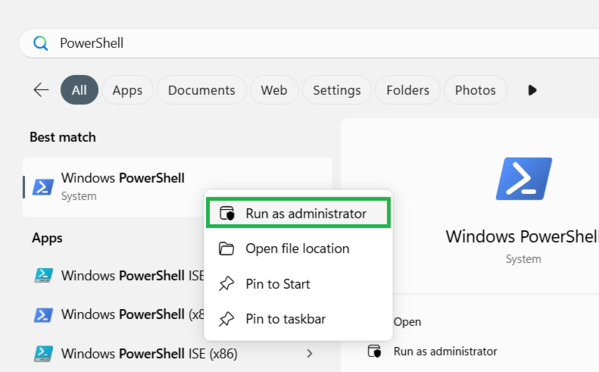
Step 1: Enable WSL
To open PowerShell as an administrator, press the Windows key and search for PowerShell.
Right-click Windows PowerShell and select Run as administrator.
Step 2: Enable the WSL Feature
Run the below command, which activates the core WSL functionality on your machine:
dism.exe /online /enable-feature /featurename:Microsoft-Windows-Subsystem-Linux /all /norestart
Step 3: Enable Virtual Machine Platform
In the same elevated PowerShell, run the command below to enable the Virtual Machine Platform that WSL 2 depends on:
dism.exe /online /enable-feature /featurename:VirtualMachinePlatform /all /norestart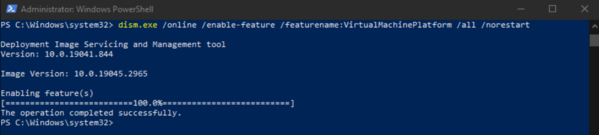
Step 4: Restart Your System
To restart your computer, simply run:
Restart-ComputerStep 5: Install the Linux Kernel Update Package
To download the Update Package, visit the official Microsoft website or use the direct link provided on the WSL documentation page.
Step 6: Run the Installer
Execute the downloaded package and follow the wizard’s instructions to install the Linux kernel update.

Step 7: Set WSL 2 as the Default Version
To configure all future Linux installations to use WSL 2 by default, open PowerShell as Administrator again and run:
wsl --set-default-version 2After a successful process, you will see an output as below:

By following the above detailed manual steps to install WSL on Windows, you gain complete control over the process and can troubleshoot each stage individually if necessary.
Method 3: Using Microsoft Store
Windows 11 allows you to install WSL through the Microsoft Store, providing a streamlined graphical approach.
This method ensures your Linux distributions remain up-to-date with the latest features.
Step 1: Ensure Prerequisites Are Met
Make sure that WSL and the Virtual Machine Platform features are enabled (see Methods 1 or 2 for instructions) and that you have a working Linux kernel update.
Step 2: Open the Microsoft Store
Launch the Microsoft Store from the Start menu.
Step 3: Search for a Linux Distribution
Enter keywords such as Ubuntu 22.04 LTS, Debian GNU/Linux, or Kali Linux to find your preferred distribution.
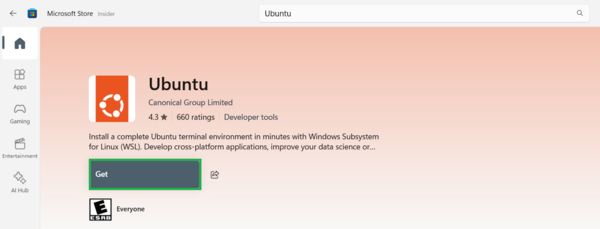
Step 4: Install the Distribution
Click Get or Install on the distribution’s page.

Step 5: Launch and Configure
Once the installation completes, click Open.

Follow the prompts to create a user account and configure your Linux environment.

That’s it! This method is ideal for users who prefer a graphical interface and want to take advantage of the latest updates available through the Store.
Method 4: Using Command Line Interface (CLI) for Manual Distribution Deployment
For advanced users, the command-line interface (CLI) allows manual downloading and installation of Linux distributions.
This method is useful when a desired distribution isn’t available in the Microsoft Store.
Step 1: Open an Elevated PowerShell
As in previous methods, ensure you run PowerShell as an administrator.
Step 2: Download the Distribution Package
Use curl (or another download tool) to fetch the distribution package.
For example, to download Ubuntu 22.04:
curl.exe -L -o ubuntu-2204.appx "https://aka.ms/wsl-ubuntu-2204"Note: Replace the URL with the direct link to your desired Linux distribution.
Step 4: Install the Package
Once downloaded, install the package using:
Add-AppxPackage .\ubuntu-2204.appxStep 5: Launch and Set Up
To do this, navigate to the folder containing the package and double-click the file if necessary to complete the installation.
Finally, launch the newly installed Linux distribution and follow the setup prompts to create your user account.
Conclusion
By following these steps, you will successfully install WSL on Windows and begin exploring Linux right from your PC. Each step ensures your setup is solid and secure. If you have questions, OperaVPS is happy to help you on your Linux learning journey!
FAQ
2. How can I check if my Windows version supports WSL?
WSL is supported on Windows 10 Version 2004 and higher as well as Windows 11. To check your version, go to Settings, then System, and select About. Look for the version number under Windows specifications.
3. What are the basic steps to install WSL on Windows?
To install WSL on Windows, open PowerShell as an administrator and run the command wsl --install. Follow the on-screen instructions to complete the setup. After installation, restart your computer if prompted.
4. Which Linux distributions are available to install with WSL on Windows?
Popular Linux distributions for WSL include Ubuntu, Debian, Kali Linux, openSUSE, and Fedora. You can find and install them from the Microsoft Store after you set up WSL.
5. Do I need to enable any features before I install WSL on Windows?
Yes, you need to enable both the Windows Subsystem for Linux and Virtual Machine Platform features. You can do this through the Windows Features menu or by using the appropriate commands in PowerShell.
6. Is it safe to install WSL on Windows?
Installing WSL on Windows is safe and supported by Microsoft. It runs separately from your main Windows system and has limited access to your files, helping to keep your computer secure.
7. Can I run graphical Linux applications after I install WSL on Windows?
Yes, you can run graphical Linux applications with WSL, especially in WSL 2 and Windows 11. Support for Linux GUIs is built in, so you can use applications with a desktop interface.
8. How do I update or remove WSL on Windows if I need to?
To update or upgrade your Linux distribution, open your WSL terminal and use the update command for that distribution. To remove WSL, go to Apps and Features, uninstall the Linux distribution, and use PowerShell to disable WSL if needed.
9. Will installing WSL on Windows slow down my computer?
WSL is lightweight and does not require much system resources. It should not noticeably slow down your computer. It is designed to run efficiently alongside your other programs.
10. Where can I find troubleshooting help for installing WSL on Windows?
If you face any issues, you can visit the official Microsoft WSL documentation or community forums. Many common problems and solutions are listed there, and you can also contact customer support for more help.