What Is PPA and How to Use It to Install Software in Ubuntu?
One of the concerns of users using different operating systems is how to install software packages. Installing software packages in different distributions of the Linux operating system differs from Windows. In most Linux distributions, the software provided is stored in servers known as Repository, which can be easily accessed. Repositories have simplified the installation and use of software for Linux distributions, but they contain some unpleasant problems for users interested in using the most up-to-date software.
For example, you install software from the Repository specific to Ubuntu, and after some time a new version of the software is released; To use the latest software version, you have to wait for the release of the next version of Ubuntu that contains software updates. In this situation, users need a third-party repository to install and use the latest version of software and software that cannot be found in the repository of their operating system.
PPA is a type of repository developed by application developers and ordinary users to store and distribute Linux software packages to meet the needs of Linux users in using rare and unique software. Ubuntu is one of the most popular Linux distributions, which is often recommended for beginner users because this distribution is provided by default with various useful software and meets the needs of Linux users.
One of the advantages of Ubuntu and its derivatives is that Ubuntu supports extensive PPAs. In order to use the software that is not found in the Ubuntu software repository, Ubuntu users can get the specific software they want without compiling the source of the software by installing PPAs. That’s why users who buy Linux VPS mostly prefer the Ubuntu operating system to improve the performance of Linux VPS. You are somewhat familiar with PPA and the importance of using it. Still, we feel your passion for learning how to use PPA to install the software in Ubuntu and get to know PPA completely; So without wasting time, let’s discuss how to add and remove PPA in Ubuntu, what PPA is, the difference between PPA and other Ubuntu repositories, and any content that can be useful for you.
What is a PPA?
Thanks to FOSS open-source software, people can independently contribute to software development to meet their needs and improve the user experience. The world of free and open-source software FOSS made it possible for everyone to contribute to open-source codes. FOSS users will benefit from important features, but the lack of integration of these programs with the official software repository of Linux distributions is one of the common problems, and PPA is the key to solving such problems.
PPA stands for “Personal Package Archive” and is a kind of software repository developed and published by application developers and Linux users to store and distribute software packages that cannot be found in official operating system repositories. PPA is useful for users looking for unique and rare software that is not available in the official repositories of the operating system used and who want to use newer and updated versions of the packages available in the official repositories of their operating system.
Ubuntu supports PPA and developers who do not create specific software independently, and it allows users to upload Ubuntu source packages to create a suitable repository with Launchpad platform hosting. Therefore, you can find the PPA developed by regular users from the Ubuntu Launchpad website to get software versions that are not found in the dedicated repositories of the Ubuntu operating system or a series of updates that are not present in the current version of Ubuntu installed on your system.
Difference between PPA and standard Ubuntu repositories
Now that you are entirely familiar with PPA, the difference between PPA and standard Ubuntu repositories is evident. Yes, as we explained, PPAs are created by regular users to enable access to specific software packages that are not supported by the official Ubuntu repositories and allow users to benefit from upgraded software packages.
But the official Ubuntu developers create the standard repositories to provide a collection of software packages. The default Ubuntu package manager manages these packages in the official Ubuntu repositories. Ubuntu’s official repositories consist of a collection of files that, in addition to providing access to software packages for installing programs, also provide information about software.
In addition, the official Repository of Linux distributions has been implemented to reduce security risks in software use, reduce the complexity of installing programs, and provide easier access to software in Linux distributions. Also, the Standard Repository is supported by reputable companies such as Canonical, which develops the open-source operating system Ubuntu.
Downloading software from these servers is far more reliable than downloading an exe file from an unknown site. Because before the release of any software in Canonical’s repositories, the software is tested by the team of experts of this company and other active companies. After ensuring its validity, the ability to download it is provided to different users. So you can install software from official Ubuntu repositories without worrying about security.
In the following, we will introduce you to the official repositories of Ubuntu versions:
Main: is a provider of free and open-source software packages supported by Canonical
Universe: provides free and open-source software packages supported by the community.
Restricted: provides dedicated drives for devices.
Multiverse: Softwares storage repositories that are limited by legal issues and copyright issues.
Now that you understand the Concept of Ubuntu’s standard repositories, you will better understand the differences between Ubuntu’s standard repositories and PPA. Some of the most fundamental differences between PPA and standard Ubuntu repositories are as follows:
- PPAs are not created by an official developer, so they are not as reliable, tested, and supported as standard repositories.
- PPA developers are regular users or private organizations, while standard repositories are developed by official Linux distribution developers.
- PPA provides software packages that are not found in standard repositories.
- The PPA must be added to the operating system using package management commands, while the standard repositories are added to your system by default without any particular configuration.
Advantages of PPA
As you know, adding new software to Ubuntu’s official repositories takes several weeks to several months to check the compatibility of the new software with Ubuntu’s system; This waiting time is unpleasant for the user who needs to use the features of the upgraded version of the desired software. Therefore, the most important advantage of PPA is providing access to up-to-date and rare software. It is not without reason that users are encouraged to use PPA because it has significant advantages, which are as follows:
- Without the need to wait for the release of the next version of the Linux distribution, it provides the possibility of using the software’s most up-to-date and latest version.
- With the help of PPA, you can install software packages that are not provided in the operating system repositories.
- Responds to users’ need to use features and test software unavailable in the official repository by providing access to Packages under development.
- It makes installing and updating software faster and easier.
- Managing PPA packages using the APT tool is simple.
- It is an efficient way to distribute software developed by users and developers.
Security issues when using PPA
PPAs offer great advantages and features, but they must be used carefully and managed properly; otherwise, they pose many security risks. Since PPAs are not tested and supported by developers and the official company, sometimes abusers and attackers distribute malicious packages containing malware or annoying advertising tools in PPAs that cause damage to your system.
The digital certificate of such packages is not signed and does not provide a way to confirm the package’s authenticity. The presence of malicious packages in PPA brings security risks that you should not ignore. Also, by adding PPA to the Ubuntu system, the packages available in the official repository are merged with those available in the PPA, which brings the possibility of security vulnerabilities in the system and software.
Of course, the possibility of hacking the system or transferring malware to the Linux system by PPA is infrequent, but to avoid such experiences, we recommend adding official PPAs to the system from reliable sources and avoiding adding any PPA to your Linux system without needing it.
Backup of repository resources
The official and unofficial apt software repositories in Ubuntu are kept in /etc/apt/sources.list or /etc/apt/sources.list.d/ file. This file plays an important role in tracking the location of programs to update them. The apt tool stores information about software and software versions and checks this information for updates. Remember to backup the sources before making any changes to the /etc/apt/sources.list file using the following command as a precaution:
sudo cp /etc/apt/sources.list /etc/apt/sources.list.backupHow to add PPA in Ubuntu
As we mentioned before, Ubuntu supports the creation of exclusive and personal repositories by Linux users by providing the Launchpad platform to developers. That means normal Ubuntu users can create repositories on the Launchpad platform, a software collaboration platform for hosting Ubuntu packages, based on their needs, and then they can add the PPA repositories to the contents of the sources.list file of the Ubuntu system so that they can install the PPA packages in the same way as they install the standard packages and benefit from the most updated software. The steps to add PPA in Ubuntu are as follows:
-
Adding PPA in Ubuntu by terminal
Step 1: Adding PPA repository to sources
First, enter the terminal, and with superuser permission, add the desired PPA repository to your sources (sources. list file) by running the following command:
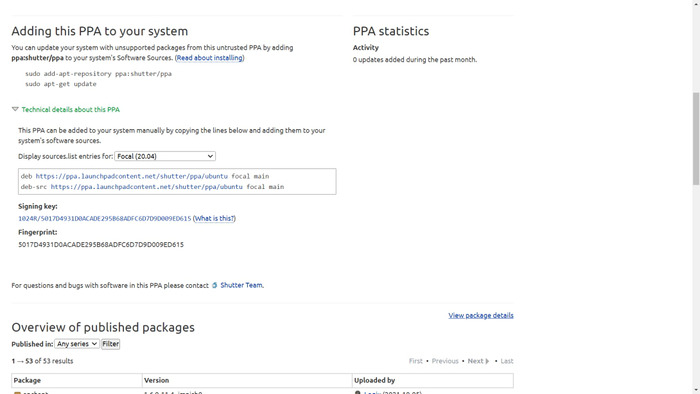
sudo add-apt-repository ppa:nameIn the previous command, replace the address of the desired PPA with ppa:name. For example, to add the screenshot tool PPA under the title Shutter to the Ubuntu system resources, you will enter the following command:
sudo add-apt-repository ppa:shutter/ppaIt should be noted that in order to access the PPA of the latest desired software, you must visit the Launchpad site and search for the name of the desired software in the dialogue box of the site and obtain the PPA of the desired software.
If you have complete information about the URL of the repository and the version of the operating system, you can also use the following commands to add the PPA of the Shutter tool (as an example) to the sources of the Ubuntu system:
deb https://ppa.launchpadcontent.net/shutter/ppa/ubuntu focal main
deb-src https://ppa.launchpadcontent.net/shutter/ppa/ubuntu focal main
The function of the previous commands is the same as theadd-apt-repositorycommand.

You may wonder if adding a PPA to system sources changes the sources.list file? No, adding the PPA to the Ubuntu system adds two files with the extensions” list” and” save” to the /etc/apt/sources.list.d directory. The file with the extension “.save” is the PPA backup file, making removing the PPA possible. The file with the extension “.list” maintains and adds repository information with the help of a command.
Step 2: Updating the Ubuntu system
Updating the Ubuntu system to add PPA in Ubuntu is one of the essential steps because to make the system aware of the availability of new PPA packages and software, you need to update the Ubuntu system using the APT package manager:
sudo apt-get updateThis command automatically updates the sources.list file with the PPA address first, then updates the system to be aware of new softwares.
Step 3: Installing a new package
Finally, you can install the desired software from the PPA that you just added to your system resources using the APT package manager:
sudo apt install package-nameFor example:
sudo apt-get install shutter-
Adding PPA to Ubuntu by the graphical user interface
Many users are interested in managing their software using a graphical user interface. Therefore, they seek a graphical method to add PPA to the Ubuntu system. In this part of the article, we will teach how to add PPA to Ubuntu resources through a graphical user interface.
1. Since the “Software & Updates” program has limitations in managing PPA and installing specific software in the field needing root access, it is better to replace the synaptic tool with “Software & Updates.” Therefore, you must first install Synaptic by running the following command in the terminal:
sudo apt install synaptic2. launch the “Synaptic Package Manager” by application launcher.
3. By referring to the “Settings” section, select the “Repositories” option.
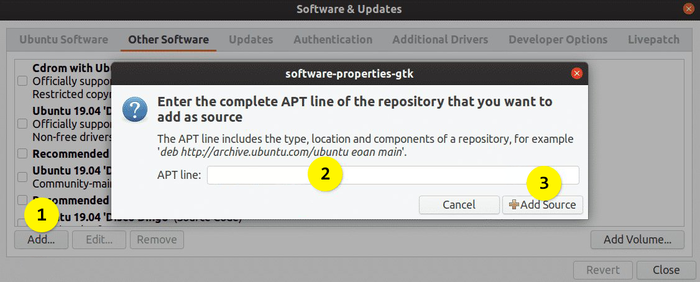
4. In the window that opens, select the “Other Software” tab and click on the “Add” option at the bottom of the page.
5. Type the desired PPA address in the input box in front of the APT line and then select the “Add Source” option.

6. Select the “Close” option.
7. Click on “Reload” to update the repositories.
You were able to graphically add PPA to Ubuntu system resources and use new softwares.
How to remove PPA from Ubuntu sources
Whenever you no longer need the software and the corresponding PPA, you can easily remove it using the graphical interface and terminal. If you do not need your desired software, before removing the PPA, we recommend that you first remove the software from the system, then proceed to remove the PPA. Because if you remove the PPA, the software will run on the system but will not receive updates. The Synaptic Package Manager tool installed in the previous steps will help you identify PPAs belonging to your software. Then you can remove the packages installed by PPA.
-
Removing PPA through the Terminal
Similar to adding a PPA to Ubuntu, enter the following command to remove the PPA from the Ubuntu sources:
sudo add-apt-repository --remove ppa:nameFor example:
sudo add-apt-repository –remove ppa:shutter/ppaBy executing the previous command, the shutter tool that you recently added to the Ubuntu system will be deleted.
To remove PPA from Ubuntu system resources, you can try another method in the terminal. In this method, you will get a list of PPA files, and in the list, you will find the file with the extension “.list” and manually delete the PPA source file, which is the same as deleting the PPA.
So first, access a list of PPA files by running the following command:
ls /etc/apt/sources.list.dThen delete the files with the extension “.list” in the displayed list to delete the desired PPA. Enter the following command for this purpose:
sudo rm -i /etc/apt/sources.list.d/ppa_filename.listFinally, update the Ubuntu system repository by running the following command:
sudo apt update-
Removing the PPA through the graphical interface
We need Synaptic Package Manager’s advanced features to remove PPA from Ubuntu sources graphically. Therefore, now that you have installed Synaptic Package Manager in the previous step launch it and follow the steps below:
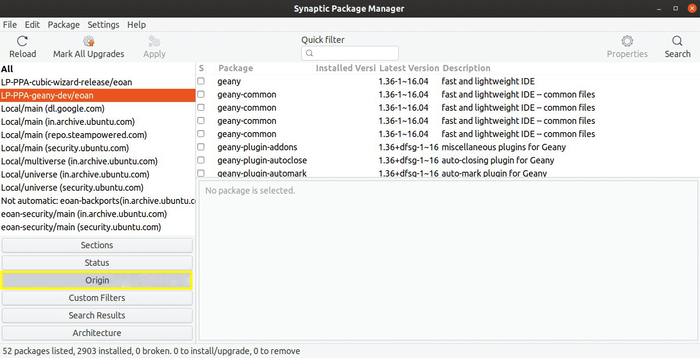
1. After launching Synaptic, select the “Origin” option to check the repositories added to your system. You will see a list of repositories that have been added to the Ubuntu system. It is not difficult to find packages installed by PPA. Packages with the PPA prefix represent PPA entries, which you can click on to view the software installed by the PPA.

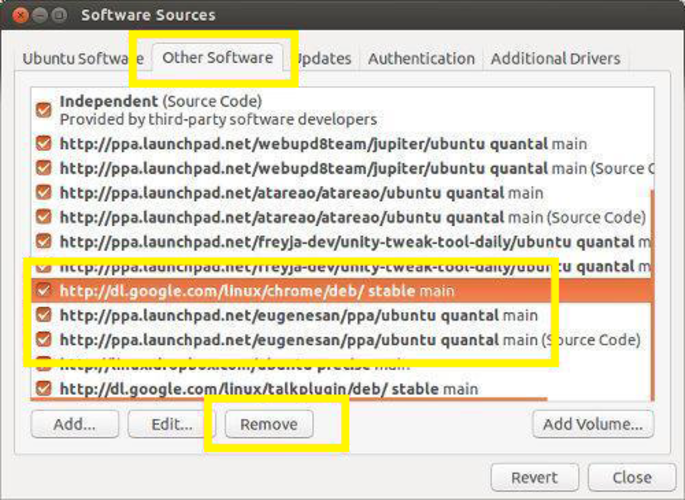
2. After finding the software package you want, you can delete it both through the terminal and from the management panel of the Synaptic tool. To remove packages installed by PPA from Ubuntu sources, select the “Software & Updates” option and then click the “Other Software” tab.
3. After finding the software package you want to remove, and checking the box next to their titles, click the “remove” option.

Therefore, the” remove “option will remove the PPA entry from its ppa_name.list file in the /etc/apt/sources.list.d directory.
FAQ
PPA vs. DEB: which one is better?
Installing and adding DEB graphically is much easier than installing the PPA package, but since the apt tool updates the Ubuntu system and software by checking the sources.list file, the software installed through DEB may not be updated by running sudo apt update && sudo apt upgrade commands. The apt tool does not support updating the desired software if it is not defined for the input software.
Therefore, software installed through DEB will not be updated by the standard Ubuntu update unless the way the package is created is different.
What is the difference between Official PPA and unofficial PPA?
Some developers create a PPA for their software, which is called Official PPA. But if another Linux user creates a PPA of that software using the source code of the software provided by the developer, it is called an unofficial PPA.
Does PPA support all Ubuntu releases?
No, unfortunately, since the release cycle of Ubuntu versions is 6 months. Developers cannot compile the software for each specific release and create the corresponding PPA for the new version because this is time-consuming. So PPAs are available for some versions of Ubuntu.
How to find out which version of Ubuntu is supported by PPA?
Knowing the release's codename, enter the specific PPA website and the versions supported by the desired PPA will be displayed on its web page. To obtain information about the Ubuntu version, it is helpful to check the contents of /etc/os-release if you are using Ubuntu-based distributions.
Conclusion
This article aims to familiarize you fully and comprehensively with PPA and how to add PPA to the Ubuntu system to share software. Although we have taken a few minutes of your precious time, we have provided you with complete and helpful information about PPA and the process of adding PPA so that you do not need to look for another article for your possible questions and doubts. Because in this article, we have explained everything you need to know about PPA and how to add and remove it in Ubuntu. PPA is a great way to use up-to-date and rare third-party software. We hope that with the help of our guide, you can enjoy the features of your favorite software in Ubuntu.
If you need more guidance in any part of the article, share it with us in the comments section so that we can be responsive.
Thank you for reading this article to the end.