How To Create A cPanel Account?
cPanel is the most famous and the best control panel used to host content and websites in the web environment. Unlike most other control panels, cPanel gives you full access to the tools you need to manage your website. cPanel has 3 main types that you should pay attention to when ordering one. Let us see what different types of cPanel are and which you should buy.
What Are cPanel Types?
- Shared cPanel Account
- Reseller cPanel Account
- cPanel Dedicated Account (cPanel VPS)
Shared cPanel Account
In cPanel, it is possible to define different roles. The most cPanel service that clients use in the web environment is the cPanel shared account. This service contains the standard tools to host the contents of your website. The provider that you order the cPanel shared account from has the ability to give you different accesses and get some of them from you. For example, the provider may define the number of domains you can host on a cPanel shared account or the amount of the I/O, memory, etc. The amount of these options is based on the plan that you order.
Reseller cPanel Account
This service is actually a shared cPanel but with more access. The user of this service can create cPanel accounts by itself, but still, it doesn’t have full access to the cPanel system. Like the shared cPanel account, the provider can grant access to this account and get some of it based on its policies and plans. One cPanel main server can have more than one reseller account based on its resources. This service is suitable for clients who have more than 2 or 3 websites.
cPanel Dedicated Account (cPanel VPS / WHM)
This service has the highest level of access between cPanel accounts. If you buy Linux VPS and install cPanel on it, you can have full access to the operating system, and it means you don’t have any limitations on this service except the server’s resources. This service is suitable for clients who have some websites with a high amount of daily visits.
Note: The number of websites that you can host on a cPanel VPS or a Dedicated server is related to the daily visit of the websites.
cPanel Dedicated Account ( cPanel On Dedicated VPS / WHM)
The difference between the cPanel VPS with a dedicated server is the resources and the prices of the licenses. This service is suitable for web-hosting service provider companies. Based on the resources of a dedicated server, it is possible to host about 50 to 200 websites. Of course, we have to keep in mind that the number of websites that we can provide is related to the websites’ usage. For example, if you have a website with a very high amount of daily visits, you may be able to host just that website on your dedicated server.
Create A cPanel Account On cPanel VPS Or A Dedicated Server
The procedure of creating a cPanel account on both a Dedicated Server and a VPS Server is the same, so I merge them.
Note: We assume that you have fully connected your server IP to your server’s domain, and we pass this step.
Step 1. Login to Your cPanel VPS / WHM
URL To Login With SSL: https://server_IP:2087 — For example: https://192.168.1.1:2087
URL To Login Without SSL: http://server_IP:2086 — For example: https://192.168.1.1:2086
Note: The username is “root” by default and the password is the same password you have set for your Linux Server.
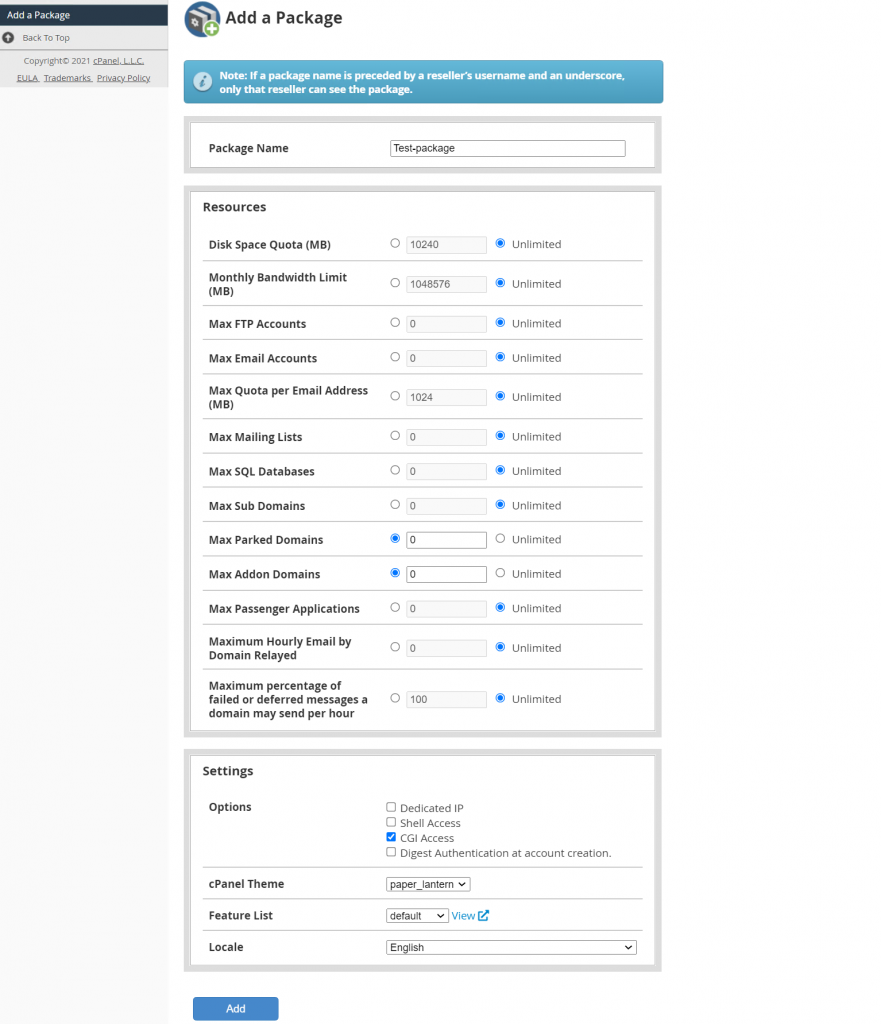
Step 2. Create A Package
A package in cPanel defines the resources and accesses that an account that have. Before creating an account in cPanel, first, it is required to create a package. To do it, search “Add a Package” in the cPanel search bar. In this section, you will be asked to choose a name for your package and the resources that this package should have.
Also, you have the right to add different access to the package, like defining the package to able clients to have Shell Access, Dedicated IP, etc. Add the package once you set the setting.
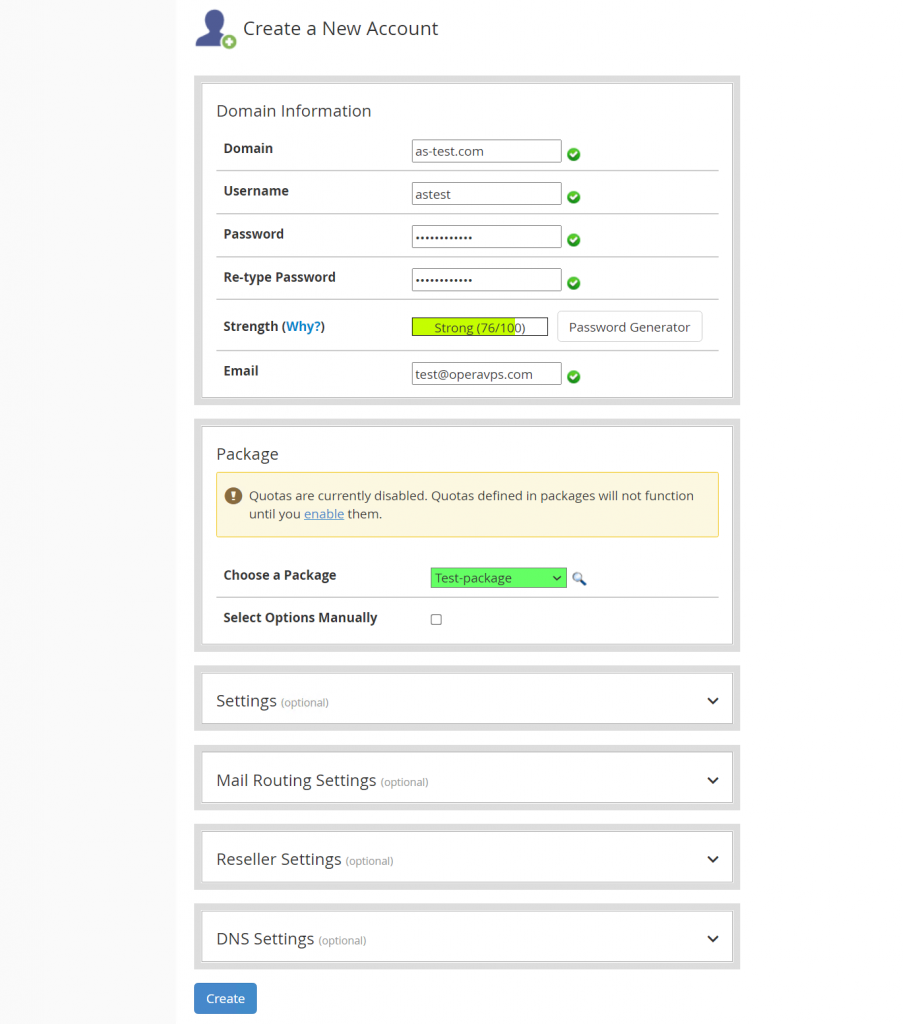
Step 3. Create The cPanel Account
This is the last step to create the account. To do it, search “Create a New Account” in the cPanel search bar. In this section, you will be asked to choose a domain name, username, and password for your new account and the package this account should have. It is also possible to make the account a reseller. We formerly explained about the reseller account in cPanel.
Step 4. Login To The cPanel Account
URL To Login With SSL: https://server_IP or domain_name:2083 — For example: https://192.168.1.1:2083
URL To Login Without SSL: http://server_IP or domain_name:2082 — For example: http://192.168.1.1:2082
Note: You have chosen username and password when creating the account. Use those details to log in to your cPanel account and if you have forgotten any of them, you can find and modify them in the “List Accounts” section.
Conclusion
Now that you know the different types of a cPanel account let’s review some definitions again to get the answer.
When you buy a shared cPanel account, the provider creates a cPanel account inside its WHM (Webhost Manager) account and gives you the login details of that cPanel account.
When you buy a reseller shared cPanel account, the provider creates a cPanel account inside its WHM (Webhost Manager) account and gives you the login details of that cPanel account with the reseller privileges.
When you buy a cPanel VPS or cPanel on a Dedicated Server, you will have WHM access to manage whole accounts.
In this tutorial, we checked how to create a cPanel account on a cPanel VPS or a Dedicated server. It is not easy for everyone to buy VPS or a dedicated Server besides paying for the price of the cPanel license. So if you are at the beginning of the way, get a shared cPanel account and upgrade it to higher levels as your website develops. I hope you have enjoyed this post and found it useful.
If you face any issues managing your cPanel account, just let me know in the comments section.