apt Command Not Found: Fix 404 Not Found Ubuntu
When encountering the apt Command Not Found error, it signifies a serious issue with your package manager, often due to missing binaries, outdated sources, or repository misconfiguration.
This problem can severely hinder system updates and security patching, jeopardizing system stability. Resolving these issues is crucial for maintaining a secure, up-to-date system.
Quick fixes include correcting your sources list and running commands such as:
sudo apt-get update

sudo apt-get install apt
This guide offers quick, actionable fixes and troubleshooting repository URLs, helping you restore your system’s functionality and safeguard its reliability.
Methods to Solve apt Command Not Found Error on Linux Ubuntu
When you are working with Ubuntu, the apt tool is the backbone of your software management. It’s what installs, updates, and removes packages.
But if you’re hit with the dreaded apt: command not found or sudo apt-get command not found, it means your system can’t find or execute the Ubuntu package manager.
You can buy Linux VPS and invest in a robust hosting solution that not only provides enhanced stability but also minimizes the risks associated with these errors.
A Linux VPS hosting typically comes with optimized configurations, ensuring minimal disturbances related to the apt Command Not Found issues while delivering superior performance.
Whether you are a beginner or an advanced user facing ”apt update not found” issues, check out below detailed step-by-step CLI & GUI solutions below.
1. Fixing apt: Command Not Found Error
The error apt command not found means the system cannot locate the APT binary. This is typically caused by minimal installations, misconfigured environments, or broken paths.
In stripped-down containers, corrupted base systems, or post-upgrade damage, /usr/bin/apt may be missing.
It causes other symptoms like sudo apt-get command not found, apt update 404 not found, or 404 not found [IP: 185.125.190.80 443] during updates.
This error prevents any package management tasks from being executed.
Solution 1: Check if apt exists on the System
Use the which apt command to quickly verify if the apt binary is present; for deeper insights on the which command, trusted Linux documentation offers valuable background.
which apt
ls -l /usr/bin/apt
If both commands return nothing, the APT tool is not installed or the file has been removed from your system, leading to the apt get command not found error.
Solution 2: GUI Method to Verify APT Location
If you’re using a desktop environment, open File Manager, navigate to File System > usr > bin, and scroll through the list to check if apt exists there.
If it’s missing, the binary is no longer available on your system, confirming the root cause of the apt command not found issue.
Solution 3: Reinstall apt using apt-get (If Still Available)
If apt-get still works, reinstalling apt is straightforward:
sudo apt-get update
sudo apt-get install aptNote: In older or end-of-life Ubuntu systems, you may encounter the sudo apt update 404 not found or 404 not found [IP: 185.125.190.80 443] error when running apt-get update.
This indicates that Ubuntu has moved your version’s repositories. To resolve that, run:
sudo nano /etc/apt/sources.listReplace all http://archive.ubuntu.com and http://security.ubuntu.com with:
http://old-releases.ubuntu.comThen update and reinstall:
sudo apt-get update
sudo apt-get install apt
This fixes most broken installations resulting in sudo apt-get command not found.
Solution 4: GUI Method for Reinstalling APT
Launch Software & Updates from Settings. Under the Ubuntu Software tab, ensure all repositories (Main, Universe, Restricted, Multiverse) are enabled.
Change the Download from option to Main Server. Close the window and reload the sources. Then, open Ubuntu Software Center, search for “apt”, and reinstall it through the GUI if available.
Solution 5: Fix a Broken $PATH Environment
Sometimes, /usr/bin/apt exists but Ubuntu still can’t find it. That’s typically caused by a broken $PATH. When this happens, even core commands fail, and you’ll see errors like apt get command not found.
Check your current path with:
echo $PATHIf /usr/bin is not in the result, add it temporarily:
export PATH=$PATH:/usr/binTo make the fix permanent, run:
echo 'export PATH=$PATH:/usr/bin' >> ~/.bashrc
source ~/.bashrc
This ensures apt is accessible after reboot and fixes environment-level errors like sudo apt update 404 not found.
Solution 6: GUI Method for PATH Repair via New User
If you’re locked out of essential commands due to a broken $PATH, press Ctrl + Alt + F3 to open a TTY session.
Log in, then open Settings > Users in a desktop session. Create a new user with admin rights.
When you log into that account, it will generate a clean environment with default paths, resolving user-level $PATH corruption.
After that, use Software & Updates to finalize the recovery.
2. Fixing sudo apt-get command not found in Ubuntu
When your terminal returns the sudo: apt-get: command not found error on Ubuntu, it means the core APT binary is either missing or inaccessible. In Debian-based systems, apt-get is essential for managing software packages.
If it breaks, you’ll be locked out of system updates, installations, and security patches. You might also notice related issues like apt Command Not Found, apt update 404, or 404 not found [IP: 185.125.190.80 443] errors during update operations.
These are all symptoms of a damaged or incomplete APT environment.
Solution 1: Confirm Your OS is Ubuntu or Debian-based
Even though the article focuses on Ubuntu, it’s still wise to ensure you’re running a compatible base. Run:
cat /etc/os-releaseIf the output confirms you’re on Ubuntu or a Debian derivative, continue troubleshooting.
If not, the Linux apt command not found error is expected because non-Debian systems use different package managers.
Solution 2: Check if apt-get is installed on the System
You should verify whether the apt-get binary still exists:
which apt-get
ls -l /usr/bin/apt-get
If both commands return nothing or show missing files, then apt-get has either been removed or never installed correctly. That’s why you’re seeing the sudo apt-get command not found.
Solution 3: GUI Method to Confirm Presence of apt-get
If you’re using Ubuntu Desktop, launch Files, navigate to File System > usr > bin, and scroll to check whether apt-get is listed.
If it’s not visible there, the binary has been deleted or the system is broken. This visual method can quickly confirm what’s wrong without opening the terminal.
Solution 4: Manually Reinstall apt-get Using .deb Package
In the absence of apt-get, you can’t use APT to fix APT. So, you’ll have to manually download the .deb package for apt.
Use wget command to fetch the correct version from Ubuntu’s repository:
wget http://security.ubuntu.com/ubuntu/pool/main/a/apt/apt_2.7.6_amd64.deb
sudo dpkg -i apt_2.7.6_amd64.deb
If you’re unsure of the version or need one for another architecture, browse the official Ubuntu APT archive to find the correct build.
This approach resolves both the Linux apt command not found and downstream issues like apt update 404.
Solution 5: GUI Method for Manual APT Installation
Open your web browser, download the .deb file from Ubuntu’s package archive. Once downloaded, double-click the file to open it in Software Install.
Press Install and authenticate with your password. This reinstalls apt-get without needing the command line, ideal for users with broken terminals.
Solution 5: Repair a Broken $PATH That Hides apt-get
If /usr/bin/apt-get exists, but Ubuntu still shows sudo apt-get command not found, your shell might be pointing to a corrupted or misconfigured environment.
Start by checking your PATH variable:
echo $PATHIf /usr/bin is missing from that list, add it temporarily:
export PATH=$PATH:/usr/binTo make this permanent, run:
echo 'export PATH=$PATH:/usr/bin' >> ~/.bashrc
source ~/.bashrc
Broken paths also lead to other system-wide errors like apt 404 not found and ubuntu apt update 404 not found, especially if essential tools can’t be found during system operations.
Solution 7: GUI method to Create a New User with a Clean Environment
Open Settings > Users in your GUI session. Create a new administrator account and log in to it. This account will have a fresh $PATH setup.
You can then check if apt-get works correctly there. If it does, your original profile’s environment is corrupted and can be fixed or rebuilt using known-good configuration files from the new user.
3. Fixing Container or Minimal Image without Package Manager
Ubuntu base images used in containers or trimmed-down environments are often deliberately built without apt to reduce system footprint.
These stripped images are excellent for performance, but frustrating if you try to run apt-get update or install packages and suddenly face the apt Command Not Found error.
In such minimal setups, even a command like sudo apt-get install might throw errors like apt-get 404 not found or apt failed to fetch 404, especially if the image lacks both apt and a working sources list.
Solution 1: Install apt manually (When Network Access Exists)
If the container or virtual image supports outbound connections and includes core utilities like wget and dpkg, you can recover package control manually. Start by downloading the appropriate .deb package for apt:
wget http://security.ubuntu.com/ubuntu/pool/main/a/apt/apt_1.6.13_amd64.debsThis version is a stable release for older Ubuntu-based images. For newer environments, you’ll need to adjust the version or architecture accordingly.
Once downloaded, install it using:
sudo dpkg -i apt_1.6.13_amd64.debThis will install the core apt binary and related dependencies. After successful installation, try:
sudo apt-get updateIf you still encounter errors like 404 not found [ip: 185.125.190.80 80] or apt failed to fetch 404, check your /etc/apt/sources.list.
It may be pointing to a deprecated mirror or referencing components that no longer exist for your Ubuntu version. Update the source list accordingly.
Solution 2: GUI Method for Container in Virtualization
If the minimal container or VM is attached to a desktop hypervisor (like VirtualBox, VMware, or Gnome Boxes) and it lacks internet access, use the GUI to attach an Ubuntu ISO:
- Mount the ISO through the Disk Settings panel of your VM/container GUI.
- Boot the system and select Try Ubuntu (Live environment).
- Once in the GUI, open the File Manager, navigate to your root mount (e.g.,
/mnt), and locate the container’s file system. - Open a terminal inside the mounted root (Right-click → Open Terminal Here).
- Copy the
aptpackage from the mounted ISO (/pool/main/a/apt/) to the system, chroot into the container root, and install it:
sudo chroot /mnt/yourcontainerroot bash
dpkg -i apt_*.deb
This approach works when traditional tools like wget are missing or unusable.
Solution 3: Use Alternative Package Tools (If Present)
In containerized environments managed by orchestration systems like Docker or LXD, some minimal Ubuntu images may rely on pre-seeded tools or external package layering.
If apt is not preloaded and you’re not using a pure Ubuntu base, you may have tools like microdnf, apk, or even zypper, though these typically appear in non-Ubuntu images.
Note: Attempting to use these tools in an Ubuntu container will not work and may mislead your troubleshooting.
If you’re mistakenly using an Alpine-based image, you’ll see errors like apt Command Not Found followed by 404 not found [ip: 91.189.91.82 80] or 404 not found [ip: 185.125.190.39 80], not because the IP is unreachable, but because the package manager doesn’t even exist.
If you’re unsure of the base image identity, confirm it with running command below:
cat /etc/os-releaseIf it returns an Ubuntu variant, you can safely proceed with apt recovery. Otherwise, switch your base image to an official Ubuntu container with apt preloaded if package management is critical to your workflow.
4. Fixing Broken $PATH (Commands Not Recognized) in Ubuntu
When the $PATH environment variable is broken, the system loses track of where to find critical binaries like apt, apt-get, or even core utilities like ls and sudo. This error can quietly cripple your Ubuntu system.
Users often report symptoms like apt-get not found, apt get not found, or even more complex issues like apt-get update 404 not found or apt Command Not Found, depending on how and when the environment was misconfigured.
These problems frequently follow manual edits to .bashrc, installing alternative shells, or misapplied environment scripts
Solution 1: Verify and Repair the $PATH Variable
To begin the diagnostic process, inspect your current $PATH using:
echo $PATHA correct path on a typical Ubuntu system should include /usr/bin, /bin, /usr/sbin, and /sbin.
If /usr/bin is missing or out of order, the system will not recognize core package commands, leading to cascading issues like apt not found, apt-get not found, and failed update attempts showing 404 not found [ip: 185.125.190.80 443] or 404 not found ubuntu.
If /usr/bin is absent, restore it temporarily:
export PATH=$PATH:/usr/binThen, immediately test if the command recognition is restored:
which apt-getIf it works, make the change permanent, run:
echo 'export PATH=$PATH:/usr/bin' >> ~/.bashrc
source ~/.bashrc
This method ensures the environment resets correctly at each login, eliminating errors like Ubuntu 404 not found or misfiring system scripts.
Solution 2: GUI Method to Create a Clean User Profile with Default Environment
If you prefer working in a desktop environment or terminal access is unstable, use Ubuntu’s graphical interface to sidestep the corrupted $PATH. Go to Settings > Users, unlock with your password, and add a new administrator account.
This new profile will use the default $PATH values preconfigured by Ubuntu. Log in, launch Terminal, and try:
apt updateIf it executes without showing apt-get update 404 not found or apt not found, it confirms your previous environment was misconfigured.
You can then compare .bashrc and .profile files between the two accounts and selectively copy the working configuration back into your main user account, avoiding a full system reinstall while fully resolving errors related to apt 404 not found and 404 not found [ip: 185.125.190.81 80].
5. Fixing Container or Minimal Image without Package Manager
Minimal Ubuntu images, often used in containers or cloud-init-based deployments, are stripped down by design. To save on space and initialization time, they exclude tools like apt, leaving you with a bare shell and almost no package management capability.
When you run sudo apt update or apt install, you’ll likely encounter an apt Command Not Found error, often followed by connectivity failures like 404 not found [ip: 185.125.190.82 80].
These images aren’t broken, they’re intentionally lightweight. But you can still rebuild functionality with precision.
Solution 1: Manually Install the apt Package
If your image has basic networking and includes wget and dpkg, you can restore package functionality by manually fetching and installing the apt binary.
Start by identifying the correct package version and architecture:
wget http://security.ubuntu.com/ubuntu/pool/main/a/apt/apt_1.6.13_amd64.debOnce downloaded, install the .deb using:
sudo dpkg -i apt_1.6.13_amd64.debIf your system architecture differs, adjust the filename accordingly. This method restores the core apt interface, allowing you to follow up with sudo apt update.
If the update fails with an apt update not found or Ubuntu 404 not found ip message, verify that your /etc/apt/sources.list is correctly configured and points to a currently supported mirror.
Note: If apt installation fails due to missing dependencies, use dpkg --info apt_1.6.13_amd64.deb to inspect required packages and download them manually in the same manner.
Solution 2: Restore Package Manager via Recovery Image or Prebuilt GUI Snapshot
For virtualized Ubuntu environments that include a desktop (like in Proxmox, VMware, or VirtualBox), and where you’ve mounted a minimal ISO, open Disks or Startup Disk Creator and attach a full Ubuntu Desktop ISO to your container or VM. Then boot into Try Ubuntu mode.
Open the pre-installed File Manager, navigate to your mounted root filesystem, and open a Terminal there (Right-click > Open Terminal Here).
Manually copy the .deb package for apt from the ISO to the container’s root partition and install it using:
sudo chroot /mnt/myroot bash
dpkg -i apt_*.deb
This GUI-assisted method is ideal when your minimal instance is inaccessible via SSH or lacks working network configurations.
Solution 3: Use Available Lightweight Package Tools (if pre-installed)
In container scenarios using ultra-minimal base images (such as those built via debootstrap), you may not have access to apt at all, nor to .deb download tools.
If your system includes alternative managers like snap or microdnf, use those as a temporary workaround. However, in Ubuntu environments, such tools are rarely preinstalled.
Avoid commands like apk or dnf, which belong to Alpine and Fedora respectively.
If you try them, you may face misleading errors such as apt update not found or sudo apt update not found, simply because those tools don’t exist in your environment.
Always stick with tools native to the Ubuntu base image.
6. Fixing 404 Not Found during apt update
Running sudo apt update may result in 404 Not Found errors if your Ubuntu repositories are outdated or have reached their end-of-life (EOL).
Outdated or End-of-Life (EOL) Ubuntu Repositories
An error such as apt update 404 not found often occurs when the Ubuntu version has reached its End of Life.
This causes the original repository URLs to go offline, leading to errors like 404 not found [ip: 185.125.190.80 80].
- Solution:
Update your /etc/apt/sources.list:
sudo sed -i 's|http://.*archive.ubuntu.com|http://old-releases.ubuntu.com|g' /etc/apt/sources.list
sudo apt update
Third-Party and PPA Issues
Conflicts from third-party software sources or obsolete Personal Package Archives (PPAs) can trigger errors, for example, 404 not found [ip: 91.189.91.81 80], interfering with your update process.
- Solution:
GUI Method:
Use the Software & Updates tool to uncheck or remove conflicting repositories.
CLI Method:
Identify and edit repository files:
ls /etc/apt/sources.list.d/
sudo nano /etc/apt/sources.list.d/conflicting-repo.list
Comment out or remove problematic lines and run:
sudo apt updateMisconfigured Repository URLs
Simple typos or outdated entries in /etc/apt/sources.list can lead to errors like 404 not found apt update fix.
Open and correct your sources list:
sudo nano /etc/apt/sources.listVerify that all URLs match your Ubuntu release and point to valid mirrors.
Network and DNS Issues
Occasionally, network glitches or DNS resolution problems can produce errors such as apt-get update 404 not found, even when everything is otherwise configured correctly.
- Solution:
Force apt to use IPv4:
sudo apt -o Acquire::ForceIPv4=true updateDouble-check network settings and DNS servers to ensure steady connectivity.
7. Failed to Fetch Error
When you see errors such as apt failed to fetch 404 or apt update not found during an update session, it generally indicates conflicts with software repositories or remnants of outdated entries.
For instance, an error like Ubuntu 404 not found or even 404 not found [ip: 185.125.190.83 80] may surface if conflicting sources are in place.
Solution 1: Using GUI to Remove Conflicting Software or Repositories
For users who prefer a graphical interface, start with the Software & Updates tool:
- Open the Software & Updates application.
- Navigate through the Other Software tab.
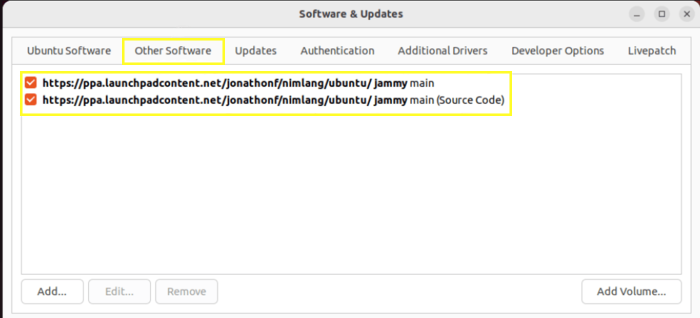
- Look for any third-party or legacy repositories that might be conflicting.
- Uncheck or remove entries that are causing issues.
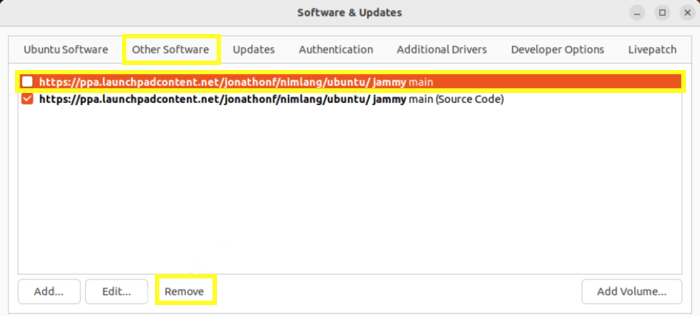
- Click Close and allow the system to refresh its repository data.
Using the GUI method is straightforward and provides visual feedback so you can monitor which sources are active, minimizing the risk of errors like apt get not found during later operations.
Solution 2: Using CLI to Remove Conflicting Software or Repository
For a command-line approach, which is faster and more granular for system administrators:
- Open your terminal and list the available repository files:
ls /etc/apt/sources.list.d/Use nano or vim as a text editor to open and inspect each file for any obsolete or conflicting entries that might trigger errors like sudo apt update not found.
Remove or comment out the conflicting line by placing a # at its start. For example:
sudo nano /etc/apt/sources.list.d/problematic-repo.listSave the changes and run:
sudo apt updateThis ensures that you eliminate unwanted repositories that produce errors like 404 not found [ip: 91.189.91.82 80] or apt-get 404 not found, restoring normal package fetching.
8. Inadequacy of Disk Space Issue
A common pitfall affecting package updates is a lack of disk space. When the disk fills up, you might receive cryptic messages resembling apt not found or interruptions in the update process.
Even a healthy sudo apt update not found procedure can falter if the system can’t write new package data to the disk.
Solution: Free Up Disk Space
- Begin by checking your disk space usage by running:
df -h- Use the command below to clean up unnecessary packages:
sudo apt autoremove
sudo apt clean
This removes outdated packages and cleans up cached files.
- Use system file managers or command-line tools to identify and delete files consuming excessive space. This will help the system regain stability, ensuring that errors like apt update 404 not found or apt-get update 404 not found do not occur due to space-related issues.
9. Fix the Slow APT-GET Update Issue
Performance issues such as sluggish package updates are not just about speed—they can also lead to timeouts that mistakenly trigger errors.
Users might see messages like 404 not found [ip: 185.125.190.80 80] or apt update not found when the mirror is overloaded or misconfigured.
Solution 1: Transport HTTP Mirror to HTTPS Mirror in sources.list File
Switching to a more secure and possibly faster HTTPS mirror can enhance the reliability of your update process:
- Open your primary sources list:
sudo nano /etc/apt/sources.list- Find any lines starting with
http://and replace them with theirhttps://counterparts. - Save the file and update:
sudo apt updateThis change not only secures the connection but can also improve the connection speed—preventing errors such as 404 not found [ip: 185.125.190.39 80].
Solution 2: Change HTTP to a Different Repo in the sources.list File
If moving to HTTPS alone doesn’t resolve the slow updates, try switching to a different server or mirror:
- Edit
/etc/apt/sources.listagain. - Replace the existing repository URLs with a known high-performance mirror, which you can find by checking the official Ubuntu mirrors list.
Save and run:
sudo apt updateBy switching the server, you eliminate regional server issues that can lead to messages like 404 not found [ip: 91.189.91.81 80] and ensure smoother, faster updates.
Advanced System Recovery (When Nothing Works)
When the usual fixes fail and you’re staring at error messages like apt Command Not Found or apt update 404 not found, it’s time to escalate your recovery efforts.
This phase is critical if every standard approach, editing repository files, resetting the $PATH, or removing broken PPAs, hasn’t solved the problem.
Here’s your step-by-step, expert-approved guide to bring your Ubuntu system back from the brink:
1. Boot from a Live USB and Prepare Your Environment
If your system is severely damaged or unable to boot properly, create a Live USB of Ubuntu. Boot into the Live USB environment where you can safely intervene in your system.
This method circumvents the system’s internal issues and allows you to work on recovery without interference.
sudo mount /dev/sdX# /mntReplace /dev/sdX# with your root partition identifier.
Note: If you need to access your system’s root files while in the Live USB environment, mounting your USB drive in Linux can be a crucial step. For detailed instructions, explore how to mount USB drives in Linux.
2. Chroot into Your Installed System
Once the root partition is mounted, switch into your system’s root using chroot.
This gives you full control over the installed environment as if you were booted into it, letting you run commands as if nothing were broken.
sudo chroot /mntInside the chroot environment, your focus becomes twofold: fix errors such as apt update 404 not found and re-establish a working package manager.
3. Manually Reinstall the Package Manager
If you see persistent issues like apt Command Not Found or apt 404 not found errors, reinstalling the package manager manually is often the last resort.
Download the required .deb files for apt, libapt-pkg, and associated packages from the official Ubuntu package repository using another system if necessary.
Then transfer these packages to your chroot and install them:
sudo dpkg -i apt_*.debThis process rebuilds the essential components that are causing errors, such as apt-get update 404 not found.
4. Finalize and Reboot
After the repair steps, ensure all package configurations are updated:
sudo dpkg --configure -a
sudo apt update
Watch for any error messages, such as the notorious 404 not found [ip: 185.125.190.82 80] message, and verify that each issue has been resolved. Once confirmed, exit the chroot, unmount the partitions, and reboot the system.
exit
sudo umount /mnt
sudo reboot
Strategies to Avoid 404 Not Found Errors in Ubuntu
If you’re tired of running into sudden breakages like the dreaded apt Command Not Found or the frustrating 404 not found [ip: 91.189.91.82 80], it’s time to know what to do to prevent future errors.
These errors typically creep in when Ubuntu installations fall behind on maintenance, third-party PPAs go unchecked, or you continue running an outdated release with no supported mirrors left. Ao, you must build preventative habits that save you from downtime.
Regularly back up your /etc/apt/sources.list file before making changes or adding repositories.
Stick to actively supported Ubuntu releases and remove deprecated PPAs after upgrades. For systems exposed to the internet, especially those using automation or minimal images, test for binary presence before deploying scripts.
Always monitor repository access logs during updates to catch early signs of issues like 404 not found [ip: 91.189.91.82 80] or apt update 404 not found.
Because when apt-get not found becomes a regular occurrence, it’s not just a broken package manager, it’s a symptom of broken planning. And as any smart admin knows, consistency is the real key to system stability.
Conclusion
In this complete guide, we broke down APT-related errors in Ubuntu into four practical categories, from missing package managers like apt-get not found, to repository issues like apt update 404 not found and 404 not found [ip: 185.125.190.80 443], to deeper system failures requiring Live USB recovery.
For each, we offered targeted fixes using both command-line and graphical tools. Whether you faced sudo apt-get command not found, apt failed to fetch 404, or ubuntu apt update 404 not found, this article provides structured, expert solutions to diagnose, repair, and future-proof your Ubuntu environment with confidence.
And more importantly, you now know why these issues appear, and how to prevent them in the first place.
I installed a PPA, but now I getting 404 errors. What should I do?
Dear Ava; If a PPA is causing 404 errors, it might no longer be maintained or compatible with your Ubuntu version. Remove the problematic PPA using sudo add-apt-repository --remove ppa:example/ppa and consider finding an alternative source
Why can’t I use apt? I thought it replaced apt-get.
The apt command was introduced in Ubuntu 14.04 as a more user-friendly interface. If it's missing, your system might be using an older Ubuntu version or a minimal installation. Use apt-get as an alternative or reinstall apt via sudo apt-get install apt if possible
I can’t find apt anywhere. Is it possible to reinstall it?
Dear Liam; The short answer is Yes. If apt is missing, you can download the appropriate .deb package for your Ubuntu version from the official Ubuntu repository and install it using sudo dpkg -i apt*.deb.
I’m getting apt-get: command not found after installing aptitude. What’s going on?
Dear Noah; Installing aptitude should not remove apt-get. If you're encountering this issue, it might be due to a misconfiguration or corruption in your system. Reinstalling the apt package or restoring your system to a previous state might help.
I’m using Ubuntu 22.04, and I get 404 errors even though I haven’t added any PPAs
Dear Lily; This could be due to default repositories being outdated. Ensure your sources.list is up-to-date or use the “Software & Updates” tool to select a different server.