Quick Guide to Installing phpMyAdmin on Ubuntu and Debian
If you are not a CLI fan, phpMyAdmin will be your favorite database management utility. It is a web-based graphical database management tool written in PHP that is used for web hosting services. This article is a Quick Guide to Installing phpMyAdmin on Ubuntu and Debian. phpMyAdmin makes use of a web-based management interface to enable browser-based database interaction. In addition to managing users and privileges, phpMyAdmin also lets you import and export databases and run database queries.
What is PhpMyAdmin & Why Use it?
phpMyAdmin is an open-source and free administration tool written in PHP designed to manage the tables and data inside the database and the administration of MySQL over the web. As a popular program for managing MySQL databases, it is possible to import, export, drop, change, and create new MySQL database tables. Additionally, phpMyAdmin supports a wide range of MySQL and MariaDB operations, including managing databases, relations, tables, columns, indexes, permissions, and users. While we still have the option to run any SQL statement, these operations can be carried out through an interface.
Since phpMyAdmin has a web browser, it can run on any server or OS. The graphical interface of phpMyAdmin makes it simpler to create, delete, and edit databases and manage all of its components than using the command-line editor for MySQL. We can manage user permissions and manage multiple servers at once thanks to phpMyAdmin. Additionally, we can export the data from our database in a variety of formats, including XML, CSV, SQL, PDF, OpenDocument Text, Excel, Word, and Spreadsheet. Using the graphical user interface of phpMyAdmin, we can run complex SQL statements and queries as well as create and edit functions, triggers, and events.
Prerequisites to Installing phpMyAdmin on Ubuntu and Debian
To let this tutorial works correctly, provide the options below and move on.
- Buy Linux VPS running Ubuntu/Debian.
- A LAMP (Linux, Apache, MySQL, and PHP) stack installed on your Debian Server. If you need guidance, refer to Install LAMP on Debian.
- A non-root user with
sudoprivileges. - Access to a command line/terminal window.
Install phpMyAdmin on Ubuntu and Debian
Let’s go through the steps of this tutorial and learn how to install PhpMyAdmin on Debian and Ubuntu. In the end, you will be able to administer MySQL and MariaDB servers and interact with your target database server.
Step1. Update APT Package Repository & Install PhpMyAdmin
On your running distribution, open a terminal window and run the commands below. When you are done, press Ctrl+z to return to the command prompt.
Also, you can visit the developer’s phpMyAdmin page to get a specific version or to verify the most recent version.
On Ubuntu:
sudo apt-get update && sudo apt-get upgradesudo apt-get install phpmyadminThe software package known as phpMyAdmin is downloaded and installed by the system after receiving your approval by pressing Y and Enter.
On Debian:
sudo apt updatesudo apt install wget -ysudo apt install apache2 -ysystemctl status apache2sudo apt -y install php php-cgi php-mysqli php-pear php-mbstring libapache2-mod-php php-common php-phpseclib php-mysqlwget -P Downloads https://www.phpmyadmin.net/downloads/phpMyAdmin-latest-all-languages.tar.gzStep 2. Configure phpMyAdmin on Ubuntu and Debian
PhpMyAdmin requires a web server to get served over a web browser using the local or internet network.
On Ubuntu:
On Ubuntu choose the apache2 web server to automatically configure. Just press Tab to navigate to <ok> and hit Enter.
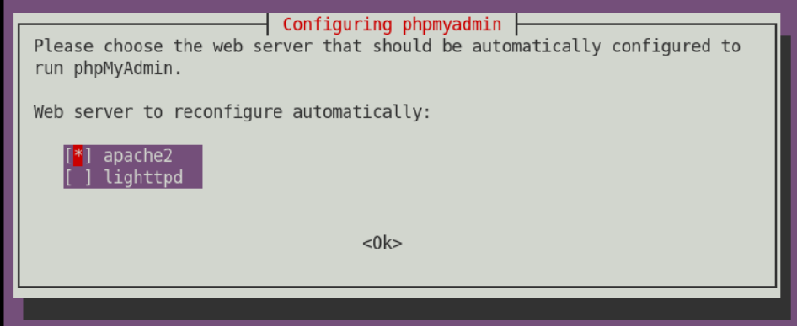
Once the installer asks for configuring the database for PhpMyAdmin, select <Yes> and hit Enter.
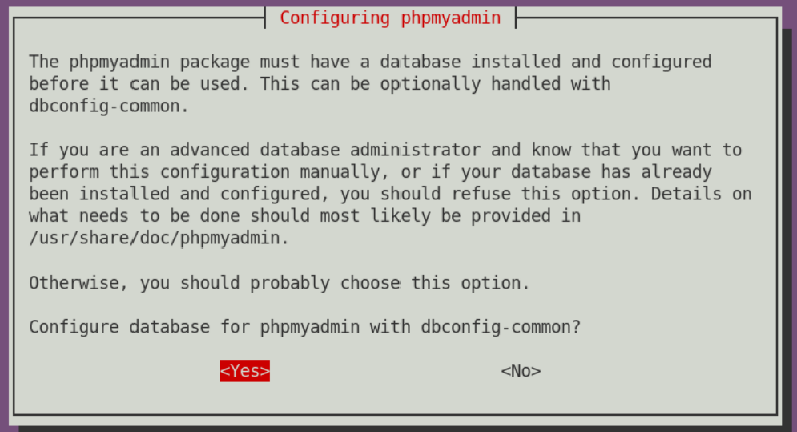
The default username is ‘’phpMyAdmin’’. Choose a strong password (which works as an administrator password) when you are prompted by the installer. When you are finished, hit Enter, then confirm the password and hit Enter again.

On Debian:
On Debian, you can use both MariaDB and MySQL because of their common features and commands. Here, we use MariaDB as an open-source database management system.
sudo apt install mariadb-server mariadb-client -ysystemctl status mariadbWhen you see the active (running) status, you are ready to configure the MariaDB database.
sudo mysql_secure_installationThen, to set a root password, type y and press Enter to create a strong root password for your database. A specified user is required in order for the phpMyAdmin tool to connect to your database. It is safer and easier to manage the degree of rights given to a user when you create a new MariaDB user. So, creating a new MariaDB user could be one of the essential steps when you are done installing PhpMyAdmin on your Debian.
How to Use PhpMyAdmin on Ubuntu
So far, you installed and configured PhpMyAdmin on Ubuntu. To start using PhpMyAdmin on Ubuntu, follow the below steps.
Step1. Enable the mbstring Extension
Mbstring is a PHP extension. Although it’s not enabled by default, it helps in the proper operation of email and.pdf files. To enable it, run the command below and then press Enter and allow the process to finish.
sudo phpenmod mbstringTo refresh the changes, use the following command and restart the Apache service:
Step 2. New MySQL Administrator Account Creation
Ubuntu by default uses auth_socket to authenticate a root user with MySQL versions 5.7 and later. This type of authentication is highly secure and validates the socket username against the name listed in the MySQL user table. But this makes using phpMyAdmin challenging.
The type of authentication can be altered. Making a new MySQL administrator account is a simpler way to get around auth_socket.
First, type the command below to log in to the MySQL server:
sudo mysqlReplace UserName with the username of your choice, and Password with a suitable strong password when entering the commands below:
CREATE USER 'UserName'@'localhost' IDENTIFIED BY 'PassWord';GRANT ALL PRIVILEGES ON *.* TO 'UserName'@'localhost' WITH GRANT OPTION;To exit the MySQL shell, run:
exitStep 3. Test PhpMyAdmin on Ubuntu
To test whether PhpMyAdmin is working correctly or not, run the commands below and replace your own information:
localhost/phpMyAdminYour server’s IP address/phpMyAdminwww.domain.com/phpMyAdminThe browser shows you a screen with a login form that welcomes you to phpMyAdmin. Please enter your username and password. The phpMyAdmin dashboard is loaded by the browser.
Step 4. Secure phpMyAdmin on Ubuntu
As we mentioned, phpMyAdmin is a popular target for hackers since it is simple to use and free. Utilize Apache’s built-in features to secure and limit access to phpMyAdmin directories by following these steps.
Firstly, open your preferred editor and use the following command to enable .htaccess and edit the phpmyadmin.conf file:
sudo nano /etc/apache2/conf-available/phpmyadmin.confLocate the section in the editor titled “Directory /usr/share/phpMyAdmin” The following two lines should appear:
Options SymLinksIfOwnerMatchDirectoryIndex index.phpThen add:
AllowOverride AllSave the file and exit. Then, restart Apache to apply the changes:
sudo systemctl restart apache2The Apache web server can be configured in further detail using the .htaccess file. So, run:
sudo nano /usr/share/phpmyadmin/.htaccessBy doing this, a new file is created and opened in a text editor. Add the next few lines to the text editor:
AuthType BasicAuthName "Restricted Files"AuthUserFile /etc/phpmyadmin/.htpasswdRequire valid-userSave the file and close.
To access the PhpMyAdmin directory, you must create a username and password. To do this, run:
sudo htpasswd -c /etc/phpmyadmin/.htpasswd UserNameThe actual username you intend to use to access the phpMyAdmin directory should be substituted for UserName. The computer prompts you to enter and verify your password. Use the same command as above but without the -c switch to add more users:
sudo htpasswd /etc/phpmyadmin/.htpasswd SecondUserStep 5. Access phpMyAdmin on Ubuntu
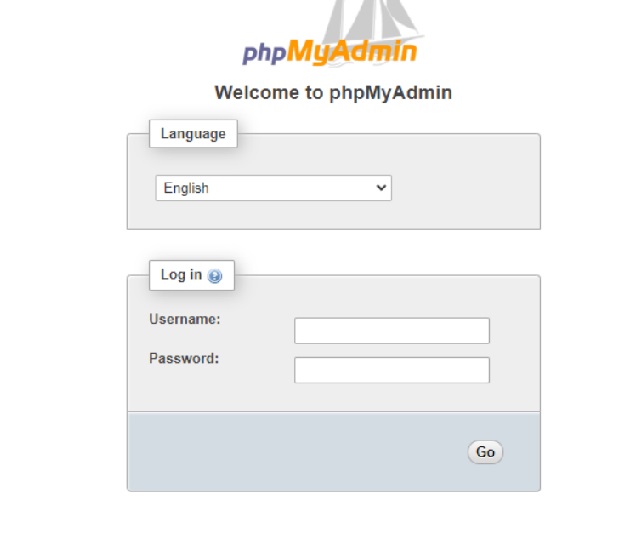
Upon completion of the installation process, launch a browser and navigate to http://your-server-IP/phpmyadmin. Substitute the IP address of the server for your-server-IP. Use the URL http://localhost/phpmyadmin if you’re using localhost. This is how the phpMyAdmin login screen will appear.
How to Use PhpMyAdmin on Debian
When you are done with installing and configuring PhpMyAdmin, you are ready to go through the remaining steps to use it on your Debian.
Step 1. Configure and Unpack phpMyAdmin
Run the following command to create a phpMyAdmin directory in the Apache web root directory:
sudo mkdir /var/www/html/phpMyAdminTo access the Downloads directory and unpack the phpMyAdmin tar.gz files to the newly created directory, type:
sudo tar xvf phpMyAdmin-latest-all-languages.tar.gz --strip-components=1 -C /var/www/html/phpMyAdminUse the following command to create a default configuration file:
sudo cp /var/www/html/phpMyAdmin/config.sample.inc.php /var/www/html/phpMyAdmin/config.inc.phpOpen your preferred text editor and add a secret passphrase to the config.inc.php file:
sudo nano /var/www/html/phpMyAdmin/config.inc.phpLocate the following line:
$cfg['blowfish_secret'] = '';Between the single quotes, insert a secret passphrase. For instance:
$cfg['blowfish_secret'] = 'My_Secret_Passphras3!';Select a challenging passphrase, exit, and save the file (Ctrl+x).
Change the config.inc.php file’s permissions:
sudo chmod 660 /var/www/html/phpMyAdmin/config.inc.phpRun the command below to change ownership of the phpMyAdmin directory:
sudo chown -R www-data:www-data /var/www/html/phpMyAdminTo restart Apache, type:
sudo systemctl restart apache2Step 2. Check phpMyAdmin GPG Key
Every downloaded package has an associated.asc file with its own key signature. The signature can be checked once both files are in the same folder.
Download the phpMyAdmin keyring to the previous location you used in order to verify the GPG key for phpMyAdmin. In this instance Downloads:
wget -P Downloads https://files.phpmyadmin.net/phpmyadmin.keyringTo navigate to the Downloads directory, then import the keyring:
cd Downloadsgpg --import phpmyadmin.keyringDownload the relevant GPG.asc file for your phpMyAdmin version and stay in the same directory.
wget https://www.phpmyadmin.net/downloads/phpMyAdmin-latest-all-languages.tar.gz.ascAgain, stay in the same directory and verify the .asc file against the keyring you downloaded:
gpg --verify phpMyAdmin-latest-all-languages.tar.gz.ascNow you can contrast the developer credentials on the phpMyAdmin documentation page with the GPG key.
Step 3. Access PhpMyAdmin on Debian
To access phpMyAdmin, open a web browser and type localhost/your_phpMyAdmin_directory into the address bar. In our instance:
localhost/phpMyAdminAs soon as you connect to the locally built Apache, MariaDB, and PHP files, the machine displays the phpMyAdmin login screen.
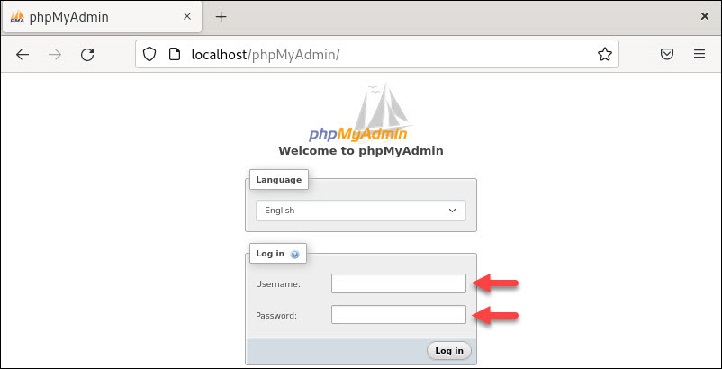
Use the username and password you created for the MariaDB user to access phpMyAdmin.
FAQ
Are PhpMyAdmin and MySQL the same?
No. While phpMyAdmin is a server tool to access the database on a MySQL server, MySQL is a database server.
Is it safe to run PhpMyAdmin over HTTP?
Since PhpMyAdmin is a popular application, it is under common attacks, and running it over plain HTTP is a security risk. Because A plain HTTP connection is unencrypted and can be intercepted.
Is securing PhpMyAdmin an optional step?
Yes. But since phpMyAdmin is vulnerable to cyberattacks, you should take security precautions like adding an authentication method.
How to run phpmyadmin on Linux?
Running phpMyAdmin under Linux is a fairly simple procedure. Either a scripted automated installation or the command line can be used. For phpMyAdmin to function properly, first install the Apache web server and the necessary PHP extensions.
How to fix ''An error occurred while installing the database'' erro on installer?
Hit ok and select the abort option.
Conclusion
In this article, you learned How to Install phpMyAdmin on Ubuntu and Debian. On your Debian & Ubuntu system, phpMyAdmin is now installed and configured. Utilize the GUI through a browser to start more effectively creating and managing your databases. Also, you can create users and tables using this interface, as well as carry out standard operations like deleting and changing data structures. Additionally, phpMyAdmin allows you to disable root user login for security reasons.
If you follow the above steps properly then you can smoothly install phpMyAdmin on Ubuntu and Debian without any errors but do not hesitate to contact us if you encounter any problems. Our technical support team will try their best to solve your problems.
Related Article : What is Debian OS