How to Install LAMP on Debian
The LAMP software stack is an abbreviation of four words: PHP, MySQL/MariaDB-Server, Apache, and Linux. LAMP is a Software bundle of the most famous free and open-source software in the web world, known as Web Stack. This collection is used to host the web server and implement dynamic sites on the server, which uses Linux as the operating system, Apache as the web server, MariaDB/Mysql as the RDBMS (relational database management system), and PHP is used as an object-oriented language.
The LAMP software stack consists of useful open-source programs to provide the necessary facilities for designing and hosting sites and improving web applications. Each of these programs is an independent and reference program on its own. The open-source nature of this collection is a commendable advantage as it allows users to access software resources and troubleshoot. Today, in all Linux releases, it becomes necessary to use LAMP as a global standard and a powerful software package. Considering that a wide range of Linux users uses Debian, learning how to install LAMP in Debian is one of the most useful tutorials.
Debian 10 Buster is the most stable and widely used version of Debian, which was recently replaced by Debian 11 Bullseye, offering hundreds of updated and new packages. As we previously taught how to install LAMP in Ubuntu, in this tutorial we will explain how to install LAMP in Debian 10/11 step by step. Linux server administrators can easily install LAMP on popular Debian versions by following the instructions in this article without having to search for another article.
Prerequisite for installing LAMP in Debian
- Buy Linux VPS that running Debian
- Having a user account with Sudo privileges to install software, manage services and edit configuration files
- Having a firewall
Steps to install LAMP in Debian
Installing the LAMP software package will be much easier than you imagine by following the instructions in this article. So without wasting time let’s get started.
Step 1: Updating the Debian Server
The first step before starting the installation of LAMP software packages is to update the repository and Debian system packages. Run the following commands to ensure that the Debian repository is up-to-date:
sudo apt update && sudo apt -y upgradeIf this is the first time you use sudo to execute commands, you may be prompted for your password to confirm your privileges to manage system packages.
Step 2: Installing the Apache web server
The first word in the LAMP collection is the Linux operating system. By preparing the Debian server, you will benefit from the features of the Linux operating system, so we are going to install the Apache web server.
Apache or Apache HTTP Server is one of the most famous and popular web servers in the world, which is the main factor in the growth of the world wide web. Apache With its history, is a great option for preparing the Debian server for hosting websites and dynamic programs. Run the following command to install Apache in Debian:
sudo apt install apache2After running the previous command, press the Y button, then Enter to confirm the installation of Apache.
In this section, we wanted to briefly guide you on how to use the Apache server:
- The main syntax to start the Apache service is as follows:
sudo systemctl start apache2.service- To stop the Apache service, use the following command:
sudo systemctl stop apache2.service- Run the following commands to restart and reload the Apache service configuration if changes are made:
sudo systemctl restart apache2.service

sudo systemctl reload apache2.service- Use the following command to check the status of the Apache service:
sudo systemctl status apache2.serviceStep 3: Updating and configuring the firewall
If you are using the UFW firewall, in order to run LAMP properly, you must set the firewall to allow HTTP and HTTPS traffic and to open the TCP ports 80 (www) and 443 ports(https). In the UFW firewall in Debian, you can access a list of profiles of programs loaded in Debian by running the following command:
sudo ufw app listOutput:
Available applications:

. . .
  WWW
  WWW Cache
  WWW Full
  WWW Secure
. . .
WWW profiles manage the ports used by web servers.
WWW Full profile activates ports 80 and 443. To confirm this, run the following command:
sudo ufw app info "WWW Full"Output:
Profile: WWW Full

Title: Web Server (HTTP,HTTPS)

Description: Web Server (HTTP,HTTPS)

Ports:

  80,443/tcp
Therefore, to allow incoming HTTP and HTTPS traffic for your desired profile, run the following command:
sudo ufw allow in “WWW Full”You can also open TCP ports 80 (www) and 443 (https) by running the following commands:
sudo ufw allow www

sudo ufw allow https
And then to check the changes you made, check the firewall status by running the following command:
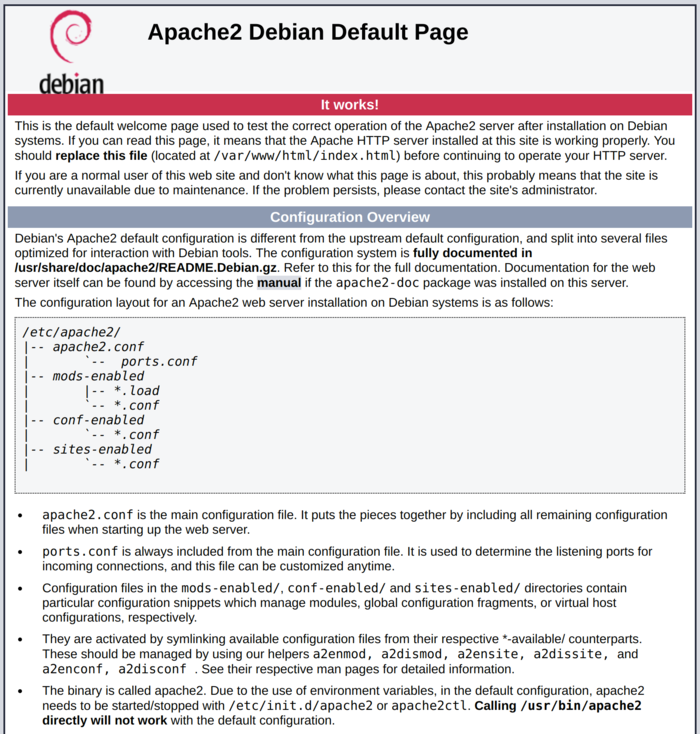
sudo ufw statusNow you can test the Apache service by referring to the public IP address or domain name of the Debian server in the web browser:
http://your_server_ipFinally, you will come across the Apache default web page, which indicates the successful installation of the Apache web server and the correct configuration of the firewall to access the web server.
Note: It may be a question for some users what the public IP address of our server is. There are several ways to find out your public IP address. One of the ways to access the public IP address of your server is to use the iproute2 tool:
ip addr show eth0 | grep inet | awk '{ print $2; }' | sed 's/\/.*$//'The output contains several lines that all the addresses it provides are correct, but one of them is used by your computer, so you can try any one you want.
Step 4: Installing the MariaDB database system
Up to this part of the article, you have implemented two software services of the LAMP collection on your Debian server. In this section, it is time to install the MariaDB database system. MariaDB is a great alternative to MySQL Server. Although Debian-based package management repositories with support for the MySQL-server meta package facilitate the installation of MariaDB, but for long-term compatibility, it is better to use the actual package of the MariaDB program to install it. So to install MariaDB run the following command:
sudo apt install mariadb-serverStep5: Running a security script to Secure MariaDB
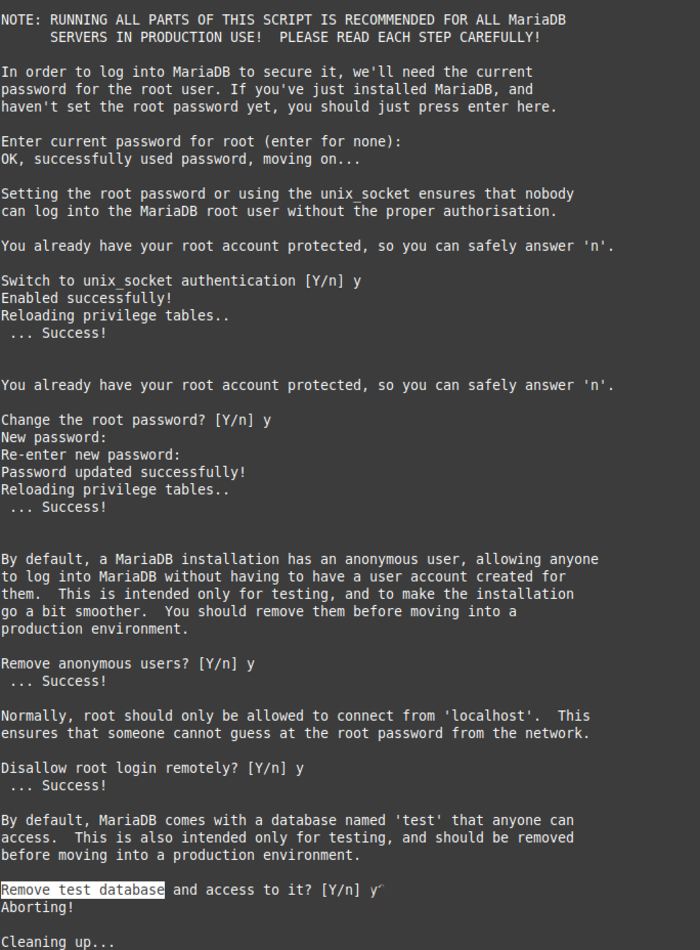
After installing MariaDB, strengthening the security of the database system by running a security script is one of the important steps you should consider. By running the security script, you prevent intrusion and access to the database system; It also removes some unsafe settings. In addition, running the security script will help you specify a password for root accounts, delete anonymous user accounts, and allow you to delete root accounts that are accessible from outside localhost; It also gives you the ability to delete test databases that are accessed by anonymous users. So run the following command to make settings to improve MariaDB security:
sudo mysql_secure_installationBy running the interactive script, you will be automatically guided by following the instructions to make changes to the MardiaDB settings.
At first, a notification will appear asking you for the main password of your current database. Since you have just installed MariaDB and have not made any changes to the MariaDB configuration, leave the password box blank and then press Enter.
Then you will receive a message asking you to set a password for the database root password. In our opinion, there is no need to set a password because MariaDB uses the security authentication method for the main user by default, so press N and Enter to skip this request.
Then, to implement the security measures of the script, answer the requests by pressing the Y button and then Enter.
Finally, enter the MariaDB console by running the following command as the database root user:
sudo mariadbOutput:
Welcome to the MariaDB monitor.  Commands end with ; or \g.
Your MariaDB connection id is 42
Server version: 10.3.36-MariaDB-0+deb10u2 Debian 10
Copyright (c) 2000, 2018, Oracle, MariaDB Corporation Ab and others.
Type 'help;' or '\h' for help. Type '\c' to clear the current input statement.
MariaDB [(none)]>
As a result, you have successfully connected to the MariaDB server without having to set and enter a password. This might seem like a security problem, but MariaDB supports a secure authentication system to log in to the server, and this method is more secure than setting a password to connect to the MariaDB server; because only system users who have sudo privileges are allowed to enter the MariaDB console as MariaDB root users.
To exit the MariaDB console, enter the following command:
exitIn this section, in addition to installing MariaDB, you also secured your database system. For more guidance, we will explain how to create a MariaDB database and user/password.
Creating a database and assigning permissions to users(Additional training)
After installing the MariaDB database system, use the following command to create the database and assign the necessary permissions to users to use the database:
mysql -u root -pIf prompted, enter MariaDB’s root password.
Then create a database with a name of your choice, for example, Operadb, using the following command and permit users to use the database:
MariaDB [(none)]> CREATE DATABASE Operadb;GRANT ALL ON Operadb.* TO 'Operauser' IDENTIFIED BY 'Operapasword';
quitTherefore, the previous command creates the Operadb database and permits to use of the database to the user ‘Operauser’ with the password ‘Operapasword’.
Test the database you just created by running the following command:
mysql -u Operauser -p'Operapasword' operadbStep 7: Installing PHP and its dependencies
This puzzle is not complete without installing PHP, so we will install PHP as the last piece of the puzzle to generate and display dynamic content. PHP plays a key role in optimizing and developing the LAMP stack. Because in addition to processing codes before displaying dynamic content, it executes scripts and connects to the Maria DB database and the Apache webserver to exchange information and content.
Up until this part of the article we installed Apache to serve content to users and MariaDB to manage data, now we will install PHP to complete the LAMP stack by following the instructions we will teach later.
Installing the PHP package alone will not solve your need, you must also install the PHP module (php-mysql) to communicate with the MariaDB database. To enable Apache to manage PHP files, you need libapache2-mod-php and you should also install PHP dependencies.
Run the following command to install PHP packages:
sudo apt install php libapache2-mod-php php-mysqlTo verify the PHP version, enter the following command:
php -vOutput:
PHP 7.3.31-1~deb10u2 (cli) (built: Dec 15 2022 09:39:10) ( NTS )
Copyright (c) 1997-2018 The PHP Group
Zend Engine v3.3.31, Copyright (c) 1998-2018 Zend Technologies
    with Zend OPcache v7.3.31-1~deb10u2, Copyright (c) 1999-2018, by Zend Technologies
You can set Apache so that by requesting the user’s directory from the server, PHP files (index.php) will be prioritized over index.html files in the search. For this purpose, access the contents of the dir.conf file using the nano editor (your favorite editor) by running the following command:
sudo nano /etc/apache2/mods-enabled/dir.conf
/etc/apache2/mods-enabled/dir.conf
<IfModule mod_dir.c>
    DirectoryIndex index.html index.cgi index.pl index.php index.xhtml index.htm
</IfModule>
in order that PHP files to be preferred over other files in the search, change the position of the PHP file to the beginning of the directory (after the DirectoryIndex specification):
/etc/apache2/mods-enabled/dir.conf
<IfModule mod_dir.c>
    DirectoryIndex index.php index.html index.cgi index.pl index.xhtml index.htm
</IfModule>
After changing the location of the PHP files in the contents of the dir.conf file, save the file and exit. To do this, press CTRL+X, then Y and Enter. (in the nano editor)
To apply the settings, reload the Apache service:
sudo systemctl reload apache2Run the following command to check the Apache service status:
sudo systemctl status apache2Step 8: Testing PHP installation and performance on LAMP Server
We will create a PHP test script to ensure the correctness of the PHP installation process and the coordination between the functions of the LAMP stack. With this, we will check the performance of the web server in processing requests for PHP files.
1. In your desired web root folder, use the nano editor to create a new file named test.php:
nano /var/www/your_domain/test.php2. After creating the new file, add the following content that contains valid PHP code to the file:
<?php

phpinfo();
3. After adding the desired content to the file, save the changes made in the file and exit the file.
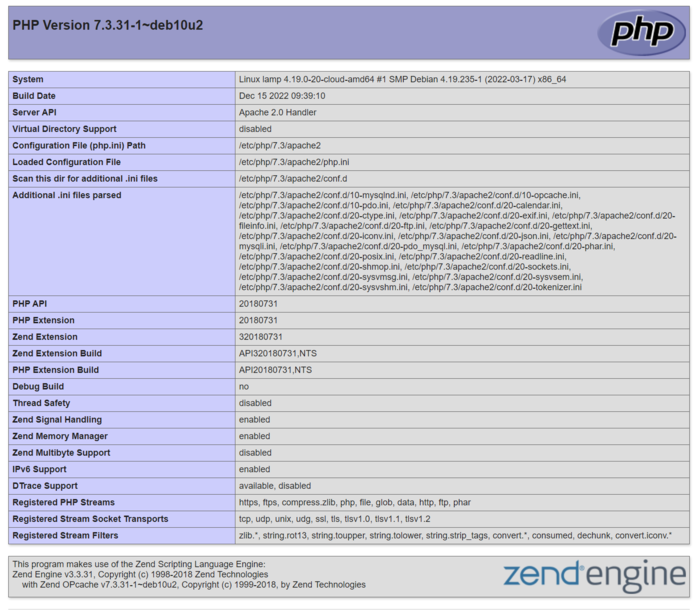
4. Now you can test the PHP script. To do this, in your web browser, search for the domain name or IP address of your server along with the name of your script (test.php):
http://your_domain/test.php5. As a result, the default PHP page containing information from your server will be displayed. By checking this page, you will be sure of the correct PHP settings on the LAMP Server, and this information can guide you in debugging. Therefore, receiving and viewing this page in the browser indicates the correct installation of PHP.
Now that you have successfully checked the LAMP configuration and PHP-related information, you will no longer need the PHP file you created. To increase security, it is better to delete this file byrmcommand because it contains important information about PHP on your Debian server. To do this, enter the following command:
sudo rm /var/www/your_domain/test.phpStep 9: Test the performance of PHP in connecting to the database
If you want to check the performance of PHP in connecting to the database and retrieving records according to the query, this part of the article will be useful for you. For this purpose, you need to connect to MariaDB, configure a database with new users, and create tables and queries from the PHP script for testing. Follow the steps below to achieve your goal.
1. First, connect to the MariaDB console with root privileges:
sudo mariadb2. Enter the following command from the MariaDB console to create the database:
CREATE DATABASE example_database;3. Using the following command, create a new user to access the new database with full privileges and specify a secure password for it:
CREATE USER 'example_user'@'%' IDENTIFIED BY 'password';4. Then grant the necessary privileges to access and manage the example_database database to the new user:
GRANT ALL ON example_database.* TO 'example_user'@'%';5. Flush the privileges so that you have no doubts about saving them in the current session.
FLUSH PRIVILEGES;6. Exit the MariaDB console by running the following command:
exit7. To test the privileges of the new user, log in to the MariaDB console as your customized user:
mariadb -u example_user -p8. After entering the ‘example user ‘password, check access to the ‘example_database’ by running the following command:
SHOW DATABASES;9. Then, from the MariaDB console, create a table called ‘check.list’ by running the following statement:
CREATE TABLE example_database.check_list (
                item_id INT AUTO_INCREMENT,
                content VARCHAR(255),
                PRIMARY KEY(item_id)
10. Add a few rows of information in the test table and run the following command several times with different values:
INSERT INTO example_database.check_list (content) VALUES ("My first important item");11. To check that the information you added to the table is saved, enter the following command:
SELECT * FROM example_database.check_list;12. After checking the correctness of the information you entered in the test table, exit the MariaDB console:
exit13. To test the connection of the PHP script to MariaDB and query the database content, you must first create the PHP script using the nano editor or any editor of your choice:
nano /var/www/your_domain/check_list.php14. After creating the PHP script, you can check its connection to the MariaDB database and query the contents of its test tables. If you encounter a problem with the connection, you will receive an error.
15. Add the following content to the check_list.php scrip. (Replace your username and password with example_user and password.)
/var/www/your_domain/check_list.php
<?php
$user = "example_user";
$password = "password";
$database = "example_database";
$table = "check _list";
try {
  $db = new PDO("mysql:host=localhost;dbname=$database", $user, $password);
  echo "<h2>TODO</h2><ol>";
  foreach($db->query("SELECT content FROM $table") as $row) {
    echo "<li>" . $row['content'] . "</li>";
  }
  echo "</ol>";
} catch (PDOException $e) {
    print "Error!: " . $e->getMessage() . "<br/>";
    die();
}
16. Save and close the file.
17. Access the content of your test table by referring to the domain name and public IP address of your website along with /check_list.php in the web browser:
http://your_domain/check_list.phpIf a page containing the content of the test table you created appears, you can ensure of the connection between PHP and the MariaDB database.
FAQ
How can you be sure of the correct implementation of LAMP?
By creating a PHP script and testing PHP in connection to the database and checking PHP performance, you can access information from the LAMP configuration and ensure that the settings are applied correctly or not. One of the most common ways to check LAMP performance is by checking the status of the Apache web server, in this way, you will get information such as the version of the Apache web server it uses and other related information.
Is the way to install LAMP in Debian 10 different from Debian 11?
No, by following the instructions in this article, you can install LAMP on Debian 10 and Debian 11.
Conclusion
LAMP is one of the most popular and stable open-source solutions for running dynamic websites, which prepares and optimal the Linux server for efficient hosting of websites. In this training, in addition to using Linux as an operating system, we succeeded in installing Apache as a free web server, installing MariaDB as a database management software (RDBMS), and installing PHP as a programming language; so we equipped our Linux server in the best possible way to host our websites through this article. If you encounter any problem or question in any part of this article, share it with us in the comments section so that we can guide you as soon as possible.
Related Article : What is Debian OS