Edit Hosts File on Windows Mac and Linux Ubuntu
Edit Hosts File allows local mapping of domain names to IP addresses, bypassing DNS. This guide covers Windows, Mac, and Linux Ubuntu for efficient hosts file editing with administrator rights.
🤖AI Overview:
Edit Hosts File is the modification of a local plain-text file that maps domain names to IP addresses, bypassing DNS servers. This file aids in quick website access, blocking sites, or redirecting traffic on Windows, Mac, and Linux. Modifications affect only the local computer and require administrator permissions.
What is a Windows Host File and How it Works?
The host file is an almost 824-byte local plain-text file that is located deep down in the Windows folder. A host file translates domain names into an IP address and can be used to skip using the DNS server and block a website as a method to Block a Website for a User in Windows, Mac, or Chrome. The host file functions as though each Windows user has their own personal Domain Name System.
The DNS settings for the websites listed in the host file on that computer are overridden. The host file is the first place the computer searches to resolve a name when seeking an IP address. The lookup fails if the name is not found in the local host file or while trying to resolve it via a DNS.
Why to Edit Hosts File?
For a variety of reasons, you might need to update your computer’s host file to correctly resolve a website by its domain name. The most frequent justification for doing this is to enable users to read or create web content right away after buying a new domain name or switching an existing domain name to another ISP (Internet Service Provider). By changing your Hosts file, malware can redirect Web addresses on your computer. The Host File Hijack is the name for this. You can navigate to the host file, right-click on it, choose Properties, and set it to ”read-only” to stop host file hijacking. By doing this, you can lock down your Hosts file and stop malware or other users from writing to it.
You may edit hosts file on your computer as a temporary workaround if you must update your website right away and cannot wait for the internet to propagate the domain information. This workaround only applies to the PC or server where the modification was done. The website won’t be accessible to anyone online as a result. Also, if your DNS server is not functioning properly even after Configuring DNS Server in Windows, edit hosts file comes in handy. You can add the IP address and domain name to the hosts file to speed up the search process if your DNS server is operating slowly.
You generally won’t need to change your Windows hosts file very often. However, being aware of its location and functioning can be useful. So, stay with us on this guide to review all the required steps to Edit Hosts File in Windows, Mac, and Linux Ubuntu.
Tutorial Edit Hosts File in Windows
So far, you learned all about hosts file and the reasons you should know how to edit hosts file on your current operating system. All operating systems have hosts files, although they are located in different places. On Windows, the hosts file is located in “C:\Windows\System32\drivers\etc\hosts“. This part covers the way you can edit hosts file in Windows 7, 8, 10, and 11.
Edit Hosts File on Windows 10 & 11
The hosts file is still present in Windows 10 and Windows 11. So, after buying Windows VPS, you are ready to follow the below steps to learn the quickest way to edit hosts file on Windows 10 & 11. Since the hosts file is protected, much like the other files in the Windows folder, to move, edit, or delete the file, you must have administrator privileges.
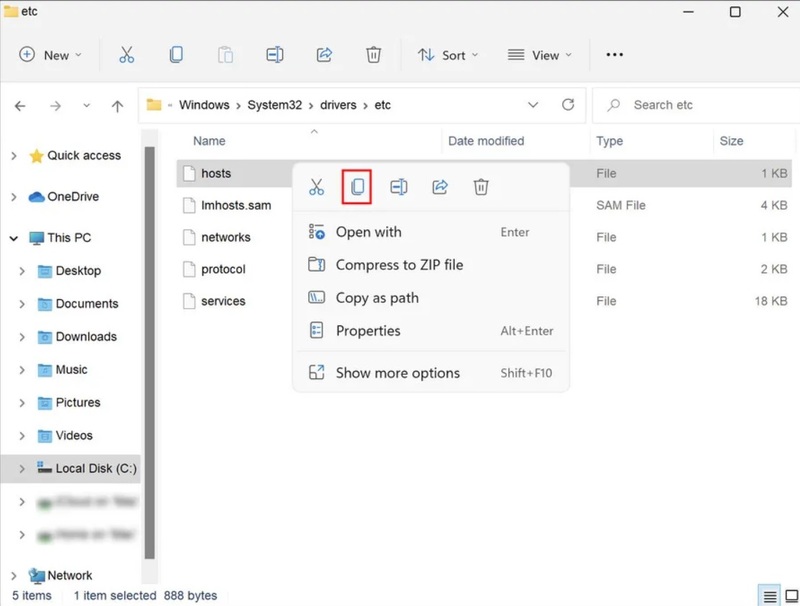
- We must first create a backup. If something goes wrong, you can use this to return to a previous state. To do this, launch File Explorer and go to the following location:
C:\Windows\system32\drivers\etcRight-click on the hosts file and then select Copy and paste the file into another secure location on your computer.
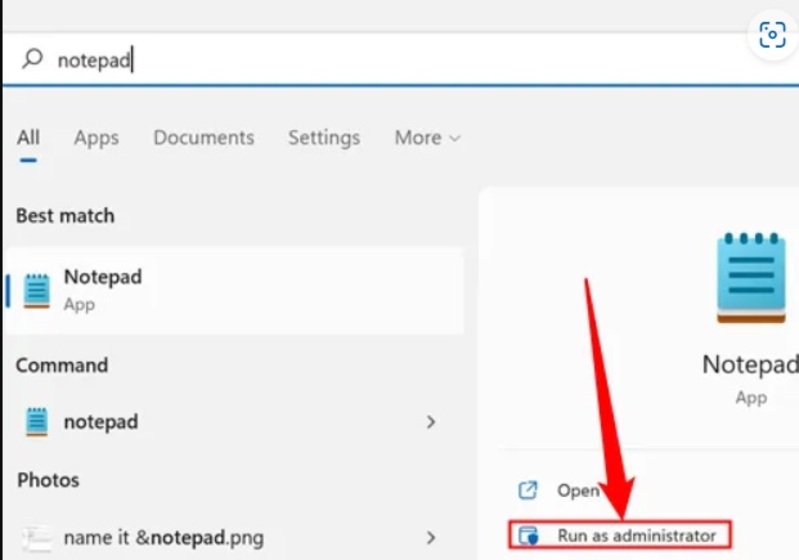
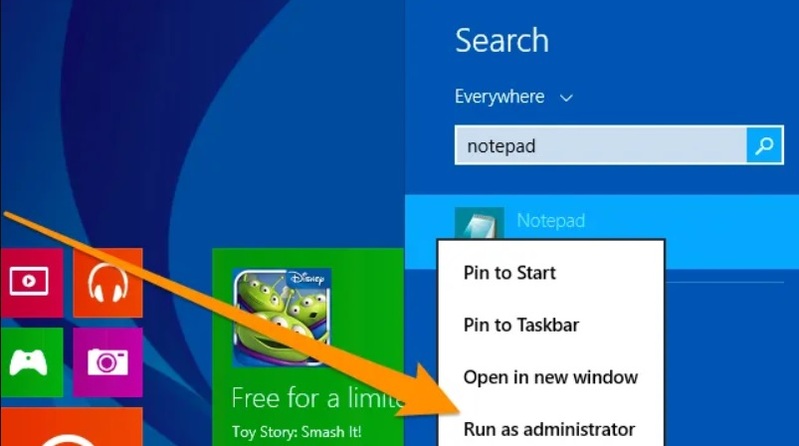
- To modify the hosts file, you can use whatever plain text editor you like, although Notepad works just fine. After clicking the Start button and typing “notepad” into the search box, right-click the program and select “Run as Administrator.”
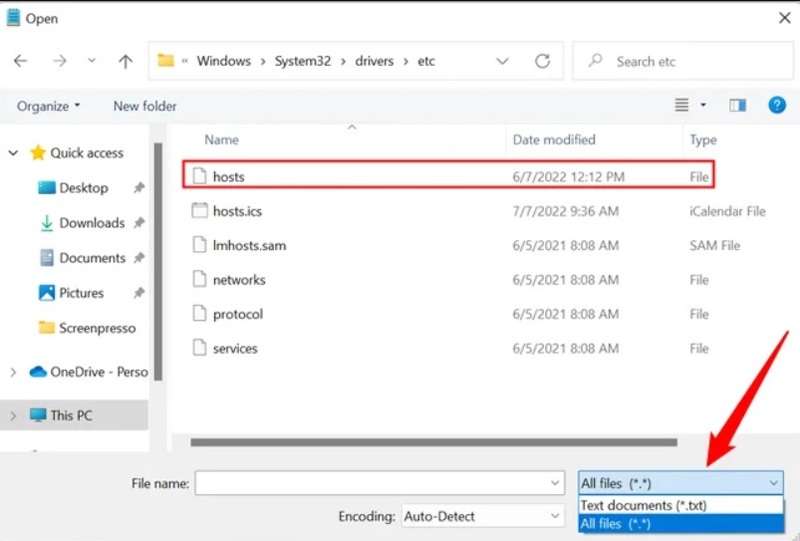
Go to File > Open in the next window. Click Open after entering the following address in the text box for the file name. You can also access the file manually:
C:\Windows\System32\drivers\etc\hostsThe select should be changed to “All Files (*.*)” rather than “Text Documents (*.txt).” If you’re only displaying text documents, the hosts file won’t be visible because it doesn’t have a file extension. Find the “hosts” file and click open after making the necessary changes.
After that, you can make any changes you want to the hosts file. It can be used for a few obvious things, such as blocking or redirecting internet traffic.
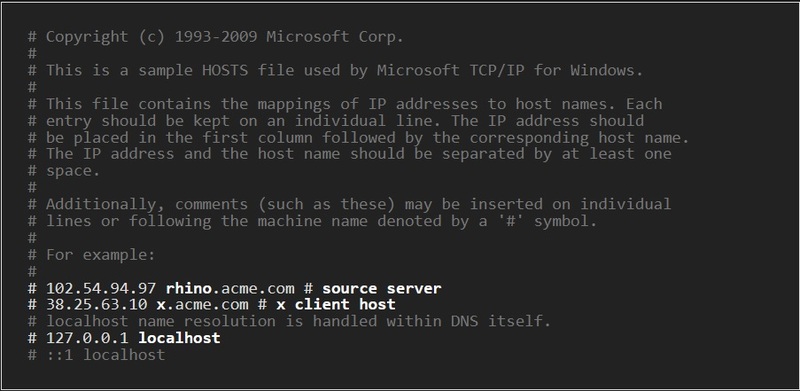
To continue and test what you have done here, open the file, then scroll to the bottom and type the IP address and domain name of the website you wish to ban. Suppose we wish to update the file to include YouTube’s IP address. Our file will appear as follows using this example.
127.0.0.1 <a href="http://<a href="https://www.youtube.com/" target="_blank" rel="noopener">www.Youtube.com</a>"><a href="https://www.youtube.com/" target="_blank" rel="noopener">www.Youtube.com</a></a>If you want to block a site, simply enter incorrect IP addresses like 0.0.0.0. Using the example above, we will be entering the following text if we want to block YouTube.
0.0.0.0 <a href="http://<a href="https://www.youtube.com/" target="_blank" rel="noopener">www.Youtube.com</a>"><a href="https://www.youtube.com/" target="_blank" rel="noopener">www.Youtube.com</a></a>Click File > Save As to save time. Then, select All Files from the Save as type option by expanding it. Finally, save the file to your desktop with the name hosts2.
All that’s left to do is place the hosts file in the appropriate spot now that it’s ready to use. Go to the desktop, right-click the newly generated file, and select Rename.
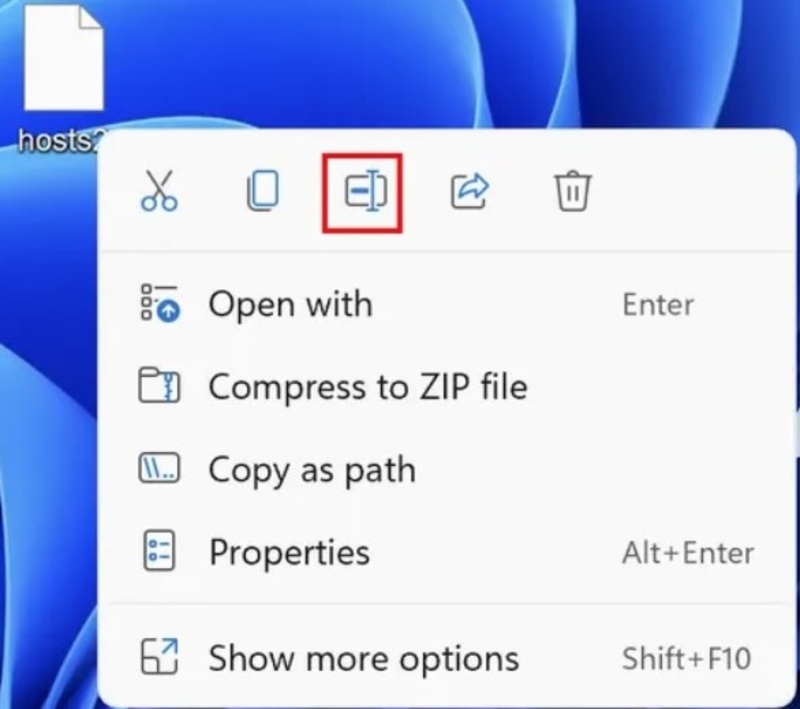
Removing the 2 (or any other number or letter you added) will leave the file with the name Hosts alone.
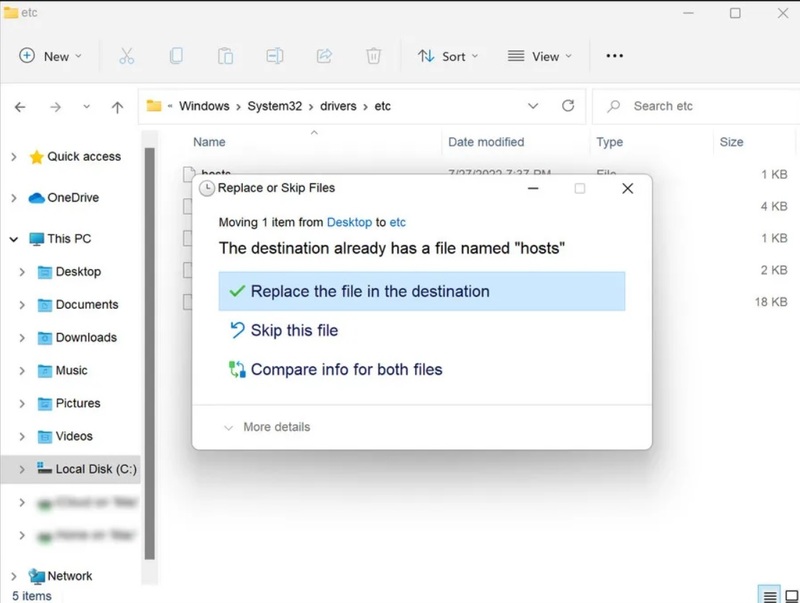
Copy the file. Open File Explorer, then go to where the host was originally located. If you receive an overwrite prompt, simply paste the new file here and select Replace the file in this destination.
You can now use your edited hosts file.
Edit Hosts File on Windows 8
On Windows 8 and 8.1, editing the hosts file is essentially the same as on Windows 10 or 11.
- So, again type “Notepad” into the search bar, right-click it in the search results list, and select “Run as Administrator”.
Once Notepad is launched, open it by clicking “File” in the top right corner, selecting “Open,” and then going to the /etc/ folder:
C:\Windows\System32\drivers\etc\hostsThe hosts file can be edited just like any other file. If you like, you can use it to restrict access to particular websites.
Edit Hosts File on Windows 7
The hosts file can be accessed in Windows 7 the same way it can in newer Windows versions. To open the hosts file, locate it using Notepad while running as administrator, and then open it.
- There are several options for doing this. Finding Notepad, selecting “Run as Administrator,” and then going to the hosts file are the initial steps. It’s situated at:
C:\Windows\system32\drivers\etc\Instead, press Windows+R to open the Run window, then type the following command into it:
notepad c:\windows\system32\drivers\etc\hosts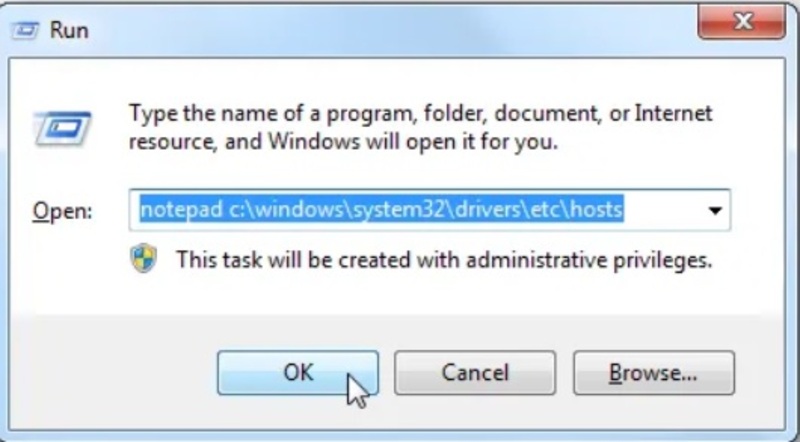
The command will open the chosen file immediately and launch Notepad as administrator. You can edit the file after Notepad is opened. In this example, Google will be blocked. Simply type the following after the # mark to accomplish this.
0.0.0.0 <a href="https://www.google.com/" target="_blank" rel="noopener">www.google.com</a>Once you’ve finished editing your hosts file, be sure to save it.
How to Edit Hosts File in Linux Ubuntu
So far, you learned how to edit hosts file in Windows. Regardless of the version you are using, the above content can be helpful. But if you are going to edit hosts file on your Linux after buying Ubuntu VPS, Linux VPS, the following part of this tutorial is all for you.
Edit Hosts File on Linux Ubuntu
To edit hosts file on Linux Ubuntu, you can use your preferred text editor to complete the task on Linux. In Ubuntu (and most Linux systems) it is possible to change the hosts file in the Terminal directly. You can use your preferred GUI text editor or your preferred command-line editor.
- In this case, we will use Ubuntu’s Gedit. Ctrl+Alt+T will launch the Terminal. Then enter your admin password after typing the command below:
sudo suEnter the following command to launch Gedit and access the hosts file:
sudo gedit /etc/hostsJust like in the Windows 10 & 11 instructions, add the targeted IP address, a space, and the domain name at the bottom of the hosts file and save your edits.
Edit Hosts File on macOS
As the latest explained OS, if you are using Mac, use the below steps to edit the Mac hosts file:
- Open Terminal by clicking the Launchpad button. The Nano Editor is what we’ll be utilizing. Type the following statement into the box and hit Enter to run it as an administrator:
sudo nano /private/etc/hostsYour password must be entered. You’ll be taken to the hosts file. Include the domain name first, then your preferred IP address, separated by a space. Use the Ctrl + O shortcut to save your changes.
Troubleshoot Hosts File Not Working
There may be several causes for the hosts file to stop functioning on Windows, Linux, or Mac. It’s possible that you can’t open the file because the format isn’t supported, or you don’t have the necessary access permissions. Here are some troubleshooting techniques you can attempt if you are having problems with the file:
1. Clear the NetBIOS and DNS Cache
The first thing we advise doing to fix such problems is clearing DNS cache because they frequently result from damaged or defective cache files.
Once the DNS cache has been removed, proceed as follows to erase the NetBIOS cache:
In the Windows search box, enter “Command Prompt”, select “Run as administrator.”, and run the following command in the ensuing window.
nbtstat -RCheck to see if the issue has been fixed after running the command.
2. Restart the hosts file
To fix any problems with the hosts file, you can also attempt restoring it to its original state. Launch File Explorer and go to the following location:
%systemroot% \system32\drivers\etcChange the hosts file’s name to hosts.bak and navigate to the location below:
%WinDir%\system32\drivers\etcTo change the text in the hosts file, double-click on it and enter the following:
To make the changes, save the file.
Conclusion
Learning how to edit the hosts file empowers you to control how your computer connects to internet addresses. By following the clear, step-by-step instructions above tailored for Windows, Linux, and macOS, you can confidently edit the hosts file for tasks such as blocking sites, redirecting domains, or troubleshooting. Remember to work with care, back up your files, and verify your changes for the best results. Editing the hosts file is a simple yet powerful tool in your Linux and general computer skills arsenal.
FAQ
2. Why do I need to edit the hosts file?
To block sites, redirect domains, speed up access, or test websites locally before DNS propagation.
3. How do I edit the hosts file in Windows?
Open Notepad or another editor with administrator rights, open "C:\Windows\System32\drivers\etc\hosts", edit, and save.
4. How to edit the hosts file in Linux Ubuntu?
Use a terminal editor with sudo, e.g., "sudo nano /etc/hosts", to open and modify the file.
5. How do I edit the hosts file on a Mac?
Use Terminal with sudo, e.g., "sudo nano /private/etc/hosts", to edit and save the hosts file.
6. How can I block websites using the hosts file?
Add a line with 0.0.0.0 followed by the domain to redirect and block that site.
7. How can I protect the hosts file from malware?
Set the file to read-only and regularly scan your system to prevent unauthorized changes.
8. What should I do if my edited hosts file is not working?
Clear DNS cache, restart your system, and check for correct file format and permissions.
9. Why do I need administrator rights to edit the hosts file?
System protection requires elevated rights to prevent unauthorized modification.
10. Can editing the hosts file affect my entire network?
No, changes affect only the local machine where the file is edited.