Configure DNS Server in Windows Easily
Configure DNS Server in Windows by installing the DNS role, creating forward and reverse lookup zones, and adding DNS records. This process enables efficient name resolution within your network.
🤖AI Overview:
Configuring a DNS Server in Windows involves installing the DNS Server role on a Windows Server, setting up forward and reverse lookup zones, and adding essential DNS records such as A and PTR. This configuration facilitates proper domain name to IP address translation and supports network name resolution.
DNS in A Simple Word
The Domain Name System (DNS) functions as a fictitious phone book for the Internet. Your device utilizes DNS to look up the specific IP addresses of the websites you enter into the address bar of your browser to locate them online. You no longer need to bother trying to remember the IP address of each website you wish to access thanks to this. DNS is a naming database that contains data about domain names and the IP addresses that go with them.
Additionally, it converts human-readable domain names such as www.operavps.com into their IPv4 or IPv6 equivalents, which are more difficult for people to remember and type out.
How Does DNS Work?
Your computer searches for the associated IP address of a website when you type its address into a search engine, such as YouTube.com, to find the correct page. In order to avoid a web traffic backlog, well-known websites like Google have numerous IP addresses that can be used concurrently. The recursive DNS server, root name server, top-level domain (TLD) nameserver, and authoritative nameserver are the four main servers that convert hostname-to-IP address. They are also called DNS resolutions.
Your browser receives the data after the correct IP address has been identified, and the web page loads. Additionally, the recursive DNS server keeps that IP in its cache memory for a short while up to a week. You can also learn how to clear DNS Cache in Windows.
This is done so that the server won’t need to ping other servers in order to swiftly return the address. Consider this to be comparable to your computer’s RAM, which keeps track of recently used programs, so it may access them more rapidly the next time they are needed. Your browser receives an error notice if a query reaches the authoritative name server level but the IP address still cannot be located. It all happens in a few milliseconds.
Note: A cyberattack technique known as DNS tunneling allows attackers to exploit DNS to introduce data packets containing malicious software into a system. This exploit conceals malicious software behind what seems to be legitimate DNS traffic and is frequently applied to create a command and control link with a target network. If DNS traffic isn’t constantly checked, many individuals may be misdirected because bad DNS cache data frequently persist on the server and directs fresh inquiries until it expires or is manually erased.
So, it is important to use a trustable DNS server and manage and prohibit your considered websites to prevent devices on your home or office network from accessing them.
Prerequisites to Configure DNS Server in Windows
To let this tutorial works correctly, provide the options below and move on.
- A server running Windows VPS.
- A user with administrative privileges.
- At least 4 GB RAM with 2 Cores CPU.
Install a DNS Server on Windows Server
Once you purchased your own Windows VPS to run Windows Server with any edition you prefer, you also need to have a pre-installed DNS server role. If you’re all set with this, skip this step to the next one. If not, review the required steps of installing the DNS server role to prepare to Configure DNS Server in Windows Server. As an administrator, you have the option of installing many server roles on a single computer or dedicating an entire server to one particular role. The Domain Name System (DNS) and Dynamic Host Configuration Protocol (DHCP) roles can be implemented simultaneously on one server for convenience.
As you read in the prerequisites part, you must log in to your Windows Server as an administrator user. Then, follow the below steps to Install DNS Server.
Step 1. Click Start, then click Server Manager and open it. When you see the screen below, click on Add roles and features.

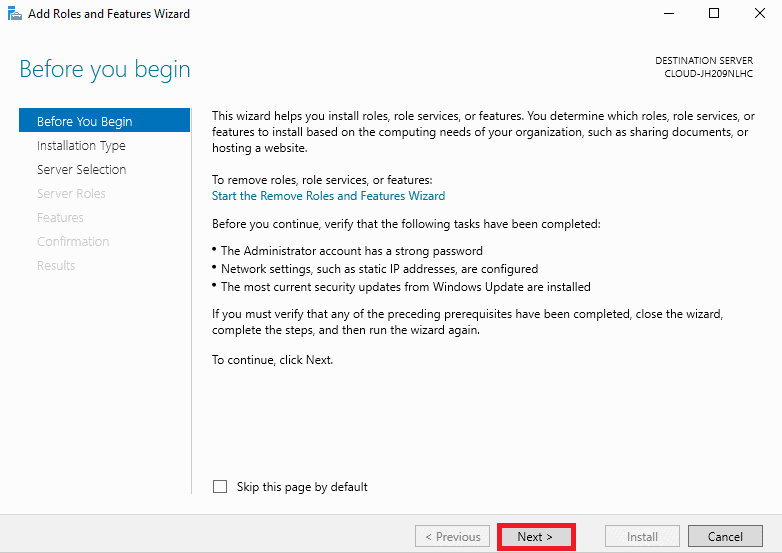
Step 2. Once you see the Before You Begin screen, click Next.
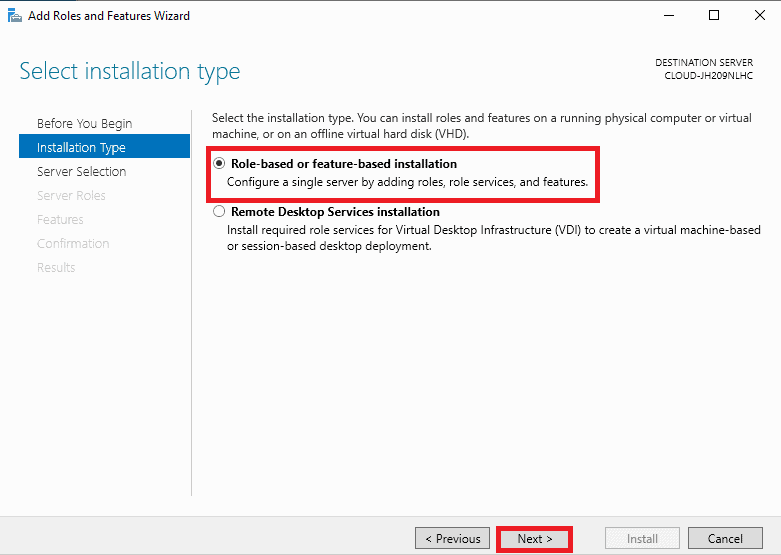
Step 3. After clicking the Next button in the previous step, you must see the Select installation type screen. There, select Role-based and feature-based installation and click on the Next button to continue.
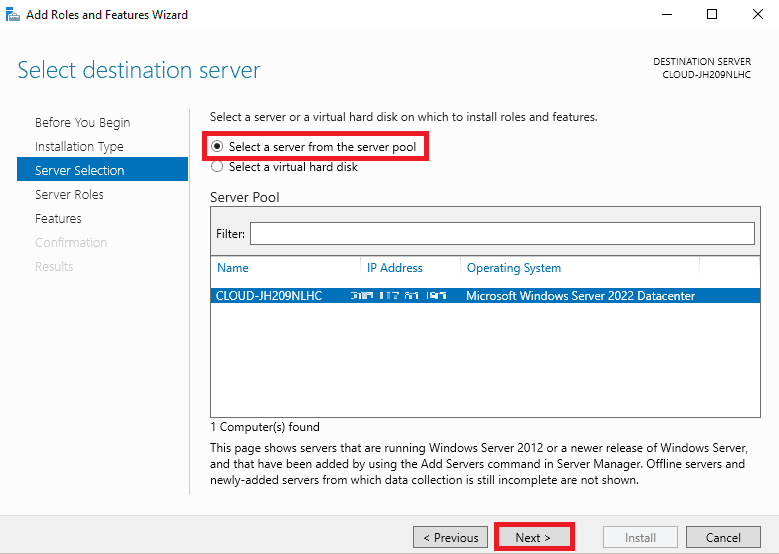
Step 4. On the Select destination server screen, you should select the server from the server pool and click on the Next button.
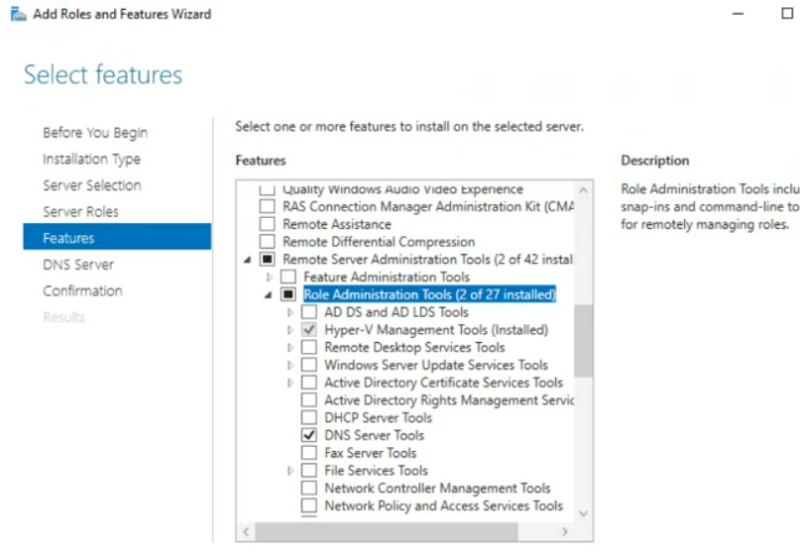
Step 5. On the Select server roles, select the DNS server and click on the Next button.
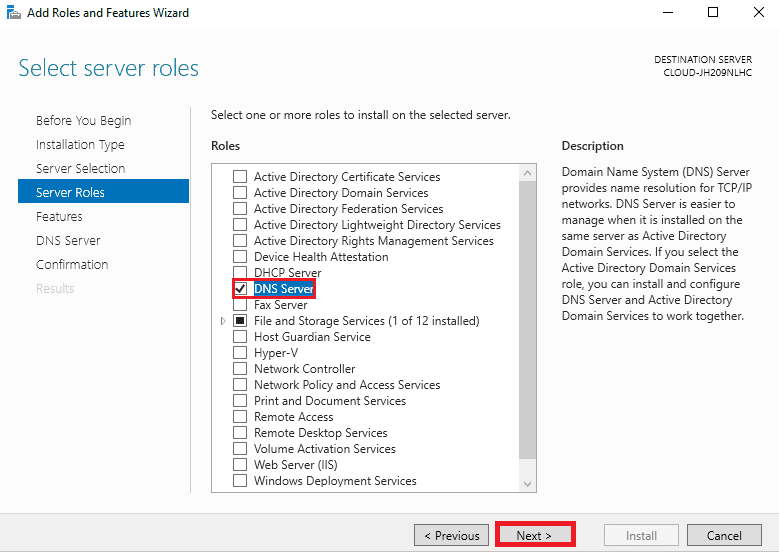
A pop-up window will appear asking you to install some more tools for the DNS server. Check your needs if you want to install the tools, then proceed as necessary. You can see some more features for your DNS server in the following window. Read them attentively, and if necessary, add them.
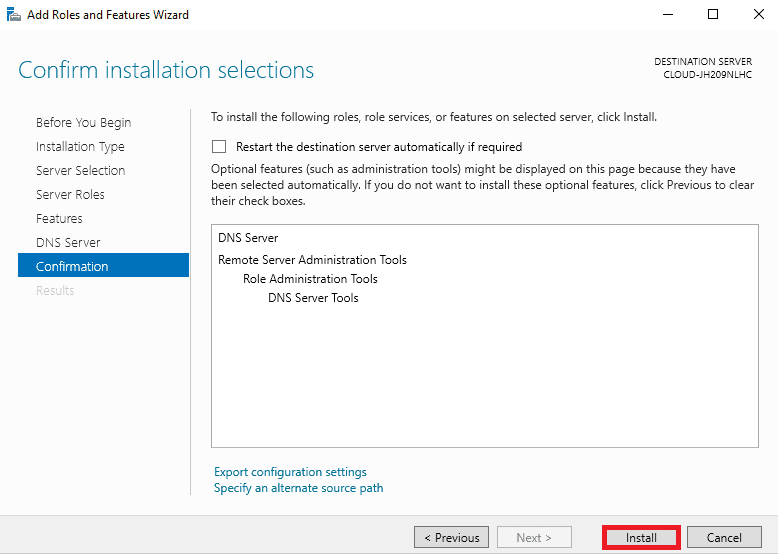
Step 6. When you see the below screen, you should verify all settings. Then, click on the Install button to start the installation process.
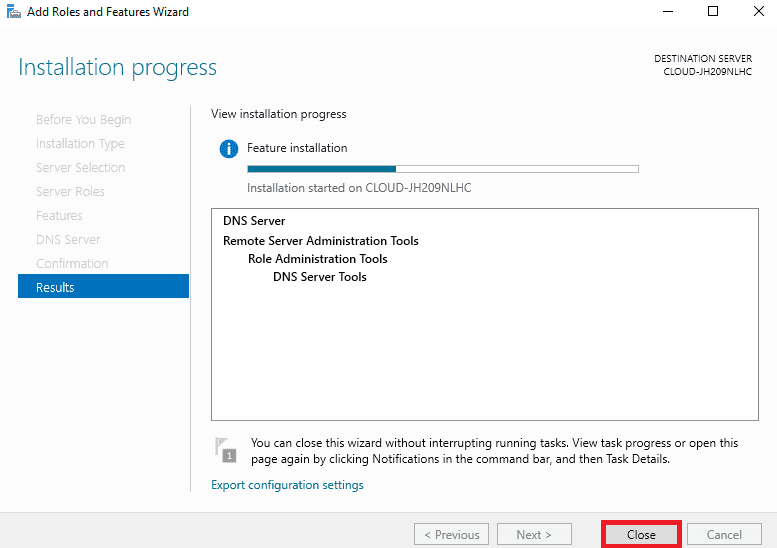
Step 7. Now, you must see the Installation progress screen. Just wait till the installation is complete. When the installation is complete, click on the Close button to close the installation wizard.
Your system’s DNS Server role has been successfully installed. Go to your Server Manager right now. A box that represents the DNS role is visible. Now that the DNS server role has been installed, let’s move on to learn How to Configure DNS Server on Windows Server.
Remove the DNS Server Role
To uninstall the DNS Server role, run the following command:
Uninstall-WindowsFeature -Name DNSHow to Configure DNS Server in Windows Server [Visual Step]
Now that you have successfully installed DNS Server on your Windows Server, let’s go through the steps of this part to Configure DNS Server in Windows.
Step 1. Create a Forward Lookup Zone
Zones are the various parts of a domain namespace. In this step, to resolve the name to the IP address you must create a forward lookup zone. To do this, review the following instructions.
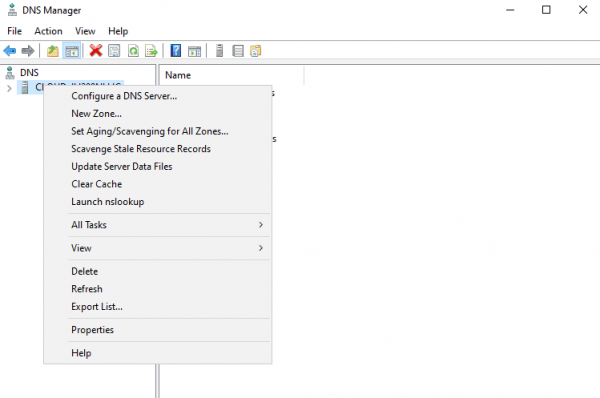
1. Open the Server Manager and click Tools > DNS. So, you can see the DNS manager will be opened.
2. Right-click on the server name and click on the New Zone.
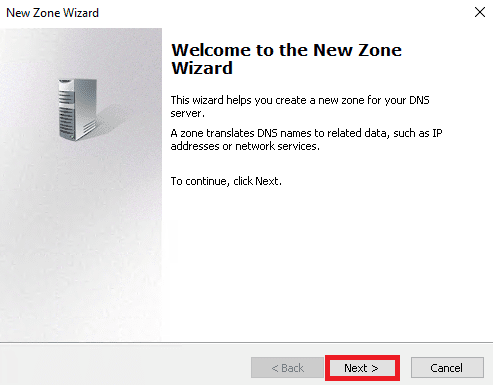
3. Once you see the zone configuration wizard screen, click on the Next button.

4. Now, you must see the zone type selection screen. Just select the Primary zone and click on the Next button.

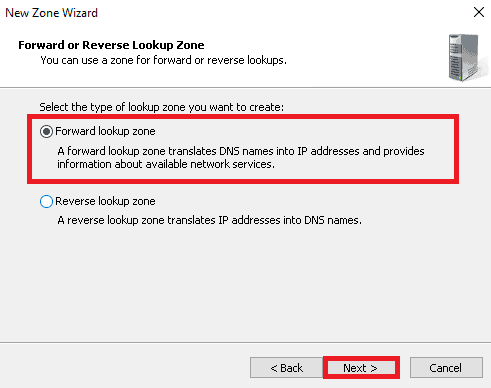
5. On the below screen, select Forward lookup zone and click on the Next button.
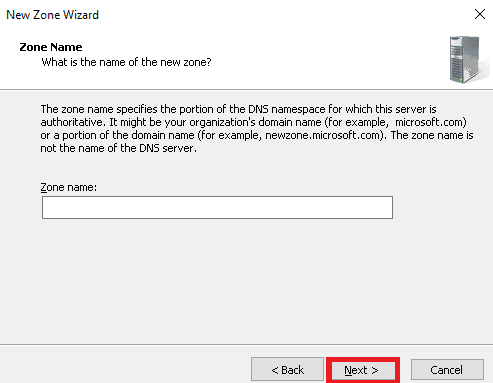
6. On the below screen, you will be asked for the name of the new zone. So, give your zone name and click on the Next button.
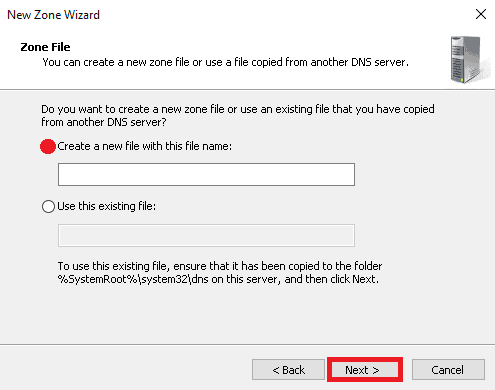
7. On the Zone File screen, select “Create a file with the file name” and click on the Next button.
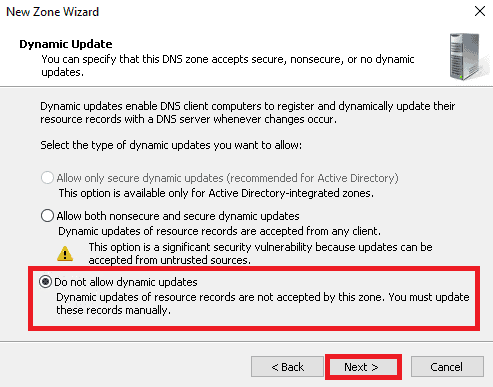
8. Once the Dynamic Update screen is displayed, select “Do not allow dynamic update” and click on the Next button.
9. After viewing the below screen, click on the Finish button.
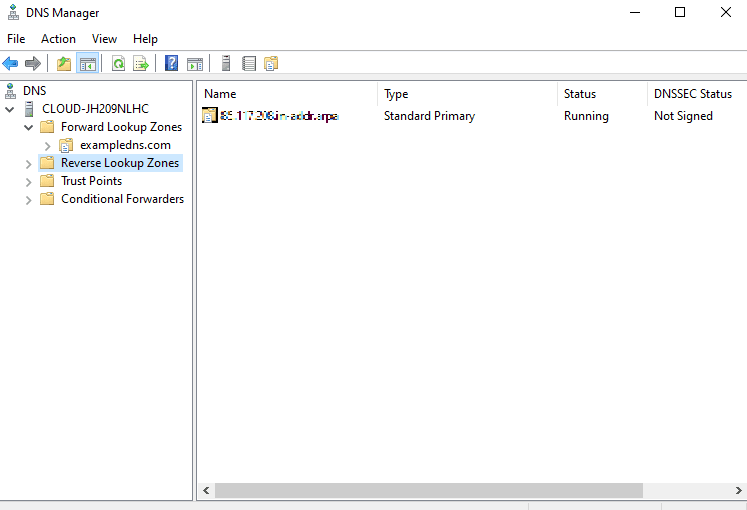
10. when you see your reverse lookup zone in the below screen, you’re done with this step.
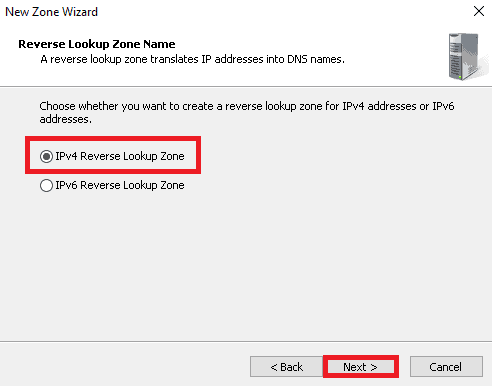
Step 2. Create a Reverse Lookup Zone
You completed the first step to Configure DNS Server in Windows. You need to complete three more steps. In this step, you will review how to create a reverse lookup zone to resolve the IP address to the name. Just follow all the below-required actions.
1. On the DNS manager, right-click on the server name and click on the New Zone to view the zone creation wizard:
2. The Zone Type selection screen should be displayed. Select the Primary zone and click on the Next button.

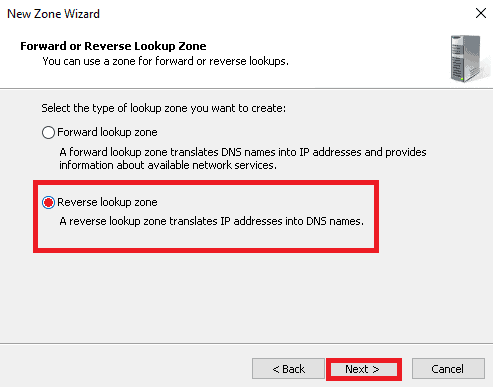
3. On the Forward or Reverse Lookup Zone screen, select “Reverse lookup zone” and click on the Next button.
4. Once you see the Reverse Lookup Zone Name screen, select IPv4 Reverse Lookup Zone and click on the Next button.
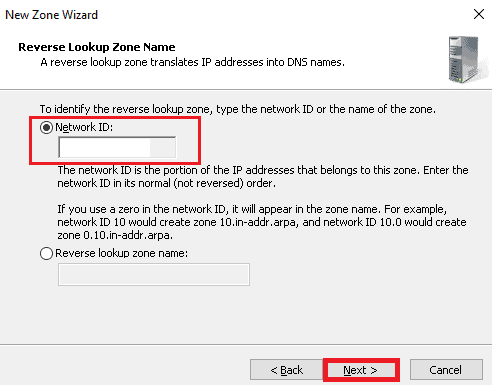
5. As you see below, it is time to define your network id. Then, click on the Next button.
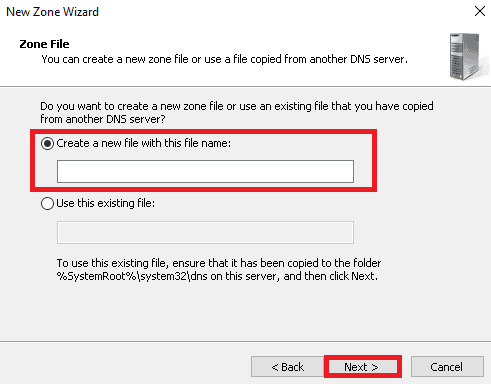
6. When the below screen is shown, select “Create a file with this file name” and click on the Next button.
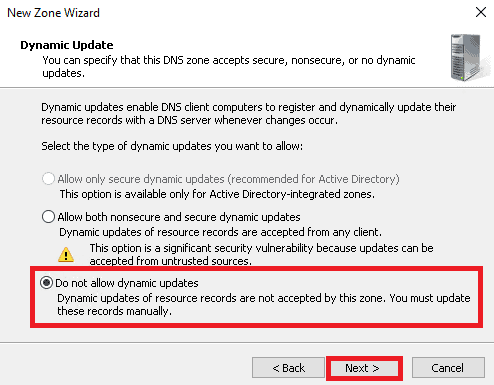
7. Again on the Dynamic Update screen, select “Do not allow dynamic update” and click on the Next button.
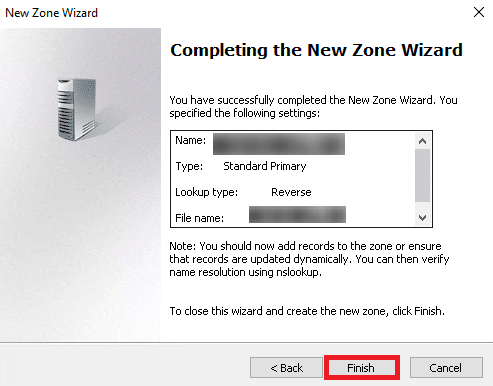
8. When the below screen is displayed, click on the Finish button.
9. And finally, when you see your reverse lookup zone on the following screen, it says you have successfully completed the second step to Configure DNS Server in Windows Server.
Step 3. Add A and PTR Records to DNS
The third step to Configure DNS Server in Windows is to add A and PTR Records for remote hosts to perform name resolution. If you need to know about DNS Records, refer to our related article and come back to complete this step by adding A and PTR records to DNS.
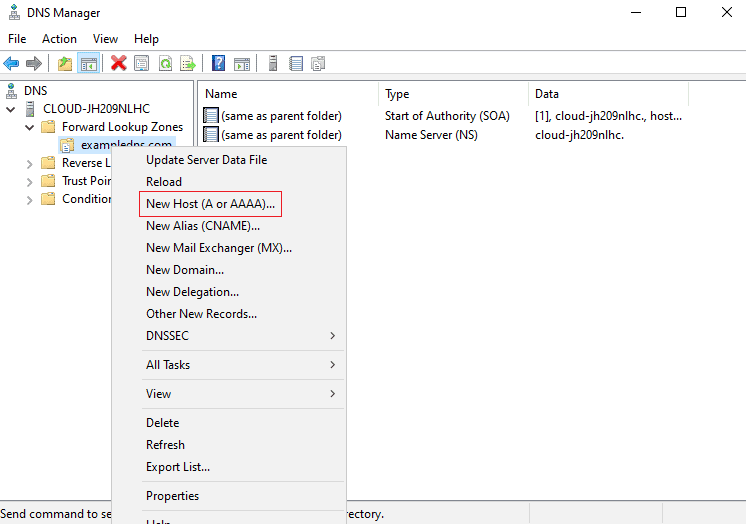
1. On the DNS manager, right-click on the forward lookup zone. Then, click on the New Host (A or AAAA).
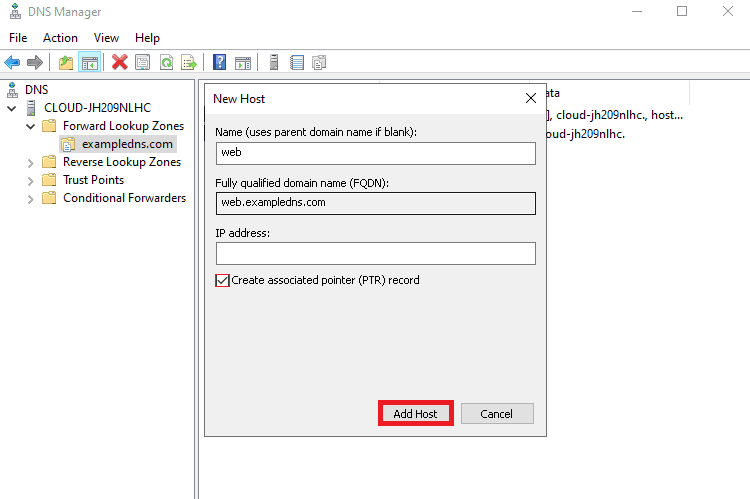
2. Now, define the parent domain name and IP address of your host in the below screen. then, select “Create associated pointer record” then click on the Add Host button.
3. When the below screen is displayed, click on the forward lookup zone.
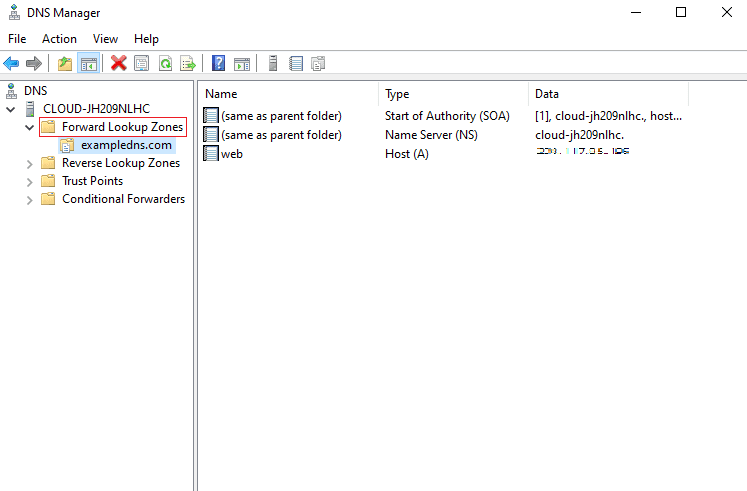
By this, you can make sure that you have successfully completed the steps. Configuring DNS Server in Windows is done if you can see the above screen.
How to Configure DNS Server to Listen on a Specify Interface
Since a DNS server will listen for requests on all IP address interfaces by default, you can use the GUI or PowerShell to configure DNS server to listen on a specify interface.
Run PowerShell on your computer. Then, find your computers existing IP address by running the Get-NetIPAddress cmdlet. Make a note of the IP address that you want to use for your DNS server.
How to Test DNS Name Resolution
Once you are done with Installing and Configuring DNS Server, you are ready to verify if DNS Name Resolution works correctly.
Simply open your command line interface and run the following command:
nslookupIf you can view the name you provided for your server and your IP address in the output, you can continue by typing the FQDN of your added host:
> web.exampledns.comYou should see the name to IP address resolution in your output. If yes, type the IP address of your added host to see the IP address to name resolution and make sure everything is working correctly.
Conclusion
Configuring a DNS server in Windows is a foundational skill for business owners managing their IT infrastructure. By setting up a properly configured DNS environment, businesses enhance network reliability, speed, and security.
This comprehensive guide has outlined the key steps to install, configure, and maintain DNS servers in Windows, with an emphasis on best practices suited for business needs.
Employing the detailed steps and considerations discussed here will ensure that your DNS infrastructure supports your organizational goals effectively and securely.
FAQ
2. How do I install the DNS Server role on Windows Server?
Use Server Manager to add roles and features, select Role-based installation, pick the server, enable DNS Server role, and complete installation.
3. How to create a Forward Lookup Zone?
In DNS Manager, right-click the server, select New Zone, choose Primary zone, specify Forward Lookup Zone, name it, and complete the setup without enabling dynamic updates.
4. How to set up a Reverse Lookup Zone?
Create a New Zone in DNS Manager, select Primary zone, choose Reverse Lookup Zone, define your network ID, and finish without allowing dynamic updates.
5. What are A and PTR records and how to add them?
A records map hostnames to IP addresses; PTR records do the reverse. Add them in DNS Manager within the appropriate zones by selecting New Host and entering details.
6. How to configure DNS Server to listen on a specific network interface?
Use PowerShell commands to identify the desired IP address and configure the DNS service to listen on that interface.
7. How can I verify DNS Name Resolution?
Run nslookup on the command line and check if domain names and IP addresses resolve correctly.
8. What to do if DNS Server is not responding?
Check installation, network settings, clear DNS cache, and review security configurations for potential issues.
9. How to uninstall the DNS Server role?
Use PowerShell command "Uninstall-WindowsFeature -Name DNS" to remove the role.
10. What security measures should be applied?
Implement trusted DNS servers, restrict zone access, monitor DNS traffic, and prevent unauthorized dynamic updates to ensure security.
halo, saya masih bingung menegnai dns server , kalau kita membuat dns server pribadi semisal untuk perusahaan , untuk bagian set ip address di arahkan ke ip dnsnya atau diarahkan ke ip ISP? lalu pada bagia router gateway apakah ini diarahkan juga ke dns server lokalnya atau di arahkan ke dns ISP, mohon pencerahanya terimakasih
A public DNS server, such as Google's 8.8.8.8, or the DNS server provided by your ISP can be set as the upstream DNS server when you create a private DNS server. The **primary DNS server** setting on the configuration page of your router is the IP address section to which you are referring. The IP address of the DNS server that your router should use to resolve domain names is specified by this setting.You may specify the IP address of your private DNS server as the primary DNS server in your router's setup page if you put one up for your business. A public DNS server or the DNS server provided by your internet provider can be used as the upstream DNS server when creating a private DNS server. The IP address of the DNS server your router should use to resolve domain names is specified by the primary DNS server setting on the settings page of your router. Your router will redirect all DNS requests to your private DNS server if you set this to the IP address of your private DNS server.
How to find a good DNS server for 2023 games?
Our recent article about the best DNS servers for gaming helps you find the most suitable one according to your needs and equipment.