How to Clear DNS Cache on Windows Linux and Chrome
Clearing DNS cache removes stored domain-to-IP mappings on Windows Linux and Chrome improving connection accuracy and resolving browsing errors. Use command line tools or browser settings to flush outdated DNS data effectively.
🤖AI Overview:
Clear DNS Cache involves removing stored DNS lookup data to ensure websites load current information. This process is essential for fixing connection errors and maintaining network security. It can be done on Windows Linux systems or directly within Chrome browser settings.
To clear DNS cache:
- Use
ipconfig /flushdnson Windows. sudo systemd-resolve --flush-caches(or restart DNS services) on Linux.- Go to
chrome://net-internals/#dns> Clear host cache in Chrome.
If you have invested in performance and reliability with a solution like buy VPS, mastering DNS hygiene helps you prevent downtime and keep your services running smoothly.
Steps to Flush DNS Cache on Windows (All Versions)
Whether you’re running Windows XP or the latest Windows 11, the method to clear DNS cache remains consistent
This universal use of the ipconfig /flushdns command is one of the fastest and safest ways to clear DNS cache in Windows without relying on third-party tools.
It’s essential for fixing domain resolution issues, especially when managing DNS changes on remote servers or after you buy Windows VPS for hosting tasks.
Clear DNS Cache in Windows 10/11
1. Open Command Prompt:
Right-click the Start icon → Windows Terminal (Admin) or Command Prompt (Admin).
Or press Windows + R, type cmd, and hit Enter.
2. In the terminal, type:
ipconfig /flushdns3. Press Enter.
If successful, you’ll see:
“Successfully flushed the DNS Resolver Cache.”
This clear DNS command ensures your resolver retrieves fresh DNS records from authoritative servers, avoiding cached routing errors.
Clear DNS Cache in Windows 8
1. Press Windows + X and choose Command Prompt.
Or:
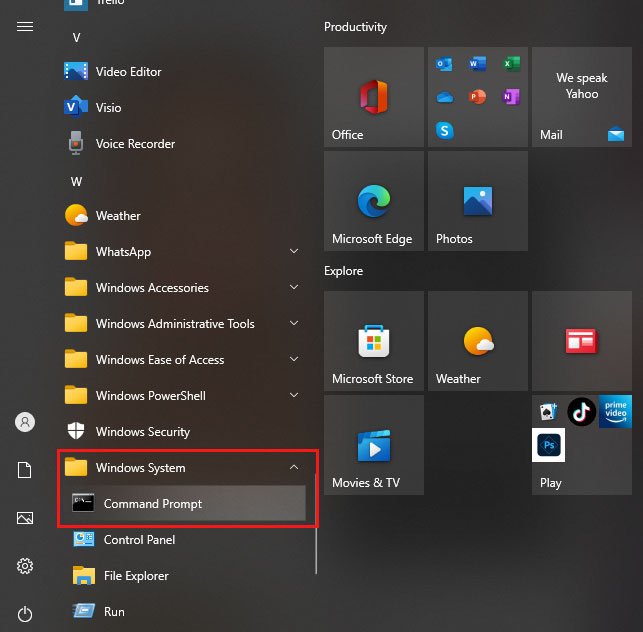
Open Start, go to Apps → Windows System → Command Prompt.
3. Run:
ipconfig /flushdns4. Confirm the success message appears before closing the window.
Clear DNS Cache in Windows 7, Vista, and XP
1. Click Start → All Programs → Accessories → Command Prompt.
2. Enter the DNS flush command:
ipconfig /flushdns3. Press Enter and wait for the confirmation.
Final Notes:
If using Windows Vista, and you see “Action Requires Elevation,” you’ll need to rerun Command Prompt as Administrator.
For older systems like Windows XP, this clear DNS cache Windows XP method helps resolve DNS resolution failures without advanced tools.
Steps to Clear DNS Cache in Linux
Linux does not have a default, unified caching system for DNS, which means clear DNS cache procedures can differ based on the active service and distribution you’re using.
Using Linux tools to help troubleshooting DNS issues can provide deeper insights when simple cache clearing doesn’t resolve complex DNS problems.
Some distributions rely on systemd-resolved, dnsmasq, nscd, or BIND to store cached DNS records, and each has a unique method to flush DNS Linux.
If you’re managing a Linux VPS for hosting or networking, performing a Linux clear DNS cache regularly helps prevent resolution errors, outdated records, or service misrouting.
Flush DNS on Ubuntu & Debian-Based Systems
If flushing the DNS cache doesn’t fully resolve your issues, adjusting or changing DNS server settings in Linux can often improve resolution speed and reliability.
On Ubuntu and its derivatives, systemd-resolved is typically responsible for DNS caching. Here’s how to clear DNS cache Linux effectively:
1. Open the terminal by pressing Ctrl + Alt + T or searching for Terminal in Activities.
2. To flushdns Linux, run:
sudo systemd-resolve --flush-caches3. To verify that the DNS cache is cleared:
sudo systemd-resolve --statistics4. For systems running BIND, restart the service to ensure DNS records are reloaded:
sudo systemctl restart bind9.serviceClear DNS Cache in Red Hat, Fedora, and CentOS
On RHEL-based systems such as Red Hat, CentOS, and Fedora, the DNS services may vary:
1. For systems using NSCD (Name Service Cache Daemon), run:
sudo systemctl restart nscd.service2. For systems using dnsmasq:
sudo systemctl restart dnsmasq.serviceThis will flush DNS Linux for these distributions, similar to running ipconfig dns flush on Windows.
Flush DNS Cache for Other Linux Distributions
If you’re using a different Linux distribution or have a custom DNS service, you can use this clear DNS command to attempt a system-wide flushdns Linux:
sudo /etc/init.d/dns-clean startThis command provides a fallback for clearing DNS cache on various Linux versions that don’t rely on the standard services above.
How to Clear DNS Cache on Chrome
When Chrome starts resolving the wrong IPs or loads outdated content, it’s likely time for a browser-level DNS reset.
Chrome maintains its own internal DNS resolver separate from your system, and clearing it can fix issues faster than system-level changes.
This is why many network engineers recommend performing a flush DNS Chrome procedure before resorting to OS-level troubleshooting.
Access Chrome’s Internal DNS Tool
In your Chrome address bar, type the following and press Enter:
chrome://net-internals/#dns
This is the interface for DNS lookups handled internally by Chrome. It’s the official access point for chrome //net-internals/#dns clear operations.
- Note for Opera Users:
Since Opera is built on Chromium, it uses the same internal DNS resolver structure. To flush DNS in Opera, open your browser and enter opera://net-internals/#dns in the address bar.
Then click “Clear host cache,” just like in Chrome.
This executes the same opera net internals dns clear host cache function behind the scenes, ensuring Opera flushes outdated DNS records fully.
Clear Host Cache in Chrome
On this page, find and click the “Clear host cache” button to perform a chrome clear dns cache operation that removes outdated DNS entries stored within the browser.
This triggers the chrome //net-internals/#dns clear host cache operation, wiping all cached domain resolutions. It’s a precise step to ensure DNS entries are fully resolved.
Note: This tool is part of the broader chrome //net-internals/dns clear interface Chrome provides for advanced DNS cache handling.
Clear Chrome Sockets (Highly Recommended)
To fully flush socket-related caches, go to:
chrome://net-internals/#socketsHere, click:
- “Close idle sockets”
- “Flush socket pools”
This step ensures Chrome drops all reused network connections, crucial after the Chrome flush DNS command.
Restart Chrome (Optional but Ideal)
Although optional, restarting Chrome after you clear DNS cache Chrome helps apply the reset fully, especially when testing CDN propagation, DNS failovers, or private zones.
Final Tips:
If you’re running Chrome on Linux and have already ran linux clear dns or linux flush dns at the system level, don’t skip the browser reset. Chrome stores a separate DNS cache that’s untouched by commands like ipconfig flushdns or flushdns linux.
Whether you’re on Ubuntu, Arch, or CentOS, you must use the Chrome method too.
To reset it fully, you should run the browser-level chrome net internals dns clear host cache process manually, especially when testing new DNS zones or resolving CDN routing conflicts.
Why You Should Clear DNS Cache?
Over time, your system’s DNS cache may store outdated or malicious records that cause connection issues, security risks, or privacy leaks.
Whether you’re on Windows, Linux, or Chrome, knowing how to clear DNS cache is an essential troubleshooting and protection step.
This step also helps prevent errors such as the Fix DNS_PROBE_FINISHED_NXDOMAIN in Linux & Windows Error by ensuring DNS settings are refreshed and accurate.
Fix Security Risks
Cached DNS entries can be hijacked or spoofed. Attackers may exploit them to redirect users to fake sites.
Running ipconfig /flushdns on Windows or systemd-resolve --flush-caches on Linux helps eliminate these threats.
Protect User Privacy
DNS history reveals your browsing behavior. On shared systems, this can be misused by tracking tools.
Use chrome://net-internals/#dns to clear DNS cache in Chrome and remove host resolution history.
Resolve 404 & Load Errors
Sites moved to new servers can return 404 errors due to outdated cache. Use flushdns on Linux, or ipconfig dns flush to force fresh lookups and fix mismatched domain resolutions.
Flushing the DNS cache often resolves connection interruptions, but if you encounter persistent errors like the Fix DNS_PROBE_FINISHED_BAD_CONFIG Error, deeper DNS configuration troubleshooting may be required.
Restore Site Access
If a site won’t load despite working elsewhere, DNS cache corruption may be to blame.
Clear DNS commands vary by system: ipconfig flushdns, linux flush dns, or clear dns cache chrome depending on where the issue occurs.
Conclusion
Clearing DNS cache is an important step in maintaining healthy internet connectivity and troubleshooting browsing issues. Whether you are using Windows, macOS, or Linux, the process involves simple commands executed in the command prompt or terminal to flush outdated DNS records.
Understanding why, when, and how to clear the DNS cache empowers you to fix website loading problems, avoid security risks from cached DNS poisoning, and optimize your network experience.
By following the clear and easy-to-understand instructions provided in this guide, beginners can confidently Clear DNS Cache on their devices whenever necessary. Remember to run commands with the appropriate permissions and verify your system details to use the correct procedures. Regular maintenance of your DNS cache and awareness of its role in your internet connection will help ensure smooth and secure browsing overall.
FAQ
2. How do I clear DNS cache on a Windows computer?
Open Command Prompt as an administrator and run the command 'ipconfig /flushdns' to refresh DNS records.
3. What is the method to clear DNS cache on Linux?
Use commands like 'sudo systemd-resolve --flush-caches' or restart caching services depending on your Linux distribution.
4. How can I clear DNS cache on the Chrome browser?
Go to 'chrome://net-internals/#dns' and click 'Clear host cache'. Also clear sockets via 'chrome://net-internals/#sockets' if needed.
5. When should I clear the DNS cache on my device?
Clear DNS cache when facing website errors connection issues or after changing DNS settings.
6. Does clearing DNS cache improve internet speed or security?
It mainly improves security by removing outdated or malicious data and indirectly enhances speed by ensuring fresh lookups.
7. Can clearing DNS cache fix errors like DNS_PROBE_FINISHED_NXDOMAIN?
Yes it frequently resolves DNS lookup failures caused by cached corrupted or outdated entries.
8. Is it necessary to clear DNS cache regularly?
It is advisable especially after DNS changes or network switches but clearing on demand suffices for most users.
9. Are there any new DNS security measures related to cache clearing?
Yes modern protocols like DNS over HTTPS and DNS over TLS enhance privacy and security reducing risks from caching.
10. Does clearing DNS cache have any effect on privacy?
Yes it removes stored DNS queries that might reveal browsing history helping protect user privacy.
How can I clear the DNS cache on macOS?
You can do this using the following command: sudo dscacheutil -flushcache; sudo killall -HUP mDNSResponder
How do I clear DNS cache on Linux when using dnsmasq?
Dear Vina; if your Linux system uses dnsmasq for DNS caching, run the below command to restart the dnsmasq service and clear the DNS cache:
sudo systemctl restart dnsmasqOnce finished, you can verify that the DNS cache has been cleared by checking the statistics or logs of the respective services.Chrome's DNS cache not clear when using chrome://net-internals/#dns. what should i do now?
Dear Samudra; If Chrome's DNS cache doesn't clear using
chrome://net-internals/#dns, consider the following actions: 1. Ensure that you're using an up-to-date version of Chrome, as older versions may have bugs affecting DNS cache clearing. 2. Try clearing the DNS cache in an Incognito window, as some extensions or settings may interfere with the process in regular browsing mode. 3. Disable browser extensions temporarily to rule out interference with DNS cache clearing. 4. Remember that Chrome maintains its own DNS cache separate from the system's DNS cache. Ensure that you've also cleared the system's DNS cache using the appropriate method for your operating system. Let me know if the problem is not solved after considering above solutions.I cleared the DNS cache on Chrome. Why does it still resolve to the old IP?
Dear Zahira, if Chrome continues to resolve to an outdated IP address even after clearing the DNS cache via
chrome://net-internals/#dns, consider the following steps: 1. Navigate tochrome://net-internals/#socketsand click on "Flush socket pools" to close any persistent connections that might be retaining old DNS data. 2. Restart Chrome. 3. Open Command Prompt and runipconfig /flushdns; on Linux, usesudo systemd-resolve --flush-cachesas you learned in this guide to clear system DNS cache. 4. Check the hosts file to ensure there are no overriding entries in your system's hosts file that could be directing Chrome to the old IP. Check the IP and let me know if the problem is not solved.Is it possible to automate DNS cache flushing on Linux?
Dear Jamal, Yes. You can automate DNS cache flushing on Linux servers. To do this, you can create a cron job that runs the appropriate flush command at regular intervals. As an example, open the crontab editor and run:
crontab -eThen, add a line to flush the DNS cache daily at midnight:0 0 * * * sudo systemd-resolve --flush-cachesIn this way, this cron job will execute the flush command daily at midnight, ensuring that the DNS cache is regularly cleared.