Install Apache Web Server on Linux
Apache Web Server is a leading open-source platform powering robust web services globally. Installing Apache on your Linux VPS Hosting is essential for secure, fast, and reliable web hosting, providing complete control over your server environment.
Whether you are building a development setup or a production server, mastering how to install Apache Web Server on Linux ensures secure, high-performance HTTP delivery.
Use the below commands to install Apache on Ubuntu, CentOS, Fedora:
- Ubuntu:
sudo apt install apache2 -y - CentOS:
sudo dnf install httpd -y - Fedora:
sudo dnf install httpd -y
The whole process varies slightly across distros but follows the same principle, such as updating your system, installing the core package, and enabling the service.
Prerequisites to Install Apache Web Server on Linux
Before installing Apache Web Server on Ubuntu, CentOS, Fedora, ensure you meet the following requirements:
- Reliable internet connectivity for downloading packages.
- A non-root user with
sudoprivileges to install packages and dependencies. - A Linux VPS running a compatible Linux distribution (Ubuntu, CentOS, Fedora).
- Adequate disk space and memory to support Apache and your web content.
- Basic knowledge of the Linux command line for configuration and troubleshooting.
Install Apache Web Server on Ubuntu
To install Apache on Ubuntu is to unlock one of the most reliable methods for hosting web applications in a Linux environment.
This section provides a complete, step-by-step process to install Apache Web Server on Linux, specifically tailored to Ubuntu.
Ideal for developers, sysadmins, or businesses running scalable infrastructure, learning to install Apache on Linux ensures performance, security, and full control over deployment.
Whether for staging or production, this walkthrough defines exactly how to install Apache Linux with precision and clarity.
Step 1: Update System Repositories
Always start with a clean, current package index.
This prevents outdated dependencies and ensures you’re pulling in the latest security patches.
sudo apt update && sudo apt upgrade -yThis is a foundational step before you install Apache on Linux. Skip it, and you risk installation failures or unstable performance.
Step 2: Install Apache on Ubuntu
Use the apache2 package; it’s optimized for Ubuntu’s APT ecosystem.
sudo apt install apache2 -yThis command downloads and installs the Apache HTTP Server, required modules, and the service handler.
Once done, Apache is ready to serve basic content from /var/www/html.
Step 3: Start, Enable, Restart, and Stop Apache
Apache installs as a systemd service. Use the commands below to manage its lifecycle:
# Start the server
sudo systemctl start apache2

# Enable on boot
sudo systemctl enable apache2

# Restart after configuration changes
sudo systemctl restart apache2

# Stop the server
sudo systemctl stop apache2

# Check current status
sudo systemctl status apache2
In case you need to know what happened during start-up, use journalctl -u apache2 to view detailed logs.
Step 4: Allow Apache Through Ubuntu Firewall (UFW)
To let Apache serve external traffic, open ports 80 (HTTP) and 443 (HTTPS) via UFW.
sudo ufw allow 'Apache Full'
sudo ufw reload
This step is critical for internet-facing servers. Use sudo ufw status to confirm Apache is fully allowed.
Step 5: Test Apache Installation
Point your browser to your server’s IP to confirm the success of your Ubuntu install Apache process.
http://your-server-ipYou should see the “Apache2 Ubuntu Default Page”, confirming that Apache is running.
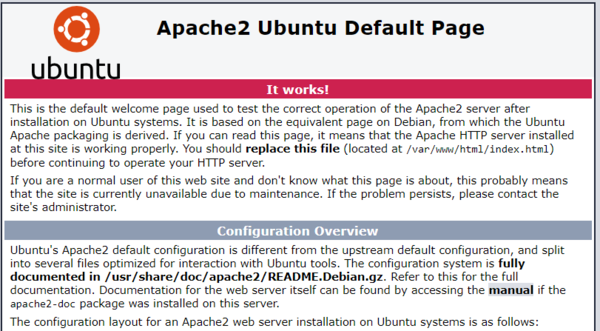
To find your public IP:
curl -4 ifconfig.meOr use ip a if you’re within a private network.
Step 6: SSL & Virtual Hosts Setup (Optional)
Add SSL with Certbot (Let’s Encrypt)
sudo apt install certbot python3-certbot-apache -y
sudo certbot --apache
This auto-generates HTTPS certificates and updates your Apache config securely.
To secure your Apache server on Ubuntu with Let’s Encrypt SSL certificates and improve your site’s security, see the expert instructions in Secure Apache on Ubuntu.
- Set Up Apache Virtual Hosts:
Create your config:
sudo nano /etc/apache2/sites-available/example.com.confPaste in:
<VirtualHost *:80>
    ServerAdmin [email protected]
    ServerName example.com
    DocumentRoot /var/www/example.com
</VirtualHost>
Enable it and reload Apache:
sudo a2ensite example.com.conf
sudo systemctl reload apache2
How to Uninstall Apache on Ubuntu
If you ever need to remove Apache from Ubuntu, do it cleanly:
sudo apt remove apache2 apache2-utils apache2-bin apache2.2-common -y
sudo apt autoremove -y
Optionally wipe config and content:
sudo rm -rf /etc/apache2 /var/www/html /var/log/apache2Uninstalling Apache Web Server on Linux should always include a cleanup phase if you’re prepping the system for a different stack.
That’s it! Stay with us to review the Apache installation guide for CentOS and Fedora.
Steps to Install Apache Web Server on CentOS
When managing CentOS for production or development, the ability to install Apache Web Server on Linux is essential.
Apache remains a widely trusted server solution, and CentOS provides the stability and control needed in enterprise environments.
This guide explains how to install Apache on CentOS, covering all required and optional configurations with practical, system-level detail.
For those building infrastructure or maintaining scalable web services, mastering how to install Apache on Linux with CentOS is a critical skill.
Step 1: Update the System
Ensure all packages are current to avoid conflicts during installation.
sudo dnf update -yThis keeps the CentOS base system aligned with its latest repository versions and security patches.
Step 2: Install Apache on CentOS
Apache is available as the httpd package on CentOS systems.
sudo dnf install httpd -yThis installs all required Apache binaries and dependencies. With this, you begin the core process to install Apache Web Server on Linux using CentOS.
Step 3: Enable and Manage Apache Service
Start and manage the httpd service via systemd:
# Start Apache immediately
sudo systemctl start httpd

# Enable at boot
sudo systemctl enable httpd

# Restart when configuration is modified
sudo systemctl restart httpd

# Stop the server
sudo systemctl stop httpd

# Check status
sudo systemctl status httpd
Controlling the service ensures Apache is persistently available or temporarily halted as needed.
Step 4: Configure the Firewall
To make the Linux install Apache web server accessible over the network, update firewalld rules:
sudo firewall-cmd --permanent --add-service=http
sudo firewall-cmd --permanent --add-service=https
sudo firewall-cmd --reload
Verify:
sudo firewall-cmd --list-allThis opens HTTP (80) and HTTPS (443), which is required for external access.
Step 5: Test Apache Installation
Visit your server’s public IP in a browser to confirm successful installation:
http://<your-server-ip>To retrieve the IP:
curl -4 ifconfig.meYou should see the CentOS Apache test page, verifying that your install Apache on CentOS operation was successful.
Step 6: Add SSL with Let’s Encrypt (Optional)
Enable HTTPS for secure communication:
sudo dnf install epel-release -y
sudo dnf install certbot python3-certbot-apache -y
sudo certbot --apache
This adds a free SSL certificate using Certbot, further securing your install Apache on Linux deployment.
Step 7: Configure Apache Virtual Hosts (Optional)
Create virtual host files for custom domains.
- Edit a new configuration:
sudo nano /etc/httpd/conf.d/yourdomain.com.conf- Example block:
<VirtualHost *:80>
    ServerName yourdomain.com
    DocumentRoot /var/www/yourdomain.com
    ErrorLog logs/yourdomain.com-error.log
    CustomLog logs/yourdomain.com-access.log combined
</VirtualHost>- Create the directory:
sudo mkdir -p /var/www/yourdomain.com- Restart Apache:
sudo systemctl restart httpdHow to Uninstall Apache on CentOS
To remove Apache from your CentOS system entirely:
sudo dnf remove httpd -y
sudo rm -rf /etc/httpd /var/www/html /var/log/httpd
This command set cleanly removes the Linux install Apache web server setup, preparing the system for reconfiguration or alternative deployments.
How to Install Apache Web Server on Fedora
Fedora is a bleeding-edge Linux distribution that combines innovation with the power of Red Hat technologies.
It’s widely used for testing modern server deployments and web hosting environments.
Knowing how to install Apache on Fedora gives you a reliable, open-source HTTP server aligned with systemd and SELinux.
This step-by-step process ensures that your Apache Web Server installation on Fedora is secure, optimized, and production-ready.
Every command is streamlined to meet Fedora’s DNF package ecosystem and system architecture.
Step 1: Update Fedora System
Before proceeding with any server configuration, update the system packages:
sudo dnf upgrade --refresh -yThis ensures that all core libraries and repositories are synchronized, which is crucial for a clean install Apache on Linux process on Fedora.
Step 2: Install Apache on Fedora
Fedora identifies Apache as httpd. Use DNF to install it:
sudo dnf install httpd -yThis completes the core Apache Web Server installation, fetching all dependencies required by Fedora’s modular structure.
Step 3: Start and Enable Apache Service
Fedora uses systemd to manage services. Run the following commands to manage Apache:
# Start Apache immediately
sudo systemctl start httpd

# Enable Apache to run on boot
sudo systemctl enable httpd

# Optional control commands
sudo systemctl status httpd      # Check status
sudo systemctl restart httpd     # Restart after config changes
sudo systemctl stop httpd        # Stop the server when needed
Service control is foundational to all Apache Web Server Linux operations.
Step 4: Configure Firewall
Fedora uses firewalld for runtime firewall control. Open HTTP and HTTPS ports:
sudo firewall-cmd --permanent --add-service=http
sudo firewall-cmd --permanent --add-service=https
sudo firewall-cmd --reload
Firewall adjustments allow the public to access your Apache Web Server on Linux, confirming operational exposure on ports 80 and 443.
Step 5: Test Apache Installation
Once Apache is running and firewall rules are applied, verify your setup by opening a browser and navigating to your server’s IP address.
This confirms your CentOS install Apache process was successful:
http://<your-server-ip>To check your public IP:
curl -4 ifconfig.meIf successful, Fedora’s default Apache test page appears, confirming your install Apache on Fedora task is complete.
Step 6: Secure Apache with Let’s Encrypt SSL (Optional)
Fedora supports Certbot from the EPEL repository:
sudo dnf install epel-release -y
sudo dnf install certbot python3-certbot-apache -y
Run Certbot to automatically fetch and apply SSL certificates:
sudo certbot --apacheThis adds HTTPS support, a crucial step in a modern Apache Web Server Linux environment.
Step 7: Configure Virtual Hosts (Optional)
For managing multiple domains on the same server, define virtual hosts:
- Create a configuration file:
sudo nano /etc/httpd/conf.d/yourdomain.com.conf- Add virtual host block:
<VirtualHost *:80>
    ServerName yourdomain.com
    DocumentRoot /var/www/yourdomain.com
    ErrorLog logs/yourdomain.com-error.log
    CustomLog logs/yourdomain.com-access.log combined
</VirtualHost>- Set up the document root:
sudo mkdir -p /var/www/yourdomain.com- Restart Apache:
sudo systemctl restart httpdVirtual host management is key in flexible Apache Web Server installation scenarios.
How to Uninstall Apache on Fedora
To completely remove Apache from Fedora:
sudo dnf remove httpd -y
sudo rm -rf /etc/httpd /var/www/html /var/log/httpd
This clears all files and services tied to your install Apache on Linux session on Fedora.
Conclusion
In this article, you learned essential prerequisites, step-by-step installation commands, and key security configurations for Ubuntu, CentOS, Fedora Install Apache.
Installing Apache on Linux remains crucial for delivering stable, scalable web services with tight control over performance and security.
Using a reliable Linux VPS Hosting provider enhances this experience by offering affordable, flexible, and secure server environments tailored to your needs.
Choosing the right distro like Ubuntu, CentOS, or Fedora ensures compatibility and ease of maintenance. Equally important are ongoing updates and firewall setups to safeguard your server against vulnerabilities.
Mastering how to install Apache Linux and secure it properly sets a strong foundation for any production-ready web environment, crucial for professionals demanding reliability and resilience.
When considering web server options, understanding the differences in Caddy vs Nginx vs Apache can guide you toward the best fit for your project’s performance, security, and configuration needs.