Pinging IP Address in OSs
As a Linux user, you might be familiar with the Ping command which is one of the most popular commands. If not, follow this article as the essential content of Linux to review Pinging IP Address in OSs. Also, many useful Linux ping commands will be explained with examples for those who need to upgrade their knowledge of ping options and variations. In the networking world, the Ping command enables you to Ping an IP to solve network issues since it allows you to access the information to interpret.
Whether you use Linux, Windows, macOS, or iOS, pinging an IP address is very easy since similar command lines will be used on them. Join us with this article to learn how to Ping an IP address in your considered OSs and observe if the internet is working ideally.
Prerequisites to Pinging IP Address in OSs
To let this tutorial work correctly, provide the below prerequisites.
- A non-root user with
sudoprivileges. - A system running Linux, UNIX-like system, or Windows.
- Access to Terminal.
How does Ping work in Linux and Windows?
Ping doesn’t necessarily need to include an IP address, but to communicate with the host computer as a networking interface, you need to use Ping. An IP address is assigned to the host and receives data packets (ICMP Echo) from users when Ping is initiated. Then, the requests are responded to by the server (Echo reply). The terminal keeps printing the responses until interrupted. After every session, there are a few lines with ping statistics. icmp_seq is the sequence number of each ICMP packet.

Clearly, in the case of receiving no reply from the server, there is not any connectivity between the host and the user. An unsuccessful ping is announced by the message ‘’Request timed out’’, while a successful ping gives you some information due to a proper connection between the host and the client.
Firstly, let’s see what is happening while Pinging IP Address in OSs. Once the terminal shows multiple responses from the IP address, it means that the ping was successful. Any of the displayed IP addresses are with a time in milliseconds. While these times represent the latency of the connection and also the speed of data transfer, you must be looking for the one with low latency which says the end server is responding quickly. In other words, having a high ping means a connection with a slow response time.
The good news is that the process of pinging an IP address is alike for most OSs. In the following of this article, you will see how to use the ping command individually on different devices. Since the ping command remains consistent across all systems, you need to know how to open the terminal or command line tool on your device.
Usages of Pinging IP Address
So far, you have learned the way Ping works on different OSs. Now, let’s see when you need to ping an IP address. Pinging makes the command-line tool a good utility for troubleshooting connectivity issues and is really simple. Undoubtedly, you have faced the situation of website loading issues. Undoubtedly, you have faced the issues of website loading. The situations of not loading or loading too slowly. When you use the ping utility, it helps you to get some information on potential problems. It is a fact that this tool may not give a complete picture of website performance but puts you at a good point to start troubleshooting.
Here are the most used examples of situations a user might decide to Ping an address.
- When a website is not loading, it is needed to be checked if it is down or not.
- When the domain name is not working and the user wants to find out if it is resolving to the correct IP address.
- If a user wants to discover whether a server is responding to requests with reasonable latency.
- When you need to check whether a server or an internet-connected device like a router is up and running.
How to Ping an IP address in Linux [Complete Guide]
Ping helps you check the network connectivity both locally and with a remote host. To test if your server or any considered server is up and running, the Linux ping command comes as a simple tool. So, you can check if a network is available and a host is reachable or not. Troubleshooting various connectivity issues is the other feature of the Linux ping command.
The Pingcommand allows you to check some important options such as: checking the online status of a remote machine, testing your internet connection, and analyzing if there are network issues like dropped packages or high latency. Linux comes with many ping options that users will enter the commands into the Linux Terminal. Here are some useful command lines to ping IP addresses on Linux. All of them will work for all the distros.
Let’s start discovering how to use the Ping command in Linux.
Ping followed by a hostname, a name of a website, or the exact IP address is the basic ping syntax.
ping [option] [hostname] or [IP address]In this way, you can check whether a remote host is up. Look at the example below using google.com as an instance. Type it in your terminal.
ping google.comAny time you want to stop the process, you just need to Press Ctrl + C.
How to fix reaching a website or remote machine issues
Stay with us to get familiar with Ping commands in Linux with examples to learn what to do when you encounter issues reaching a website or a remote machine.
In this situation, you can ping localhost to confirm you have a network connection. To check the local network interface, use one of the following ways.
ping 0: This is the quickest way to ping localhost. Once you type this command, the terminal resolves the IP address and provides a response.ping localhost: You can use the name to ping localhost. The name refers to your computer, and when we use this command, we say: “ping this computer.”ping 127.0.0.1: Some people prefer using the IP address 127.0.0.1 to ping localhost.
Previously, you have read about IPv4 & IPv6. As you know, since there is a limited number of IPv4 addresses, IPv6 is the IP address alphanumeric format that will supersede IPv4. When you want to specify the internet Protocol and request an IPv6 or IPv4 address, add -6 or -4 after the ping command and before a hostname/IP.
ping -6 hostname/IPv6Copied!ping -4 hostname/IPv4How to change Time interval between Ping packets
As we mentioned, the default interval between each ping is set to one second. To increase or decrease that time use the -i switch, and you can use values lower than 1 to decrease the ping interval. Clearly, you must enter any value higher than 1 to increase the ping interval.
ping -i 0.5 google.comHow to change Ping Packet Size
Also, you can use -s to increase the packet size from the default value of 56 (84) bytes. Learning this topic helps you when you want to test network performance. Notice that the number in parentheses represents the ping bytes sent including 28 bytes of the header packet.
So, if you want to increase the packet size to 1000 bytes, you will run:
ping -s 1000 google.comTo increase the packet size to a few thousand bytes, you can test if a network link throttles.
How to use Ping to test performance
To test your network performance under heavy load when you need to ping flood.
Ping flood -f option requires root to execute. Otherwise, apply sudo to your ping command to flood a host. This command sends numerous packets as soon as possible.
sudo ping -f hostname-IPHow to Suppress Ping Output
One of the uses for ping is to print only Summary Statistics to Suppress Ping Output. So, you can use the-qswitch to display the summary only if you do not want to clog your screen with information for every packet. In this way, the-q option (which stands for “quiet” output) prints one line with the regular ping information and then provides the statistics at the end.
ping -c 10 -q google.comHow to add Timestamp Before Each Line in ping Output
It is possible to note the time of day when you execute the ping command. To do this, you just need to add the -D option to print a timestamp in UNIX format before each line.
ping -D google.comKeep in mind that these commands are case-sensitive and uppercase D must be used.
How to get an Audible Ping when a host is reachable
When you are troubleshooting network issues and do not want to look at the screen until there is a response, an audible ping would be necessary. To do this, use the-aswitch, to let the system play a sound when there is a response from a host.
ping -a google.comHow to show Ping Version and Exit
To check the version of the ping tool on your system, you can append-Vto the ping command to display the version of this utility.
ping -V google.comTwo ways to limit the number of Pings
In this part, you will learn how to limit the number of Pings because the default setting for the ping command is to keep sending the request until you interrupt it. Here are two methods to limit the number of Pings:
1- Limit the Number of Ping Packets
You can use -c and a number to make the ping command automatically stop after it sends a certain number of packets. In this way, the desired amount of ping requests is set. Let’s look at the example below.
ping -c 2 google.com2- Set Time Limit for ping Command
In the second method, you can add -w and an interval in seconds to your command to stop receiving a ping output after a specific amount of time. Here, we want to stop printing ping results after 25 seconds:
ping -w 25 google.comIn the end, let’s review some commonly used Ping Commands.
| Ping Option | What The Command Does |
|---|---|
| a | Generates a sound when the peer can be reached. |
| b | Allows to ping a broadcast IP address |
| B | Prevents the ping to change the source address of the probe. |
| c (count) | Limits the number of sent ping requests. |
| d | Sets the SO-DEBUG option on the used socket. |
| f | Floods the network by sending hundreds of packets per second. |
| i (interval) | Specifies an interval between successive packet transmissions. The default value is one second. |
| I (interface address) | Sets the source IP address to the specified interface IP address. The option is required when pinging IPv6 link local address. You can use an IP address or name of the device. |
| l (preload) | Defines the number of packets to send without waiting for a reply. To specify a value higher than 3, you need superuser permissions. |
| n | Displays IP addresses in the ping output rather than hostnames. |
| q | Shows a quiet output. One ping line is displayed and the summary of the ping command at the end. |
| T (ttl) | Sets the Time To Live |
| v | Provides verbose output. |
| V | Displays the ping version and exits to a new command prompt line. |
| w (deadline) | Specifies a time limit before the ping command exits, regardless of how many packets have been sent or received. |
| W (timeout) | Determines the time, in seconds, to wait for a response |
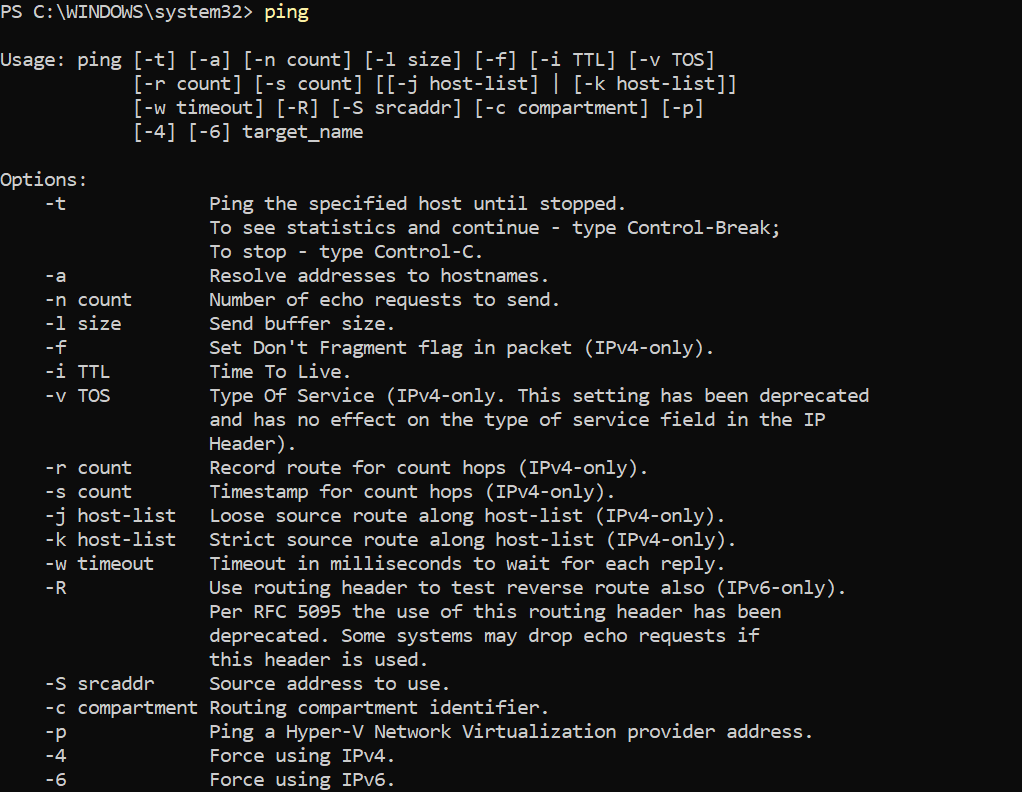
How to Ping an IP address in Windows 10
Like Linux, Pinging an IP address is very easy on Windows and you will find that the command lines are similar to the ones you learned above in the Linux section. On Windows, the process of pinging IP address requires using Command Line Interface tools like CMD and PowerShell. Then, you must run some command lines with the desired IP address. Also, the domain name could be used instead of the IP address.
Pinging an IP address in Windows Using CMD
As we mentioned, there are two tools to ping an IP address in Windows. First, let’s see how CMD works. It is the most commonly command-line interface to ping an IP address. To see the list of ping options available, enter Ping in CMD.
Follow the required below steps to go through pinging IP an IP using CMD.
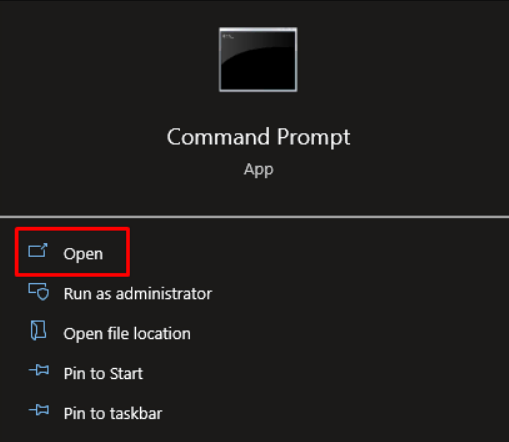
1. Press the Windows Key+R or open the search bar. Type CMD and hit Enter.
2. To access the Command Prompt window, click Open.
3. Run the command by typing ”ping” along with the IP address or domain name you want to check. For example, enter ping 8.8.8.8.
When you press Enter, the request will be sent four times.
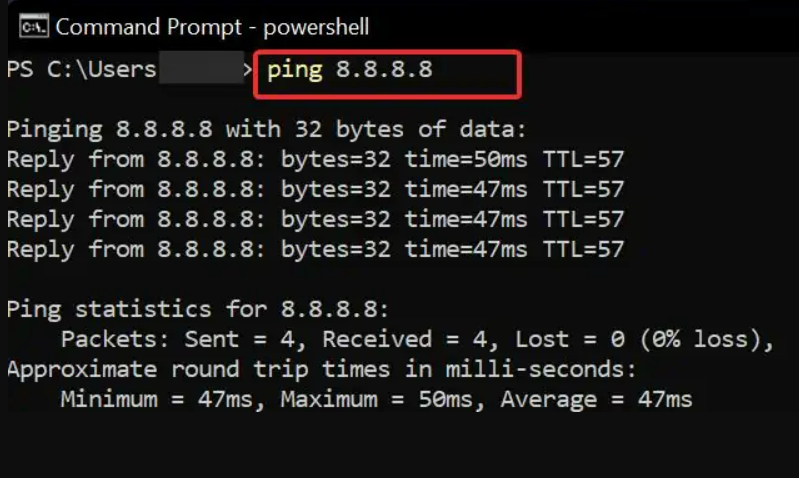
The ping statistics will be presented at the end of the fourth reply.
4. Use the Ctrl + C shortcut, to stop the ping command from running.
Pinging an IP address in Windows Using PowerShell
The second tool, PowerShell provides you with diverse ping outputs compared to the CMD. Here is how you can use it to Ping IP address.
1. Press Windows Key + R to open Run. Type PowerShell and hit Enter.
2. Enter Test-Connection 8.8.8.8 to ping to the IP and see the desired output.
3. It is also possible to ping multiple IP addresses using this command. Test-Connection 8.8.8.8, 1.1.1.1
In the case of having many IPs to ping, do it in seconds using PowerShell and a quick command line. In this way, you will also be able to save output results in a text format. Just follow the path below:
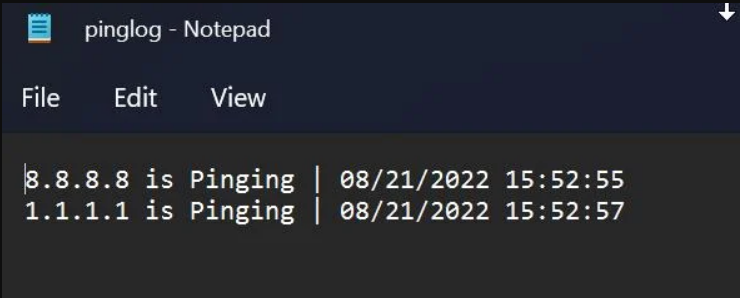
1. Save the IP addresses in a notepad and save it (in .txt). In the command, the list is saved under the name List of IPs.txt. Similarly, the output log will be saved under the name pinglog.txt.
2. Open Powershell and paste this command. Replace the source and output file directory in the command line and execute it.
$ServerName = Get-Content "C:\Users\XYZ\OneDrive\Desktop\List of IPs.txt"
$outputfile = "C:\Users\XYZ\OneDrive\Desktop\pinglog.txt"

foreach ($Server in $ServerName)
{
    $date = get-date
    if (test-Connection -ComputerName $Server -Count 2 -Quiet )
    {
        "$Server is Pinging | $date" | out-file $outputfile -Append
    }
    else
    {
        "$Server NOT pinging | $date" | Out-File $outputfile -Append
    }
}
3. In the specified location, a ping log will be saved to your device. So, you will see if the IP is getting pinged or not.
How to Ping an IP address in macOS
To run the ping command on Terminal in Linux and macOS, you can follow the steps below if you are using Linux distros.
1. At the bottom left of your screen, click Show Application.
2. In the search bar, type ”terminal”. Here, we are using Ubuntu.
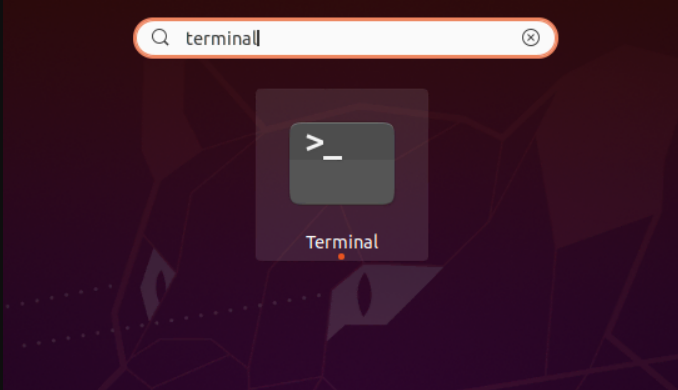
3. Type in ”ping” and hit Enter.
4. To close the connection and view the statistics, hit Ctrl + C.
To do it on macOS, you just need to:
Click the Launchpad icon on the Dock > type ”terminal” in the search field > Input “ping” and press Enter to start > close the connection by pressing the Ctrl + C shortcut and see the ping statistics.
How to Ping an IP address in iOS
iOS (and Android) does not provide you with access to a terminal out of the box. As an iOS user, you know it is possible to access apps on App Store. There, you can find a lot of apps that enable you to run ping tests without needing to jailbreak your device. To find a ping app for your iPhone or iPad, search for an app and try it out. Then, enter an IP address or a domain name to run the ping command in the desired app.
Interpreting your Ping Results
Regardless of which OS you are running, the successful results of your Ping contain some same information such as latency times, Time-to-Live (TTL) values, and the number of bytes the responses contains:

Multiple responses from the server that you are pinging are displayed in the first half of the results. The second section details the number of packages sent by the ping tool and the number that were lost (if any). High loss numbers indicate that the ping tool was unable to establish a connection to the IP address one or more times. You can also get the overall average latency times from ping results. The pinging of an address’s latency results should be interpreted as follows:
- 0-100 milliseconds: This is the ideal range for server response latency. Shorter loading times result from your server responding to requests rapidly, which is indicated by values under 100 ms.
- 150 to 100 milliseconds: There is space for server performance improvements if the ping test results are in this range.
- At least 150 milliseconds: Over 150 ms of latency indicates that the server is responding to requests too slowly. This could be momentary, but it could also indicate that your server’s optimization is lacking.
Take note that whenever we discuss pinging, we always talk about the server rather than specific websites. This is due to the fact that a ping test doesn’t offer much information about the actual performance of your website. It informs you whether the server responds to queries promptly or not.
Even with extremely low ping latency periods, a website may still take a while to load. This implies that even while your server is excellent, the website it is hosting might not be effectively optimized.
Occasionally, using the ping command will result in problems. These mistakes imply that there was a problem with the procedure.
Why the ping result shows the ''request timed out''?
It indicates that the ping reply was not received and that the destination IP address or domain name did not respond. The host or domain name may not exist, the local network adapter may not be functioning, the DNS may still be propagating, the server may be unavailable, or there may be a null route as a possible cause. In rare circumstances, it may be a sign that an IP address is blocked if it may be pingable from one device but not another.
My IP address exist but I received the ‘’unknown host’’ error!
If you are sure that you are connecting to the correct IP address or domain, you must check your internet connection’s DNS setting. The DNS server might fail to resolve the domain name properly. You are recommended to switch to a custom DNS to test if that is the case or not.
Conclusion
In this article, you learned about Pinging IP Address in OSs [Linux, Windows, macOS, iOS]. Now, you know how to use the Linux ping command and how to test the performance of your server. All the mentioned examples show you the way you can use ”ping”. Any OS you are using, include a ping tool that uses the same command comparing the OSs. As you reviewed, after opening your terminal, you must type ping followed by the IP address or domain that you need to test. So long as your responses are reachable, you will see them from the server almost immediately.