Setup Active Directory Domain Services for Your Business Success
Setup Active Directory Domain Services allows businesses to centralize user and computer management. It involves installing and configuring the AD DS role on a Windows server. This ensures secure authentication and access control. Proper setup is essential for business IT security.
🤖AI Overview:
Setup Active Directory Domain Services is the process of installing and configuring Microsoft’s directory service to manage and store information about network resources and user accounts. The main intent is to provide secure authentication, centralized management, and organization of users and computers within a network. Setting up Active Directory Domain Services is essential for businesses that need secure access and control over network resources. This setup enables streamlined administrative tasks and enhanced security in IT environments.
Advantages of Active Directory
- Centralized management of users and granting the ability to set and control policies, permissions, access levels, and restrictions for users
- Increasing security by specifying access levels and user restrictions and the possibility of changing passwords and applying security policies
- Ease of use and the possibility of accessing different resources on the network without the need to use a different password and username
- Compatibility and integration with other Microsoft services
Steps to install Active Directory Domain Services on Windows Server
New versions of Windows Server, such as Windows Server 2012/2016/2019/2022, support Active Directory service; so by following the instructions we provide below, you can install Active Directory Domain Services on your server with the versions we mentioned and Upgrade the server to a Domain Controller.
A server equipped with Active Directory Domain Services can authenticate and manage Windows domain systems in the network and set security policies and permissions to increase network security for systems. Domain Controller is a server that, thanks to Active Directory Domain Services, will have all the necessary facilities to manage other systems in the network.
It should be noted that setting up Active Directory Domain Services on the server with Windows Server 2012/2016/2019/2022 versions is not different from each other.
To start setting up Active Directory Domain Services on the server, you must first buy a Windows VPS with the Windows server version you want, which is ready to install Active Directory Domain Services. Then follow the guide to install Active Directory Domain Services on Windows VPS.
1. Access to Server Manager
Click the desktop’s start button or press the keyboard’s Windows key. Type “Server Manager” in the search bar and open it.
2. Add Roles and Features
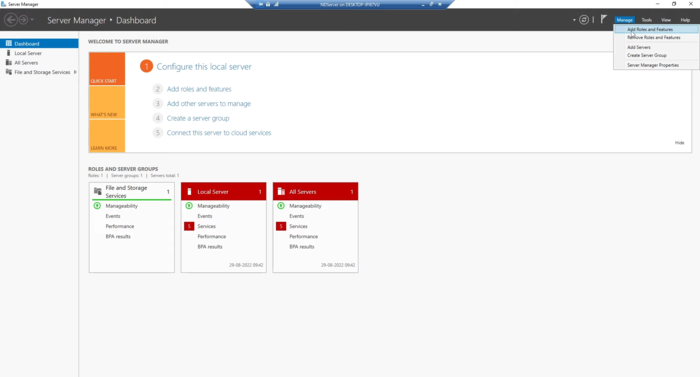
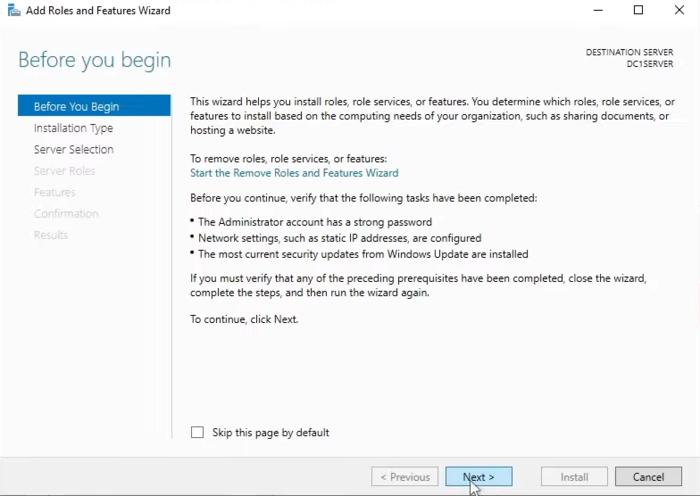
Select “Dashboard” from the page’s left panel, right-click “Manage” on the top bar, and select “Add Roles and Features” in the drop-down menu. By selecting “Add Roles and Features”, you will enter the “Add Roles and Features Wizard” page, leading you to the next step by clicking Next.
3. Select an installation type
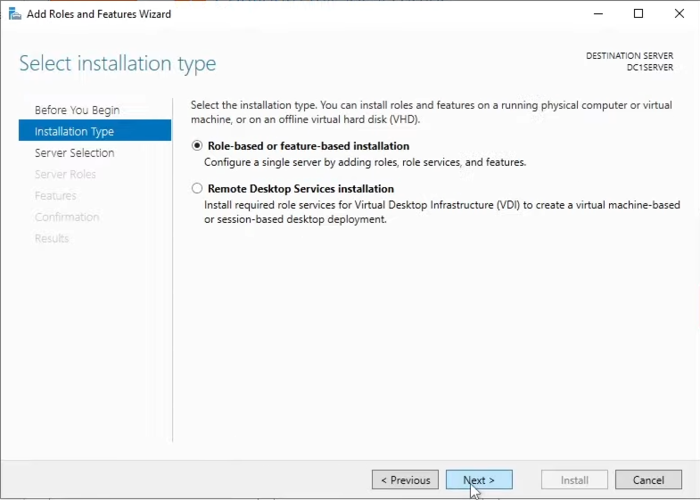
Choose the “Role-based or feature-based installation” radio button for the installation type.
4. Select the destination server
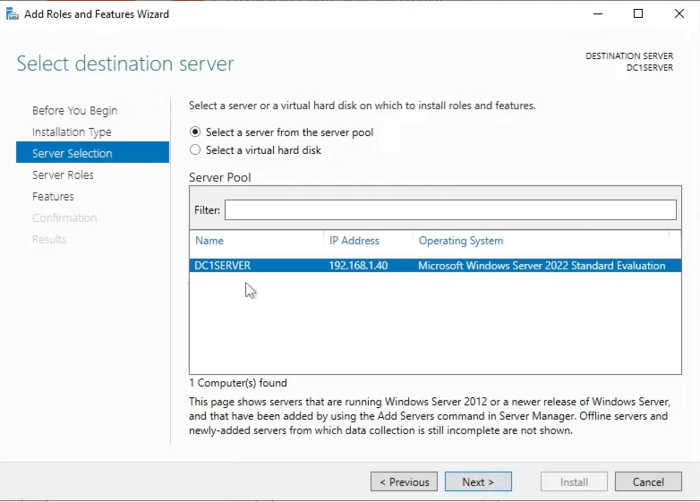
This step is to select the server on which you plan to set up Active Directory Domain Services. First, select the “select a server from the server pool” option, select the server name and IP address displayed, and click Next.
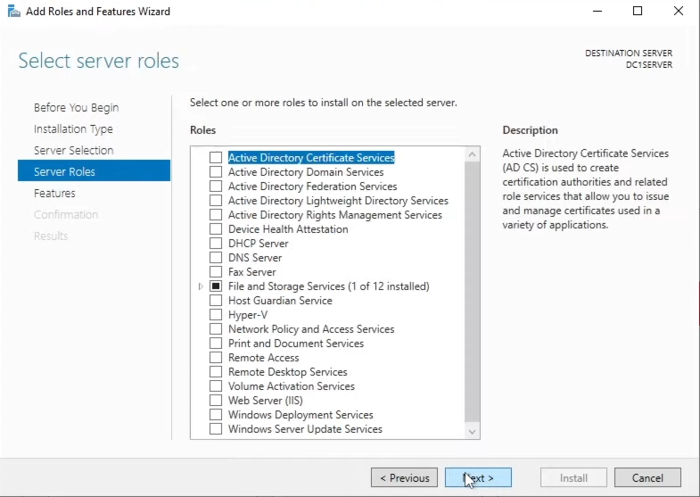
5. Select server roles
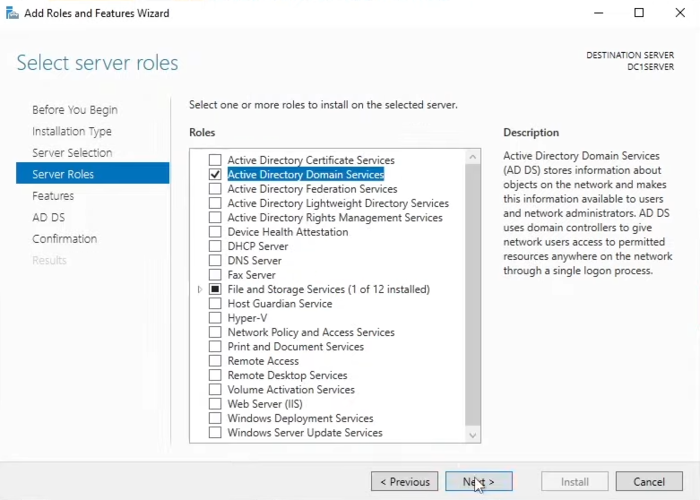
To specify server roles, you will be faced with a list of different options that you should check the “Active Directory Domain Services” checkbox.
6. Add Features
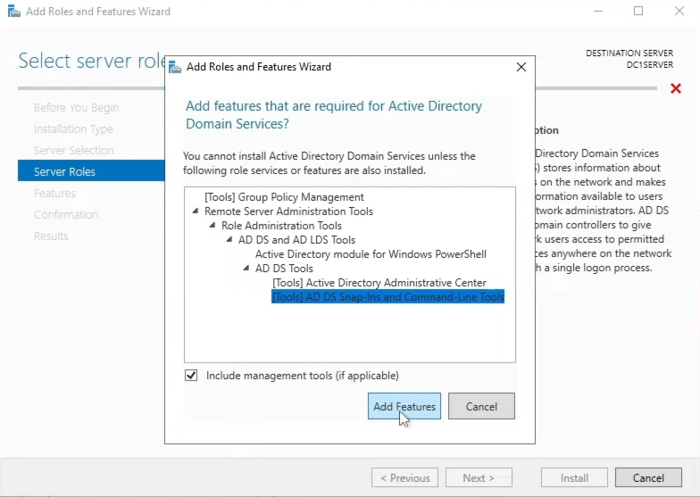
Add Roles and Features Wizard window appears automatically after step 5, which displays additional features required for Active Directory Domain Services, such as group policy management, remote server, administration tools, AD LDS tools, etc. To add the necessary features, click “Add Features” and Next.
7. Select Features
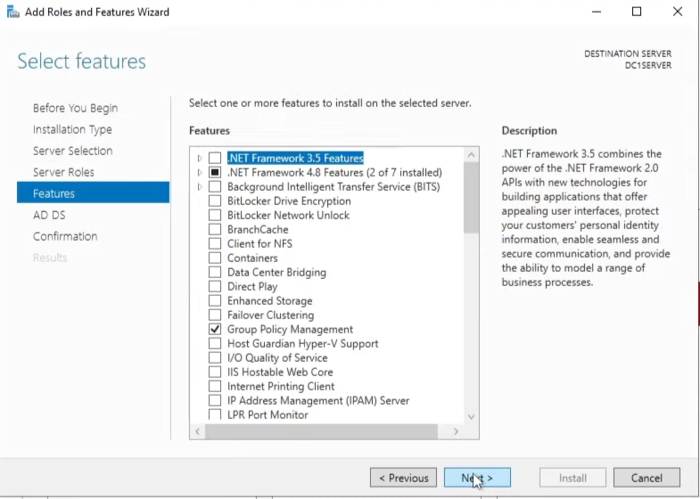
Adding a special feature on the “select features” page is not mandatory. If you need, you can add a special feature, otherwise, go to the next step by selecting Next to run the active directory domain services wizard.
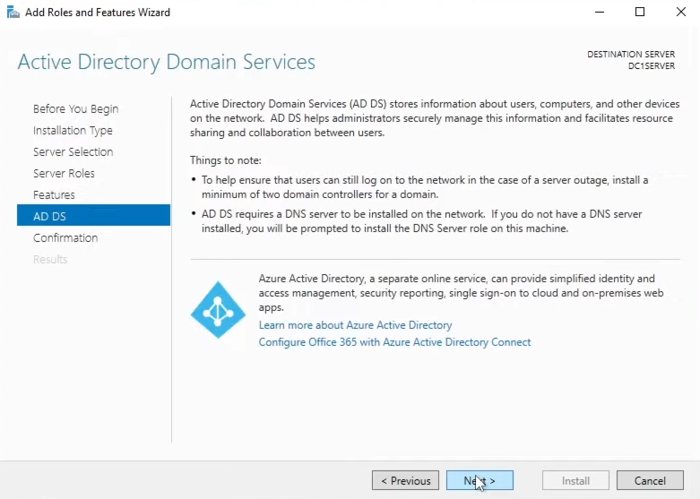
8. Read the information about AD DS
By running the active directory domain services wizard, you will see information that, after reading it, click on Next and proceed.
9. Confirm installation selections
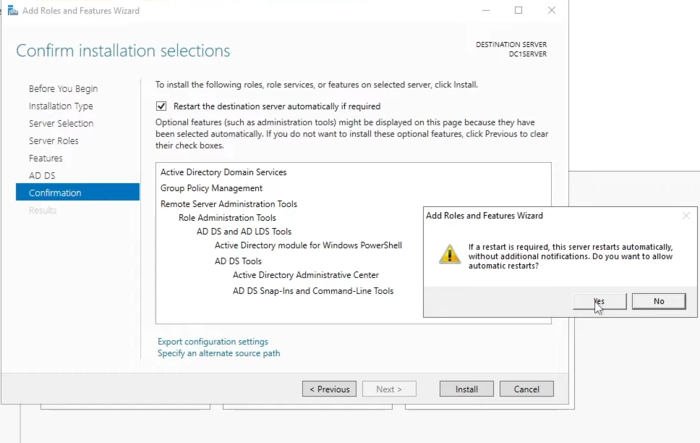
In this step, you can see the items that we have selected during the installation of active directory domain services to be installed before the installation of AD DS. Check the specified items and click the “Install” button after making sure.
Before choosing Install, check the “restart the destination server automatically if required” box, answer “yes” to the request, and continue.
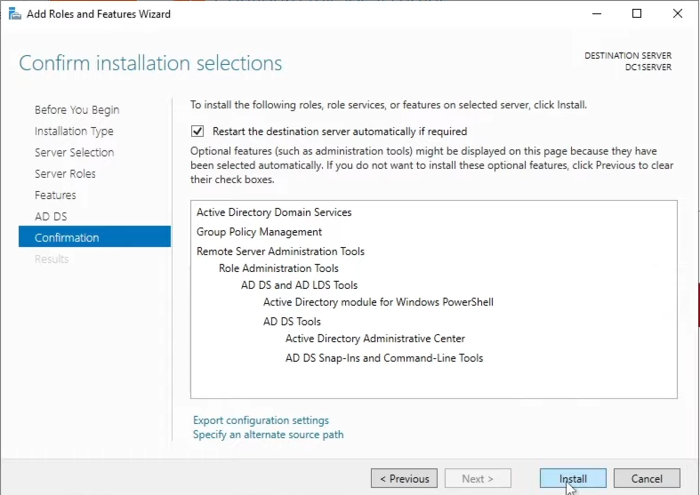
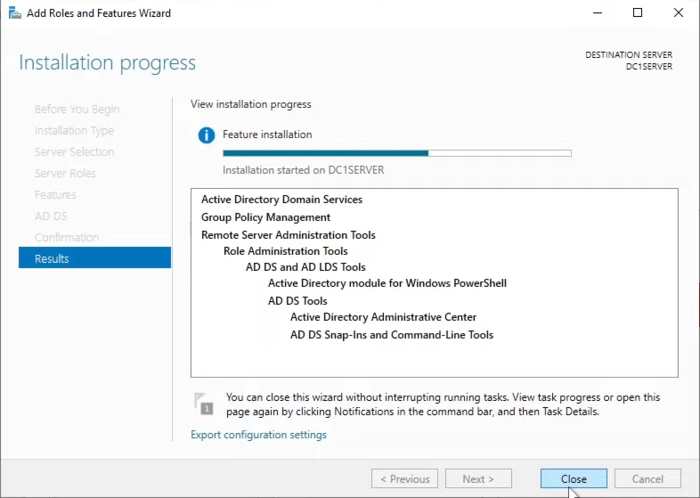
As a result, the installation process starts; wait until the installation process of active directory domain services features is completed. It won’t take much time.
10. Promote the server to Domain Controller
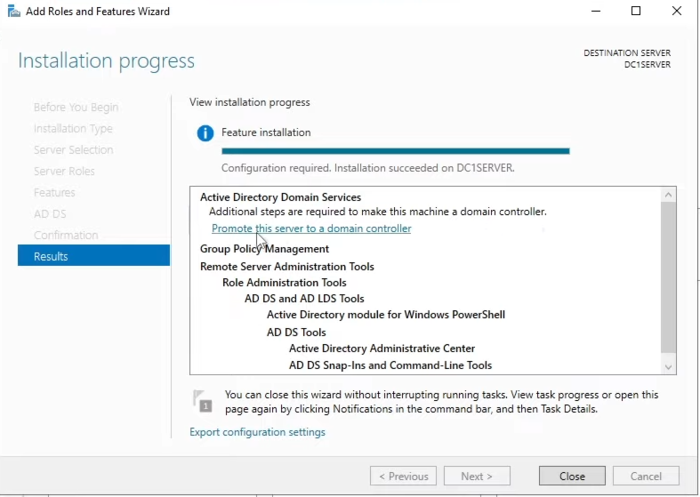
Now you have successfully installed the features and prerequisites of active directory domain services, and it is time to upgrade the server to Domain Controller. To do this, click on the “Promote this server to a domain controller” option after installing additional features.
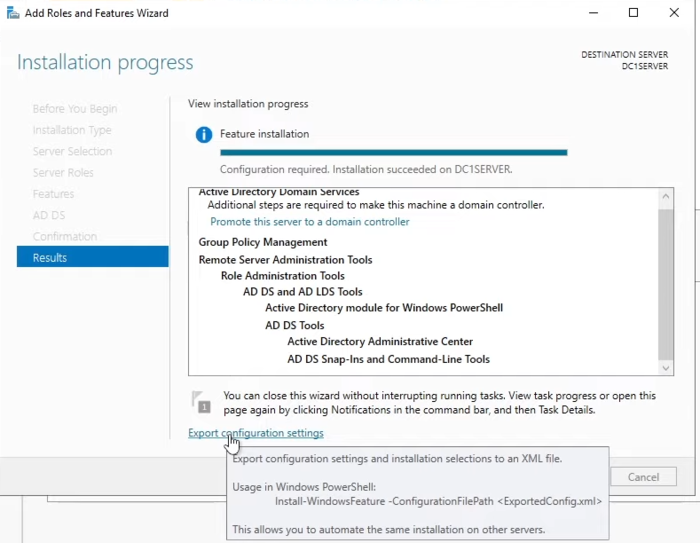
Note: At the bottom of the page, the “Export configuration settings” option is used to implement configuration and similar settings on another server to set up an active directory.
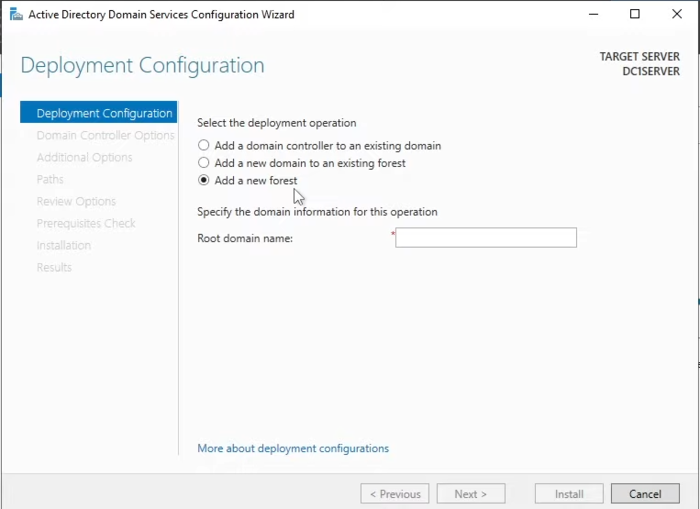
11. Select Deployment Configuration
In this step, you must select the deployment operation from the three available options. If you have not created a domain controller in the network before and are creating a domain controller for the first time, select the “Add a new forest” option and enter the Root domain name in the Empty dialog box. Finally, select the Next option.
12. Domain Controller Options
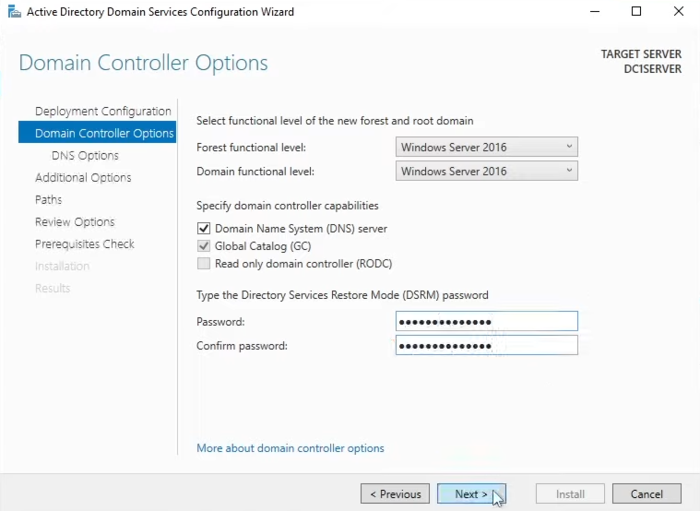
In domain controller options, you have to specify the forest functional level and the domain functional level. By default forest functional level is set to windows server 2016. That means all domain controllers in your network should be 2016 or above. If there is a domain controller below 2016, you should select a lower version of the operating system. The domain functional level can be higher than the forest functional level but can not be lower than the forest functional level.
Do not change the default settings in the Domain Controller Options window. All you have to do is enter the Directory Services Restore Mode (DRSM) password and then click Next.
13. Ignore the errors about the DNS server
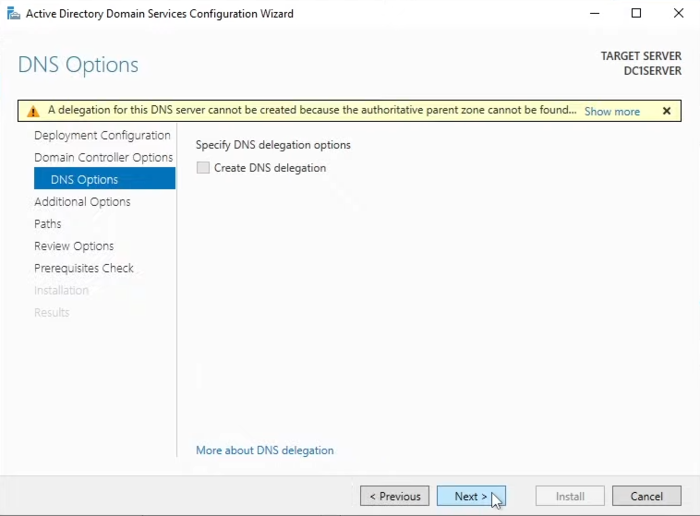
At this step, you will see the “A delegation for this DNS server cannot be created because the authoritative parent zone nameserver cannot be found” error, ignore it and continue by selecting the Next option.
14. Verify the NetBIOS domain name
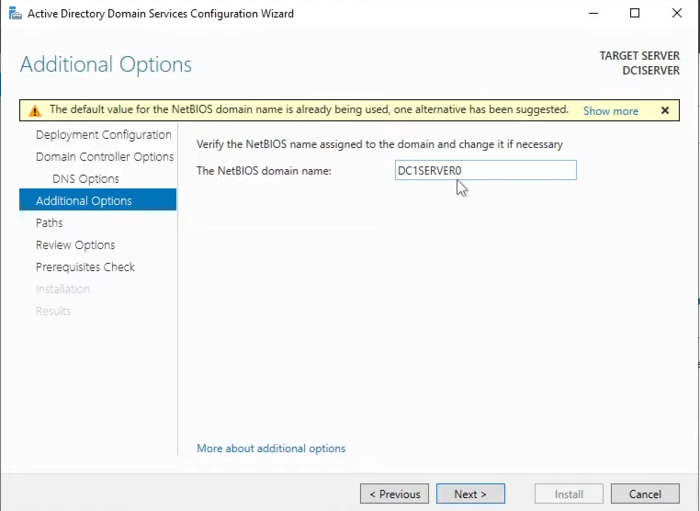
You can specify the NetBIOS domain name if needed or use the Default value for the NetBIOS domain name. If you have already used the default value of the NetBIOS domain name, you must define a new value. Usually, the computer recommends an alternative.
15. Specify the paths
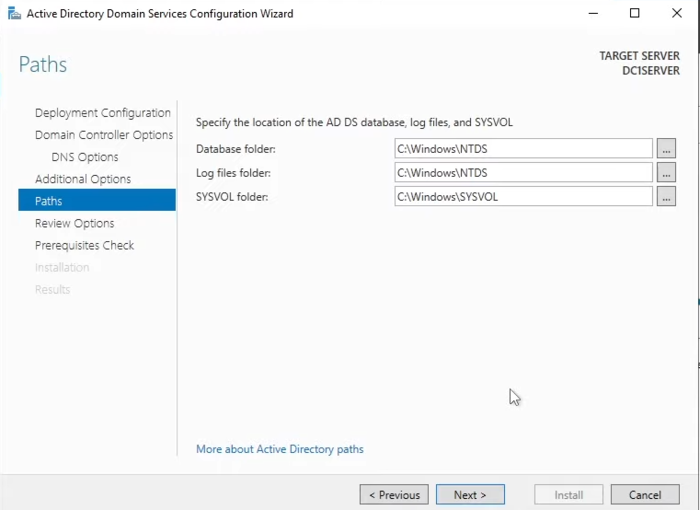
In this step, you must specify the location of the AD DS database, log files, and SYSVOL(cessfull folder). We prefer to accept the default settings of the paths and not make any changes and complete the process of installing active directory domain services by selecting the Next option.
16. Review selections
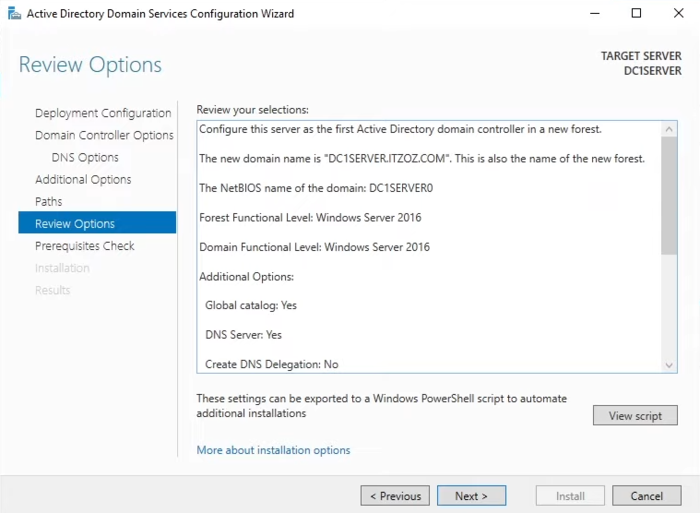
This step is to check the options you selected during the active directory domain services set up in the previous steps. If you think you need to change, select the “Previous” option and apply the changes you want. If you are sure of your choices, click on the Next option.
17. Prerequisites Check
At this step, the prerequisites for the Active Directory Domain Services installation are checked and confirmed, and you can see the results of the prerequisites check in the View Results dialog box. If you encounter an error, return to the previous steps, make the necessary corrections, and then select “Install” to start the installation process.
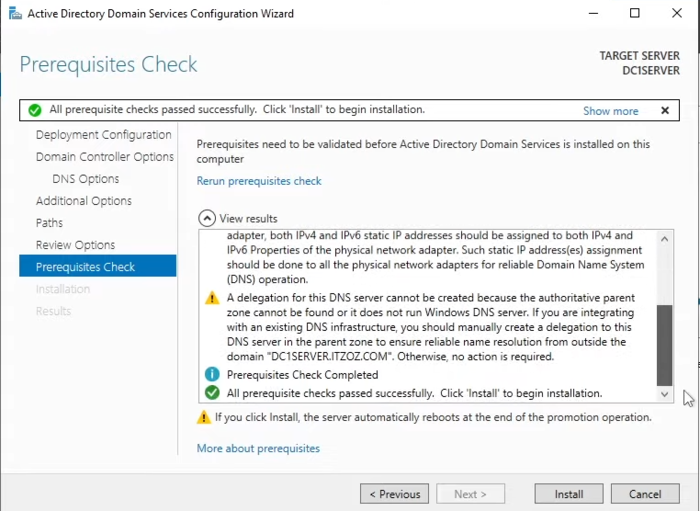
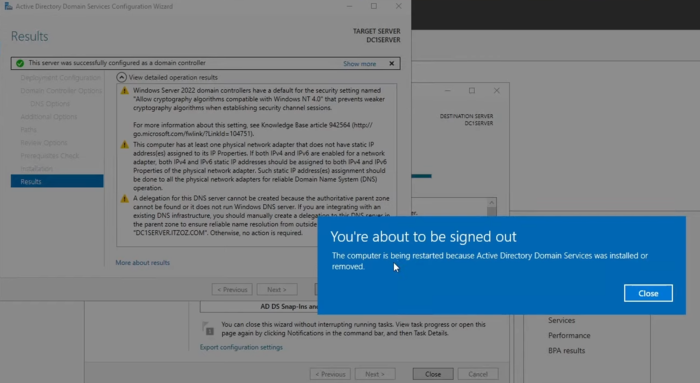
The installation will take some time, and also the server will reboot.
After the installation, you will be asked to allow the system to reboot.
After the server is up, enter the username and password you set during installation and click the Arrow symbol to sign in to the domain controller.
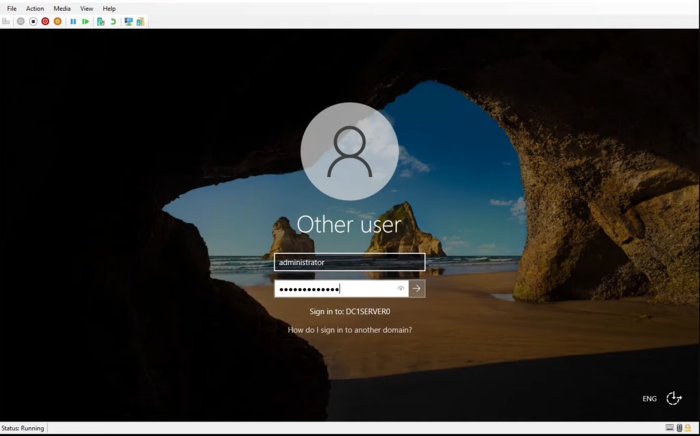
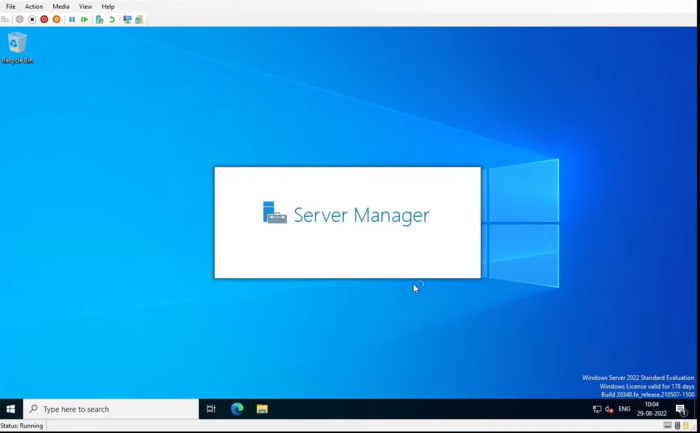
Note: Your password is the same password you used to log in to the local server before installing AD DS.
Congratulations, you have successfully installed Active Directory Domain Services on Windows VPS and logged in to your domain controller.
After accessing the Domain Controller, the Server Manager will automatically load everything you have installed. In the list, you see AD DS (AD DS stands for active directory domain services), and by double-clicking on it, you will see more details about AD DS, such as management services, performance, and other things.
Conclusion
Each step in Setup Active Directory Domain Services is essential for building a robust IT environment. Following structured, methodical approaches guarantees long-term security, easier management, and the flexibility that growing businesses require. Proper setup positions your organization for scalability and future success.
FAQ
2. What are the core requirements to set up Active Directory Domain Services in my business environment?
To set up Active Directory Domain Services, you need a physical or virtual server running a supported version of Windows Server, a static IP address, reliable network connectivity, and appropriate administrative access with clearly defined security policies.
3. How does setting up Active Directory Domain Services improve user and resource management?
AD DS simplifies user authentication and authorization, enabling centralized control and policy enforcement for users, devices, and data. This streamlines user management, reduces administrative overhead, and ensures compliance with business policies.
4. What are the security benefits of using Active Directory Domain Services for my organization?
Implementing AD DS significantly enhances security by providing centralized authentication, granular access control, robust password policies, and auditing capabilities. These features help protect your business data and reduce the risk of unauthorized access.
5. Can Active Directory Domain Services integrate with other business applications or cloud services?
Yes, AD DS integrates seamlessly with a wide range of business applications and cloud platforms such as Office 365 and Azure Active Directory. This ensures a unified identity management solution, allowing employees to access critical apps securely and efficiently.
6. How do I ensure high availability and disaster recovery when setting up Active Directory Domain Services?
High availability is achieved by deploying multiple Domain Controllers in different network locations and regular backup procedures. Planning for disaster recovery includes implementing robust replication strategies and maintaining up-to-date system snapshots.
7. What are the ongoing administrative tasks after setting up Active Directory Domain Services?
Routine tasks include creating and managing user accounts, monitoring system health, applying security patches, updating group policies, and conducting periodic audits. These activities help maintain the integrity and performance of your AD DS environment.
8. Are there compliance or regulatory considerations when configuring Active Directory Domain Services?
Yes, businesses must consider industry-specific compliance requirements related to user access control, data confidentiality, and audit logging. Proper configuration of AD DS helps demonstrate adherence to standards such as GDPR, HIPAA, and ISO 27001.
9. How long does it typically take to deploy Active Directory Domain Services for a small to medium business?
The deployment timeline for AD DS varies based on the complexity of your business environment. For most small to medium enterprises, the setup process can be completed in a few hours to a few days, ensuring minimal disruption to operations.
10. What support is available after the initial setup of Active Directory Domain Services?
Ongoing support is usually available through Microsoft and specialized IT service providers such as OperaVPS. This support includes monitoring, troubleshooting, regular updates, and expert guidance to optimize the reliability and security of your AD DS deployment.