Build Backup Server Using FTP Server
Build backup server by setting up an FTP server to securely store copies of important data. Automate backups and protect your data against loss or damage for reliable recovery.
🤖AI Overview:
Building a backup server involves creating a dedicated system to store and safeguard critical data from cyber threats, hardware failures, and accidents. Using FTP servers on Linux or Windows allows easy, automated backup management and secure file transfers. This practice is key for data continuity in personal and business IT environments.
What is a backup server?
A backup server is a powerful server that backs up important information, including data, files, programs, and databases, on a dedicated internal or remote server and is responsible for protecting and collecting important data. The network is in high-risk conditions such as cyber attacks, power outages, equipment failures, etc. In addition, it is known as the ideal data protection method by providing the possibility of data recovery in case of data loss.
Using the most advanced software and hardware technologies, the backup server communicates with hosts, servers, or other related devices to provide Storage and retrieval services in case of data loss or failure.
Nowadays, the backup server is the main component in business IT infrastructure. Usually, local servers or cloud-based servers are used as backup servers and secure sources in the network to store information on a daily or weekly basis.
Backup server features
Having a high storage capacity: Backup servers have a high storage capacity thanks to special software and additional hard disks to be able to store and restore massive files and data.
Automatic backups: As a bonus, backup servers allow for automatic backups, which eliminates the worry of storing backup copies of data.
High security in backup servers: Due to the nature and purpose of the backup server, it must be designed securely to protect the organization’s critical data. Therefore, security is a priority in backup servers and should perform best in this field.
Advantages of the backup server
The backup server is one of the essential information infrastructures for businesses because it provides valuable advantages to the user. Improving data security and performance is one of the main advantages of the backup server.
Automatic backup
The backup server makes it possible to back up user data automatically. Automating the backup process was highly effective in improving data backup quality and recovery capabilities. In addition, automated backups have reduced the IT team’s responsibility by reducing the possibility of human mistakes in data integrity. Therefore, backup servers help businesses save time and effort in data storage and retrieval.
Protect important data
In addition to storing and retrieving important business information, backup servers offer data encryption to increase data security. Organizations can make several backup copies of their data with the help of a backup server so that they can quickly recover their data from a backup server in case of a malfunction in the main server. Therefore, backup servers can reduce the possibility of data loss and the impact of failures on businesses.
File versioning
Backup servers can periodically back up data that is stored in distinct locations and provide multiple different copies of data to the user. For example, the backup copies of the data and files that are prepared on the server today are kept in a separate place from the data or files that are backed up tomorrow. So any business can restore any previous data backup when data is lost. Backup servers allow file versioning and give businesses’ IT departments freedom to manage.
Why is server backup important for businesses?
For businesses, backup servers are primarily a way to ensure data security and restore important information in the event of damage.
Every business continues its activity based on the vital data related to its job, and the business activity relies on their information. With the loss of important information of a business, the business may encounter problems in the path of growth. The interruption of companies due to losing their essential information will sometimes have more severe consequences, such as damage to the company’s reputation and disruption of existing customer relationships.
Also, since important business information can be helpful to some profiteers, it should be considered that your information is also vulnerable to cybercriminals, viruses, and other forms of malware. Sometimes, due to human error, system failure, and other unforeseen circumstances, there is a possibility of accidental data loss and deletion.
It can be concluded that the loss or possible misuse of data can have serious consequences for people, especially businesses.
In addition to backing up data, preparing multiple copies of data, and saving and maintaining data, the backup server allows the recovery of business information after experiencing an unforeseen problem. Therefore, make it a priority to get a backup server as a reliable way to store and restore your critical business information. As you have learned about the importance and features of a backup server, remember that to create and benefit from a backup server, buying a dedicated server is the best option because of the high security and many resources it provides to the user.
FTP server
File Transfer Protocol or FTP is a type of Internet protocol that is responsible for transferring files between a server and a client through a network or the Internet. This protocol is similar to those used for email (SMTP) and web pages (HTTP). An FTP server allows the exchange of files between a server and a client. Therefore, a client connects to the server after successful authentication and is given the privilege to read files or upload new files to the server.
Now that you are familiar with the FTP server, you can configure the FTP server to transfer files between the server and the client. In the following, we will explain how to configure an FTP server, assign access to users, set up a firewall, and encrypt your FTP connections using SSL.
How does an FTP server work?
File transfer protocol (FTP) acts as an intermediary between the server and the client. The user can upload or download a file on the server. A client establishes two separate connections with the server: one to issue commands and the other to send and receive data.
On port 21, the command port of the FTP server, the client issues the command, and a data port is used to receive and send data.
How to Build Backup Server (FTP server) in Linux
The steps to configure an FTP server in Linux begins by logging into the Linux virtual machine via SSH with a user that has sudo permissions:
Step 1: Installing the FTP server
There are many types of FTP servers; our preference is vsftpd among ProFTPD, vsftpd, etc.
What are the features of vsftpd FTP server?
vsftpd is an excellent choice for an FTP server that has a lot of features.
- Compatible with SSL/TLS integration
- Ability to set limits for bandwidth
- Support for setting virtual IP
- Support for virtual users
- Compatible with IPv6
- Having a chroot feature to lock users into the root directory
Starting the vsftpd FTP server installation process
First, install vsftpd by entering the following command:
sudo apt install vsftpdTo ensure that the vsftpd service is active, enter the following command:
sudo systemctl status vsftpd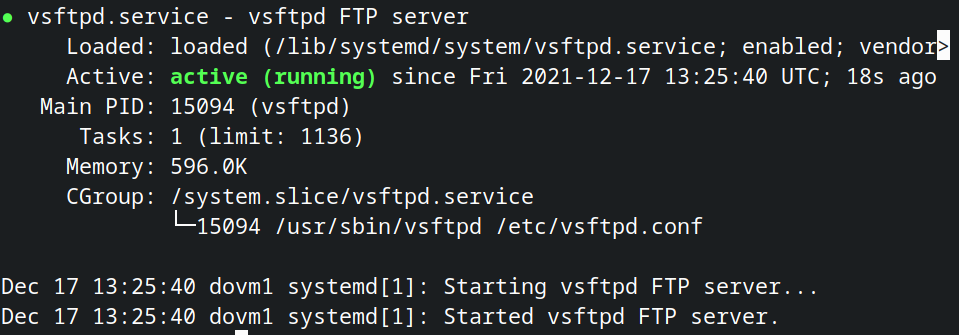
As you can see, displaying the word Active in green means that the service is active and running. In Linux, services are managed and monitored using the systemctl command. In addition, this command is also used to activate and deactivate services. If you find that the vsftpd service is disabled, use the following command to activate the service:
sudo systemctl enable --now vsftpd–now in the incoming command, to affect the enable command on our service without delay. So instead of waiting for a reboot, your service will be activated without delay by entering the above command.
Step 2: Configuring the firewall
This step is helpful for users for whom the use and setting of a firewall are essential; FTP uses different ports for passive mode and uses port 20 for active mode and port 21 for instructions. Therefore, these ports should be set to Open your firewall. Usually, in Linux systems, ufw is used to control and manage the firewall. Some cloud service providers have firewalls outside the virtual machine that must be configured through your own portal. Anyway, no matter what your situation is, for passive FTP connections, just open some ports in addition to ports 20 and 21 for TCP connections.
The range of inactive ports will vary depending on how many users you anticipate having. Additionally, a client can send multiple files or large amounts of data using different ports. We will explain how to specify your FTP server to use ports. Our inactive FTP port range should be higher than the reserved ports up to 1024, assuming, for example, that we want to enable ports 5000 to 10000 and open port 990 for TLS, which we will adjust in the following sections of the article; so Run the following commands for ufw:
sudo ufw allow 20/tcp

sudo ufw allow 21/tcp

sudo ufw allow 990/tcp

sudo ufw allow 5000:10000/tcp
Step 3: Configuring users
There are two purposes for using FTP servers, which are:
- Lots of people connect to your FTP server to receive files, and you want to host it publicly.
- You bought a Linux VPS for personal use and want to store your files there, but you don’t want anyone else to access them.
If your goal is to host an FTP server publicly, you must create an additional user and then share the password and username of that account with other users so that they can access the FTP server and files.
It is assumed that an administrator can place files in any directory on the device, while a general user can only access files in a restricted directory.
The general idea is that an administrator can put files in any directory on the device, while a public user can only access files in a restricted directory. To do this, you need at least a familiarity with user permissions. Only the root user can create new files in any directory on the server. Other users can create new files in their home directory (/home/username), other directories are not writable by other users except the root user, and only the root user can create new files in any directory.
If you want to upload files to a directory other than your admin user’s home directory, you must either change the owner of the directory to your admin user (using the chown command) or change the directory permissions (using the chmod command).
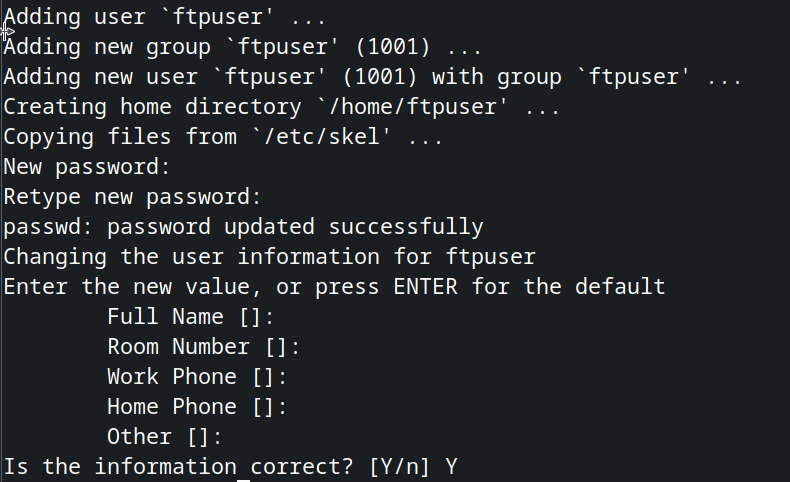
We will start the process by creating a public user account. For this purpose, enter the following command:
sudo adduser ftpuserType your password, leave all other fields blank, and type Y to save your settings.
To improve security, it is better to disable the user’s SSH access. To disable SSH access, run the following command:
sudo nano /etc/ssh/sshd_configEdit this file to include the following line.
DenyUsers ftpuserPress Ctrl + x and then Y simultaneously, and then press Enter. Stop and restart the SSH service for the changes to take effect.
sudo systemctl restart sshdStep 4: Creating an FTP folder and setting permissions
To create an FTP folder, enter the following command:
sudo mkdir /ftpTo change the ownership of the directory to the administrative user, enter the following command:
sudo chown adminuser /ftpChanging the ownership of the folder to the administrator user is for the purpose that when you encounter a limitation in uploading files in a folder that does not belong to the administrator user, change the ownership of the folder to the administrator user through the above command.
Step 5: Securing and configuring vsftpd
To apply the changes, first, run the vsftpd configuration file. To do this, type the following command:
sudo nano /etc/vsftpd.confEnsure the following lines are uncommented :
...
anonymous_enable=NO
local_enable=YES
write_enable=YES
...
Additionally, it would be best if you allowed vsftpd to use the ports we opened in step 2 for passive FTP connections (5000-10000). Therefore, enter the following commands in the vsftpd.conf file:
pasv_min_port=5000

pasv_max_port=10000
In this step, you need to specify the directory by default during FTP connections so that the user will be transferred to the directory we specified by connecting to the FTP server. Therefore, for this purpose, enter the following command:
local_root=/ftpNote: To execute the command, be careful not to leave a space before and after =.
Locking user in the home directory
Since any user can typically access any file on the Linux server, we must limit the access of ftpuser as the default directory to increase security. For this, you must use the chroot command in vsftpd, so un-comment the following commands:
...

chroot_local_user=YES

chroot_list_enable=YES

chroot_list_file=/etc/vsftpd.chroot_list

...
Additionally, add the following line, which is not by default in the configuration file.
allow_writeable_chroot=YESAs for the above commands, the first command provides chroot capability for local users, which includes the admin user and ftpuser, and the second and third commands are used to specify which users are allowed to use the chroot feature.
Run the following command to set file permissions:
local_umask=0002By running the above command, the modification permission of each new folder will be set to 775 (rwxrwxr-x), and each new file will be set to 664 (-rw-rw-r-). Since ftpuser does not own the directory, it can only browse and download files from any subdirectory of our FTP directory. Still, it cannot add new files to existing directories in the FTP directory.
Next, press Ctrl + x and then y and Enter and create the list file we mentioned through the following command:
sudo touch /etc/vsftpd.chroot_list

sudo nano /etc/vsftpd.chroot_list
Any user you add to this file will not be chroot-ed. Because we don’t want this file to be locked, so enter your admin account in this file.
Press Ctrl+x, then y and Enter, and then you need to restart the vsftpd server for the changes to take effect. For this purpose, enter the following command:
sudo systemctl restart --now vsftpdStep 6: Secure vsftpd with SSL/TLS
To use FTP securely over the Internet, it is best to encrypt its traffic. FTPS (File Transfer Protocol over SSL) is the best option for encrypting all communications. To start, We will generate a self-signed certificate, so type the following command:
sudo openssl req -x509 -nodes -days 365 -newkey rsa:2048 -keyout /etc/ssl/private/vsftpd.pem -out /etc/ssl/private/vsftpd.pemBy entering the necessary information, the desired certificate will be created. Also, press Enter to set the default values.
Enter the following command to run the vsftpd configuration file:
sudo nano /etc/vsftpd.confThen delete the following lines from the end of the file.
rsa_cert_file=/etc/ssl/certs/ssl-cert-snakeoil.pem

rsa_private_key_file=/etc/ssl/private/ssl-cert-snakeoil.key

ssl_enable=NO
Replace the lines you deleted with the following lines:
rsa_cert_file=/etc/ssl/private/vsftpd.pem

rsa_private_key_file=/etc/ssl/private/vsftpd.pem

ssl_enable=YES

allow_anon_ssl=NO

force_local_data_ssl=YES

force_local_logins_ssl=YES

ssl_tlsv1=YES

ssl_sslv2=NO

ssl_sslv3=NO

require_ssl_reuse=NO

ssl_ciphers=HIGH
After saving the changes, enter the following command to restart the vsftpd service:
sudo systemctl restart --now vsftpdStep 7: Connecting to the FTP server
This step requires an FTP client, that there are several options to choose from. Filezilla can be an excellent option to use. Therefore, you can download and install it, and to connect to your server, enter its IP address in the Host field along with your username and password and then click the Connect button.
Your local computer directories are on the left, and your remote FTP server directories are on the right. Files can be transferred between the device (client) and the FTP server simply by dragging and dropping them.
How to configure FTP server in Windows
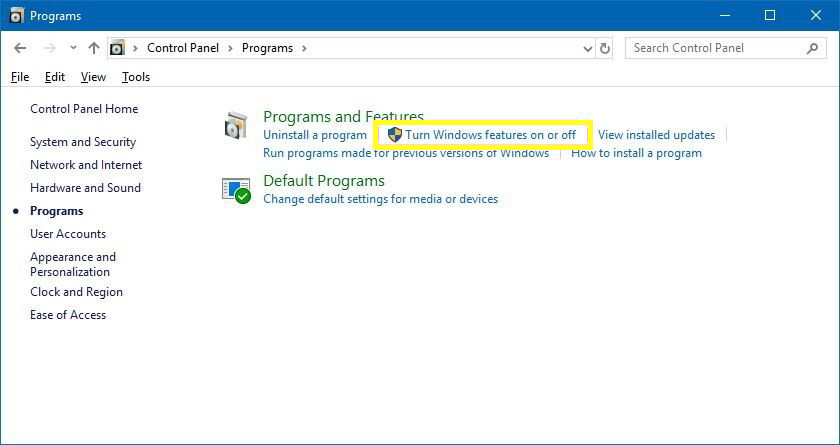
Although Windows supports setting up an FTP server, you must add the necessary components manually before starting an FTP server configuration in Windows.
Follow the steps below to install the necessary FTP server components:
- Enter the control panel.
- Open the Programs option.
- In the “Programs and Features” section, click the Turn Windows features on or off link.
- Expand the “Internet Information Services” feature and FTP Server option.
- Check FTP Service and FTP Extensibility settings.
- In the Web Management Tools section, use the default settings and make sure that the IIS Management Console is enabled.
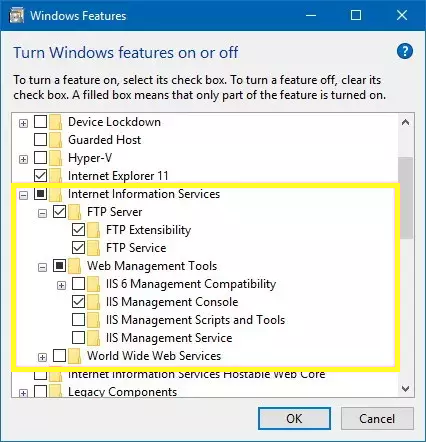
Then click on the Ok and Close buttons.
By completing these steps, you have installed the necessary components for FTP Server configuration on your system.
Steps to configure FTP Server in Windows (Windows 10)
After installing the necessary components, the FTP server can be configured on the computer by adding a new FTP site, setting firewall rules, and enabling remote access.
Setting up an FTP site
Follow the steps below to set up an FTP site:
- Enter the Control Panel.
- Select the System and Security option.
- Click on the Administrative Tools option.
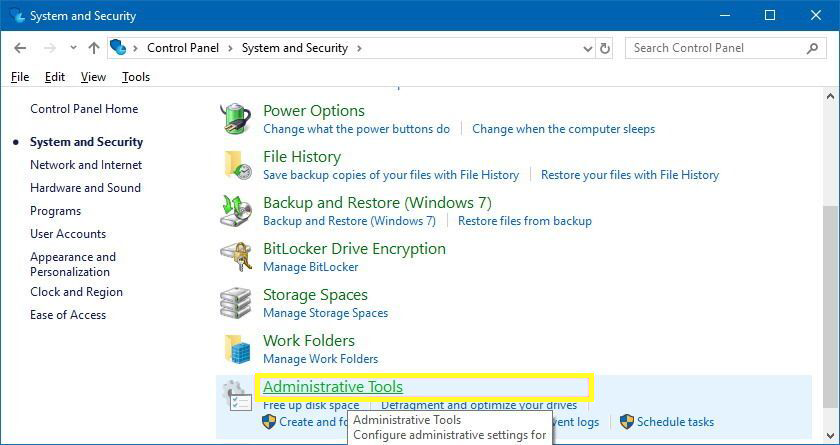
- Open the Internet Information Services (IIS) Manager by double-clicking its shortcut button.

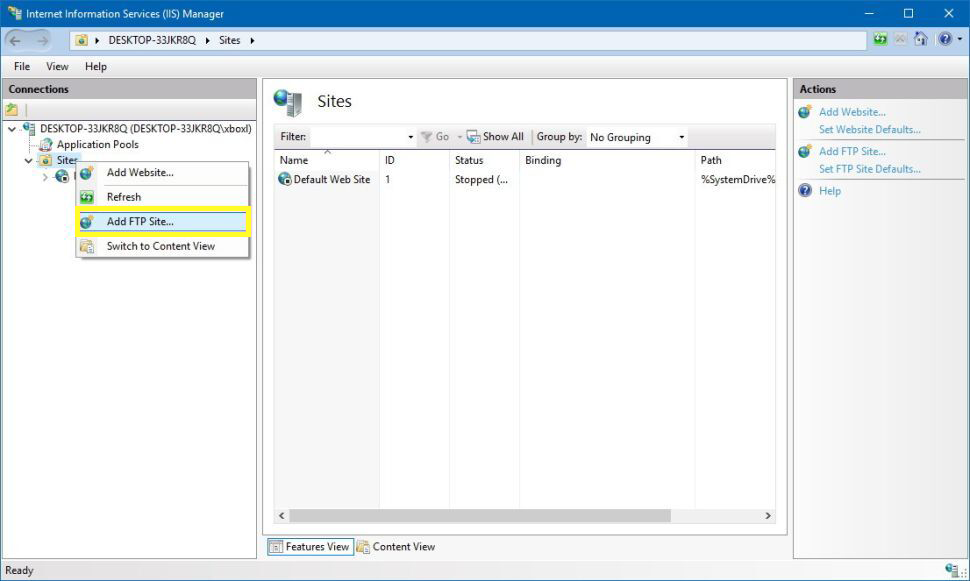
In the “Connections” section, select the Add FTP Site option from the menu that appears by right-clicking on the site option.
In the FTP site name section, name your server.
To find the folder you want to use to store your FTP files, click the right button in the “Content Directory” column in the “Physical path” field.
Note: It is recommended that you create a folder either on a separate hard drive or in the root of the main system drive. Otherwise, when making multiple accounts, users will not have access to the home folder if you set the home folder to one of your default folders. (Although you can change the permissions of a folder, we don’t recommend it.)
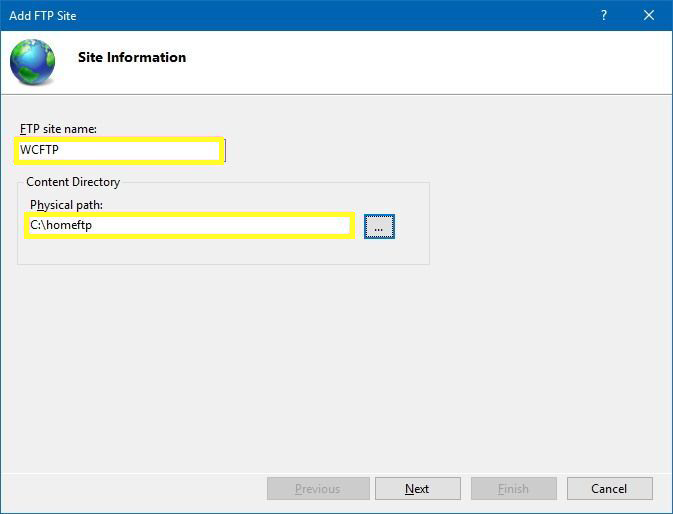
Then click on the Next option.
Apply default Binding settings.
Activate the Start FTP site automatically option by ticking.
Check the No SSL box under the “SSL” column.
Note: In a commercial environment or on an FTP server, selecting the Require SSL option is the best way to configure the site to prevent a clear-text data transmission.
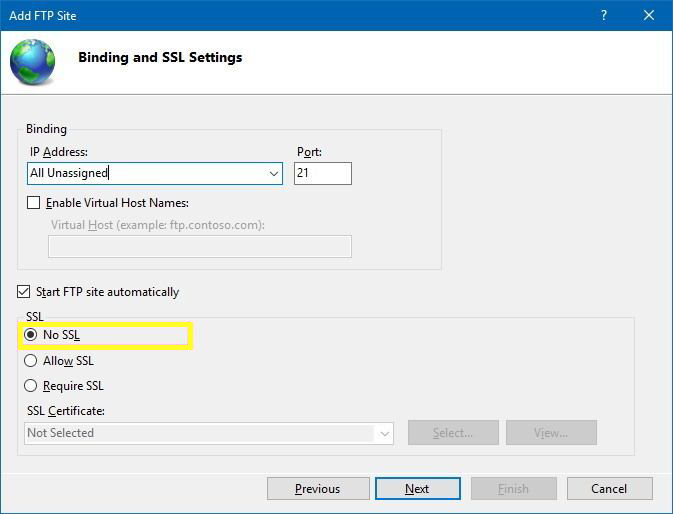
Then click OK.
Select the Basic option in the “Authentication” section.
In the “Authorization” drop-down menu, select Specified users.
Enter the name of your local account or the email address of your Windows account to connect to the FTP server.
Check the box in front of the Read and Write option.
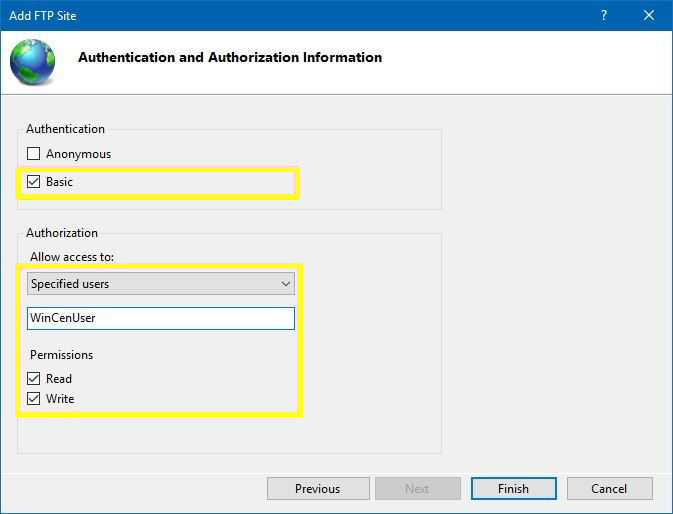
By selecting the Finish option, these steps will end, and now you have an active FTP site.
Configuring Firewall rules
If you have an active firewall on Windows, connections to the FTP server will be blocked by default. Therefore, to set the necessary rules for access to the service, you must follow the following instructions manually:
Steps:
- Go to Windows Defender Security Center
- Open the Firewall & network protection option
- Click on Allow an app through the firewall
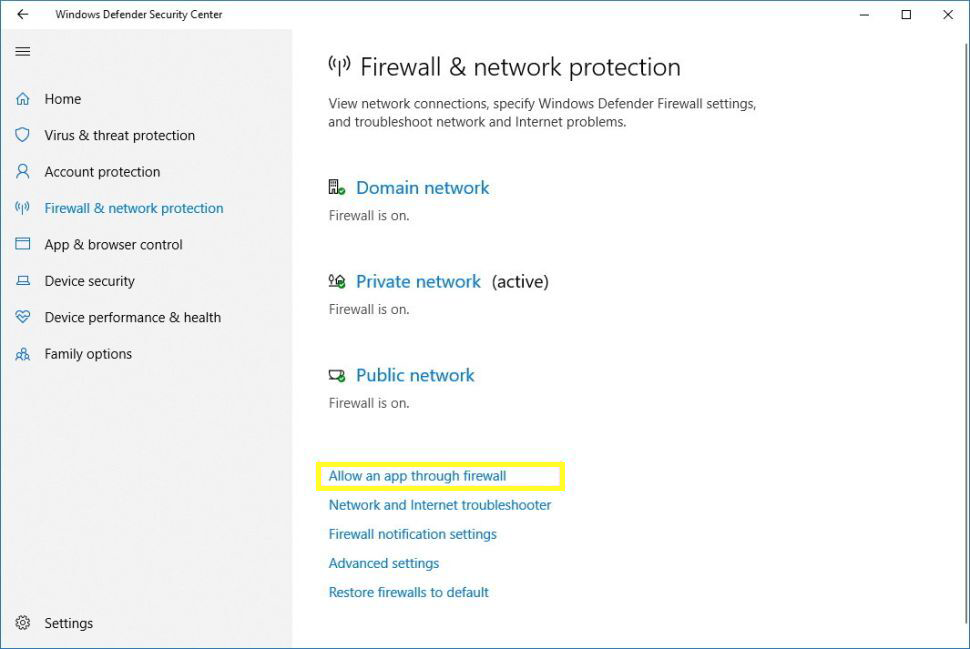
- Click on the Change settings option
- Select two options: allow Private and Public access and FTP Server
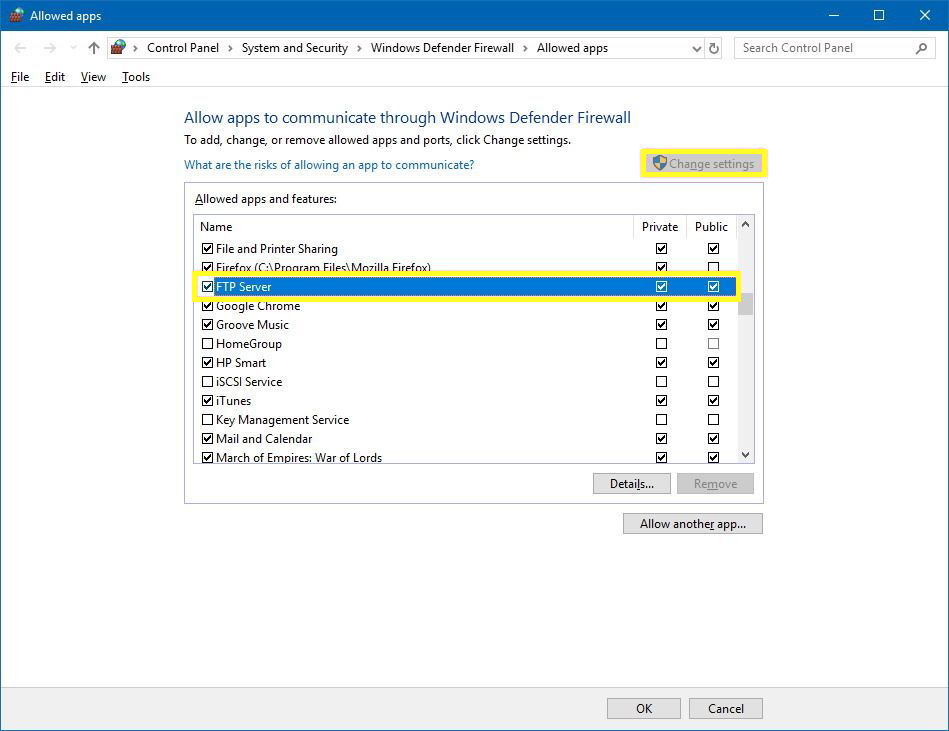
After completing the instructions, the FTP server should now be accessible from the local network.
If you use third-party security software, check your vendor’s manual website for more detailed instructions on creating firewall rules.
Allowing external connections
To communicate with the FTP server over the Internet, you must open Transmission Control Protocol/Internet Protocol (TCP/IP) port number 21 on your router.
Port forwarding methods are different based on the operating system and router. We’ll cover the basic steps below, but it’s best to check your manufacturer’s support website for more detailed instructions.
To enable FTP connections from outside the local network via port 21 forwarding, make the following changes:
- Go to Settings.
- Open the Network & Internet option.
- Click on Status.
- Select the Change connections properties option.
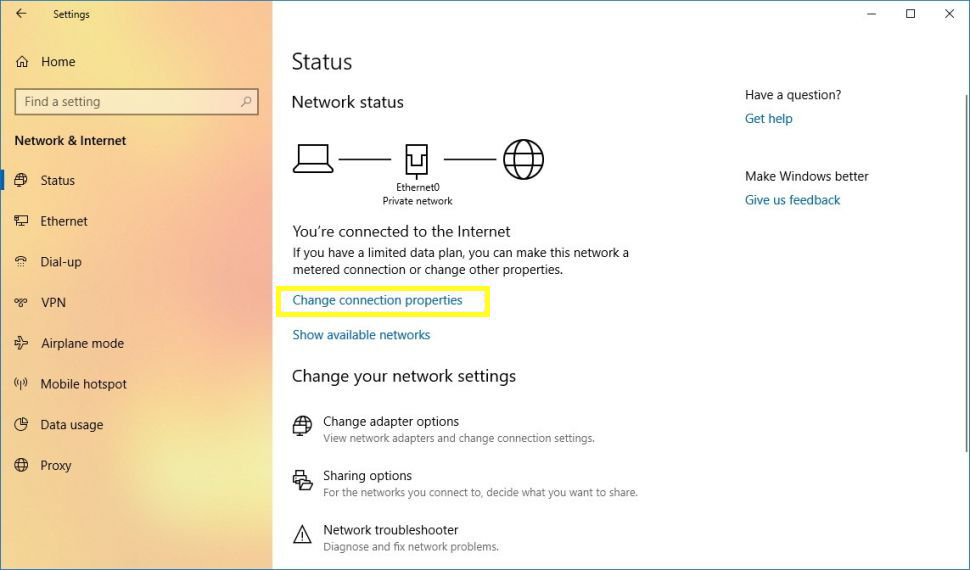
Write down the address of the IPv4 DNS server, which is the address of your router. Addresses in the 192.168.x.x range are commonly used for private networks.
The next step starts with opening the web browser.
Then enter the router’s IP address in the address bar and go to the next step by pressing Enter.
Log in with your router credentials.
Select the Port Forwarding page on the WAN, NAT, or Advanced settings pages.
To send incoming connections to the FTP server from the public network (Internet), create new rules by adding the following information:
Service name: Specify a name for port forwarding rules.
Port range: enter the number 21 in this section.
Local IP: Enter the IP address of the FTP server to which incoming connections to the FTP server will be sent by the router to this IP address (the same as your IPv4 address)
Local port: Enter port number 21.
Type Protocol: TCP.
Finally, click the Add button and Apply to save the changes made.

After the configuration is complete, any incoming connections on port 21 will be redirected to the FTP server.
Setting up a static IP address
To avoid updating the router every time your device’s IP address changes, it is recommended to configure a static IP address if you plan to transfer files over the Internet. For this purpose, follow the steps below:
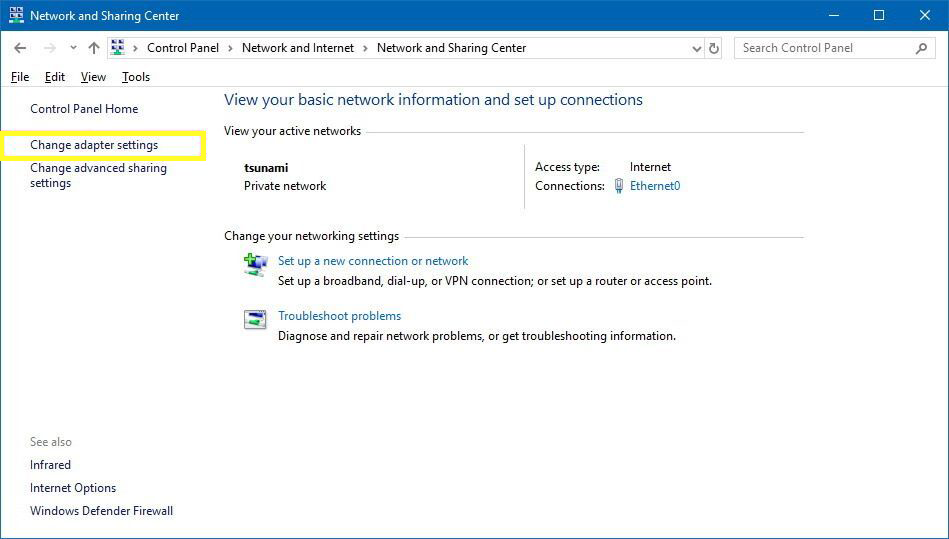
- Go to the control panel
- Click on Network and Internet
- Click on Network and Sharing Center
- Select the Change adapter settings option on the left side.
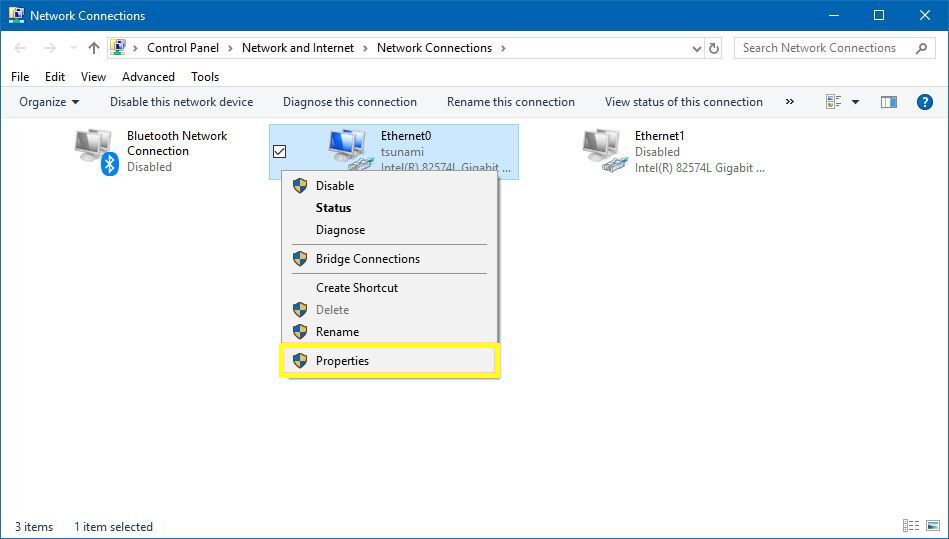
To access the adapter settings, right-click on it and select “Properties.”
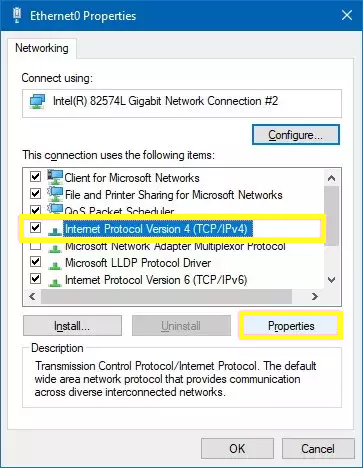
Click on Internet Protocol Version 4 (TCP/IPv4).
Then select the Properties option.
Then click on Use the following IP address option.
IP settings:
IP address: enter the fixed address of the computer in the network. Using an address outside the range of the router’s DHCP server is the best way to avoid IP address interference.
Subnet mask: Typically, a private home network uses an IP address of 255.255.255.0.
Default gateway: The router’s IP address is typed in this section.
Preferred DNS server: You should usually type your router’s IP address.
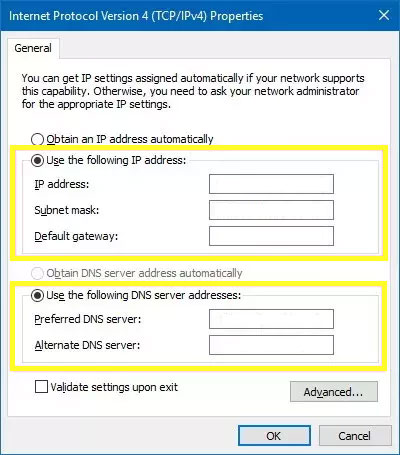
Then click on the OK and Close options.
After going through the steps, the IP configuration will not change, and any future connection problems will be avoided.
How to configure multiple FTP accounts in Windows
If you want multiple users to access the FTP server simultaneously, you must create various user accounts, each with its own privileges.
For this purpose, Windows public accounts must be created, and the appropriate settings must be configured.
Create new user accounts
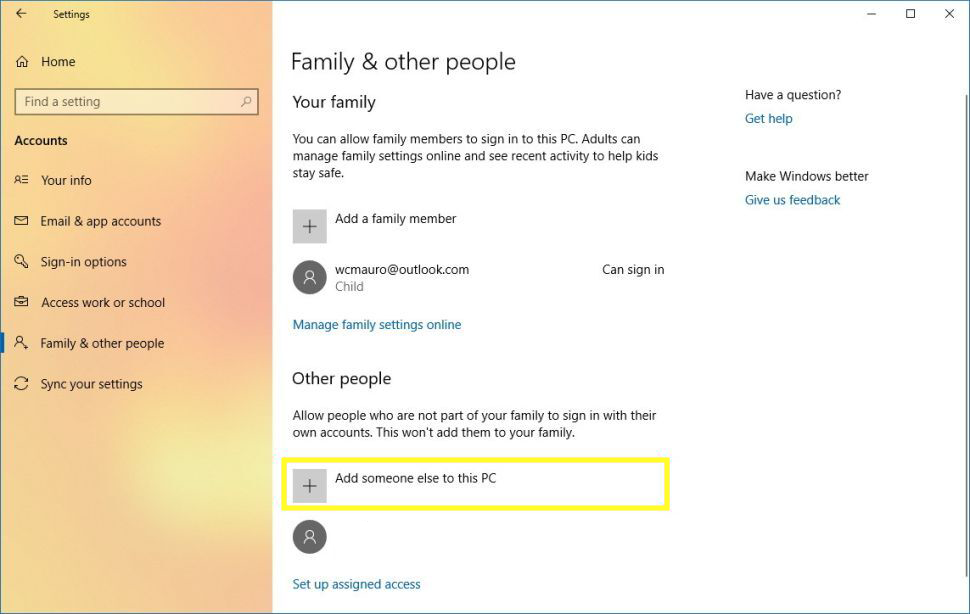
Follow the steps below to add a new user account to FTP Server.
- Open Settings.
- Select the Accounts section.
- Click on the Family & other people option.
- Select the Add someone else to this PC option.
For the user who has permission to access the FTP server, enter the email address of the Microsoft account.
Note: If you do not know the user’s Microsoft user information but still want him to access the server using local accounts, select the I don’t have this person sign-in information option and then click on Add a user without a Click Microsoft account and follow the on-screen direction to create a new account.

Then click on the Next option.
After you have completed the steps correctly, repeat the same steps to create additional accounts.
Setting up user accounts on the FTP server
To prevent multiple accounts from accessing the FTP server at the same time, follow these steps to make changes to the server settings:
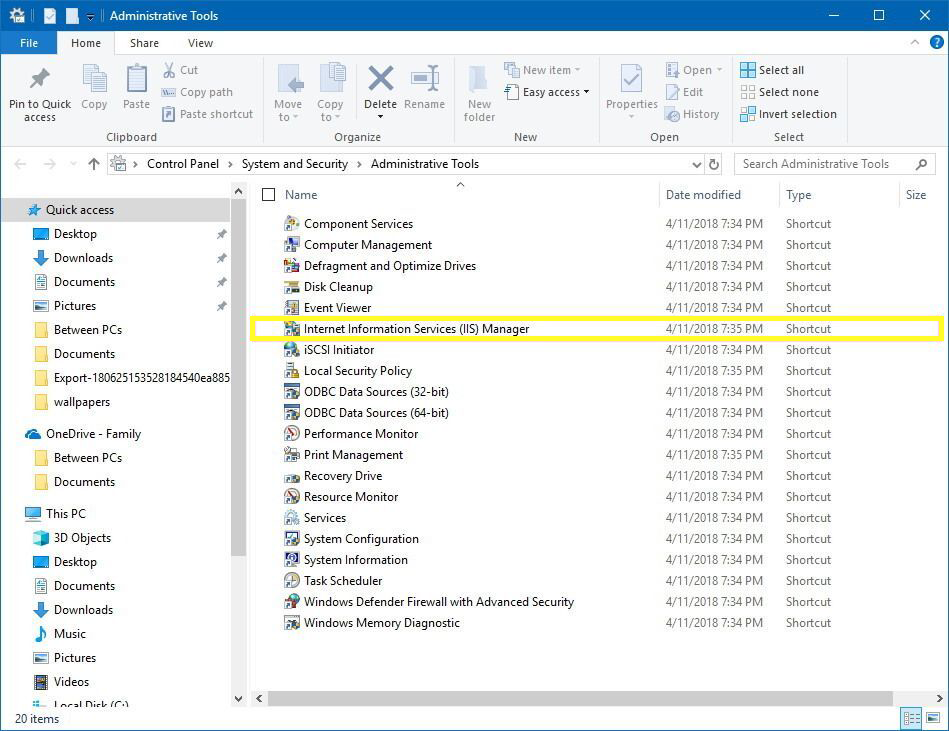
- Open the control panel.
- Select the System and Security option.
- Select Administrative Tools.

Double-click the Internet Information Services (IIS) Manager shortcut.
In the left pane, click on “Sites,” find the site you created earlier and select it.
Open the FTP Authorization Rules option by double-clicking.
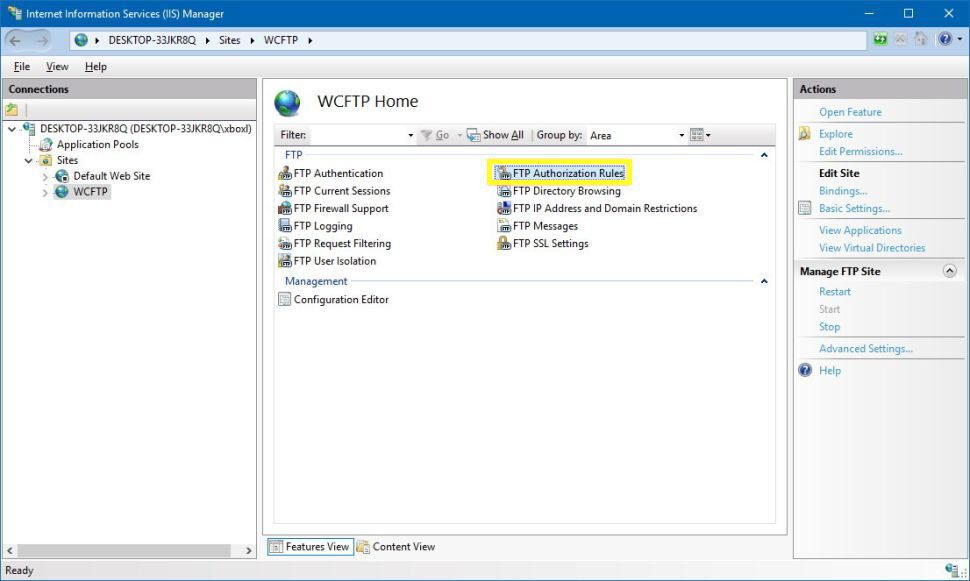
At the top right of the screen, select Add Allow Rule.
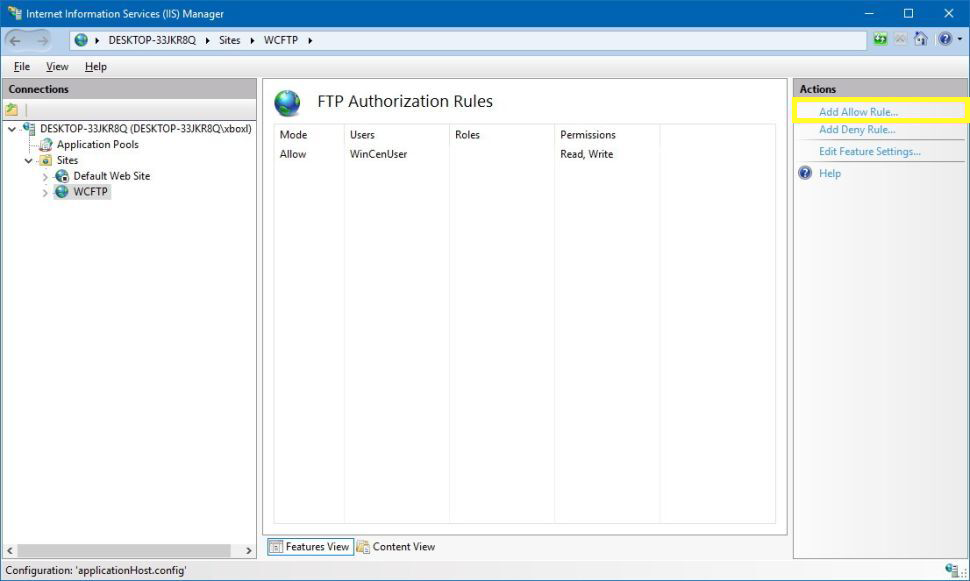
Choose one of the following options:
All Users: Allows all users configured on your Windows system to connect to the FTP server.
Specified users: With the help of this option, you can select the users who have permission to access the FTP server. (To enter user names, separate them with a comma.)
After choosing one of the two options, check the Read and Write options.
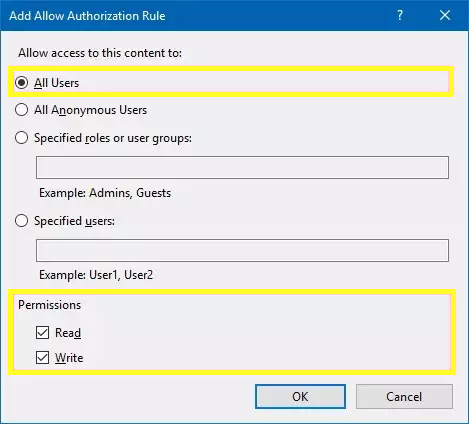
Then click OK.
By completing the steps and settings you have made, access to the FTP server will be provided to the users you have specified.
How to connect to a remote FTP server in Windows
There are various methods to access the FTP server and upload and download files, which we will explain the simplest.
Access and download files
To access the files and download them, you can do this through a web browser (Internet Explorer, Firefox, or Chrome).
- Open your system’s web browser.
- Enter the IP address of the server using FTP:// in the address bar and press Enter.
- Enter your account credentials.
- Click on Log on.
By following these instructions, you should be able to access the server and download any files and folders you like.
If you want to access the FTP server from the Internet, you must enter the external IP address of the server’s network.
The fastest way to find this out is to do a simple Google or Bing search for “what’s my IP” inside the network before trying to connect remotely. If you are not using a DDNS service or have a static IP address from your ISP, you should always check the public IP address before connecting to ensure your connection.
Conclusion
The need to build Backup Server is clear given the critical role data plays in personal and business environments. Backup servers serve as the backbone of data protection strategies by providing automated, secure, and efficient means to store and recover information. Setting up an FTP server on either Linux or Windows systems gives you the tools to manage backups and transfers effectively. By following the outlined steps and best practices for security and maintenance, beginners can confidently build reliable backup servers that safeguard essential data. Taking these steps today helps prevent future losses and ensures peace of mind knowing your data is protected. If further assistance is needed, consulting experts or engaging with community forums can offer additional guidance to optimize your backup server setup.
FAQ
2. What features should a backup server include?
High storage capacity, automated backups, data encryption, and support for file versioning are key features for secure and efficient backups.
3. Can beginners build a backup server on Linux or Windows?
Yes, both platforms support FTP server setup, allowing beginners to securely transfer and manage backup files with guided steps.
4. How does an FTP server help in building a backup server?
An FTP server facilitates file transfer over a network, making it easier to upload, manage, and retrieve backup data securely.
5. What steps are involved in setting up an FTP backup server on Linux?
Install FTP server software, configure firewall ports, create user accounts with permissions, set directory access, and enable encryption via SSL/TLS.
6. How can I set up a backup server on Windows?
Enable FTP services through Windows features, use IIS to create an FTP site, configure firewall and user permissions, and optionally set up port forwarding.
7. What benefits do automated backups provide?
They consistently save data without manual effort, reducing human error and ensuring reliable data protection.
8. Is building a backup server costly for small businesses?
Using existing hardware and free FTP server software can make building a backup server affordable and effective for small operations.
9. How do I ensure the security of an internet-accessible backup server?
Use strong authentication, SSL/TLS encryption, restrict access, update software regularly, and properly configure firewalls and ports.
10. What are modern alternatives for file transfer in backup servers?
SFTP is a highly secure alternative to FTP and FTPS that uses SSH for encrypted file transfers and is widely recommended in contemporary IT environments.