Creating a New User in Ubuntu
Creating a new user in Ubuntu is an essential step for managing server environments efficiently, especially when you’re setting up a VPS.
It ensures better control over who has access to your system and what they can do.
There are two main methods for this process:
- CLI Method:
The CLI method offers more precision and flexibility, perfect for server environments where efficiency and control are key:
sudo adduser username          # Recommended, interactive
sudo useradd -m -s /bin/bash username   # Manual method
sudo passwd username           # Set password
sudo usermod -aG sudo username # Grant sudo access- GUI Method:
The GUI method is ideal for those who prefer a visual approach, providing a simple point-and-click experience:
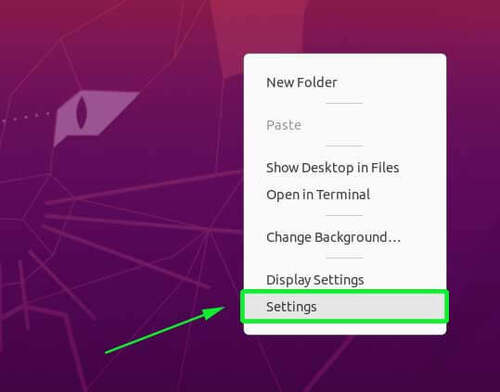
- Open Settings from the top-right system menu.
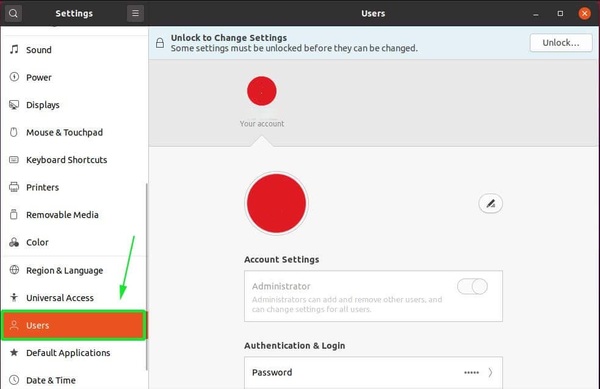
- Go to Users in the left sidebar.
- Click Unlock and enter your admin password.
- Select Add User… and fill in name, username, and account type.
- Choose between Standard or Administrator access.
- Click Add to create the account, ready for use instantly.
Whether you’re just starting with Ubuntu or configuring a Linux VPS, understanding both methods ensures you are ready to handle user management with confidence, enhancing stability, privacy, and layered control.
How to Create a New User in Ubuntu (Command Line Method)
Managing users from the terminal is essential for anyone running Ubuntu on a VPS, remote server, or development environment.
Even if you start on a desktop, knowing how to create new Ubuntu users using the command line gives you tighter control, automation capability, and advanced permission handling.
Using adduser; The Recommended Way (Beginner-Friendly)
The adduser command is a high-level utility that simplifies the Ubuntu create new user process by prompting for all the necessary details interactively, including password, full name, etc.
This method is ideal for beginners and server administrators who want things done right without manual errors, and it automatically sets up the home directory and default shell.
sudo adduser [username]- Example:
sudo adduser operaWhen asked, just fill in the password and skip the rest unless you want metadata.
It automatically:
Creates /home/opera.
Assigns bash shell.
Sets default permissions.
Using useradd (More Control)
The useradd command is lower-level, it gives you raw control over every aspect, but you need to pass flags manually.
If you skip arguments, it won’t even create a home directory.
To create new user Ubuntu style with useradd, use it like this:
sudo useradd -m -s /bin/bash [username]- To assign a password, run:
sudo passwd operaExample:
sudo useradd -m -s /bin/bash opera
sudo passwd opera
Advanced Options (Optional But Powerful)
You can also customize the create new Ubuntu user process with more control:
- Set Expiration Date:
sudo useradd -e 2025-12-31 -m -s /bin/bash operaThis sets the user to expire at the end of the year, useful for temporary access.
- Assign User to Primary Group:
While assumes developers group already exists
sudo useradd -g developers -m -s /bin/bash opera- Add User to Multiple Supplementary Groups:
sudo useradd -G sudo,www-data,adm -m -s /bin/bash opera- Then assign a password:
sudo passwd operaThese options are excellent when managing user access in production or team environments, like during Linux VPS deployment, onboarding, or automation scripting.
Using the sudo Command to Create a New User in Ubuntu
Keep in mind that creating a new user in Ubuntu requires root or sudo privileges, so it’s crucial to understand what sudo is and why it’s so important in managing Linux systems securely.
If you’re not logged in as root, prepend your command with sudo.
Example:
sudo adduser operaOR
sudo useradd -m -s /bin/bash opera
sudo passwd opera
This is the correct and secure way to create a new Ubuntu user in professional environments, and it applies whether you’re working on local systems, cloud servers, or Docker containers.
Set and Update Password for New User
After you’ve created a new user in Ubuntu, it’s crucial to set a strong password for that user to maintain security.
Ubuntu requires a password for each user, and you can either set it during the creation process or change it afterward.
- Set Password During Creation:
When you use the adduser command, you’ll be prompted to set the password interactively. For example:
sudo adduser operaIt will then ask you to provide a password for opera. Make sure to choose something strong!
- Change or Update Password:
If you need to change the password for an existing user, you can do so using the passwd command. Just run:
sudo passwd operaIt will prompt you to enter a new password for the opera account. Remember to choose a strong password that is hard to guess but easy for you to remember.
- Force Password Change on First Login:
If you want the user to change their password as soon as they log in, you can do this:
sudo chage -d 0 operaThis forces the user to update their password on their next login, which is particularly useful for temporary accounts or guest users.
Creating User with Home Directory and Shell (Advanced CLI)
Sometimes, you need more control over the new Ubuntu user account.
For example, if you want to define a specific home directory or choose a different shell, you’ll need to tweak your command.
- Manually Create a User with Specific Directory and Shell:
The useradd command allows you to specify the home directory and shell explicitly. This gives you greater flexibility.
sudo useradd -m -s /bin/bash opera-m ensures the creation of a home directory for the user (e.g., /home/opera).
-s /bin/bash sets the shell to Bash, which is the default and most commonly used shell.
If you don’t specify the -m option, it won’t create a home directory automatically.
Without the -s option, the user might get assigned the default shell (which is not always Bash).
- Choose Different Shells:
Besides Bash, you can specify a different shell if needed:
/bin/sh – The basic shell (default for most Linux systems)
/bin/zsh – Z Shell, known for its advanced features like autocompletion
/bin/fish – Friendly interactive shell, known for its user-friendly interface
For example:
sudo useradd -m -s /bin/zsh operaThis will create the user opera with Zsh as the default shell. Customize it according to your needs.
Confirming New User Creation
After you’ve created a new user in Ubuntu, it’s a good practice to verify that the user was successfully added to your system.
This ensures everything is in order before users log in or interact with your system.
Check User in /etc/passwd:
One way to confirm the user exists is by searching for the username in the /etc/passwd file. This file stores user information, including their home directory and shell.
grep '^opera:' /etc/passwdThis command will output a line like:
opera:x:1001:1001:Opera User:/home/opera:/bin/bashIf you see the line for your user, then the account has been created successfully.
- List Home Directory:
You can also check if the user’s home directory was created. Run:
ls -l /home/This will show you a list of all users’ home directories. You should see /home/opera if the user was created successfully.
- Check User Information:
To see specific details about the newly created user, use the id command:
id operaThis will output information such as:
uid=1001(opera) gid=1001(opera) groups=1001(opera),27(sudo)It confirms that the user opera exists and is part of the appropriate groups.
Grant Sudo Access to New User in Ubuntu
Creating a new user in Ubuntu is just the first step; most setups require giving that user sudo access to install tools or manage the system.
Here’s how to grant admin rights the right way, using trusted sysadmin techniques.
Method 1: Add to sudo Group (Beginner-Friendly, Cleanest Way)
If you’ve already used the CLI to create new user account in Ubuntu, the fastest and safest way to give that user admin rights is by assigning them to the system’s sudo group.
Ubuntu is designed so that any user in this group inherits administrative capabilities—no hacks, no risky edits, just clean group-based privilege.
- Syntax:
sudo usermod -aG sudo [username]-aG: Appends the user to the group without removing existing ones.sudo: This is the built-in administrative group in Ubuntu.
Example:
sudo usermod -aG sudo operaNow the user opera can safely execute privileged commands like:
sudo apt updateThis is the most widely accepted approach when you create Ubuntu user account for development, administration, or remote tasks.
Method 2: Confirm Sudo Access (Post-Setup Verification)
After assigning the user to the sudo group, it’s smart to confirm they got those rights.
Use this command to view group membership:
groups operaYou should see something like:
opera : opera sudoOr use:
sudo -l -U operaThis outputs a list of what the user is allowed to do using sudo.
Note that always verify after you create new user accounts in Ubuntu VPS environments; access misconfigurations can cause serious downtime later.
Method 3: Use visudo for Manual Sudo Rules (Advanced)
While most sysadmins stick with group-based sudo access, sometimes you need finer control.
This method is a solid choice if you’re not using groups or need this rule to apply in isolated environments.
The visudo tool lets you manually define sudo behavior per user, with syntax checking built in to avoid breaking system access.
Launch the editor:
sudo visudoThen scroll to the bottom and add:
opera ALL=(ALL:ALL) ALLThis line explicitly tells Ubuntu: “The user opera is allowed to run any command as root.”
For more detailed guidance on editing the sudoers file securely, check out How to Edit the Sudoers File guide.
Optional; Passwordless Sudo (Use with Caution)
If you’re automating deployments, running scripts, or provisioning containers, you might want the user to run sudo commands without being prompted for a password.
Open visudo again:
sudo visudoAdd this instead:
opera ALL=(ALL) NOPASSWD: ALLOr you can drop a custom rule file inside /etc/sudoers.d/:
sudo nano /etc/sudoers.d/operaPaste the same line:
opera ALL=(ALL) NOPASSWD: ALLNote that this removes a layer of protection; use only where necessary.
Switching between users in Ubuntu is also an important part of managing a multi-user environment.
Once you’ve created a user and assigned them to appropriate groups (like sudo), you may need to switch between users for different administrative tasks.
Creating a New User in Ubuntu (Beginner-Friendly Method)
This method is ideal when setting up family computers, developer sandboxes, or internal workstations; no CLI is needed.
Step-by-Step via Ubuntu Settings
To create new Ubuntu user through the GUI, you’ll be using the system settings built into Ubuntu’s GNOME environment.
Open Settings:
Click on the top-right corner of your desktop and select Settings from the dropdown.
Navigate to Users:
In the left sidebar, scroll down and select Users. You’ll see a list of current user accounts.
Unlock Administrative Access:
Click Unlock in the top-right and enter your admin password. This grants permission to modify system users.

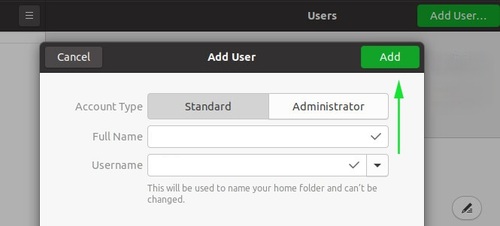
Click “Add User…”:
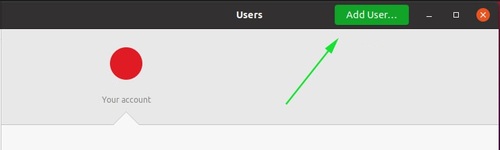
A dialog box will appear, asking for account details.
- Fill in the following:
Full Name: Display name of the user.
Username: This will become the actual login name and directory.
Account Type: Choose Standard (limited privileges) or Administrator (sudo-level access).
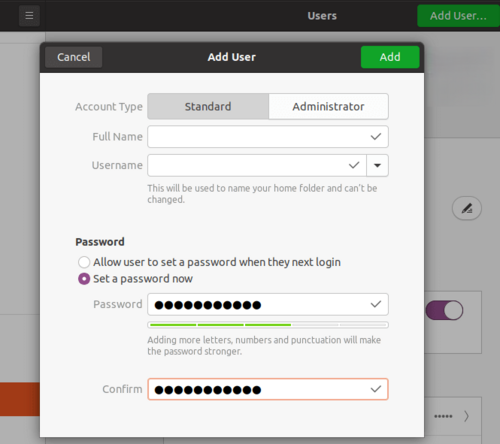
Then click Add to finalize. The new user will now appear in the system’s user list.
GUI Permissions & Account Types
When you create Ubuntu user account via the GUI, Ubuntu handles permission levels automatically, but it’s critical to understand what each role grants.
- Standard User: Can run apps and change personal settings. Cannot install software or modify other accounts. Perfect for guest access or minimal access roles.
- Administrator: Full sudo rights. Can install packages, update the OS, add users, or configure system-wide settings.
If you’re deploying desktops in a managed environment or provisioning developer machines, granting admin rights via GUI is a valid and secure method, especially when paired with password policies and multi-user setups.
Also note: GUI-created accounts are fully compatible with CLI tools. You can later use usermod, passwd, or chage for deeper control.
How to Remove Users from Ubuntu [CLI and GUI]
At some point after creating a new user in Ubuntu, you may need to reverse the process, whether for security, maintenance, or decommissioning systems.
Knowing how to remove users from Ubuntu 20.04 and later versions isn’t just about running a command.
It’s about doing it cleanly, without leaving behind orphaned home directories, sudo privileges, or shell access remnants.
This section walks you through both CLI and GUI methods to properly handle user removal in modern Ubuntu systems.
Remove User with deluser
The simplest and safest way to remove a user account from the system is to use the built-in deluser tool.
This command ensures Ubuntu’s internal consistency is maintained during user removal.
sudo deluser usernameExample:
sudo deluser tempdevThis method only removes the user account, not their files.
If you’re managing shared development environments after creating new user accounts in Ubuntu, this is typically used for disabling access quickly without touching user data.
Remove User Along with Home Directory (Cleanup Method)
If you want to fully remove users from Ubuntu 20.04, including their home directories, cached files, and mail spool, you’ll need the --remove-home flag:
sudo deluser --remove-home usernameExample:
sudo deluser --remove-home tempdevThis is ideal in environments where temporary users were created for isolated tasks, for example, CI/CD runners, project-based developers, or contractors.
Note that this is irreversible. Always back up the user’s files if needed before executing this.
Check Existing Users Before Removal
Before deleting anyone, always verify who’s actually on the system.
Use this to avoid deleting essential or active users, especially when you’ve recently completed tasks like creating a new user in Ubuntu or adjusting groups.
cut -d: -f1 /etc/passwdOr, filter users with UID ≥ 1000 (which usually excludes system accounts):
awk -F: '$3 >= 1000 {print $1}' /etc/passwdYou can also inspect group memberships:
getent group sudoThis ensures you don’t accidentally delete someone with elevated privileges you set up earlier after creating new Ubuntu user accounts.
For CentOS users, the process of adding, deleting, and listing users can be similarly managed with commands such as useradd, userdel, and id, as detailed in our guide on Add, Delete and List Users in CentOS 7.
Remove User via GUI (User Accounts Settings)
If you used Ubuntu Create New User GUI methods earlier, you can just as easily delete them without the terminal.
Click the top-right system menu → choose Settings.
Scroll down and select Users.
Click Unlock (you’ll need to enter your password).
Select the user you want to remove.
Click Remove User → choose whether to keep or delete their home folder.
This is especially useful for beginner desktop users who previously used the GUI to create new user account Ubuntu.
Best Practices for Secure Ubuntu User Management
Once you finish creating a new user in Ubuntu, the real work starts: securing the account and managing long-term access.
Whether you use CLI or GUI to create new Ubuntu user profiles, these steps help protect your system, especially on servers or VPS deployments.
Use Strong Passwords
When you create new user account Ubuntu, always set strong, unique passwords. Use adduser to prompt secure credentials:
sudo adduser newuserEnhance security with tools like libpam-pwquality for enforced complexity. It’s a must on any server where you add users to Ubuntu 20.04.
Avoid Giving Unnecessary Sudo
After you create new user in Ubuntu, don’t automatically add them to sudoers unless needed. Run this to verify:
groups usernameTo revoke sudo access:
sudo deluser username sudoFollow the principle of least privilege, even if you used the sudo command to create a new user in Ubuntu.
Clean Up Old Accounts
Unused accounts are attack surfaces. After a task or user is done, clean it up:
sudo deluser --remove-home usernameIf you regularly add users to Ubuntu 20.04 for projects, automate removal for security hygiene.
Monitor User Activity on VPS Servers
Creating new users in Ubuntu is just step one; monitor their actions. Use tools like last, journalctl, and auditd to track logins and commands.
This is essential for servers, where one misused account can lead to system compromise.
After monitoring user activity, consider implementing steps to Disable User Login Accessibility in Linux for inactive accounts, enhancing your server’s security.