Remote Desktop Black Screen on Windows
Experiencing a Remote Desktop Black Screen on Windows is a common and frustrating problem that interrupts productivity, leaving users unable to access their remote sessions.
This issue can arise from outdated graphics drivers, incorrect display settings, network instability, RDP configuration errors, or even hardware acceleration conflicts.
Here are the 8 practical solutions to quickly resolve the issue:
- Maintain Updated Graphics Drivers.
- Configure Display Settings Appropriately.
- Disable Bitmap Caching.
- Adjust RDP Configuration Settings.
- Keep Your System Updated.
- Ensure Network Stability.
- Access Task Manager.
- Disable Fast Startup.
Prerequisites to Fix Remote Desktop Black Screen on Windows Issue
Before troubleshooting the RDP black screen, make sure to meet the following prerequisites, which can help prevent the black screen issue:
- The latest Windows updates installed.
- A high-performance Windows RDP for an optimal remote desktop experience.
- Proper RDP configuration settings.
- Up-to-date graphics drivers.
8 Quick Solutions to Resolve RDP Black Screen
If you are dealing with the frustrating black screen when RDP, it’s time to dive into these 8 quick solutions that will get your remote desktop up and running smoothly again.
Solution 1: Update Graphics Drivers
Outdated or incompatible graphics drivers can lead to display errors, including the black screen when RDP.
Keeping your graphics drivers up to date ensures optimal performance and compatibility with Remote Desktop Protocol (RDP).
Why Outdated Drivers Cause Display Errors
Graphics drivers act as intermediaries between your operating system and the graphics hardware.
When these drivers are outdated, they may not support the latest features or optimizations, leading to display issues such as the black screen when RDP.
Steps to Update Graphics Drivers
Follow the below to address display errors caused by outdated graphics drivers, including the black screen on RDP:
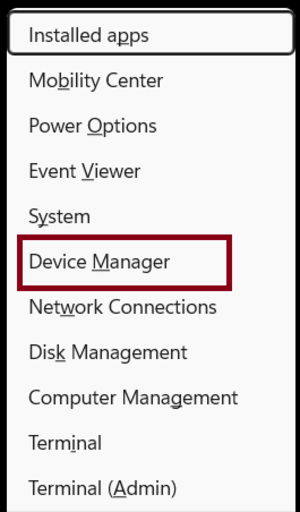
- Open Device Manager:
Press Win + X and select Device Manager.
- Locate Display Adapters:
Expand the Display adapters section.
Right-click on your graphics card and select Update driver.
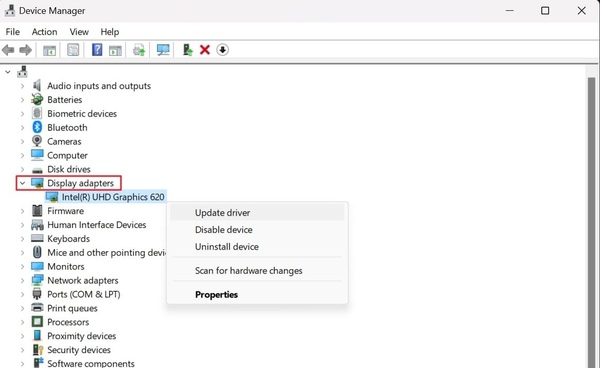
Choose Search automatically for updated driver software.
- Restart Your Computer:
After the update, restart your computer to apply the changes.
Solution 2: Adjust Remote Desktop Display Settings
Proper resolution and display configurations are crucial for a seamless Remote Desktop connection black screen experience.
Incorrect settings can lead to display issues, including the black screen RDP problem.
Importance of Proper Resolution and Display Configurations
Ensuring that your display settings are correctly configured allows for optimal performance during remote sessions.
Misconfigured settings can cause display errors, such as the RDP black screen fix issue, leading to a frustrating user experience.
Steps to Adjust Remote Desktop Display Settings
Follow the below steps to address display issues related to the Remote Desktop black screen Windows Server problem and ensure a smoother remote desktop experience.
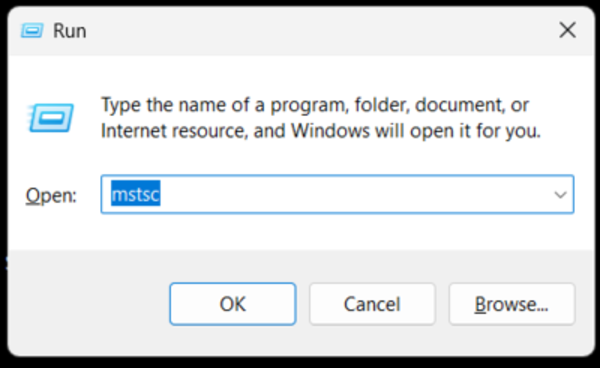
- Open Remote Desktop Connection:
Press Win + R, type mstsc, and press Enter.
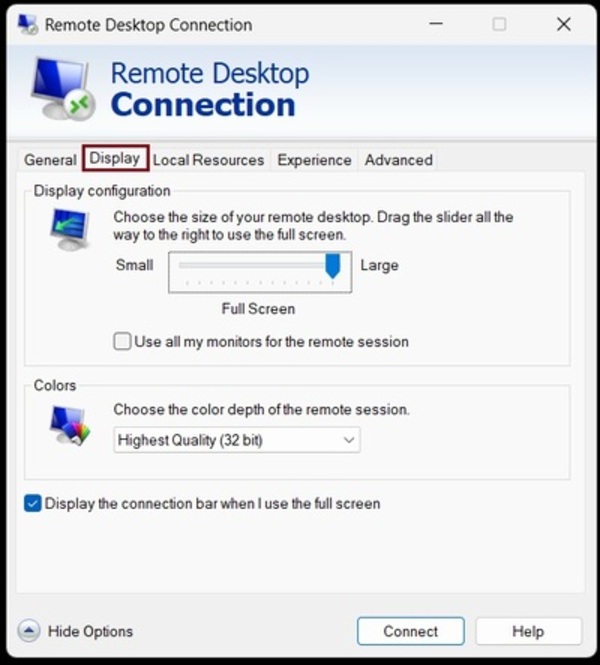
- Access Display Settings:
In the Remote Desktop Connection window, click on the Show Options button.
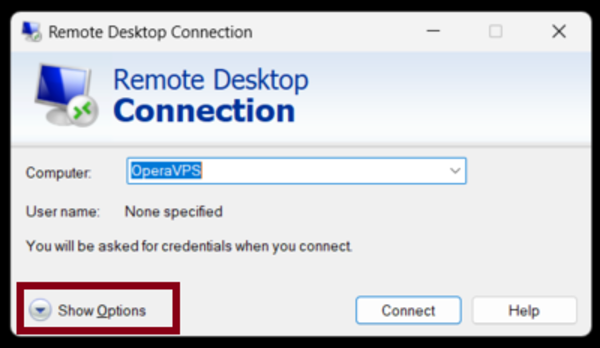
Navigate to the Display tab.
- Adjust Display Configuration:
Use the Display configuration slider to set the desired resolution.
Ensure the Colors setting is appropriately configured.
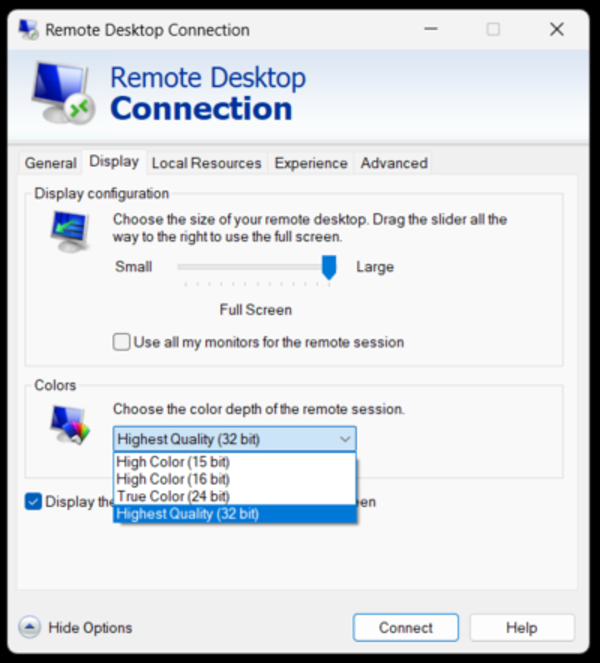
Note: For optimal performance, set the Display configuration slider to the recommended resolution (typically 1920×1080) and ensure the Colors setting is set to Highest Quality (32-bit).
- Save Settings:
After making adjustments, click Save As to create a custom RDP file with these settings for future use.
Solution 3: Disable Bitmap Caching
Bitmap caching can cause display issues, including the RDP to black screen problem, by storing outdated images that interfere with your connection.
Disabling this setting can fix errors like the Windows 10 Remote Desktop black screen or Remote Desktop black screen after connection
How Disabling Bitmap Caching Affects Display
This setting, when enabled, stores graphical data to speed up future connections but may lead to corrupted images that cause display issues. Disabling it refreshes the connection and may resolve the black screen issue.
Steps to Disable Bitmap Caching
Follow the below steps to turn off bitmap caching and potentially fix the Remote Desktop black screen after connection:
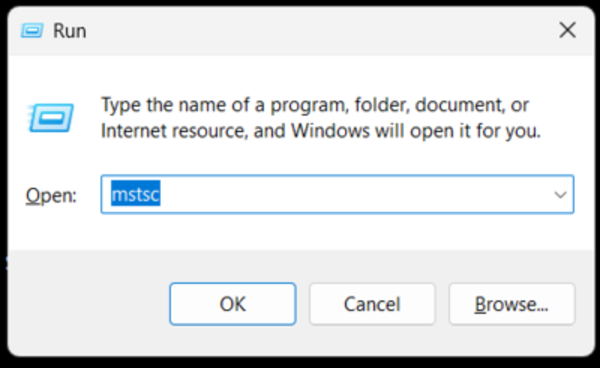
- Open Remote Desktop Connection:
Press Win + R, type mstsc, and press Enter to open the Remote Desktop app.
- Access Settings:
Click Show Options to reveal the connection settings.
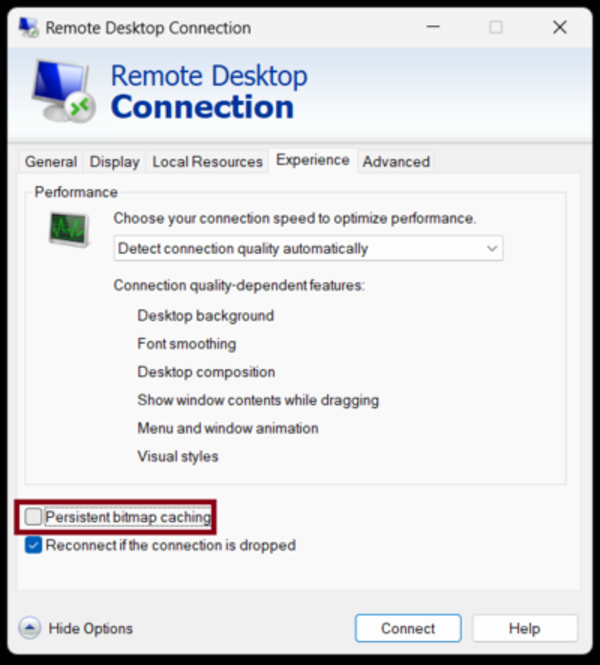
- Disable Bitmap Caching:
In the Experience tab, uncheck the Persistent bitmap caching box.
- Reconnect to the Remote Computer:
Click Connect to initiate a new connection without bitmap caching.
Disabling bitmap caching helps resolve the RDP black screen issue by preventing display corruption.
Solution 4: Modify RDP Configuration File
The Remote Desktop black screen after login issue can sometimes be resolved by adjusting settings in the RDP configuration file, which may have become corrupted or misconfigured.
How Modifying the RDP Configuration File Affects Display
The RDP configuration file contains settings that dictate how the remote session is established.
Corrupted or incorrect configurations can lead to display issues, such as the RDP black screen Windows 10 problem.
Steps to Modify the RDP Configuration File
The below steps help you to modify the RDP configuration file and address issues like the How to fix Remote Desktop black screen on Windows problem, ensuring a smoother remote desktop experience.
- Locate the RDP File:
Find the .rdp file you use to connect to the remote system.
- Edit the RDP File:
Right-click the .rdp file and select Edit.
This will open the file in Notepad or your default text editor.
- Modify Configuration Settings:
Look for the following lines:
screen mode id:i:1 (sets the display mode)
desktopwidth:i:xxxx and desktopheight:i:yyyy (sets the resolution)
session bpp:i:32 (sets the color depth)
Adjust these values as needed. For example, to set a resolution of 1920×1080, modify the lines as follows:
desktopwidth:i:1920desktopheight:i:1080- Save and Close:
Save the changes and close the text editor.
- Reconnect Using the Modified RDP File:
Double-click the modified .rdp file to initiate a new connection with the updated settings.
Solution 5: Update Windows OS
Keeping your Windows operating system up to date is crucial for resolving known issues that can lead to a black screen on RDP.
How Updating Windows OS Affects Display
Microsoft regularly releases updates that address bugs and enhance system stability.
Steps to Update Windows OS
Updating your OS is a reliable fix for the Remote Desktop black screen problem Windows 11 and ensures system stability:
- Open Windows Update Settings:
Press Win + I to open the Settings app.
Navigate to Update & Security.
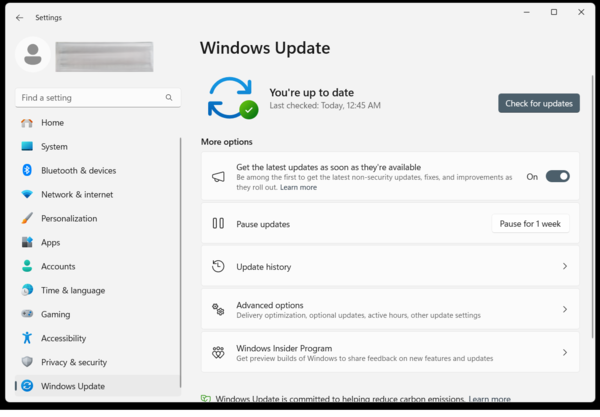
- Check for Updates:
Click on Windows Update in the sidebar.
Press Check for updates to see if any are available.
- Install Updates:
If updates are found, click Download and Install.
Wait for the process to complete; this may take some time.
- Restart Your Computer:
After installation, restart your PC to apply the updates.
Note: Regularly updating your operating system ensures that you have the latest fixes and improvements, reducing the likelihood of encountering issues like the black screen when remote desktop.
Solution 6: Test Network Stability
A stable network connection is critical to preventing disruptions like the Remote Desktop black screen issue on Windows 10 and Windows 11. Ensuring network reliability enhances RDP performance significantly.
How Network Stability Affects RDP Display
Unstable connections can cause freezes, lags, or the infamous black screen problem, especially during high-latency situations.
Steps to Test and Improve Network Stability
The steps below help address network issues and reliably resolve the RDP black screen problem on both Windows 10 and Windows 11:
- Ping the RDP Host:
Open Command Prompt (Win + R, type cmd, and press Enter).
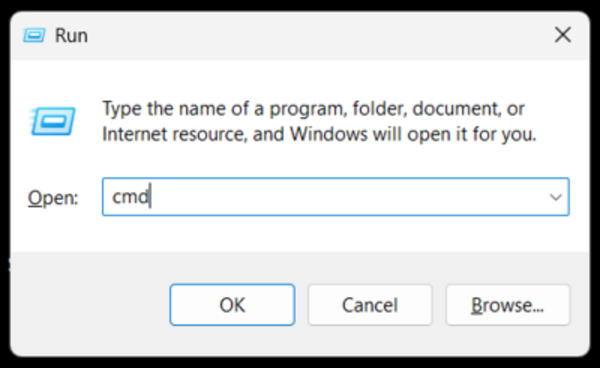
Enter ping [RDP host IP] to check for latency or packet loss.
Check Internet Speed:
Use tools like Speedtest.net to ensure adequate bandwidth for remote Desktop sessions.
Switch to a Wired Connection:
Use an Ethernet connection instead of Wi-Fi to minimize interference and improve stability.
Restart Networking Equipment:
Reboot your modem and router to refresh your network connection.
Solution 7: Using Task Manager
Opening Task Manager can be a vital step in fixing Remote Desktop Black Screen on Windows by helping you identify and end any problematic processes that may be causing the issue.
How Task Manager Helps Resolve RDP Black Screen
Task Manager provides a behind-the-scenes view of your system, where you can check for misbehaving apps or processes like explorer.exe that may be triggering the black screen on RDP sessions.
To efficiently manage tasks during a remote session, it’s crucial to know how to open Task Manager within Remote Desktop.
Steps to Open Task Manager and End the Problematic Task
The below steps lead you to a process that effectively addresses the Remote Desktop Black Screen on Windows Issue by terminating any corrupted processes and refreshing the session.
- Access Task Manager:
Press Ctrl + Alt + Delete on your keyboard.
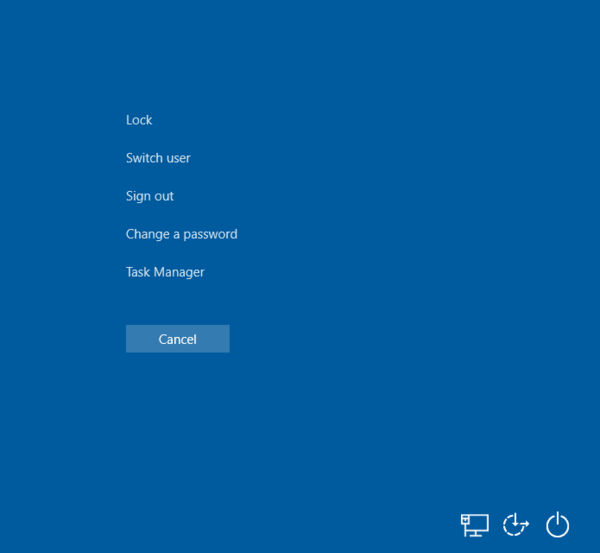
Select Task Manager from the options.
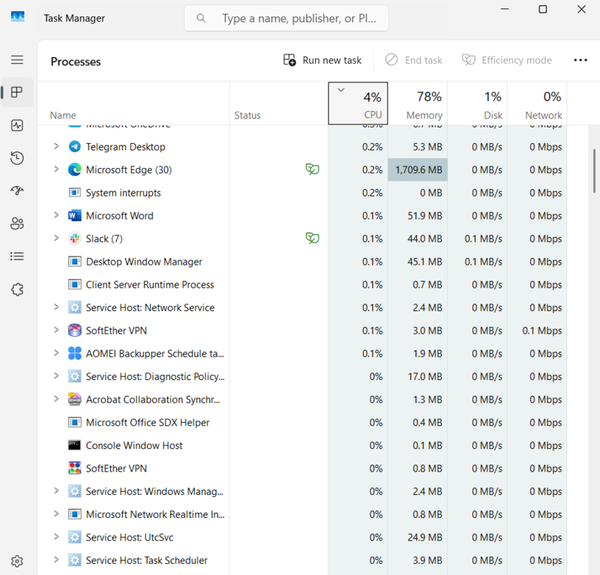
- End Explorer.exe Process:
In Task Manager, click on Details from the left panel, locate explorer.exe in the list, right-click on it, and select End Task.
- Run a New Task:
In the top-right corner of Task Manager, click Run New Task, type explorer.exe into the box, and hit OK to restart the process.
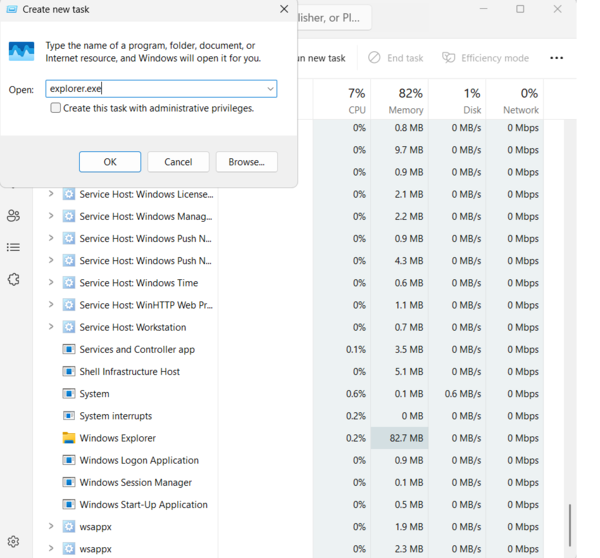
Note: If you’re unsure how to send Ctrl+Alt+Delete to Remote Desktop, our guide on this topic offers simple steps to help you manage your session.
Solution 8: Disable Fast Startup to Fix RDP Black Screen
Disabling Fast Startup can help resolve the Remote Desktop Black Screen on Windows by eliminating potential conflicts between the feature and RDP functionality, which can lead to the black screen issue, especially in Windows 10 and Windows 11.
Why Disabling Fast Startup Helps Resolve Black Screen Issues
Fast Startup is meant to speed up boot times, but it can sometimes cause glitches with Remote Desktop black screen after login and interfere with your RDP connection.
Disabling it ensures a smoother startup for your remote sessions.
Steps to Disable Fast Startup
Use the steps below to disable Fast Startup which helps you eliminate the Remote Desktop black screen issue Windows 10 by preventing potential conflicts that could affect your RDP session.
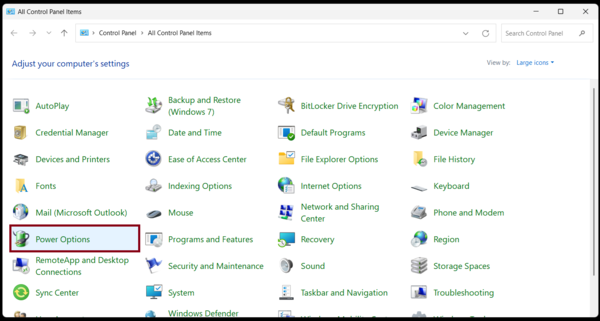
- Open Control Panel:
Search for Control Panel in the Windows search bar and open it.
Select View By: Large Icons in the top-right corner, then click on Power Options.
- Change Power Button Settings:
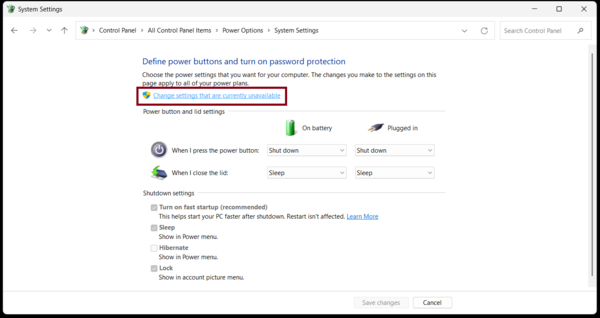
On the left panel, click Choose what the power button does.
Click Change settings that are currently available.
- Disable Fast Startup:
Uncheck the box labeled Turn on fast startup (recommended).
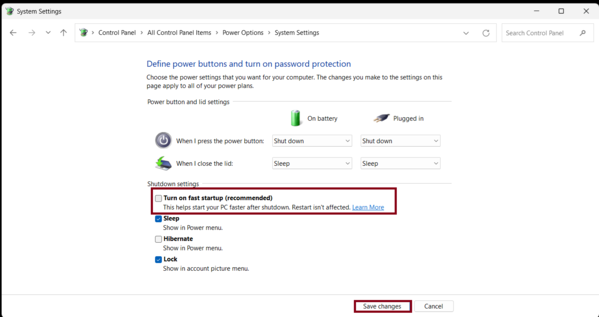
Click Save Changes to finalize.
What to Do If the Black Screen Persists After Troubleshooting
If the Remote Desktop Black Screen on Windows issue persists after following the troubleshooting steps, it’s essential to take a more systematic approach.
First, ensure that your RDP settings and hardware are fully optimized, as hidden misconfigurations can often go unnoticed.
Consider checking for deeper system conflicts, such as incompatible security software or conflicting Windows updates. If the problem continues, testing your connection on a different device or network may reveal whether the issue lies with your hardware or infrastructure.
You might also want to try using alternative remote desktop software to determine if the issue is specific to RDP or a broader system problem.
If these steps don’t resolve the issue, reaching out to IT support or considering a complete system restore could be the final solution to fix persistent black screen problems and ensure a stable, productive remote session environment.
Conclusion
In this article, we discussed various troubleshooting steps, from updating your graphics drivers and optimizing display settings to improving network stability and managing system configurations.
Each solution plays a vital role in restoring a seamless RDP experience. If you’ve been wondering, Why does my Remote Desktop show a black screen? the key lies in resolving conflicts within your system’s settings, drivers, and network connections.
By following these practical steps, such as refreshing display settings, managing RDP configurations, and ensuring smooth system performance, you can effectively resolve the issue and enjoy a reliable remote desktop session.
For users encountering similar display issues in other environments, exploring effective solutions for troubleshooting black screen errors on Ubuntu servers can offer valuable insights.