Increase Disk Space in Windows 10 Efficiently
Increase Disk Space in Windows 10 by extending system partitions, deleting unnecessary files, or using third-party tools. These steps help optimize storage and improve system performance efficiently.
🤖AI Overview:
Increasing disk space in Windows 10 involves expanding the system partition using built-in tools like Disk Management and diskpart or trusted third-party software. This process reallocates unallocated disk space to enhance storage capacity and prevent low disk space errors, ensuring stable system operation.
Windows 10 Disk Space
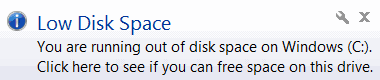
You designate a specific amount of space when you partition the hard disk for your system partition. The C drive fills up more quickly than the other disks as you use Windows and install new software. When put together, the system configurations, cached files, and settings total a substantial quantity. Thus, you will eventually encounter a Low Disk Space problem. To address the low disc space issue, the disc size has been raised. Older volumes will be deleted and combined into a C drive to increase the disc’s size.
Important data and files shouldn’t be kept on a C disk for two reasons. The system’s speed and performance are first harmed by massive data stored on the C drive. There will eventually be a disk space constraint as a result. Second, if a virus or Windows upgrade is required, data will be destroyed.
Opera blog has recently published an article for Linux users to learn How to Check Free Disk Space. Let’s go through this tutorial to review all the helpful ways to extend disc space to let you find your ideal solution.
Methods to Increase Disk Space in Windows 10
This article is gathering most useful methods and solutions to Increase Disk Space in Windows 10. For the last time close the Low Disk Space Error message in your system and follow the suggestions below ways according to your facilities.
1. Increasing Disk Space in Windows 10 Using Disk management
The native Windows software Disk Management makes it simple to solve the low disk space problem. Disk management has a built-in feature to expand the capacity of the C drive. Disk management basically works by expanding available, unallocated space on various partitions. Only partitions that are adjacent to them, or those that are on the same hard drive as them, can receive additional unallocated space. Also, this approach is useless if the partition you wish to expand isn’t an NTFS one.
So, starting the program is the only way to determine if you can extend the system partition in Windows 10 using this method. Ideally, you’ll locate a sizable amount of free space directly near the C drive. Let’s see the required steps for using the Disk Management method.
Step 1. Start the Extend Volume Wizard
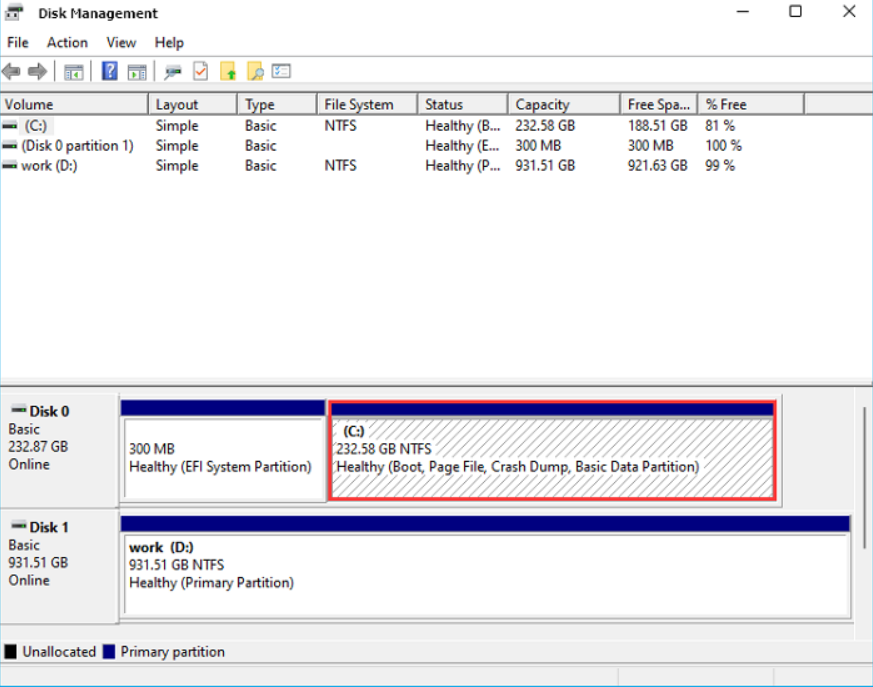
Search for Disk Management in the Start Menu first. Also, you may access it by right-clicking the Windows Start button and choosing it from the menu, or you can look for it under Administrative Tools in the list of programs. Start Disk Management, then use the right-click menu to choose the C disk in the window that appears. To launch the Extend Volume Wizard, select the Extend Volume option. You cannot use this method if the option is grayed out, most likely because no contiguous unallocated space could be detected.
Step 2. Incorporate Unallocated Disk Space
On the first wizard screen, select Next. You can choose the disks you want to work with on the following screen. The list on the left has the available unallocated disk space. If none are accessible, utilizing this method will not allow you to extend your system partition. To add a space to the Selected list on the right, click the Add > button after clicking on the space. To increase the final disk space of the C drive as much as feasible, add as many empty spaces as you can. When finished, click Next to advance to the wizard’s next step.
Step 3. Complete the Changes
Click the Complete button to complete the extension process after carefully reviewing the changes you’re about to make sure there are no errors. After a while, you ought to return to the Disk Management home page with more space on the C disk.
In this way, your C drive will be allocated new space.
2. Increasing Disk Space in Windows 10 Using Third-party Service
Follow the below steps to use the Third-party server disk manager method:
Step 1. Install it on your System
Installing it on your machine is the first step. Choose the disc whose size you want to increase. The application only offers one resize/remove option. The barrier will begin to grow. Make careful to select another disc if you want to utilize the unclaimed space on it. The disc partition will be resized in accordance with the available space.
Step 2. Extend System C drive with unallocated space
First, right-click on the System C: drive and select “Resize/Move”. Then, drag the system partition end into the unallocated space so to add it to the C: drive. And click “OK”. And next, click “Execute Task” and “Apply” to execute the operations and extend the C drive.
Step 3. Extend System C drive without unallocated space
first, right-click a big partition with enough free space on the system disk, and select “Allocate Space”. Then, select the system drive at the Allocate Space From (*) To section, and drag the end of the System C drive into the unallocated space. Click “OK” to confirm. Next, click “Execute Task”, it will list the pending operations, and click “Apply” to save the changes and extend the C drive.
0:00-0:26 Extend System Drive with Unallocated Space; 0:27-0:58 Extend System Drive without Unallocated Space.
3. Increasing Disk Space in Windows 10 Using Command-Line
The other method to increase disk space in Windows 10 is to use the Windows command line and the diskpart utility. This method takes time but is straightforward. Also, it would be helpful if you are working on a headless remote server without a GUI. The steps to increase disk C drive space using the command line are listed below:
Step 1. Start PowerShell
Use the Start Menu to launch Windows PowerShell. Don’t forget to run it as Administrator as well. You will already have access to the command line if you are utilizing an SSH connection.
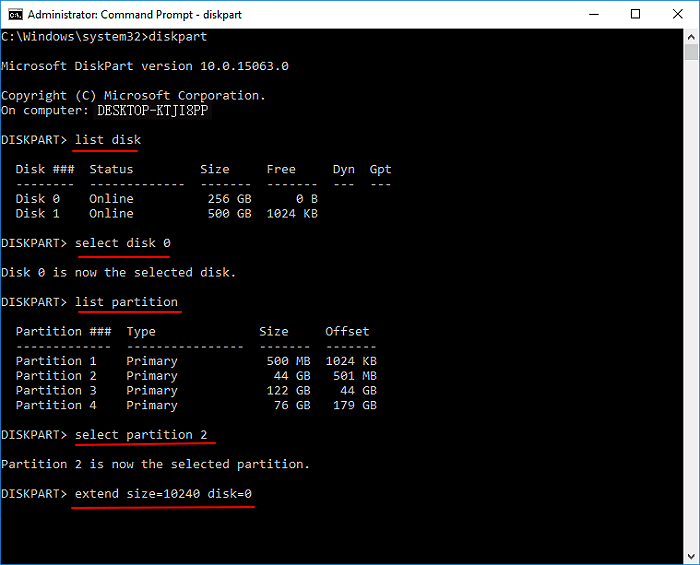
Step 2. Launch the diskpart tool
Put the command below into Windows PowerShell and press Enter:
diskpartYou will now see diskpart simple text-based UI, which should be as follows:
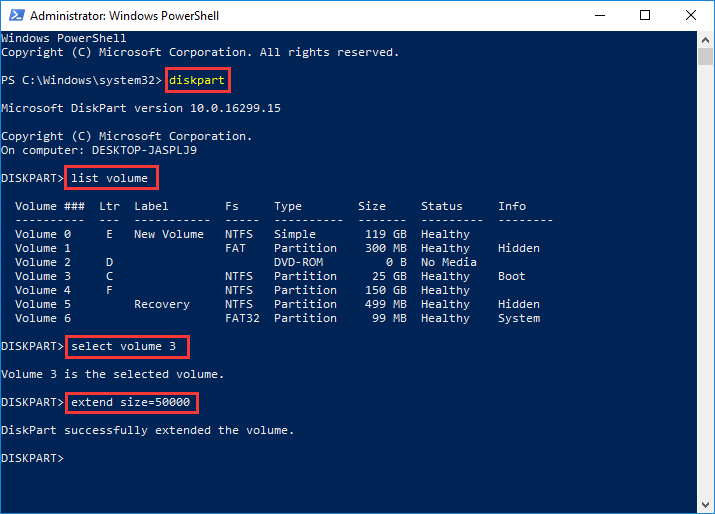
Following the DISKPART> prompt, run:
list volumeStep 3. Choose the appropriate drive
All the partitions’ names, file systems, and other details will be listed for you to see. Locate your system partition, which is often on the C drive, and make a note of its volume number, which will be displayed beneath the first column. Enter the following command while keeping the number in mind. ## will be the volume number of the system partition
select volume ##Step 4. Enter the ”extend” command
To extend the partition size, run the following command. ### equals the number of megabytes (MB) you want to extend the C drive.
extend size=###As the amount is supposed to be in megabytes, take care to put the correct number of zeros. Using diskpart is only an option if your system partition is next to an unallocated area, just as the prior technique. If not, you can either utilize the third and final technique, which might be a little trickier, or you can take a shortcut by skipping to the end of the article.
4. Increasing Disk Space in Windows 10 Using CMD
The 4th method to increase disk space in Windows 10 is to add space using CMD. This method is also another built-in method to increase C drive. The specifics of increasing C Drive with and without unallocated space via CMD are as follows. To Increase C Drive with Unallocated Space:
Step 1. Click Windows + R to open the Run dialog box.
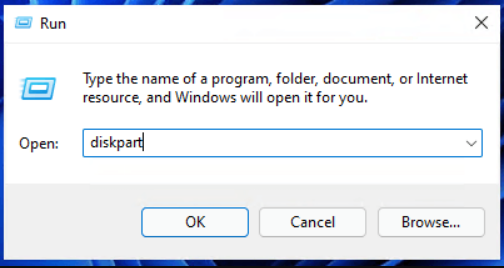
Step 2. Open Command Prompt
To open Command Prompt as Administrator, type CMD and click Enter.
Step 3. Open DiskPart
To open DiskPart, type diskpart and click Enter.
Step 4. Helpful commands to extend the C drive
To extend the C drive, run the below CMD command lines and press Enter.
- select disk x (Replace X with the disk number of your system disk.)
- list volume
- select volume x (Replace X with the partition number of your C drive.)
- extend size =number (Normally, the default size unit is MB.)
- exit.
Now, you can restart the system and your computer will have a larger C drive. Then, follow the below path to Enlarge C Drive without Unallocated Space. To do this, back up all your data to a safe location and continue with the required steps to extend the C drive.
Step 1. Open DiskPart
To open DiskPart, open the Run dialog, type cmd, and hit Enter to open Command Prompt as Administrator. Type diskpart and hit Enter.
Step 2. Helpful commands to extend the C drive
Run the command lines given below and click Enter each time to get your C drive expanded.
- list disk
- select disk x (Replace X with the disk number of your system disk.)
- list volume
- select volume * (Replace * with the partition number that you want to delete.)
- delete volume
- select volume x (Replace X with the disk number of your C drive.)
- extend size =number (Normally, the default size unit is MB.)
- exit
5. Increasing Disk Space in Windows 10 Using Partitioning Software
In the event that using Disk Management is not an option, you may always simply move your files from the D drive to another disk or the cloud, erase the D drive, and then use Disk Management to expand the C drive with the extra space. Of course, considering how much time and work would be required, that is not a very appealing alternative. The good news is that you still have options. Using software from a third party is the last item on the list. There are many free and premium partitioning programs available, but for the purposes of this article, we’ll be using DiskGenius Free Edition.
Follow the below steps to learn how to use this method as the last one in this tutorial. While using this method on a laptop, keep in mind to plug it in to not lose power till the end and also disable the sleep mode or hibernation since the process would take up some time.
Step 1. Download and run DiskGenius
The accessible version of DiskGenius must first be downloaded from their official website. Launch DiskGenius Free Edition after downloading and installing it to proceed to the next action.
Step 2. Go to the Extend Partition screen
A list of all the partitions on your disk drive can be found on the left. Right-click on the system partition (which is located on the C drive by default). Choose Extend Partition from the options.
Step 3. Choose the appropriate partition
Now, you will notice a breakdown of the drive on the Extend Partition screen, with partitions and their volume being clearly displayed. Because DiskGenius will move that space to your C drive, find a partition with a lot of spare space. After determining which partition you want to shrink in order to free up more disk space in Windows 10, click Yes to move on to the next step.
Step 4. Resize the partition
You can specify exactly how much of the new partition you wish to transfer to your C drive in the Resize Partition window. To enter a precise number, either drag the separator bar or use the text box. Also, you have the option to choose to leave some more free space (in case you need to try this again). Click the Start button once you have completed all the necessary configurations. After that, a list of the upcoming modifications will be displayed to you. Click Yes after reviewing them to ensure they are accurate. It will take some time, and your computer might restart once.
Conclusion
Increasing available disk space on your Windows 10 system is essential for business owners to maintain system performance, avoid errors, and protect critical data.
Each of the methods described provides viable options, from using native Windows tools like Disk Management and DiskPart to leveraging third-party partition management software with enhanced capabilities.
Choosing the appropriate method depends on your specific circumstances, technical proficiency, and the configuration of your disk partitions.
Regardless of the method selected, always ensure that you have backed up important data beforehand to protect your business information against unforeseen complications.
If challenges arise during this process, consult with professional technical support to avoid risking data loss or system damage.
FAQ
2. Can I increase disk space on the C drive without losing data?
Yes, by backing up important files and using built-in or reliable third-party tools designed to preserve data during partition resizing.
3. Does Windows 10 allow increasing disk space natively?
Yes, using Disk Management if contiguous unallocated space exists next to the partition formatted as NTFS.
4. How does more disk space affect Windows 10 performance?
Additional disk space improves system stability, supports updates, and prevents slowdowns caused by low storage warnings.
5. What third-party tools are recommended for disk space increase?
Tools like DiskGenius, MiniTool Partition Wizard, and EaseUS Partition Master are reliable and user-friendly options.
6. Can Command Prompt or PowerShell be used to increase disk space?
Yes, the diskpart utility can extend partitions via command line, suitable for advanced users and administrators.
7. What precautions should be taken before increasing disk space?
Always back up critical data and ensure you understand the partition structure to avoid data loss.
8. How to check if disk space can be increased?
Use Disk Management or diskpart to view current partitions and unallocated space.
9. Are there limitations to extending disk space?
Limitations include the need for adjacent unallocated space and compatible partition formatting.
10. How often should disk space be monitored?
Regularly, especially for the system drive, to prevent storage shortages that affect system performance.
Good Article. Any Layman can understand the procedure.
We value your attention. We are eager to hear any questions that you might have.