How to Install Docker Easily for Beginners
Install docker by first updating your package manager then downloading and installing the Docker package. Docker lets you run applications in containers. This is suitable for beginners.
🤖AI Overview:
Install docker refers to the process of setting up the Docker software on your computer or server. Docker is a platform that allows users to create, run, and manage containers for applications easily. The main goal of installing Docker is to simplify application deployment by using isolated environments. This process helps developers and IT professionals automate and streamline their workflows.
Quick Steps
Quick Steps to Install Docker:
- Update your system to ensure all packages are current.
- Install required dependencies for Docker.
- Add the official Docker repository to your system.
- Download and install the latest Docker package.
- Start the Docker service to enable functionality.
- Enable Docker to start automatically on boot.
- Verify your Docker installation with a version check.
- Add your user to the Docker group for easy access.
Introducing Docker-related fixes
Docker container: a created instance of Docker images that runs along with applications. Each container has its own unique ID and is kept entirely separate from other containers. But the core of containers is the common feature between containers.
Docker Daemon: This is the term for the hidden process of the host system that creates and manages containers. It is also known as Docker Engine.
Docker Client: The user uses Docker Client, which is a command line tool to communicate with Docker Daemon.
Docker image: A screenshot file of a container that cannot be modified. The file system and application dependencies required to run the software are stored in a Docker image.
Docker registry: a program that oversees the distribution and storage of Docker container images. The Docker registry can make information available to the public or keep it private.
Advantages of Docker
- open source
- Freedom to use any technology to complete the work process
- Providing a light and organized environment to achieve the testing goals of the programmers
- A platform for rapid application development
- Speeding up the process of writing codes and executing them in an environment
- Providing the possibility of testing, sending, and deploying codes
Installing Docker on Ubuntu: Step by Step
prerequisites
Pay attention to the following things that are important to go through the steps of installing Docker on Ubuntu Linux:
- Launch and access non-root sudo user
- Ensure internet connection
- Configuration and initial setup of Ubuntu 20.04 Linux on the system
Note: If you plan to run Docker on a Linux server, set up a firewall in addition to the above. It should be noted that creating a user account in Docker Hub is also necessary.
In the standard repositories of Ubuntu 20.04, the Docker package is available for installation, but to ensure that we have installed the latest version of Docker, it is better to search for and install the newest version of Docker in the official Docker repositories.
Step 1: Installing Docker on the Ubuntu system is not complicated. First, you activate the Docker repository for legal and valid downloads by adding and installing the new package source and installing the GPG Docker key.
Step 2: First, update a list of packages:
sudo apt updateStep 3: Install the necessary prerequisites to add a new HTTPS repository:
sudo apt install apt-transport-https ca-certificates curl gnupg-agent software-properties-commonStep 4: In this step, using the curl command, we download the GPG key of the official Docker repository and add it to our system:
curl -fsSL https://download.docker.com/linux/ubuntu/gpg | sudo apt-key add –Step 5: Through the following command, we add the Ubuntu stable version Docker repository to the list of APT sources:
sudo add-apt-repository "deb [arch=amd64] https://download.docker.com/linux/ubuntu $(lsb_release -cs) stable"Once the Docker repository is enabled, any Docker version found there can be installed.
Step 6: Docker installation on Ubuntu 20.04 will start. Follow the steps below to install the latest version of Docker on your system. Before beginning the installation process, it is better to update the list of available packages in the system. If you intend to install a specific version of Docker, skip this step and go to the next step.
sudo apt updatesudo apt install docker-ce docker-ce-cli containerd.io –yStep 7: Before installing a particular version, you need to get a complete list of Docker repository versions and update them.
sudo apt updateapt list -a docker-ceIn the second column, you will see a list of current Docker releases. We see that the official Docker repository hosts a version of Docker (5:19.03.93-0ubuntu-focal).
Output
docker-ce/focal 5:19.03.9~3-0~ubuntu-focal amd64To install a particular version of Docker, add =<VERSION> after the package name in the command:
sudo apt install docker-ce=<VERSION> docker-ce-cli=<VERSION> containerd.ioThe Docker service starts immediately after the installation is completed to begin the activation process at boot. To ensure its execution, enter the following command:
sudo systemctl status dockerAfter entering the above command, you will get the following result, which indicates that the service is activated and running:
Output:
-
docker.service - Docker Application Container Engine

Loaded: loaded (/lib/systemd/system/docker.service; enabled; vendor preset: enabled)

Active: active (running) since Thu 2020-05-21 14:47:34 UTC; 42s ago

TriggeredBy: ● docker.socket

Docs: https://docs.docker.com

Main PID: 24321 (dockerd)

Tasks: 8

Memory: 46.4M

CGroup: /system.slice/docker.service

└─24321 /usr/bin/dockerd -H fd:// --containerd=/run/containerd/containerd.sock
If for any reason, you did not receive the Active message in the above command, that means your Docker is not running and use the following command to run it:
sudo systemctl start dockerYou can set Docker to run automatically at system startup via the following command:
sudo systemctl enable dockerAlso, use the following command to restart Docker:
sudo systemctl restart dockerStep 8: Once a new version of Docker is available, you can upgrade packages via the following standard method:
sudo apt update sudo apt upgradeIf you don’t want to update Docker packages, mark it as disabled:
sudo apt-mark hold docker-ceThe Docker command line application, commonly known as the Docker Client, is now included in standard Docker installation alongside the Docker service (daemon). In this guide, we will also mention Docker commands.
Run Docker commands as a non-root user
By default, Docker commands can be run by the root user with sudo privileges or by a user who is in the Docker group.
If you try to run Docker commands as a user that is not in the Docker group or without the sudo invocation, you will get the following results:
Output
docker: Cannot connect to the Docker daemon. Is the docker daemon running on this host?.

See 'docker run --help'.
So if you want to run Docker on Ubuntu without the need for sudo command and use a user other than root to run Docker commands, you need to add the user to the docker group. This group is automatically created when Docker CE is installed. To do this, follow the instructions below:
sudo usermod -aG docker ${USER}$USER is the environment variable where your username is placed.
To update and refresh membership in the group, log out and log in again or enter the following command:
su - ${USER}Now you can run docker commands as a non-root user without problems. If you do not go through the above steps, you must have sudo privileges to run docker commands and type sudo before each docker command.
Installation confirmation
To ensure the Docker installation is successful, we run a test container.
To test Docker, you can use the docker command without the need for the sudo prefix:
docker container run hello-worldA test image is received through this command, created by a container that displays the events related to the execution of this command by presenting the message “Hello world.”
Of course, at first, a local search is performed, and if the test image is not already on the local machine, a search is made in Docker Hub to find the image, and then it runs it in a container, outputs “Hello from Docker,” and terminates. The result is as follows:

Because there is no long-running process, the container stops after printing the message.
As you know, Docker containers are created based on Docker images. Docker automatically downloads images from Docker Hub. This cloud-based registry service can store Docker images in public or private repositories.
To check the local Docker images already available on the system, enter the following command:
docker imagesTo search for Docker images in Docker Hub, use the Search command. For example, if you want to search for Ubuntu images, type the following command:
docker search UbuntuTherefore, this command finds the list of images related to Ubuntu by searching in Docker Hub scripts.
Checking the installation status
You can also track the status of the Docker installation through the Sudo command, in which case you must enter the following command:
sudo docker versionAs a result, you can get the Docker version you installed from the version field in the output you received.
Uninstalling Docker on Ubuntu
Before uninstalling Docker, it is better to delete images, networks, containers, and volumes.
If you want to stop a specific container that was created:
- First, access a list of running containers via the following command:
docker container ls –a- Then in the NAMES column, find the desired container name.
- Finally, delete the desired container using its name.
docker rm container_nameTo stop all active containers and remove all docker objects, enter the following commands:
docker container stop $(docker container ls -aq)docker system prune -a –volumesNow you can uninstall docker with the apt command:
sudo apt purge docker-cesudo apt autoremoveInstalling Docker on Debian 11 by following 14 steps
Prerequisites
- Having Sudo user privileges
- Having a 64-bit system
- Stable and secure connection to the network
- Configure Debian 11 on the system
Starting the Docker installation process on Debian 11
Step 1: Install Docker Dependencies
The first step to start the process of installing Docker on Debian 11 is to update the system. To do this, open a terminal using CTRL+ALT+T and enter the following command:
sudo apt-get updateNext, we use the following command to add the necessary Docker dependencies to the Debian platform:
sudo apt –y install apt-transport-https ca-certificates curl gnupg2 software-properties-common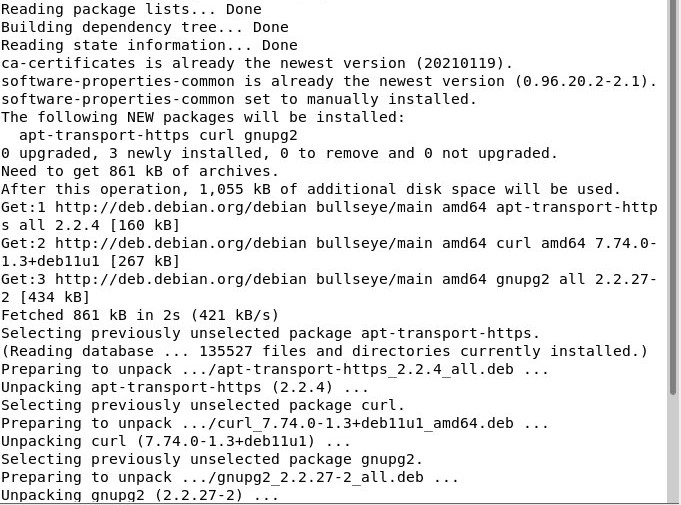
Note that the Docker dependencies have been successfully installed so that the application will run without any problems.
Step 2: Add the GPG key of the official Docker repository
Before you set up the repository to receive and install Docker packages, you need to include the Docker GPG key in Keyrings. The main function of this key is to ensure the validity of downloaded Docker packages. Accomplish Docker’s GPG key target by running the following command:
curl –fsSL https://download.docker.com/linux/debian/gpg | gpg –dearmor –o /usr/share/keyrings/docker-archive-keyring.gpgStep 3: Adding the trusted repository
To get the most up-to-date docker packages, you should now add the stable repository with the following command. As a result, we will launch the repository.
Echo “deb [arch=amd64 signed-by=/usr/share/keyrings/docker-archive-keyring.gpg] https://download.docker.com/linux/debian $(lsb_release –cs) stable” | sudo tee /etc/apt/sources.list.d/docker.listStep 4: Update Package Cache
After adding a repository, you need to update the package cache with the latest information from the newly added repository. To do this, you must run the following apt command:
apt-get update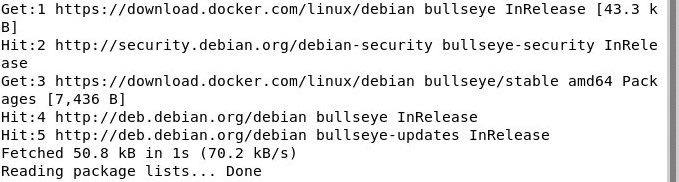
Step 5: Install Docker Engine
Then run the following command to get and install the latest Docker container and engine:
apt-get install docker-ce docker-ce-cli containerd.io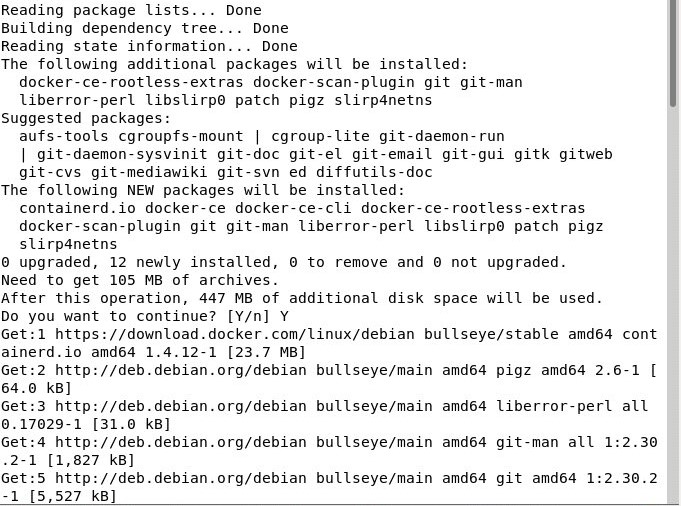
Step 6: Checking the Docker version
After you have installed the latest versions of the Docker engine and container, enter the following command to check the Docker version:
docker-versionStep 7: Check the Docker service status
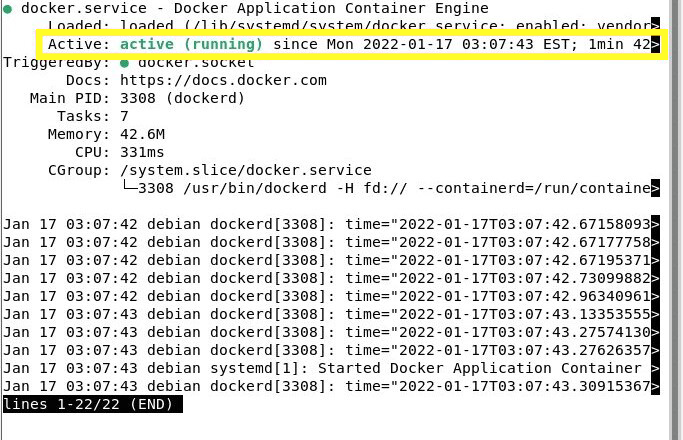
After a successful installation, you should now check the status of the Docker run. To achieve our goal, we use the “systemctl” command. A system’s services can be managed with this command. Through the “status” option of the “systemctl” command, we check whether the Docker service is running on our Debian server or not:
sudo systemctl status dockerAfter executing the above command, if Docker runs, the word Active (Running) will be displayed in green.
After installation, the Docker service will start automatically. To ensure that the Docker service is running, you can use the systemctl status docker command that we explained earlier. If needed, the systemctl start docker and systemctl restart docker commands can be used to start and reactivate the docker service, respectively.
Step 8: Docker test
So far, we have successfully installed Docker on the Debian system and checked the status of the Docker service. We need to run the “Hello-World” global Docker container test sample to check Docker performance.
Run the Hello World image
You can build your first container using the docker engine and hello-world image. You can do this by issuing the hello-world command, as shown below:
docker run hello-world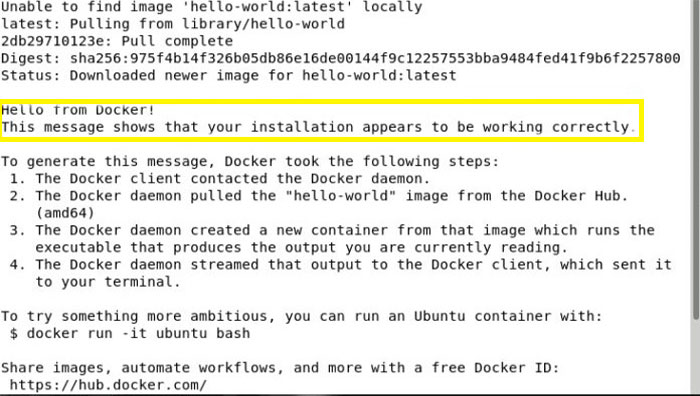
Step 9: List Docker images
Type “docker images” at a command prompt to see a complete list of available images. The docker images and docker image commands may look similar, but they perform separate tasks. You can use the docker image <command> syntax if you want to manage your own Docker images. But here we are going to access a list of images. So run the following command:
docker imagesStep 10: Run the Ubuntu container
At this point, you can start an Ubuntu Container with the docker run-it ubuntu bash command. If you do not specify a label for the image, the latest image for Ubuntu is used by default. If the image is not already available on your local system, the container will be created from an image downloaded from the Ubuntu library. For this purpose, run the following command:
docker run -it ubuntu bash

Step 11: List the docker container
Use the following command to list all containers of this software regardless of their current state:
docker ps-aStep 12: Managing Docker containers
To initialize a container, the following command should be used:
docker start <container_id>For example, if you wanted to launch a container with ID 5aa62402b888 for the Ubuntu Bash you created, you would run the following command:
docker start 5aa62402b888And use the ps command to check the status of the container:
docker psAlso, to stop running a specific container, use the following command:
docker stop <container_id>For example, if you want to stop a container with the ID 5aa62402b888, you should put the real ID of the active container in the <container_id> field of the above command:
docker stop 5aa62402b888Then, as we explained before, rerun the ps command to check the status:
docker psAlso, run the following command to delete the image:
rm <container_id>After removing the image, use the docker images command to check the list of images and ensure that the container with the specified ID is removed:
docker images
Step 13: Push the images to the Docker Hub repository
To use and save images in Docker Hub repositories, you must create a user account and enter the repository with the user account’s credentials. To create a Docker Hub account, visit the Docker Hub site and then type this command to access your account:
docker login
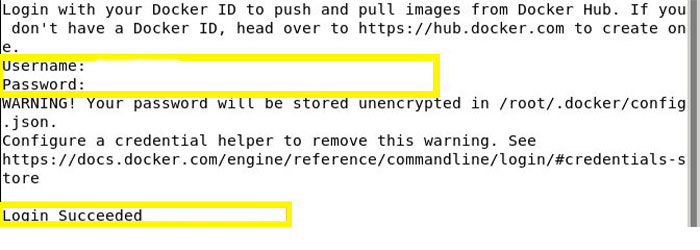
After executing the command, it is necessary to enter the username and password and press Enter.
After you have successfully logged in, push your images through the following command:
docker push <Image_name>Note: The image may need to be tagged before being pushed to the Docker Hub repository.
Step 14: Uninstall Docker
If you want to remove the Docker engine, we must uninstall Docker Engine, CLI, and Containerd packers with the help of the following command:
apt-get remove docker-ce docker-ce-cli containerd.io
Note: Images, containers, volumes, and specialized configuration files on your host will not be removed without your intervention. Therefore, to manually delete all images, containers, and volumes, the following commands should be used:
sudo rm -rf /var/lib/dockerTo remove containers, use the following command:
sudo rm -rf /var/lib/containerdSteps to install Docker on CentOS
This tutorial will present the process of installing Docker on CentOS7. First, pay attention to the prerequisites:
prerequisites
- Having a user account with Sudo permission
- Using a supported version of CentOS, as Docker does not support or test older distributions.
- Activation of the CentOS Extras repository (usually, this repository is enabled by default in CentOS, if it is disabled, you must re-enable it.)
- Accessing the terminal by right-clicking on the desktop and selecting the Open in Terminal option
- Installing the yum software package manager
Start the Docker installation process on CentOS7 using Yum
To install Docker from Docker repositories on CentOS, using the Yum command is the easiest way.
Step 1: Update the Docker package database by running the following command:
Sudo yum check-updateYou may have to wait a few minutes for the operation to complete.
Step 2: Install Dependencies
At this stage, install the necessary prerequisites for installing Docker on CentOS by typing the following command:
sudo yum install -y yum-utils device-mapper-persistent-data lvm2The -y option in the Yum installer is to accept all defaults, which continues the installation process regardless of opening a window for confirmation, and this option also results in the addition of the yum-utils yum-config-manager switch. Docker requires the Device-Mapper-Persistent-Data and lvm2 packages to function correctly, as it depends on the Device Mapper storage driver.
Step 3: Adding Docker repository to CentOS
Adding a stable Docker CE repository to a CentOS system is a prerequisite for installing Docker edge or testing versions. For this purpose, enter the following command:
sudo yum-config-manager --add-repo https://download.docker.com/linux/centos/docker-ce.repo
The stable version includes fewer changes, and more time and precision are spent on testing it. It also has a slow update cycle. While Edge versions are updated more often, stability tests are not performed on them.
Note: It should be noted that activation of additional repositories is not required for stable versions because when installing Docker if the desired version is not specified, the latest version of Docker will be selected by default. Enabling the stable repository prevents accidental updates from the stable version to the edge version.
Step 4: Using Yum to install Docker on CentOS
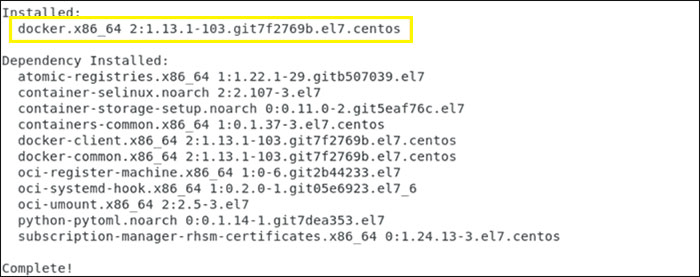
After going through the previous steps, you can now install Docker on CentOS7 with the help of the following command:
sudo yum install DockerThe installation process will start automatically. Upon completion, a message will appear informing you that Docker has been successfully installed and what version of Docker is currently running on your system.
Depending on your operating system, you may be prompted to accept the GPG key. Doing this works like a digital fingerprint.
The following format should be used for fingerprints:
060A 61C5 1B55 8A7F 742B 77AA C52F EB6B 621E 9F35Step 5: Managing the Docker service
We will not see the CentOS service running by installing Docker on CentOS. To run the service, we need to set it so that when the system starts, the Docker service is also started automatically. Therefore, it is necessary to execute the following instructions in order.
Start Docker:
sudo systemctl start dockerEnable Docker:
sudo systemctl enable dockerCheck service status:
sudo systemctl status docker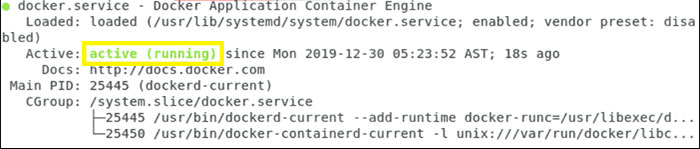
Seeing the word Active (Running) in green indicates that Docker is active.
Installing a specific version of Docker on CentOS
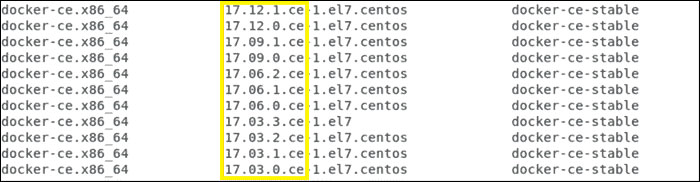
If you wish to set up a certain Docker version. First of all, you should make a list of the available versions. So run the following command:
yum list docker-ce --showduplicates | sort-rThe above command will result in a list of versions in the repositories activated in the previous steps. To install a specific version of Docker, enter the following command:
sudo yum install docker-ce-<VERSION STRING>To find the <VERSION STRING> field, pay attention to the middle column, the first part of the alphanumeric code, before the hyphen.
Other docker commands that we explained about Ubuntu and Debian, such as the docker “Hello World” command to check docker performance and docker images to check all the images in the system, docker search [search] to search for images in the docker repository, docker pull [image_name] for To download the desired image, docker run -t -i [image_id or image_name] to call the image using its ID or name (the –i option to make the image interactive and the –t option to access the terminal), etc., are also applicable for CentOS.
Conclusion
You have learned how to install Docker on your system with clear steps and explanations. Each section matters to ensure your Docker installation is secure, updated, and ready for use. Following these instructions helps you avoid common mistakes and gives you a strong foundation for running containers in Linux. If you have any questions or need assistance, the OperaVPS team is always here to help. Thank you for choosing this guide to install Docker.
FAQ
2. What are the minimum system requirements to install Docker on my computer?
To install Docker, your computer should have a 64-bit operating system with at least 2 GB of RAM. For Linux distributions, you need a recent version such as Ubuntu 20.04 or later, Fedora, Debian, or CentOS. Windows and macOS users should ensure they meet Docker Desktop’s requirements.
3. How can I install Docker on Ubuntu for the first time?
You can install Docker on Ubuntu by updating your package index, installing necessary dependencies, adding the official Docker repository, and then installing the Docker Engine. For beginners, OperaVPS offers easy-to-follow step-by-step guides to simplify this process and ensure a successful setup.
4. Do I need root or administrator privileges to install Docker?
Yes, installing Docker typically requires root or administrator privileges. This ensures Docker can set up system components needed for its operation. After installation, you may choose to manage Docker as a non-root user by configuring appropriate user permissions.
5. What should I do if I encounter errors while trying to install Docker?
If you receive errors during the Docker installation, first review the official Docker documentation for your operating system. Common issues include outdated packages or missing dependencies. At OperaVPS, we recommend double-checking each installation command and seeking support from our technical team if the problem persists.
6. How do I verify that Docker was installed successfully?
After you install Docker, you can check the installation by running the command docker --version or docker run hello-world in your terminal or command prompt. A successful installation will return Docker’s version number or a welcome message from Docker.
7. Can I install Docker on both Windows and macOS?
Yes, Docker provides Docker Desktop, a user-friendly application for both Windows and macOS. This tool allows you to install, update, and manage Docker containers easily. Be sure to download the version suitable for your operating system directly from the official Docker website.
8. Are there security considerations I should keep in mind after I install Docker?
After installing Docker, always keep Docker up to date by regularly checking for updates. Limit container privileges, use trusted container images, and apply security patches. At OperaVPS, we prioritize secure setups and provide guidance on configuring a secure Docker environment.
9. How do I update or uninstall Docker if needed?
To update Docker, you should follow the same steps as installation but ensure you are installing the latest version. To uninstall Docker, you can use your package manager’s remove or uninstall option. Detailed guides are available from OperaVPS to assist with both tasks.
10. Where can I find reliable support and resources to learn more about installing and using Docker?
OperaVPS offers comprehensive tutorials and dedicated customer support for all users. You can also find official documentation at the Docker website and active community forums where you can get answers to technical questions and learn from experienced users.