How to Install GUFW in Ubuntu
Firewalls are a security tool to protect your Linux system from unauthorized access, intruders, and hacker attacks that allow users to control and manage incoming and outgoing traffic from your device to the network. By default, Linux allows users to benefit from the features of firewalls by equipping their distributions with the best Linux firewalls, such as iptables, and implementing a security layer in their system to increase security; For this reason, Linux VPS is one of the preferences of security-sensitive users.
Since setting up and using the iptables firewall is complicated and challenging for many Linux beginners, UFW (Uncomplicated Firewall) is installed and used, especially in Ubuntu and Debian-based distributions, as a user-friendly front-end to facilitate setting up and managing the iptables firewall. Also, it makes the configuration of the iptables firewall easier for users who are not familiar with the command line.
But the technological progress does not end here; GUFW (Graphical Uncomplicated Firewall) is a graphical interface developed to set rules and manage UFW and provides an intuitive way to control network traffic without needing command line knowledge. Now that the importance of using a firewall is clear to you and you are familiar with the efficient GUFW tool let’s see how you can set up firewall with GUFW in Ubuntu. In this article, you will learn how to setup GUI for UFW firewall in Ubuntu using GUFW.
Advantages of installing GUFW in Ubuntu
- Providing an intuitive and user-friendly graphical interface to facilitate the process of configuring and managing firewall rules
- Ease of use and setting and managing rules in the firewall with just a few clicks
- Visual representation of firewall rules and network traffic for better understanding and monitoring of firewall settings
- Supporting different firewall profiles (e.g., Home, Office, Public)
- Application and Port Control
- Facilitate customization of firewall settings according to specific needs through graphical user interface
- alerting users to potential security issues through support for configuring firewall logging and notifications for events like blocked connections
- Useful for Linux beginners
- Reducing the risk of syntax errors or misconfigurations
- Facilitating and improving security and network traffic control systems
How to Install GUFW in Ubuntu (using command line)
Fortunately, all Linux distributions support the UFW front-end tool by default, so you can install Gufw from the Ubuntu Universe repository. Before installing GUFW, make sure to install UFW on Ubuntu/Debian because GUFW is a graphical interface for managing UFW. To install Gufw in Ubuntu, after having sudo privileges and accessing the Linux terminal (by pressing the Ctrl+Alt+T buttons), follow the steps below:
1. Enable Universe Repository
To be sure, enable the Univers repository in Ubuntu so that you can install Gufw from the Ubuntu Universe repository:
sudo add-apt-repository universe2. Update the package list
Update the package list in Ubuntu to the latest version by running the following command:
sudo apt update3. Install GUFW
Install GUFW in linux Ubuntu using the following command:
sudo apt install gufw4. Authenticate
After running the “install gufw” command, you will be prompted to type your sudo password. After entering the sudo password, proceed to the GUFW installation in Ubuntu by pressing the Enter button.
5. Confirm installation
To confirm Gufw installation, type “Y” or “Yes” when prompted. Finally, GUFW will be successfully installed on your Ubuntu system.
Installing GUFW on Ubuntu (using GUI)
If you are dependent on Ubuntu GUI, you can install Gufw in Ubuntu via Software Center. For this purpose, follow the steps below:
1. Launch “Software Center” and search Gufw, and then click the Firewall configuration that was displayed as a result of your search.
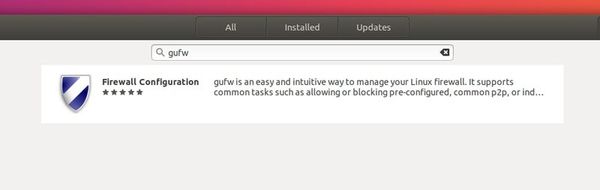
2. Click the “Install” button on the information page related to GUFW.
3. As a result, you have installed Gufw in Ubuntu so easily and you can run it by searching in the programs menu.
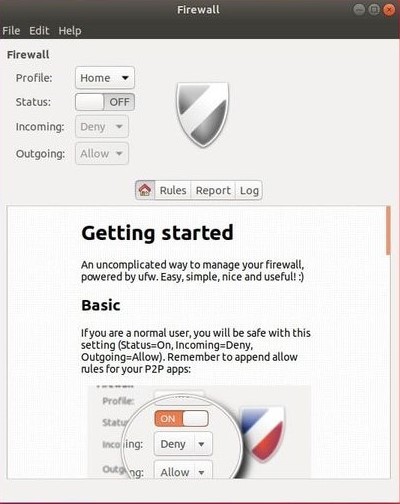
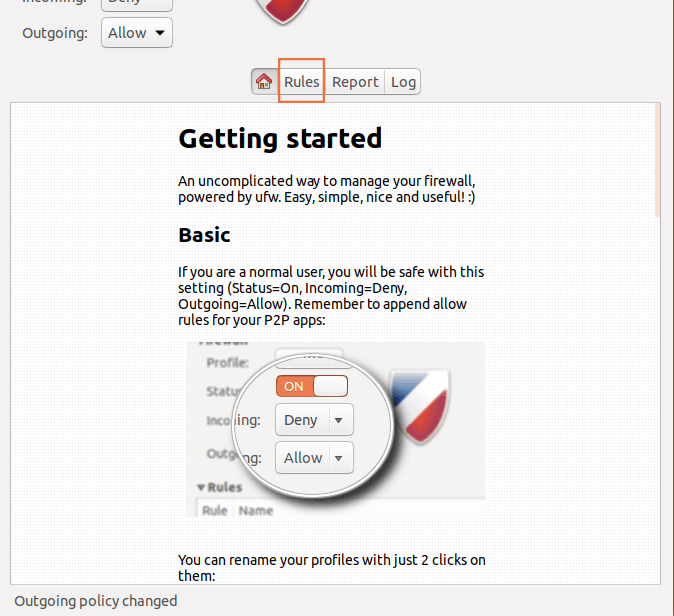
The “Getting Started” section welcomes you to the fascinating world of GUFW, and everything is ready to configure the firewall.
How to use GUFW to manage the UFW firewall?
In this part of the article, you will learn how to use GUFW to manage and set UFW firewall rules in ubuntu.
Launching GUFW
After the installation is complete, launch GUFW in one of the following two ways:
- Open the Applications Menu in Ubuntu and search for “Firewall Configuration” or “GUFW,” by clicking on it, you can launch GUFW.
- Open the terminal by pressing the Ctrl+Alt+T keys and launch GUFW by running the following command:
sudo gufwNote: You must have sudo privileges to run GUFW because configuring the firewall requires administrative privileges.
So you can access GUFW’s user-friendly interface through one of the two methods we described and set and manage firewall rules.
Basic configuration
After opening the GUFW interface, as we mentioned, you will see a page containing different tabs and profiles for firewall management. The basic configuration of GUFW consists of selecting the appropriate profile with your current network configuration and enabling the firewall.
The first step you should take is to enable the firewall. That means you need to enable your Ubuntu system firewall to protect your system from unauthorized network traffic. To enable the firewall, change the “Status” switch from the off to the “On” position.
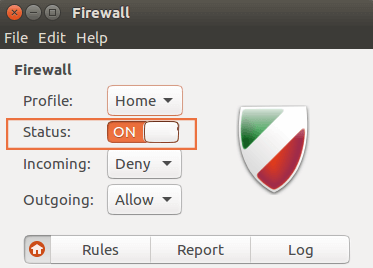
By doing this, Ubuntu’s default firewall is activated, and at system startup, it automatically starts to apply policies and rules to network traffic to deny unauthorized incoming traffic and only allow outgoing traffic.
The GUFW interface offers three different profiles, including Home, Office, and Public, so that users can choose the appropriate profile according to their network configuration by clicking on each.
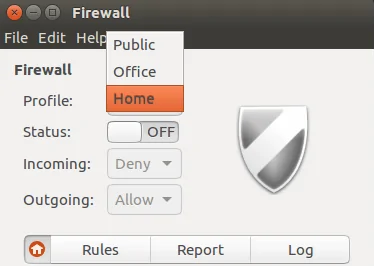
Each of these profiles applies default rules to your firewall, which are as follows:
Home: The default policies of this profile are Deny incoming traffic and allow outgoing traffic, but compared to other profiles, it allows more permissive rules, and by default, it considers the devices in the local network as reliable.
Office: The policies defined for the Office profile are similar to the Home profile and implement moderate security. Office profile is more suitable and useful for office networks.
Public: considers the strictest rules and policies to provide the highest level of security, rejects incoming traffic, and prevents any service or user from entering and accessing your system. The Public profile is a reasonable choice for public Wi-Fi networks or untrusted office environments.
As a result, each profile uses a different policy for the default rules of the firewall, which leads to changing the firewall’s behavior in the restrictions applied to the incoming and outgoing traffic of the system.
Configure firewall behavior through Firewall Preferences
If your needs go beyond relying on the default GUFW profiles, the GUFW interface supports customization and allows users to add, modify, and even delete profiles. The important point is that to configure the firewall policy and rules, you must ensure the firewall status is enabled and then apply your desired configurations.
To add additional profiles, click the “Edit” tab and select the “Preferences” option.
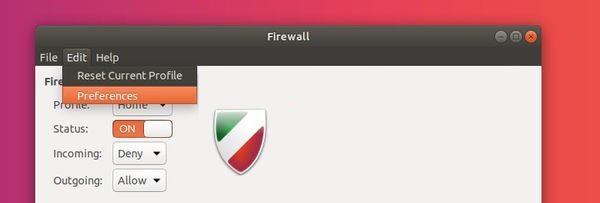
In the firewall Preference window, the firewall configuration options are as follows:
Logging: Allows you to set the logging level for firewall events, which includes options such as Low,” “Medium,” and “High.” You can set higher logging levels to get more detailed information.
Profiles: provides a set of predefined rules for different profiles that you can delete, add, or change these profiles. For example, to change the profile’s name, you can double-click on the desired profile and press the “Enter” button to change the name of the desired profile or press the “Esc” button to undo the name change. You can also use the “+ ” icon to add a new profile to the list of predefined views and delete the selected profile using the” –” icon.
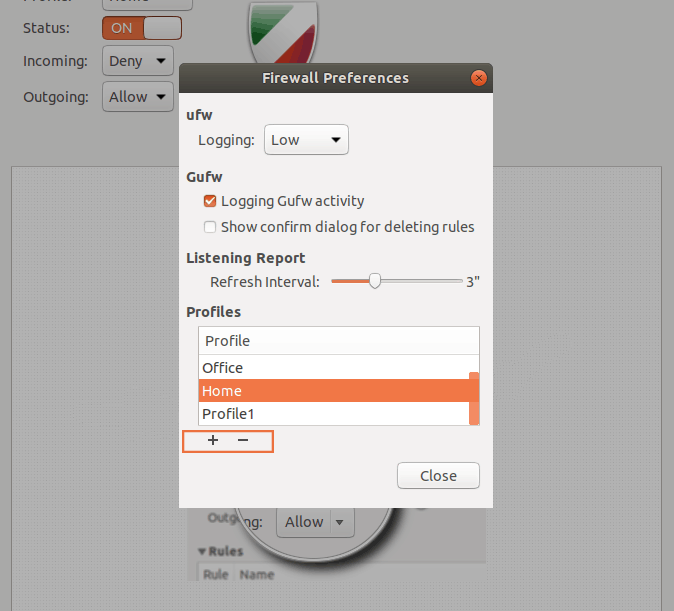
After configuring your settings, click “Close” to save your changes. As a result, you could easily customize the management of incoming and outgoing connections and events and notifications related to the firewall.
Creating custom rules
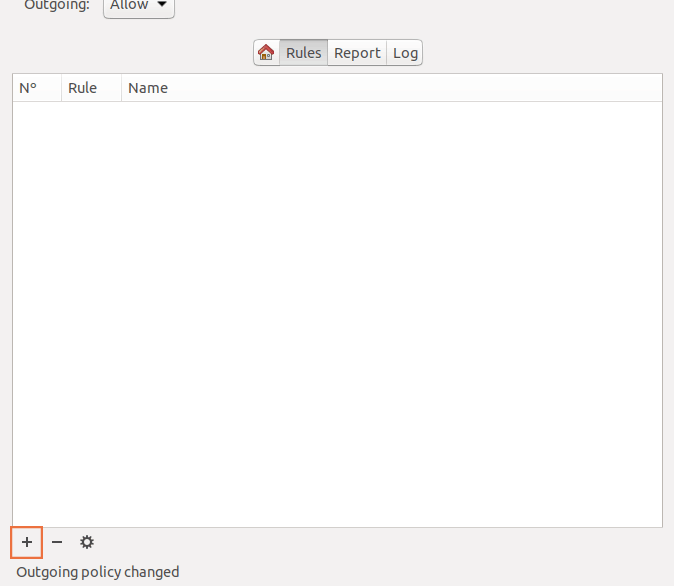
As we mentioned, one of the advantages of the GUFW interface is its flexibility and customization. As a result, you can customize your firewall rules by creating specific rules for services and ports. To do this, go back to the main menu and click on the “Rule” tab from the menu you see in the middle of the page.
In the window that opens, you can configure custom rules for your firewall. To configure the rules, you must know the basic concepts and policies for setting firewall rules. These policies are as follows:
- Allow: It is added to the firewall rules to allow incoming traffic to the port.
- Deny: prevents incoming connections and access to the system unless explicitly allowed by rules.
- Reject: Rejects incoming traffic by sending an ICMP reject message to the service or user trying to access your system.
- Limit: applies a traffic limit that, after several attempts of an IP to connect, incoming traffic from a specific IP will be rejected.
Tip: Reject has the same function as Deny, but with the difference that when rejecting the requesting service and user, it sends feedback to the requesting user to inform them of the traffic rejection.
Now that you are familiar with the basic concepts for configuring firewall rules, click the “+” icon (Add a rule) in the “Rules” tab to create new and custom rules.
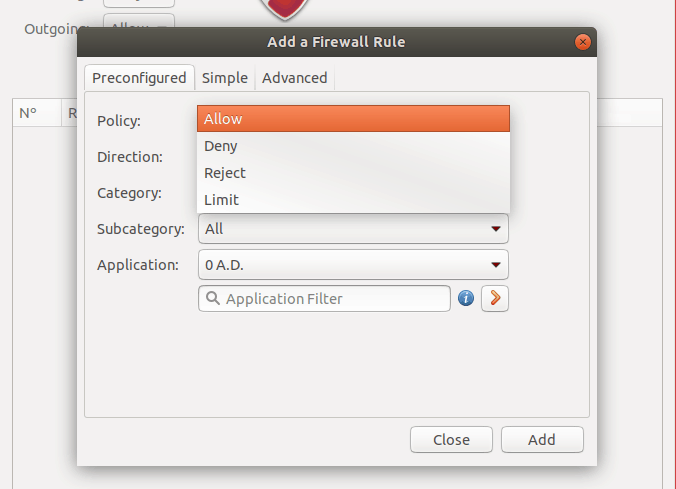
In the “Add a Firewall rule” window, three tabs are provided to add rules: Preconfigured, Simple, and Advanced.
In the “preconfigured” tab, Policy, Direction (inbound or outbound), category, subcategory, and application are the options that are available to set the details of the rule, which is the most beginner way to set the rules.
We will explain the options further here:
- Policy: Through this option, select your desired policy that we explained earlier (Deny, reject, allow, limit).
- Direction: Specify the incoming or outgoing connections or both on which you intend to apply the specified policy.
- Category and Subcategory: Specify the programs you want to define restrictions for.
- Application: Specify the program for which you want to block access to the preset ports, and with this, several ports you want will be blocked without spending time to write them, just by selecting a program.
- Arrow symbol > orange color: used for more advanced customization of firewall rules.
After setting the details of the rules, click on the “Add” button to create your new rules and then click on the “Close” button. Finally, you will see the created rule in the “Rule” tab.
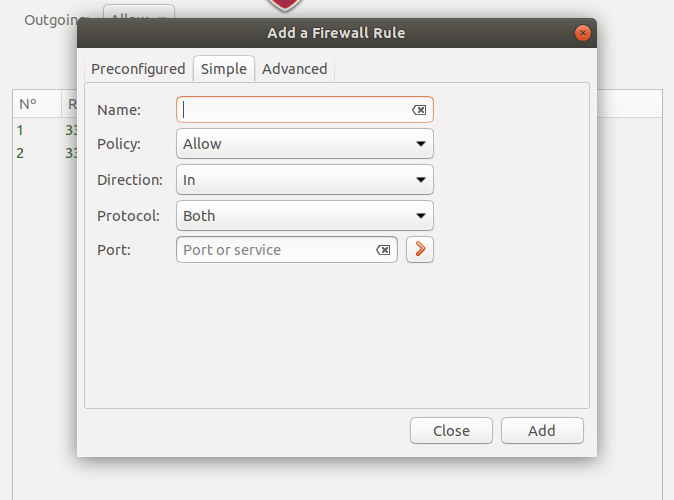
The “Simple” tab in the “Add a Firewall Rule” window is another way to create a rule in the firewall, where you have to manually and directly create a rule with details. Like the “Preconfigured” tab, the “simple” tab allows you to select the policy and direction options, but in addition to choosing the desired policy and the direction of the restriction, you must select a name for your new rule. Also, specify the protocol (TCP, UDP, or Both) and the port (it can be a port or a port range) that you intend to manage traffic, and then click on the “Add” button to create your rule.
The “Advanced” tab is for professional and experienced Linux users and allows users to configure more advanced rules to manage traffic from specific IP addresses.
In the “Advanced” tab, similar options have the same function as the “Preconfigured” and “Simple” tabs, so you are familiar with them. New options for advanced settings of firewall rules include insert, interface, log, and IP address.
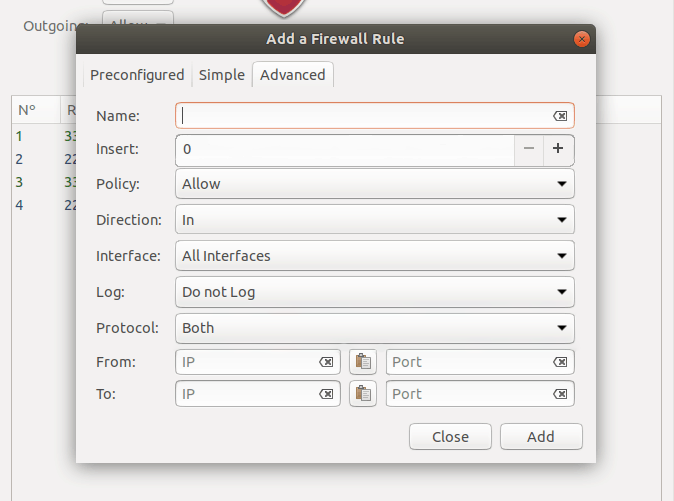
Insert: Since GUFW numbers firewall rules by default, you can specify the position of your rule in the list of prioritized rules by entering the number in the options. For example, by entering the number 0, the position of your rule will be adjusted so that your rules will be applied after applying all existing rules.
Interface: From this section, the particular interface in the network that you intend to restrict the traffic from and to that particular interface is specified.
Log: Specifies the information that the firewall should log.
IP: This section is used to determine the IP of the requester and recipient (From, To) to apply restrictions.
After setting the rules you want, click on the “Add” button to create your new rule.
Managing firewall rules using GUFW
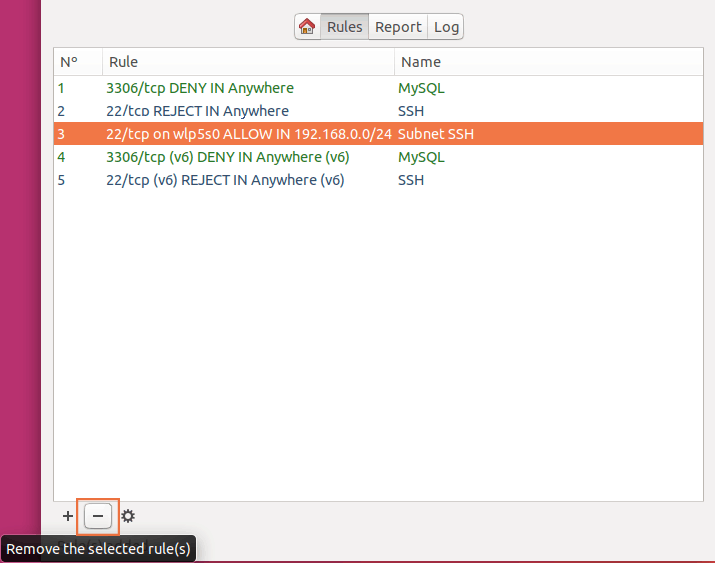
Fortunately, you can edit or delete the rules created in the firewall. The GUFW interface makes removing and editing firewall rules very simple. To edit the set rules, highlight the rule you want from the list of rules in the “Rules” tab by clicking on it, click on the little cog icon to edit your desired settings, and click the “Apply” button.
To delete the created rule, after selecting the desired rule, click on the “-“ icon at the bottom of the window and delete the set rule from the list of rules.
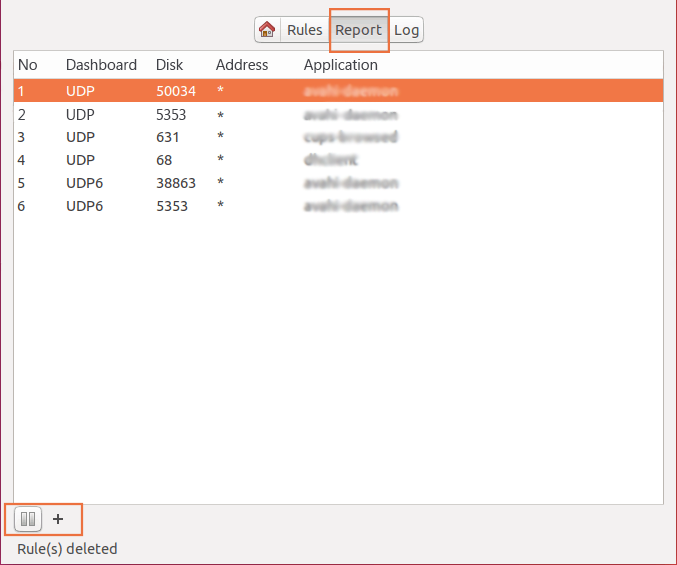
Monitoring running services
As you can see, in the main menu of the GUFW interface, the Rules tab is for creating, editing, and deleting firewall rules. But what is the use of reports and logs tabs? If you want to monitor and manage running services and their detailed information such as port, service name, IP address, protocol, etc., you should expand the “Reports” menu and enter the Reports page. From the Reports section, the two icons “Pause” and “+” are helpful because they allow you to Pause Listening Report and create rules for services in addition to viewing and checking running services.
Checking errors resulting from invalid rules
But when should we use the Logs option? You may create a rule, and it won’t be made for some reason, and you get an error when creating the rule, but you don’t know what the problem is. This is where the Logs tab comes in handy because through the Logs section, you can get a report of the rule and the created problem (using the reporting icon at the bottom of the page, which is similar to a sheet of paper) and by checking the report copied to your clipboard, the reason for the inability to add the rule is revealed.
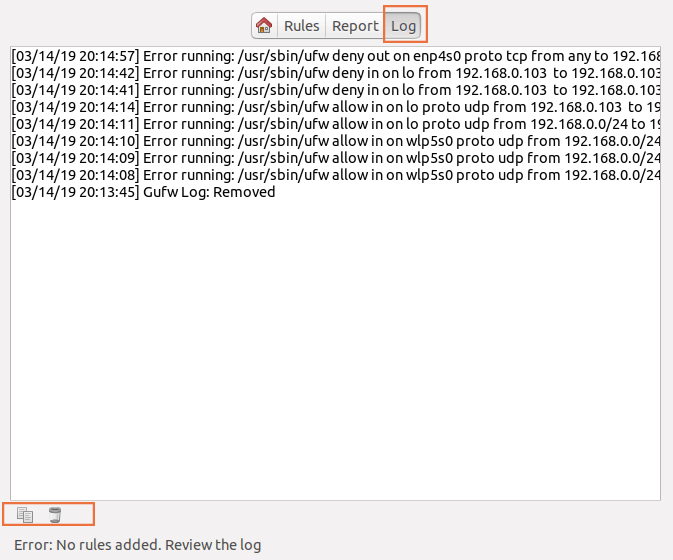
Note: The trash can icon is used to clear the log.
Conclusion
Proper firewall configuration is one of the effective security measures to improve Linux system security. If you are weak in the configuration of the firewall, you may not be able to implement the security in your system as you want; So using GUFW is a valuable solution to increase the security of the system through the correct configuration of the UFW firewall for users with any level of knowledge and expertise.
GUFW provides a user-friendly GUI for users not comfortable with the Linux terminal to manage the UFW firewall in Ubuntu and creates a new experience for Ubuntu. In this article, you learned how to set up GUFW in Ubuntu and how to use GUFW to set different firewall rules. If you have already configured the rules in the UFW firewall in the command line, after using GUFW, you will realize the advantages of the GUFW because configuring the rules in the firewall with GUFW is much easier than you imagine.
We sincerely hope that you found this article to be informative.