How to Install IIS in Windows Step by Step
Learn how to install IIS in Windows Server with this straightforward guide. Enable the web server role easily and start hosting websites and applications on Windows.
🤖AI Overview:
Installing IIS in Windows involves enabling Internet Information Services, the Microsoft web server, which is not installed by default on all Windows versions. IIS supports hosting websites and applications by managing HTTP/HTTPS protocols, with installation possible through Windows features or PowerShell commands. This setup is essential for businesses aiming to deliver reliable online content via Windows servers.
What is IIS and How Does It Work?
IIS is a web server that is created by Microsoft and has a simple integration process with other Microsoft products. It is a collection of web-based services that utilize the same GUI. An administrator can control website content, security settings, and service configurations through the IIS management console. In addition to the administration console, IIS offers a collection of graphical tools for doing routine activities including building and modifying websites, managing user accounts, and establishing security settings. As one of the web server types, it supports HTTP, HTTPS, FTP, FTPS, SMTP, and NNTP.
Install IIS in Windows Server allows web developers to transmit information to users in a variety of ways, including through file exchanges like downloads and uploads, static HTML-coded webpages, text documents, image files, and more.
IIS works via a number of common languages and protocols. Text, buttons, picture placements, direct interactions and behaviors, and hyperlinks are all elements that can be created with HTML. The fundamental protocol for exchanging data between web servers and users is the Hypertext Transfer Protocol (HTTP). For increased data security, HTTPS, or HTTP over the Secure Sockets Layer, encrypts the transmission using Transport Layer Security, also known as SSL. File transfers can be done using the File Transfer Protocol (FTP) or its secure variation, FTPS.
The most recent version of Active Server Page (ASP), a server-side script engine that creates interactive webpages, is the ASP.NET Core framework. The ASP.NET Core application receives a request from the web and delivers it to the IIS server, where it is processed before being returned to the IIS server and the client who made the original request. Blog platforms and content management systems (CMS) are a couple of examples of apps created with ASP.NET Core.
Benefits of Install IIS in Windows
IIS is a dependable and secure web server that will maintain the efficiency of your website. The most recent release of Internet Information Services (IIS), which came preinstalled on Windows 10 and Windows Server 2016, is IIS 10.0. Below option are the most brilliant features of IIS.
1. HTTP/2
The HTTP/2 protocol, which offers several improvements over HTTP 1.1 and enables effective connection reuse and a decrease in latency, is now supported by IIS 10.0. The HTTP.sys kernel-mode device driver, which was added to Windows Server 2016 and Windows 10, now supports HTTP/2, and all of your IIS 10.0 websites can take use of this. (You might already be utilizing HTTP/2 since the most recent versions of most modern browsers currently support HTTP/2 over TLS.)
2. IIS on Nano Server
For Windows 10 and Windows Server 2016, Nano Server is a new headless, 64-bit-only installation option that installs “just enough OS” and leaves a lower footprint. Nano Server is appropriate for executing web applications because it offers higher density, increased uptime, and a lower attack surface. IIS workloads for ASP.NET Core, Apache Tomcat, and PHP are currently supported by Nano Server.
3. IIS in Containers
Containers are portable, resource-controlled, isolated operating environments, and support for them is now added to Windows Server 2016 and Windows 10 with the Anniversary Update. Windows containers achieve isolation through process and namespace isolation, whereas Hyper-V containers achieve isolation through lightweight virtual machines. Windows Server 2016 and Windows 10 offer two alternative container runtimes with varying degrees of isolation. You may select the optimum Windows container environment for your web workloads because IIS 10.0 runs on both base OS images, Server Core and Nano Server, and in both container runtimes.
Complete Guide to Install & Configure IIS in Windows Server
Let’s go through the steps of this tutorial and review all the required actions to Install IIS in Windows Server. As we mentioned, IIS is not installed by default in Windows. So, you have two ways to have this web server installed on your system.
IIS Installation Steps in Windows Server:
- IIS can be added by utilizing the Control Panel’s “Turn Windows features on or off” dialogue or using the following PowerShell cmdlets:
Install-WindowsFeature Web-Server
Install-WindowsFeature Web-Asp-Net
Install-WindowsFeature Web-Mgmt-Console
The “net start” and “net stop” commands can be used to start and stop the services after IIS has been installed.
Now, you are ready to add the components of the IIS server. IIS’s modular design enables functionality to be added or removed using “roles” and “features.” IIS includes features and roles of Web Server (IIS) role, Common HTTP Features, Dynamic Content, Application Development, Health and Diagnostics, Security, Performance, and Management Tools.
- IIS can be handled using the “appcmd” tool’s command-line interface or the IIS Manager GUI. By adding new roles and features, like ASP.NET, PHP, or a media streaming server, IIS can be expanded. The following PowerShell cmdlets or the “Turn Windows features on or off” window in the Control Panel can be used to add these components:
Install-WindowsFeature Web-Asp-Net
Install-WindowsFeature Web-PHP
Install-WindowsFeature Web-Media-Streaming
Steps to Configure IIS in Windows:
After a successful installation, you can start configuring IIS in Windows. Setting up and configuring IIS on Windows is simple, and you can customize it according to your priorities and particular needs.
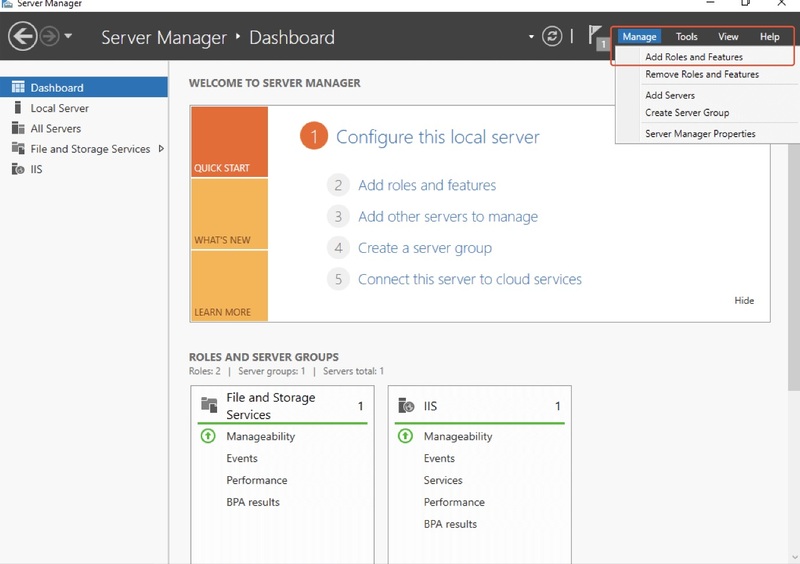
- First, you should begin with setting up the IIS role. To do this, open the ‘’Add Roles and Features’’ and in Server Manager, go to Manage ⇉ Add Roles and Features. Click the Next button when you are finished.
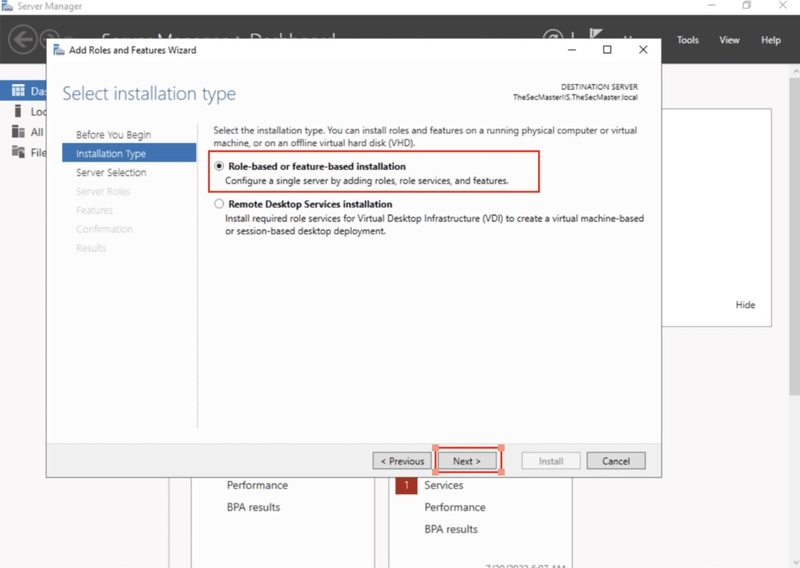
- In the Select Installation Type screen, select Role-based or Feature-based installation since it is role-based. Click Next and go on.
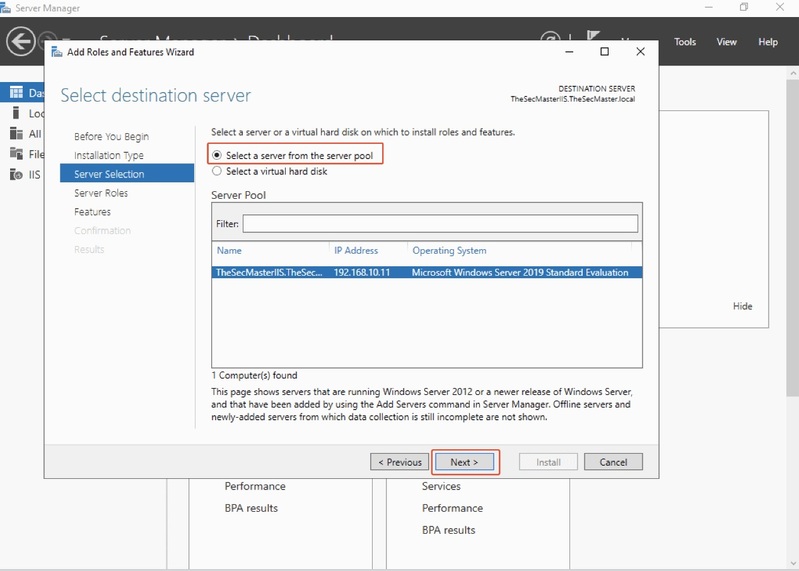
- The server on which you intend to deploy the Web Server (IIS) Role is known as the destination server. Since we will be installing IIS on the local server in this guide, choose that server on the Select the Destination Server screen and then click Next.
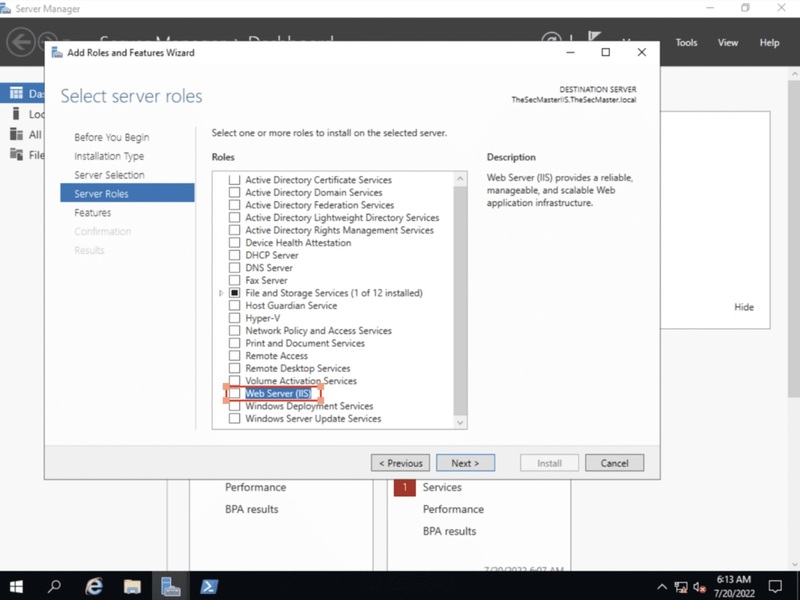
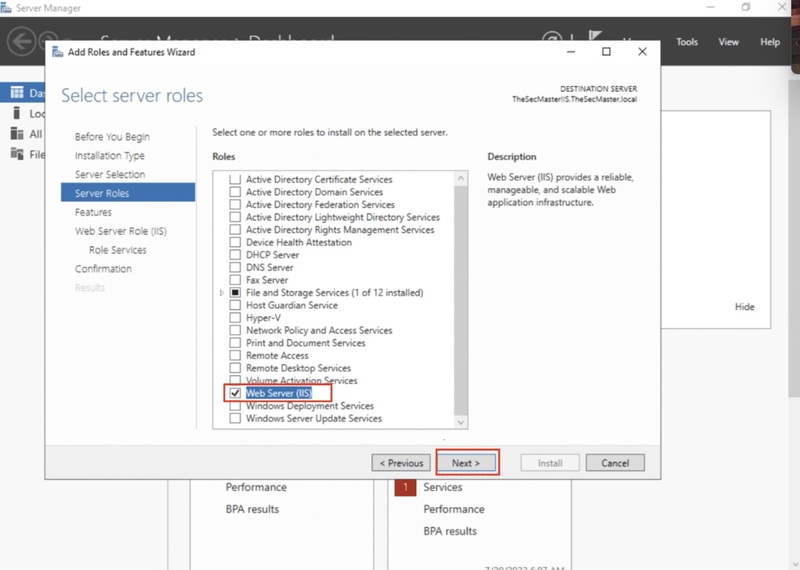
- On the Select Server roles, click on the ‘’Web Server (IIS)’’ role and then click on Next.
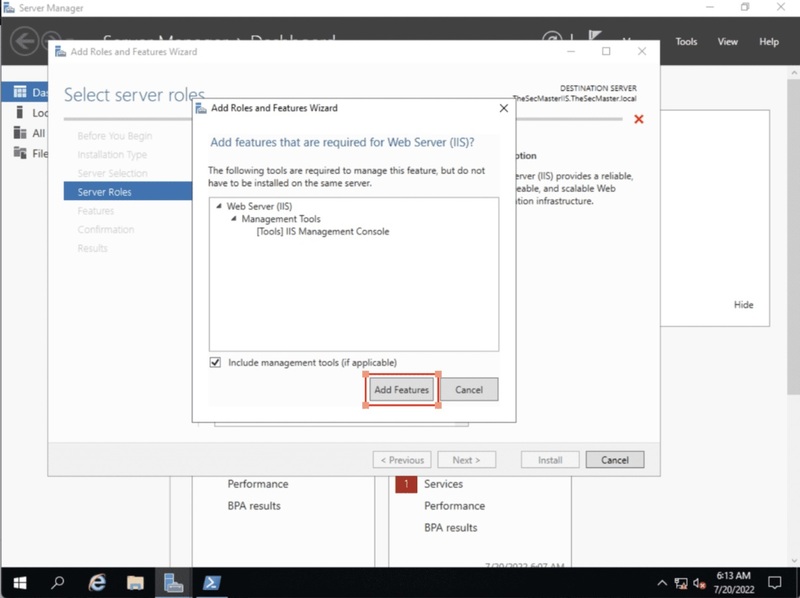
- Then, to add the IIS features, click on the ‘’ Add Features’’ button.
- On the Select Server roles, click on the Server Roles to select the roles to install IIS on the selected server. Click Next and continue.
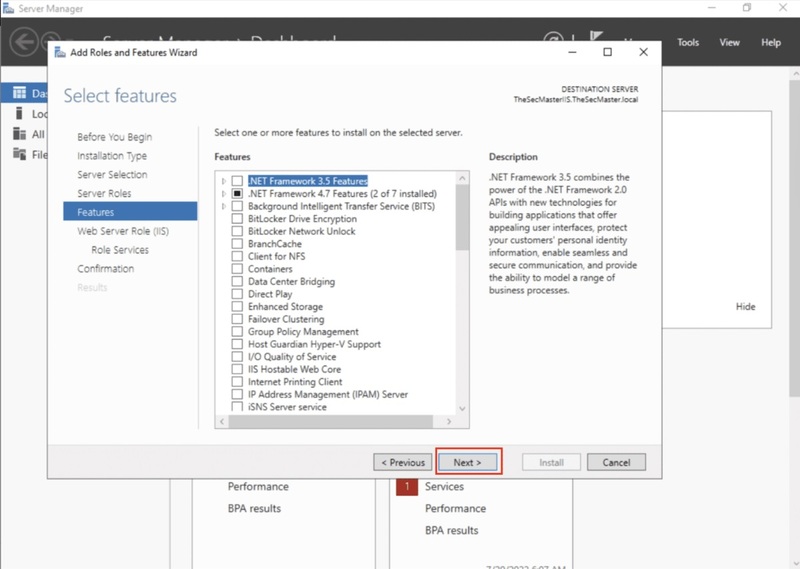
- In this step, to install IIS on the selected server, Select features.
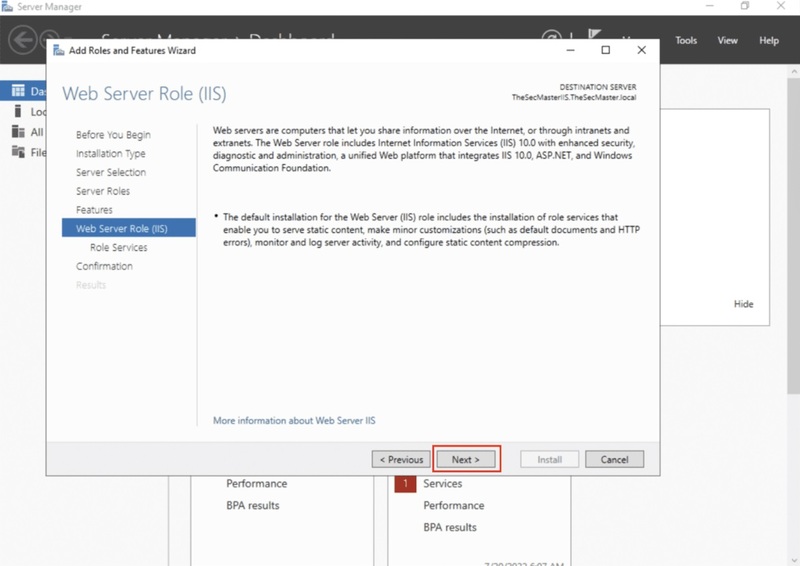
- To install the default Role service, select Web Server Roles (IIS) and click Next.
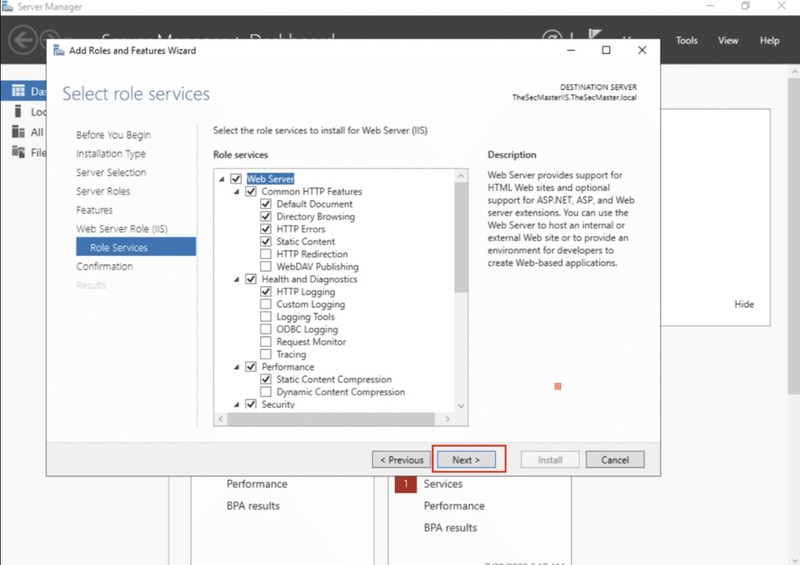
- To install the IIS Web Server, select the role service. The ‘’Role Services’’ is the default selection. Let it be chosen since the ‘’Role Services’’ are good for configuring the Basic IIS site. When you are finished, click Next.
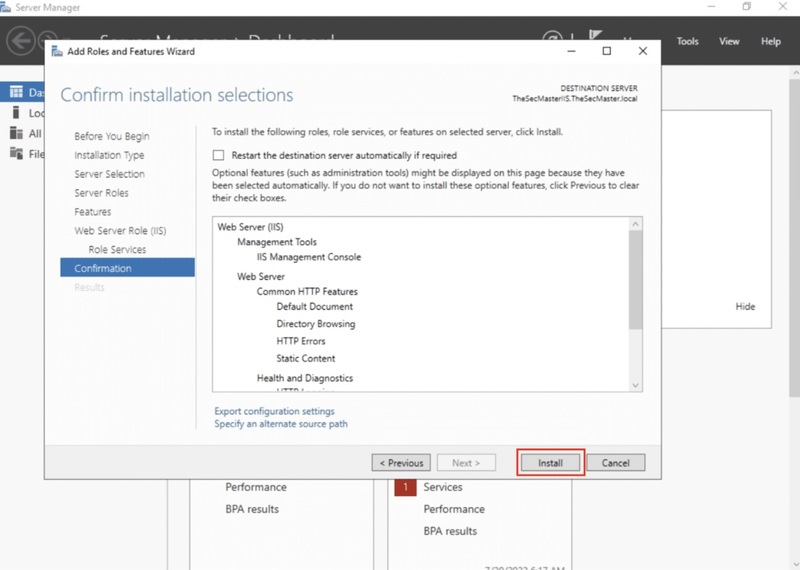
- On the Confirm installation selection, the installation configuration of the ‘’Web server (IIS)’’ role must be confirmed. To do this, confirm the settings and click on the Install button to begin the installation of ‘’Web server (IIS)’’ role.
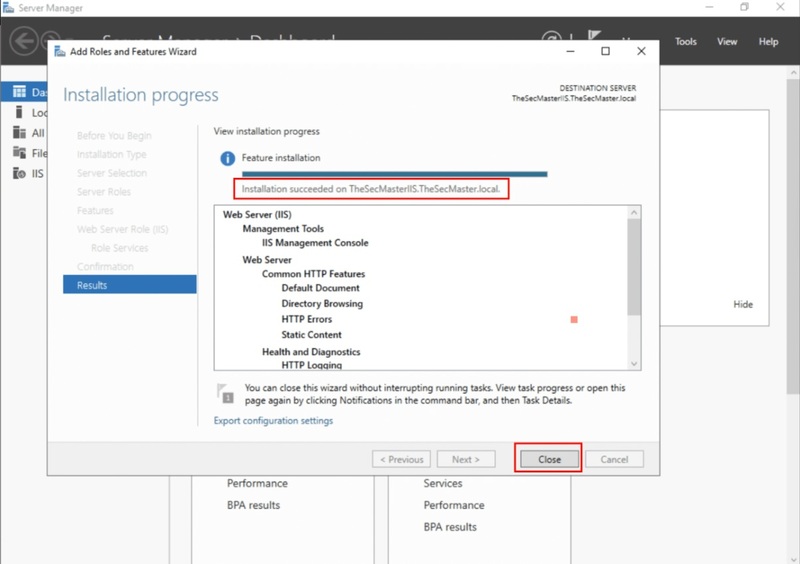
- On the Installation progress, once the configuration wizard is completed click on the Close button.
- It is time to verify the IIS web server is running. To do this, visit the default page of your IIS server to check it out. Open a browser on the server, input the server hostname or IP address in the address box, and press enter to view the default web page.
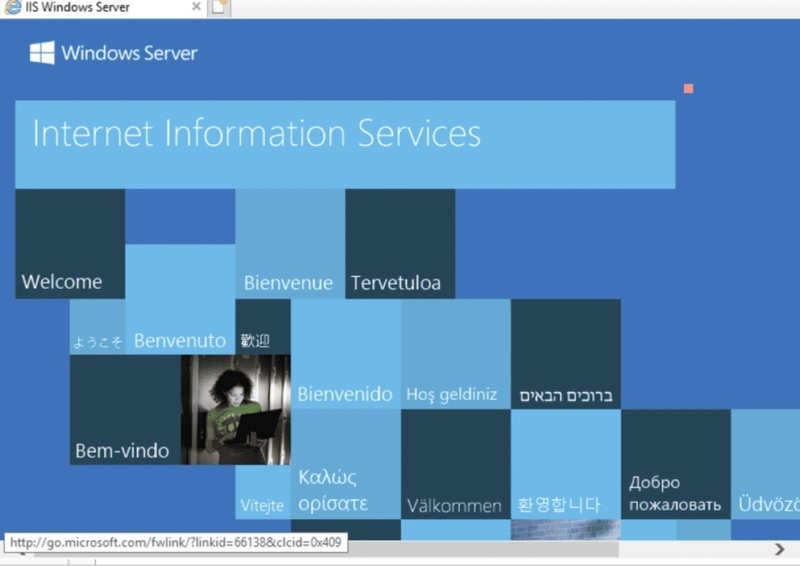
That’s it! You have now installed and configured IIS on Windows Server.
Conclusion
For business owners, the ability to install IIS in Windows efficiently is foundational for hosting reliable and secure web services. IIS’s integration with Windows ecosystems, rich feature set, and support for modern web technologies make it an excellent choice for businesses aiming to establish or enhance their online presence.
By following the steps outlined in this guide, you can confidently Install IIS in Windows and configure it to meet your organizational needs. Remember to prioritize security best practices and ongoing management to ensure that your web services remain secure and performant over time.
FAQ
2. Which Windows versions support the installation of IIS?
IIS is supported on Windows Server editions including 2019, 2022, 2016, 2012, and Windows 10, but not on obsolete versions like Windows XP Home.
3. What are the prerequisites for installing IIS in Windows?
Ensure your Windows version supports IIS, administrative rights are available, and access to Windows features or PowerShell to enable the Web Server role.
4. What benefits does IIS offer for business websites?
IIS provides reliability, integrated security, supports HTTP/HTTPS protocols, and integrates with Microsoft application frameworks like ASP.NET.
5. How can I install IIS using Windows built-in tools?
Install IIS through Server Manager by adding roles and features or via PowerShell commands such as Install-WindowsFeature Web-Server.
6. How do I configure IIS after installation?
Use IIS Manager or PowerShell to configure websites, add features, manage security, and optimize server performance.
7. What security measures are recommended post-installation?
Regularly update IIS and your server, configure security settings, and use firewalls to protect your web server.
8. Can additional features be added to IIS after installation?
Yes, IIS supports extensions like ASP.NET, PHP, and media streaming modules that can be added via Windows features or PowerShell.
9. What common problems can occur during IIS installation?
Issues include missing features, permission errors, or service start failures; verify admin privileges and feature installation to troubleshoot.
10. Is IIS suitable for small business website hosting?
Yes, IIS is user-friendly and cost-effective, easily integrating with Windows environments for small business web hosting needs.