Install MySQL on Windows Server Easily
Install MySQL on Windows Server by downloading the official MySQL Installer. Run the installer, choose your setup type, configure the server, set authentication, and complete installation to enable database management.
🤖AI Overview:
Installing MySQL on Windows Server involves using the MySQL Installer to simplify setup and configuration. You select the installation type, configure server settings including authentication and port, and run MySQL as a Windows service. This process supports efficient database setup for business or development needs.
Prerequisites to Install MySQL
Before you jump into Install MySQL on Windows Server tutorial, ensure your PC meets the following requirements:
- Windows computer system.
- Administrator privileges on Windows server.
- MySQL Installer requires .NET Framework 4.5.2
- Visual C++.
Visual Guide To Setup MySQL on Windows Server
Let’s go through this tutorial and review all the required steps to Install MySQL on Windows Server. As we mentioned, you can use the MySQL Installer to control the process of installing and setting up MySQL on Windows Server.
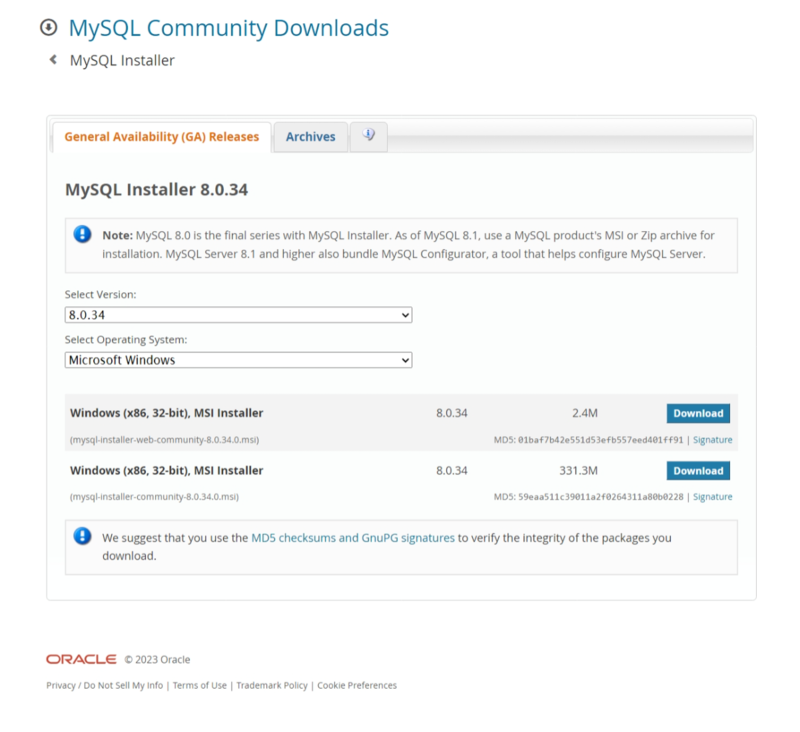
Step 1. Download MySQL Installer
Follow the path below to get started:
- On your Windows server, download the MySQL Installer.
- Choose to download either the Web Community version or the Full MySQL package.
- Web Version: Only the MySQL Installer and configuration files are present in the Web version. Later on, you can modify and add more MySQL products.
- Full MySQL package: Every MySQL Windows product, including the MySQL Server, is included in the Full version.
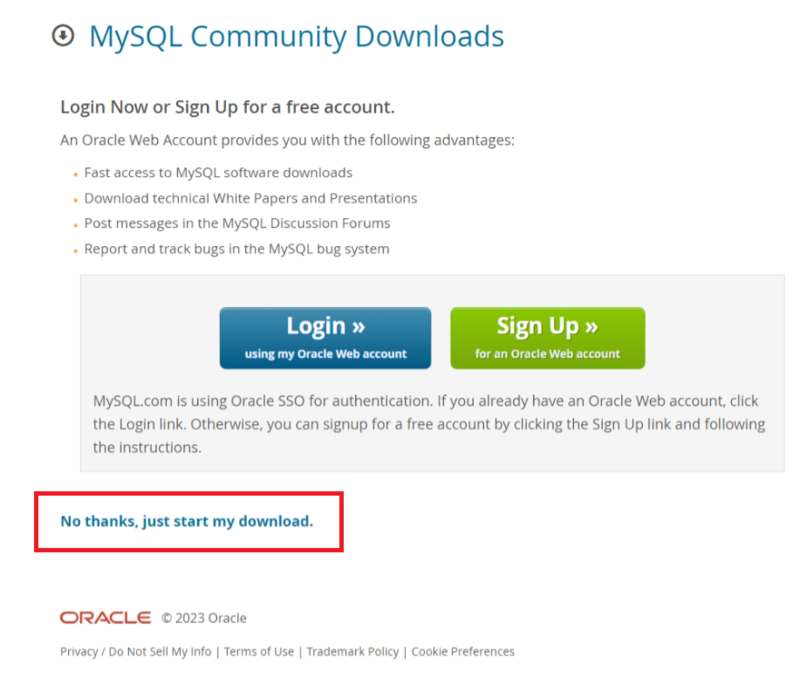
- You have the choice to create a MySQL Community account once you’ve decided on a version. At the bottom of the page, there is an option that says ” No thanks, just start my download “. If you are not interested, select this option to let the download process start.
- You can run the MySQL Installer file from the download folder once the download is finished. Windows may need some time to set up the MySQL Installer and get ready for the installation and configuration process.
Step 2. Set Up MySQL Installer
Once you complete the previous step successfully, you will face a new window with the MySQL Installer setup. To do this, you need to choose the MySQL products to install on the host.
- You have a variety of predefined settings to select from, or you can design your setup type.
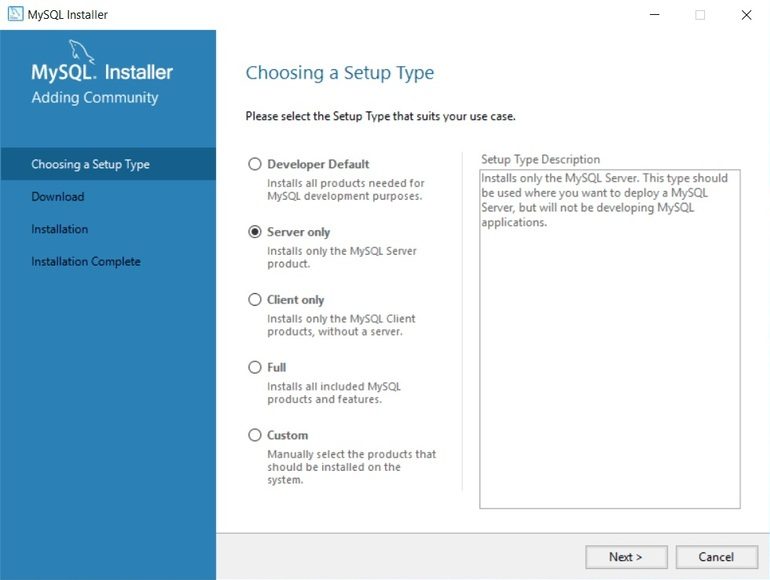
In this guide, we choose ”Server only” mode. Check the differences between the modes you see in the above wizard.
- Developer Default: Installs MySQL Server, Shell, Router, Workbench, MySQL for Visual Studio, MySQL Connectors (for.NET, Python, ODBC, Java, and C++), MySQL Documentation, and MySQL Samples and Examples, among other tools that support application development with MySQL.
- Server only: installs only the MySQL server. The general availability (GA) or development release server that you chose while downloading MySQL Installer is installed using this configuration type. It employs the standard data and installation pathways.
- Client only: It only installs the latest versions of MySQL connectors and apps. This setup type is comparable to Developer Default, with the exception that it excludes the MySQL server and any client applications that are usually provided with it, like MySQL or mysqladmin.
- Full: Installs every MySQL product that is presently available.
- Custom: You can filter and choose certain MySQL items from the MySQL Installer catalog using the custom setup type.
The system now strives to eliminate any potential contradictions. It may notify you that other items, such as the Microsoft Visual C++ 2019 Redistributable Package, must be installed in order for the process to continue. If your Windows Server has previously hosted a MySQL installation, you may also see the path installation discrepancies.
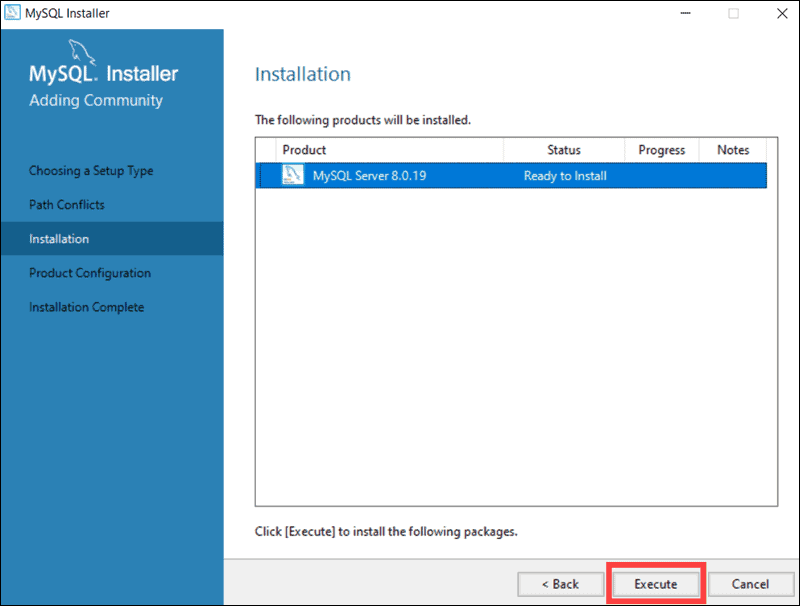
- The MySQL Installer, fortunately, automatically fixes problems and installs the most recent binary-compatible version of any missing software. Now is the time to seriously begin the installation process.
- To start the installation procedure, click Execute. Let’s continue and complete the process to Setup MySQL on Windows.
Step 3. Configure MySQL Server
After finishing the previous steps, you are ready to Configure MySQL Server on Windows:
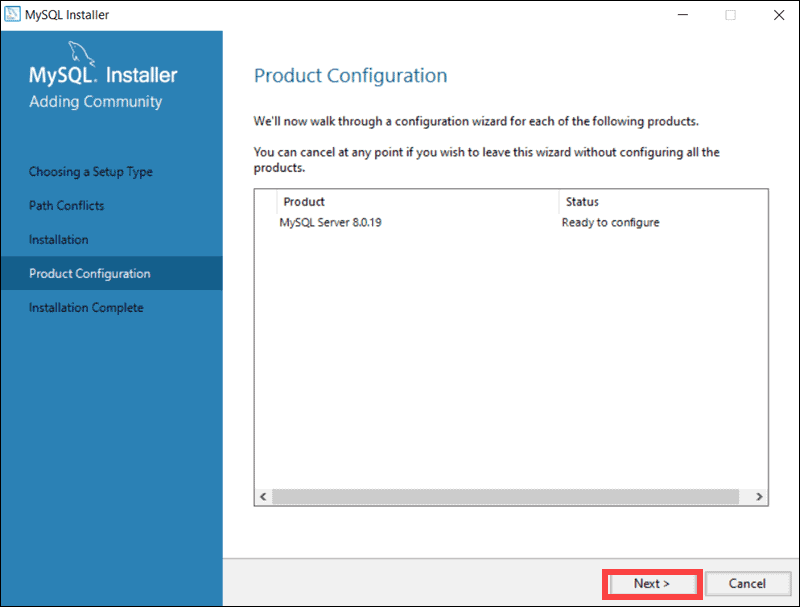
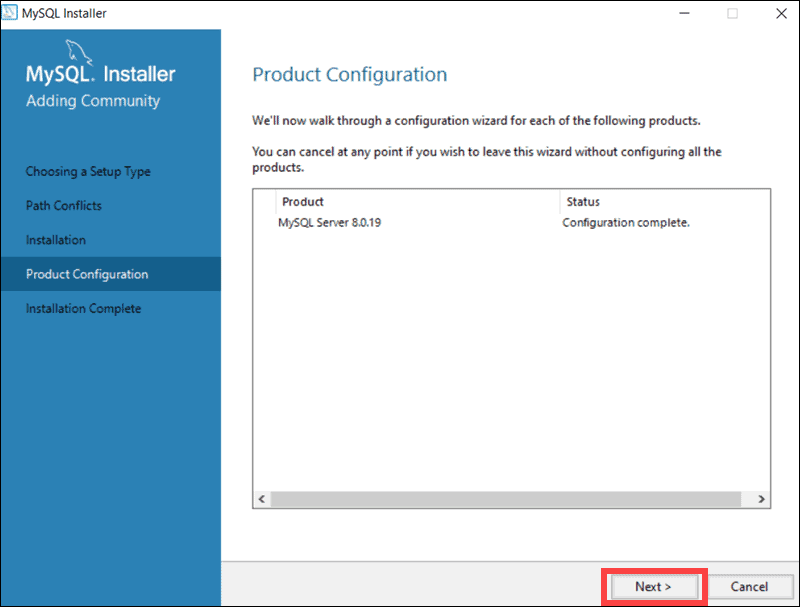
- On the Product Configuration, click Next to let the process begin.
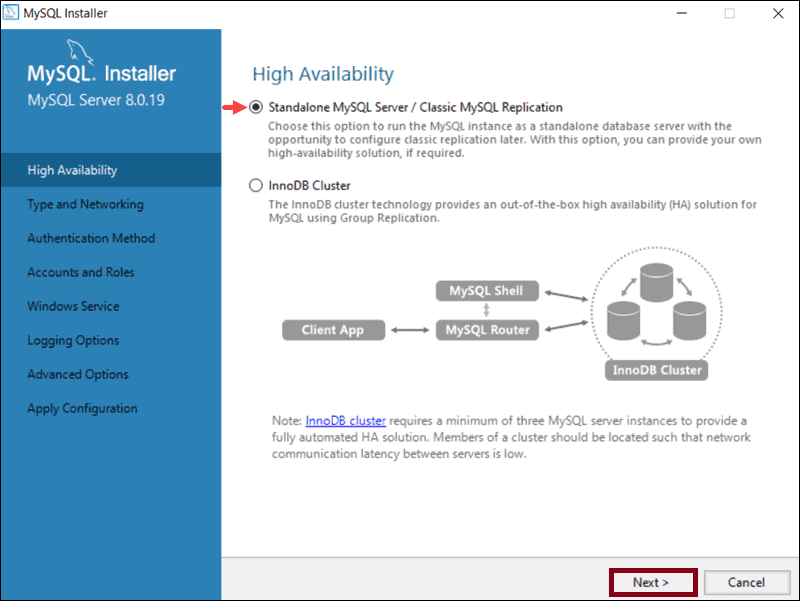
- Let’s see what is High Availability tab. The availability of the database is impacted by the first configuration parameter. To increase availability, you can choose whether to set up a Stand-alone MySQL Server or an InnoDB server cluster.
- In this case, we went with the classic, single-server option.
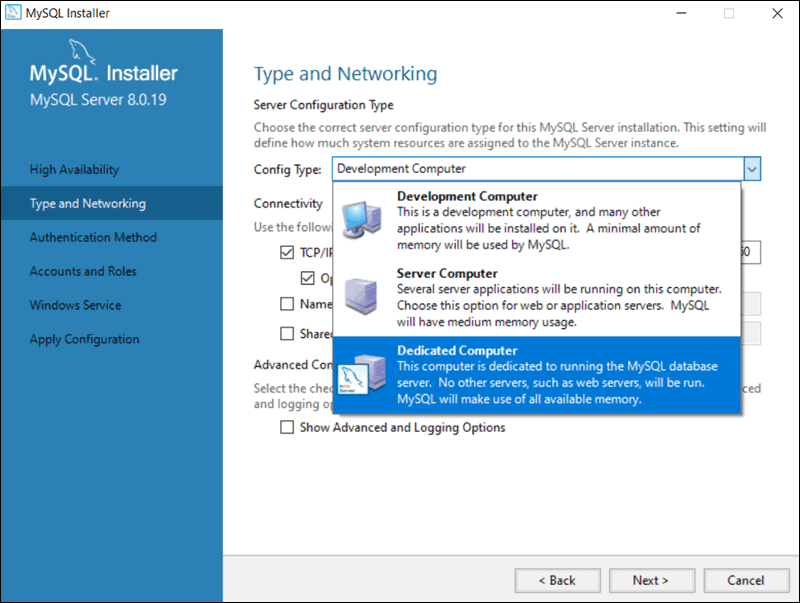
- Several key aspects are defined in the Type and Networking section. You can select one of three server configuration types using the Config Type option. Development Computer, Server Computer, and Dedicated Computer specify whether the server is going to share the underlying machine with other programs or be fully dedicated to executing your MySQL database.
- In this instance, we choose to create a dedicated MySQL server.
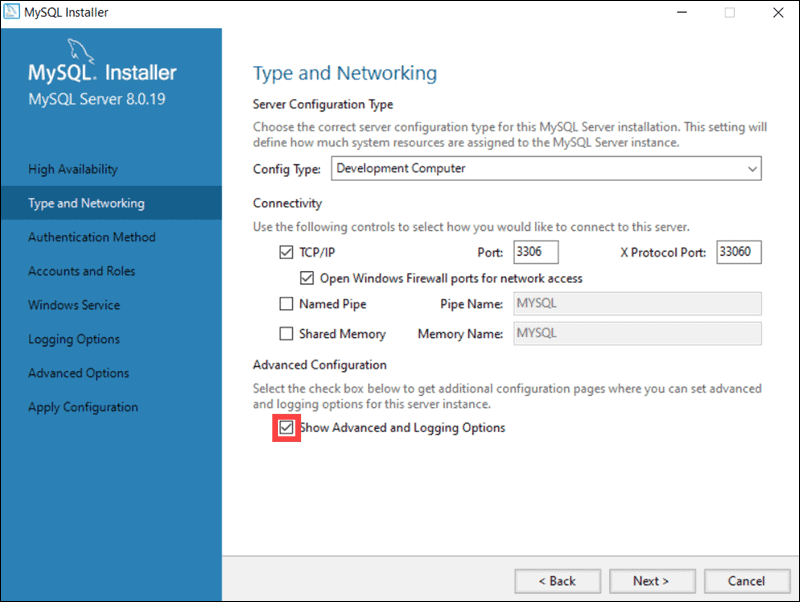
- The port that the MySQL server is listening on can also be specified in the Type and Networking tab. You can modify the port’s default configuration from 3306 to one that better suits your requirements. You can subsequently configure further logging options by selecting the Show Advanced and Logging Option checkbox.
- Once you’ve decided which options best suit your needs, click Next.
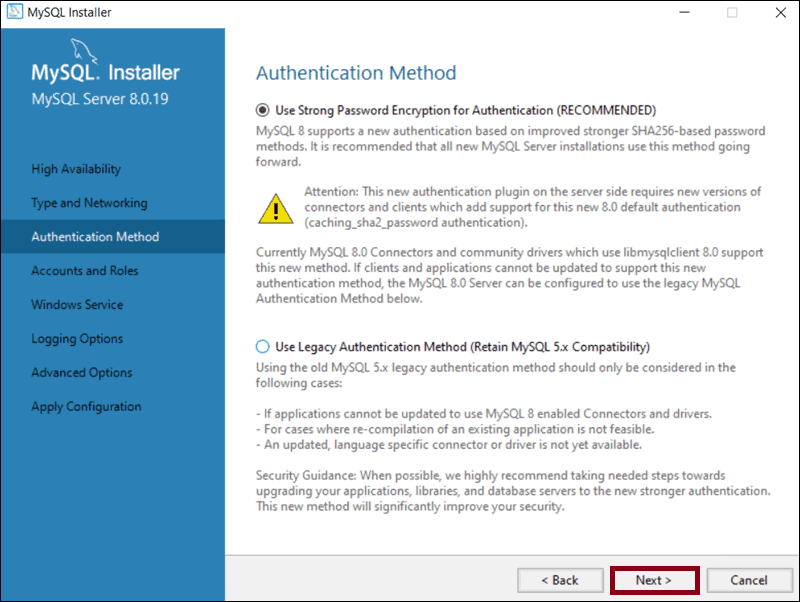
- On the Authentication Method tab, the suggested Strong Password Encryption and the Legacy Authentication Method are the two authentication methods available.
- Choose the option that is advised: Use Strong Password Authentication. However, you will be able to reset MySQL root password on Windows later.
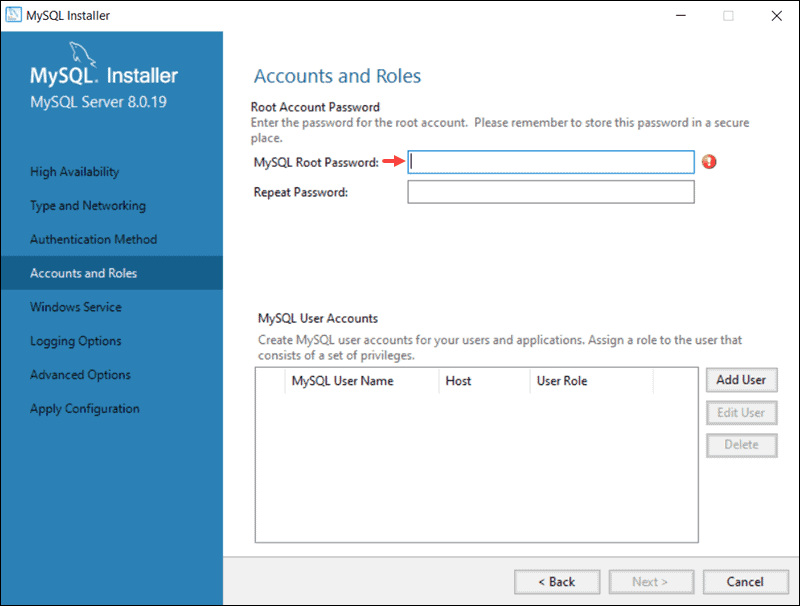
- The password for your MySQL root user is now required on Accounts and Roles. For different users and purposes, you can also establish new roles. Once the installation is finished, credentials can be changed because this is just the initial configuration.
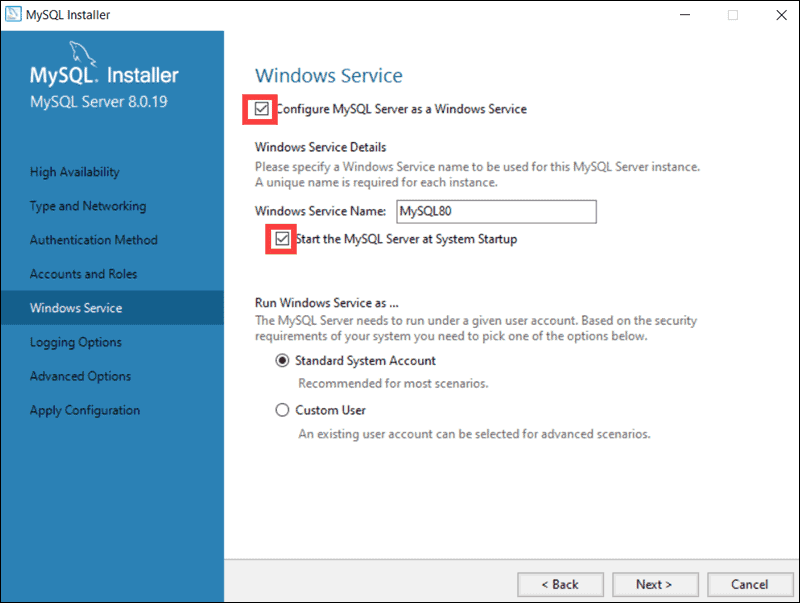
- As a Windows Service, MySQL will start automatically whenever your Windows Server boots. Also, you can configure MySQL, manually to start it as an executable software.
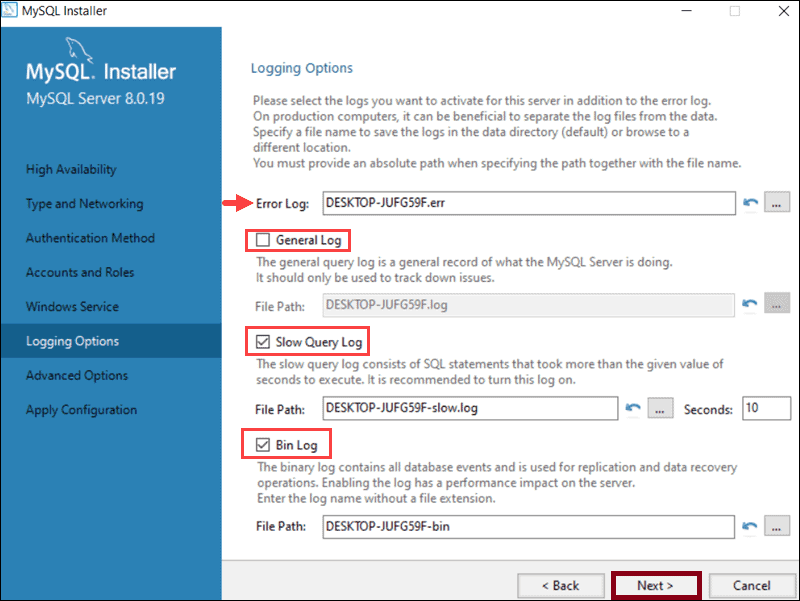
- You can now configure MySQL log options if you have chosen the Show Advanced Logging option on the Type and Networking tab. The logging option allows you to set the log directories and choose the types of logs you want to activate.
- The next tab, Advanced Options is also optional. There, you can set a unique server identifier and the type of case to be used for Table Names. Again, consider that these settings are only available if you have checked the Show Advanced Options box in the Type and Networking tab.
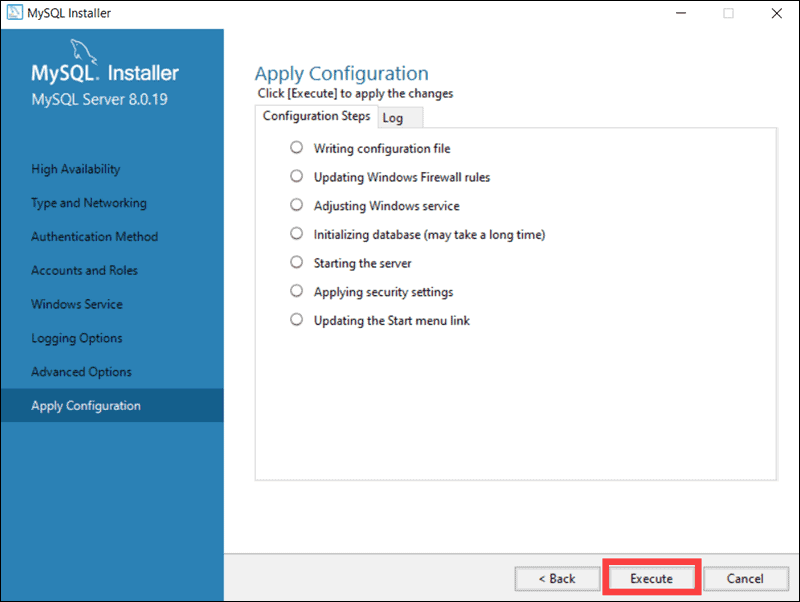
- Now that you have successfully completed MySQL configuration on Windows Server, confirm for the MySQL Installer to apply it. On the screen, a list of the configuration steps is displayed. To make the configuration effective, click Execute.
- Finally, viewing the below wizard means that the configuration process is complete. Click Next to continue the installation process. You are so close to completing Setup MySQL on Windows Server.
- Now, you can Copy Log to Clipboard. Click on it to copy the installation process log to the Windows Clipboard
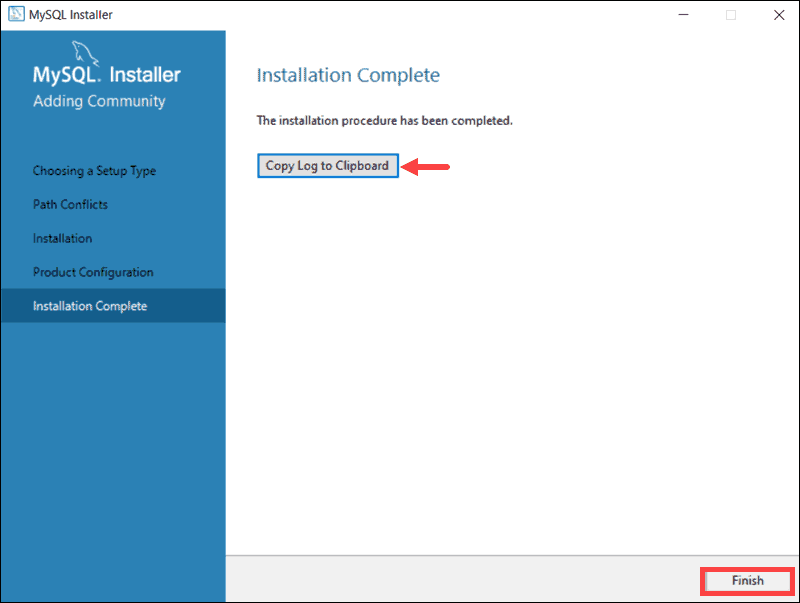
- That’s it! At this point, you just need to click Finish to complete the MySQL server installation on Windows. Setup MySQL on Windows is now finished. Stay with us to start and use MySQL on Windows Server.
How to Use MySQL on Windows Server
On your first try of starting MySQL Server on Windows, run the command below in the Windows Command Prompt.
"C:\Program Files\MySQL\MySQL Server 8.0\bin\mysqld" --consoleAs you can see in the above command, the path is the default installation folder. So, if you have changed it during the installation, use your current folder that you have installed MySQL in it. Otherwise, the mysqld executable file would not launch successfully.
Now that you learned How to Start MySQL on Windows Server, be aware that you can use the following command to Stop MySQL.
"C:\Program Files\MySQL\MySQL Server 8.0\bin\mysqladmin" -u root shutdownThe shutdown command is executed by the mysqladmin utility, completely stopping the MySQL server.
Congratulations! Now you have installed MySQL on your Windows Server and learned how to set it up. The instructions in this guide help users to Install MySQL and set it up on Windows Server 2019. Linux users also need to do the necessary steps to Install MySQL on CentOS.
Conclusion
This guide has elaborated on how to install MySQL on Windows Server, focusing on the essential steps for business owners managing vital data. Using the MySQL Installer streamlines the process by simplifying both installation and configuration, reducing potential errors and complexities.
Throughout the tutorial, attention was given to best practices such as securing the root account with strong authentication, selecting appropriate server types based on business needs, and configuring automatic service startup to ensure consistent availability.
By following these instructions meticulously, you can deploy MySQL reliably within your Windows Server environment, gaining a robust platform for managing your business data effectively.
Installing MySQL on Windows Server is an important foundational step towards building a scalable, secure, and high-performance data infrastructure supporting your business operations.
FAQ
2. How do I download and start the MySQL installation process on Windows?
Download the MySQL Installer from the official MySQL website and run it to begin installation.
3. What installation types are available when I install MySQL on Windows?
Options include Developer Default, Server only, Client only, Full, and Custom setups to fit different needs.
4. How is the MySQL Server configured during installation?
You configure server mode, port, authentication method, user accounts, and Windows Service options during setup.
5. How do I secure MySQL after installation?
Set strong passwords, assign user roles properly, disable remote root access, and consider enabling TLS/SSL.
6. What are the common post-installation commands to manage MySQL on Windows Server?
Use the "mysqld" executable to start and" mysqladmin" with shutdown command to stop the server.
7. Can the MySQL Installer automatically resolve dependency issues during installation?
Yes, it installs missing dependencies like Visual C++ Redistributables automatically.
8. How can I customize the MySQL installation to fit my business needs?
Use the Custom installation mode to select specific MySQL products and tools.
9. Is MySQL suitable for managing business data on Windows Servers?
Yes, it is reliable, scalable, and secure, making it ideal for business data management.
10. Where can I seek help if I encounter problems installing MySQL on Windows Server?
Contact technical support or consult experts experienced with MySQL on Windows Server for assistance.