Install .Net Framework on Windows for Business Owners
Install .Net Framework on Windows by opening Control Panel selecting Programs and Features and enabling the .Net Framework option. This allows business applications to run on Windows systems.
🤖AI Overview:
Install .Net Framework on Windows allows your computer to run applications that rely on Microsoft’s .Net technology. To install, you can use built-in Windows features or download the installer from the official Microsoft website. This process enables compatibility with various software that requires .Net Framework to function correctly. Ensure you meet system requirements before starting the installation.
How to Install .Net Framework on Windows
Installing the .NET Framework on Windows is very simple and straightforward, thanks to the built-in features of both Windows 10 and 11.
To install .NET Framework on Windows 10-64 bit or 11, follow these steps:
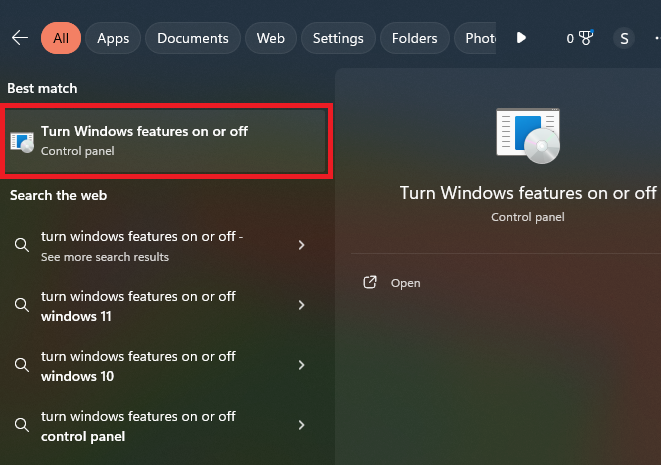
Step 1: Go to the Search section and type this phrase: “Turn Windows features on or off” and select the result as shown in the picture below:
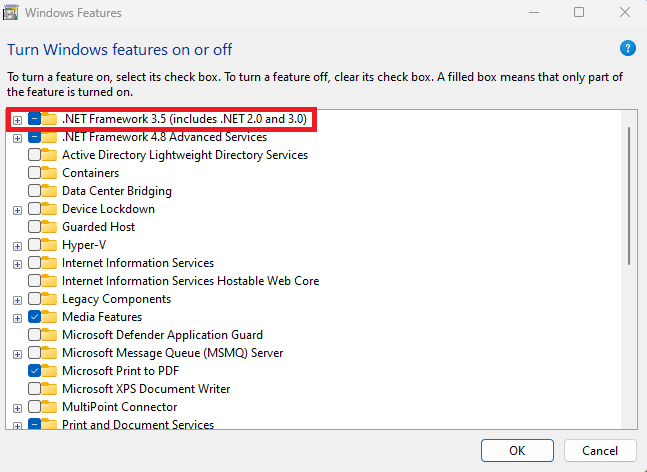
Step 2: In the Windows Features Windows, the first option is “.NET Framework 3.5 (includes .NET 2.0 and 3.0)” which is not checked. check that box and click on the OK button.

Step 3: In the new windows, select the “Let Windows Update download the files for you” option. Wait until the download and installation process is complete. It will take some time.
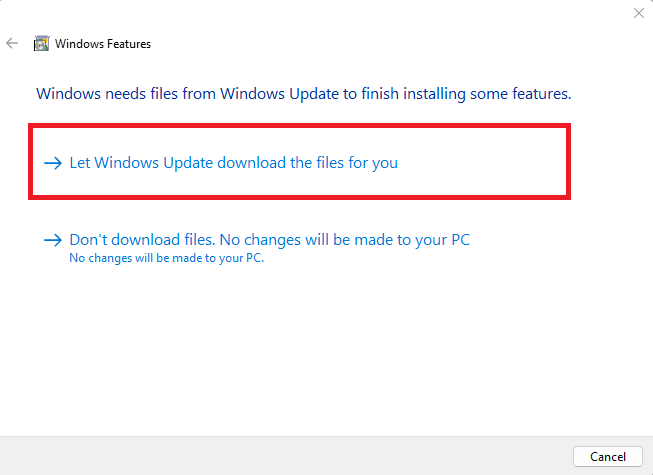
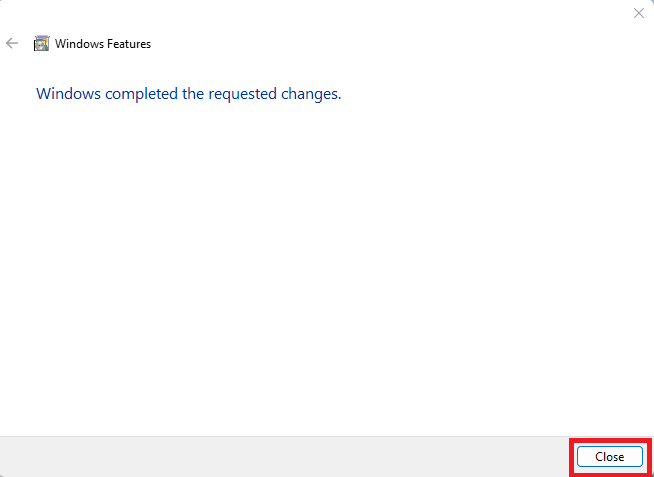
Once the installation is done, close the Window.
Step 4: Now, head over to the Windows Features window. The box behind the “.NET Framework 3.5 (includes .NET 2.0 and 3.0)” option should now be checked.
How to Update .NET Framework on Windows 10
Updating the .NET Framework on Windows 10 and 11 can be done in two ways:
1. If you are using an original version of Windows 10 or 11, updating your Windows will also update the .NET Framework.
2. But if you are using a cracked version of Windows 10 or Windows 11, you have to update it manually:
- Type “Turn Windows Features on or off” in the search bar and select it.
- Select the .NET Framework 3.5 (includes .NET 2.0 and 3.0)
- Click on OK.
- In case the window prompts, select “Let Windows Update download the files for you”.
- Windows will download and install it completely.
How to Repair .NET Framework?
If the .NET Framework has run into troubles on your Windows machine, there are three ways to repair it:
First method: Repair the .NET Framework via .NET Framework Repair Tool
The Microsoft company has developed a .NET Framework repair tool that automatically diagnoses and resolves any issues. You can download it from Microsoft’s official website.
Step one: Download the tool
Step two: Run the downloaded .exe file.
Step three: Follow the on-screen instructions provided by the tool to thoroughly detect and fix the issues.
Second method: Repair the .NET Framework using Command Prompt
To repair the .NET Framework using cmd or PowerShell on Windows 10 and 11, follow the steps below:
Step one: Open cmd as administrator.
Step two: Check the health of your Windows image by running this command:
DISM /Online /Cleanup-Image /CheckHealthStep three: If there are any issues, run this command to solve them:
DISM /Online /Cleanup-Image /RestoreHealthStep four: When the DISM process is complete, run the System File Checker tool:
sfc /scannowThe System File Checker tool will scan and detect issues or corrupted files, if there are any, and solve them.
Third method: Repair the .NET Framework through Windows Features
You can repair the .NET Framework using the Windows Features. All you have to do is to follow the instructions given in this article in the “How to Install .Net Framework on Windows” section. You can have a look at the four steps provided earlier in that section, or to put it simply, you can repair the .NET Framework by going to the Windows Features and checking the box of any .NET Framework version you need to enable and repair it.
How to install .NET Framework on Windows 7?
Similar to the method we learned on how to install .NET Framework on Windows 10 and 11, we can install .NET Framework on Windows 7.
Step 1: Go to the start and search for “Turn Windows features on or off” and select it. This will open the “Windows Features” window.

Step 2: In this window, search for the “Microsoft .NET Framework 3.5.1” and click on the box.
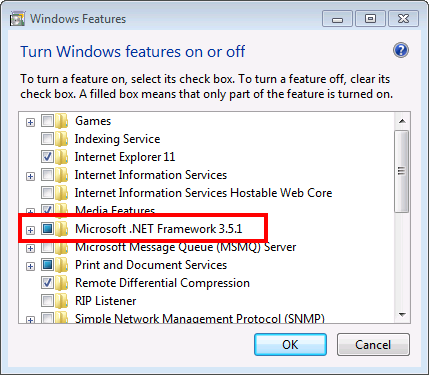
Now click on OK to finish the process.
How to uninstall .NET Framework?
Like repairing the .NET Framework, there are three ways to uninstall it on Windows:
First method: Uninstall .NET Framework through the Control Panel
You can uninstall .NET Framework from Windows 10 or 11 through the Windows Features in the Control Panel.
Step one: Type the “Windows Features” phrase in the search bar and select “Turn Windows Features on or off”.
Step two: In the Windows Features window, the “.NET Framework 3.5 (includes .NET 2.0 and 3.0)” and “.NET Framework 4.8 Advanced Services” are usually the first and second ones on the list. Uncheck the boxes behind each option you want to uninstall or disable.
Step three: Click OK to confirm and restart your computer.
Second method: Uninstall .NET Framework using Command Prompt
This method requires coding knowledge and is a suitable choice for advanced users and a hard one for newbies.
Step one: Open the command prompt or PowerShell as administrator.
Step two: Run the command below to uninstall the .NET Framework:
DISM /Online /Disable-Feature /FeatureName:NetFx3 /RemoveIf you want to uninstall .NET Framework 4.x, run this command:
DISM /Online /Disable-Feature /FeatureName:NetFx4Step three: Restart your computer for the effects to take place.
Third Method: Uninstall .NET Framework using Third-Party Tools
You can use third-party tools to manage installed features and programs, including the .NET Framework. Tools such as “Revo Uninstaller” or “IObit Uninstaller” offer more control over uninstalling software and can often remove stubborn programs that the standard Windows uninstaller cannot handle.
Can you install multiple versions of .NET Framework?
Yes, multiple versions of the .NET Framework can be installed on Windows 10 and 11. Applications require various versions of the .NET Framework, and you can install multiple versions of .NET Framework without any issues.
Does .NET Framework come preinstalled on Windows?
Windows 10 and Windows 11 come with .NET Framework 4.8 preinstalled. Additionally, .NET Framework 3.5 is available as an optional component that you can enable if needed.
How do I install .NET Framework 2.0 on Windows?
.NET Framework 2.0 comes preinstalled on Windows 10, 11, and 8. All you have to do is to enable it in the Windows Features, under the “.NET Framework 3.5 (includes .NET 2.0 and 3.0)” option.
How to install .NET Framework 3.5 (includes .NET 2.0 and 3.0) in Windows 10 offline?
You need the Windows Installation Media to install .NET Framework 3.5 (includes .NET 2.0 and 3.0) in Windows 10 offline if your Windows is licensed.
Step One: Insert the Windows Installation Media. If you don’t have Windows Installation Media DVD, you can download it with another device and create a bootable USB drive or mount it directly
Step two: Open the Command Prompt (cmd) or Powershell as administrator.
Step three: Run the following command to install .NET Framework 3.5 on Windows:
dism /online /enable-feature /featurename:NetFx3 /All /Source:D:\sources\sxs /LimitAccessIf your installation drive’s letter is different than D, replace it in the command with “D” in ” /Source:D:\ “.
Step four: Wait for the installation process to complete. Then, you will see a message indicating the completion of the installation. Now, go to the “Windows Features> Turn Windows Features on or off” and Make sure to check the box behind the “.NET Framework 3.5 (includes .NET 2.0 and 3.0)” option.
How to identify which versions of .NET Framework are installed on your Windows 10 and 11?
You can easily identify the installed versions of the .NET Framework on your Windows 10 and 11. There are four ways to confirm the successful installation of the .NET Framework versions, which are:
First method: Use Command Prompt or PowerShell
-
Command Prompt:
Open Command Prompt and run this code:
reg query "HKLM\SOFTWARE\Microsoft\NET Framework Setup\NDP" /sThe command will display a list of installed .NET Framework versions. You can see the versions in the “Version” entry under the subkeys.
-
PowerShell:
Open PowerShell as administrator and run the following command:
Get-ChildItem "HKLM:\SOFTWARE\Microsoft\NET Framework Setup\NDP" -Recurse | Get-ItemProperty -Name Version -ErrorAction SilentlyContinue | Where-Object { $_.PSChildName -match '^(?!S)\p{L}'} | Select-Object PSChildName, VersionThe output of this command will list the installed .NET Framework versions.
Second method: Use the .NET Framework Setup Verification Tool
To identify the installed versions of the .NET Framework, download the .NET Framework setup verification tool from Microsoft Official Website and run the tool to check the installed versions of .NET Framework.
Third method: Use File Explorer
Open the file explorer and go to the “C:\Windows\Microsoft.NET\Framework”. In this directory, you will see some folders with numbers as their names. These numbers are the versions of the installed .NET Framework.
Fourth method: Use Visual Studio
If you have installed Visual Studio, open it and go to “File > New > Project”, then select a template. Now, check the .NET Framework dropdown list to see which versions of it are installed on your machine.
Conclusion
Installing .Net Framework on Windows is a fundamental task that supports your business software’s functionality and security. Following these clear steps ensures your Windows environment is prepared to run .Net-dependent applications efficiently. Always adhere to best practices, such as using official download sources and verifying your installation, to maintain a reliable and secure business system. If you encounter challenges during installation, consider consulting with a certified Windows expert to minimize downtime and protect your business operations.
FAQ
2. How do I download and install .Net Framework on my Windows server?
You can install .Net Framework on Windows by visiting the official Microsoft website and downloading the installer for the required version. After downloading, run the installer as an administrator and follow the on-screen instructions. For Windows Server environments, you may also use the Server Manager or PowerShell commands to add the .Net Framework feature.
3. Which version of .Net Framework should I install for business applications?
The recommended version of .Net Framework depends on your business application’s compatibility and security requirements. Generally, it is advisable to install the latest supported version to ensure stability and receive security updates. Review your application documentation or consult with your software provider to determine the correct version.
4. Can I install multiple versions of .Net Framework on the same Windows machine?
Yes, you can install multiple versions of .Net Framework on the same Windows system. Most business applications require specific versions, and side-by-side installation is supported by Microsoft. It is important to verify compatibility with existing business software before installation.
5. What troubleshooting steps should I follow if the .Net Framework installation fails?
If installation fails, ensure Windows is fully updated and that you have administrative privileges. Temporarily disable antivirus software and review the installation log files for error messages. Microsoft also provides a .Net Framework Repair Tool to address common installation issues.
6. How do I verify that the .Net Framework is successfully installed on Windows?
You can confirm the installation by accessing the Windows Control Panel, selecting Programs and Features, and viewing the list of installed updates. Alternatively, you may use command-line tools such as PowerShell to check for the presence and version of .Net Framework on your Windows system.
7. Is it possible to install .Net Framework offline on a Windows server?
Yes, you can perform an offline installation by downloading the .Net Framework offline installer from the official Microsoft website. This method is suitable for environments where internet access is restricted or not permitted due to business policies.
8. Does installing .Net Framework require a system restart?
Some installations of .Net Framework may require a system restart, especially if system files are in use or core components are updated. The installer will notify you if a restart is necessary. For business servers, schedule installations during maintenance windows to avoid service disruptions.
9. Are there any security considerations when installing .Net Framework on Windows?
Yes, always download installation files directly from Microsoft to prevent security risks. Ensure that Windows security updates are current before and after installing .Net Framework. Regularly check for updates to the framework to protect business operations from vulnerabilities.
10. How do I uninstall or repair .Net Framework if issues occur after installation?
To uninstall or repair .Net Framework, use the Programs and Features section in Windows Control Panel. Select the installed Framework and choose either Repair or Uninstall. For advanced troubleshooting, Microsoft provides specific repair tools and guidance to resolve persistent problems.