How to Install PIP in Windows: A Step by Step Guide for Business Owners
Install PIP in Windows by downloading get-pip.py and running it with Python. PIP lets you manage and install Python packages from the command line. Business owners can automate software installations and updates efficiently with PIP.
🤖AI Overview:
Install PIP in Windows refers to the process of setting up Python’s package installer on a Windows operating system. The main goal is to enable users to easily manage and install Python packages. To install PIP in Windows, users typically download the installation script and run it with Python. This setup allows for convenient access to a wide range of Python libraries on Windows computers.
Advantages of installing PIP in Windows
- Facilitating and optimizing the installation, updating, removal, and management of Python packages (libraries, frameworks, and tools) from the Python Package Index (PyPI)
- Automatically resolving and installing package dependencies and reducing compatibility problems
- Exact version control of a package to install and maintain project stability
- Create and manage Virtual Environments to create separate development environments to avoid conflicts between packages
- Facilitating distribution by providing the ability to package Python libraries and share code within the Python community
- Facilitating and automating tasks such as continuous integration, setting up development and deployment environments through integration in scripts and automated workflows
- Integration with IDEs (integrated development environments)
PIP installation prerequisite in Windows
In order to be able to install PIP on Windows through the instructions in this article, you must have a Windows system or Windows VPS to equip your Windows system with PIP. Since virtual environments are recommended for installing PIP and benefiting from the best PIP performance, buying a Windows VPS is the ideal option for developing and using PIP features. In addition, since PIP is a package management system for Python, first, you have to install python on windows VPS. You should also be able to access the Command Prompt window with system administrator privileges.
A quick guide to install PIP in Windows
After considering the minimum prerequisites for installing PIP on Windows, you will increase your development productivity and efficiency by following the steps to install PIP on Windows.
1. Check if PIP is installed
Sometimes, when installing Python 2.7.9+ and Python 3.4+, PIP is automatically installed along with Python and is available through the command line. If you have already installed Python in Windows, open the Command Prompt window (press windows key+X > click Run > type cmd.exe) and check if PIP is already installed by entering the following command:
pip --versionOr
pip helpOutput:
‘pip’ is not recognized as an internal or external command, operable program, or batch file.If information about the PIP version is displayed, ensure Python has been installed on your Windows, but if you do not receive output or get a “program could not be found” error, you should install PIP on Windows by following the steps in this article.
2. Download PIP
To install PIP in Windows, you need to download the get-pip.py file, which is a bootstrapping script for installing PIP in Python environments, by running the following command in the Windows command prompt:
curl https://bootstrap.pypa.io/get-pip.py -o get-pip.py3. Install PIP in Windows
After downloading the get-pip.py file, install PIP by running the following command:
python get-pip.py
This command will run the bootstrapping script and install PIP in the Python environment on Windows.
Troubleshooting: One of the common errors during PIP installation in Windows is not finding the get-pip.py file. To solve this problem, check the path of the directory where the file is saved and use thedircommand to check the contents of the current directory.
Note: If you are using an old version of Python on Windows, you must get the correct version of the file from pypa.io. Then, after downloading, save the get-pip.py file in the directory where Python is already installed. Change the current directory path on the command line to the directory path where you just saved the file and run thePython get-pip.pycommand. As a result, you have manually installed PIP in Windows.
4. Verify PIP Installation
After installing PIP in Windows, run the following commands to confirm that PIP is installed correctly:
pip --versionOr
pip helpIf you get information about the PIP version or a list of PIP-related commands and the software package’s location, ensure that PIP has been installed successfully.
5. Configure Windows to use pip
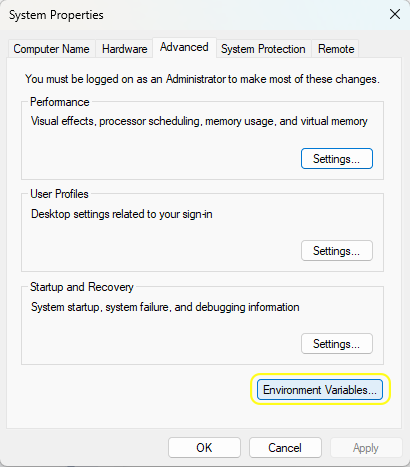
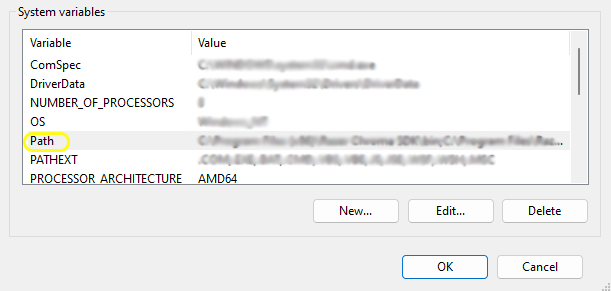
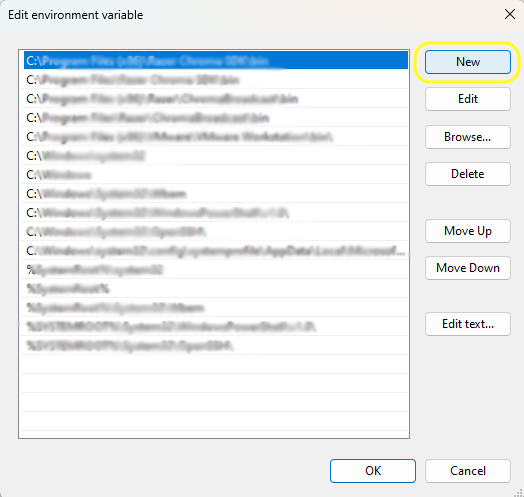
To use PIP in Windows without getting the “not on PATH” error, you must add PIP to the Windows environment variables. For this purpose, follow the steps below:
- Open the Control Plane and select “System and Security” from the window’s left pane.
- Select System settings > Advanced system settings.
- Click the Environment Variables and double-click the “Path” variable Under “System Variables.”


- Click “New,” add the directory that contains PIP (e.g., C: Python34Scripts), and click “OK.”

Note: The %HOME%\pip\pip.ini file is the PIP configuration file in Windows, and you can set a different path for the PIP configuration file using the PIP_CONFIG_FILE environment variable.
6. Upgrade Python pip on Windows for security purposes
Using the latest version of PIP brings advantages such as improved performance and security features, etc., that’s why we recommend upgrading PIP to the newest version:
python -m pip install --upgrade pipBy running the previous command, the old version of PIP will be uninstalled in Windows, and PIP will be upgraded to the latest version.
If the performance of the new version of PIP in your Windows system is disturbed and your system is not compatible with the latest version, you can downgrade PIP to the previous version or a specific version:
python -m pip install pip==version_numberConclusion
By following these structured steps to Install PIP in Windows, business owners gain reliable control over Python package management in their organizations. Each step addresses security, compatibility, and optimal performance. Adhering to these best practices reduces risks and supports scalable business processes. For further technical guidance or enterprise solutions, consider consulting with experts who specialize in Windows system environments and Python automation.
FAQ
2. How do I install PIP on my Windows system?
To install PIP in Windows, first ensure Python is installed. Download the official Python installer from the Python website and select the option to add Python to PATH. During installation, check the option to install PIP. After installation, you can confirm PIP is available by running "pip --version" in the command prompt.
3. What are the system requirements for installing PIP in Windows?
To install PIP in Windows, your system must have Windows 7 or later and the appropriate version of Python installed. Most modern business workstations meet these requirements without additional configuration.
4. How can I verify if PIP has been installed correctly on Windows?
After installing Python with PIP, open the command prompt and type "pip --version". If the installation was successful, you will see the PIP version information displayed. This confirms that PIP is ready for use on your Windows system.
5. Can I use PIP on Windows if multiple versions of Python are installed?
Yes, PIP can manage packages for different Python versions in Windows. You can use specific commands like "python3 -m pip" to ensure you are installing packages to the correct Python version.
6. What should I do if PIP is not recognized in the command prompt on Windows?
If Windows does not recognize the PIP command, ensure Python and PIP are included in your system PATH. You can adjust the PATH in the Environment Variables section of your system settings or reinstall Python and select the options to add both Python and PIP to PATH during installation.
7. How can I upgrade PIP to the latest version in Windows?
To upgrade PIP on Windows, open the command prompt and run "python -m pip install --upgrade pip". This command retrieves the latest version and updates your installation automatically, ensuring you have the most secure and feature-rich version available.
8. Is it safe to install PIP and Python packages on business computers?
Yes, installing PIP and official Python packages from trusted sources is considered secure for business environments. Regularly update PIP and review package sources to maintain system security and compliance.
9. Can I automate PIP installations for multiple business workstations running Windows?
Yes, business owners and IT teams can script and automate PIP installations using Windows batch files or PowerShell scripts. This approach increases efficiency and consistency across your organization.
10. Where can I find support if I encounter issues when installing PIP in Windows?
For technical support, consult the official Python documentation or seek assistance from reputable technology forums. If you are an OperaVPS client, our expert team is available to provide direct support and troubleshooting for all your PIP installation needs in a Windows environment.
Python has become an essential tool for developers due to its simplicity, versatility, and wide range of applications in areas like web development, machine learning, and automation.
Dear Bisnis, thanks for your observation. Python's adaptability across fields like data science, automation, and web development is a major reason it's preferred by developers and supported by tools like pip.