How to Install and Use Screen in Linux
Linux VPS is mostly managed through the terminal environment. All Linux VPS administrators are looking for solutions for better productivity and efficiency. Installing and using Screen in Linux has recently become common among Linux VPS developers and Sysadmin.
Screen in Linux is a tool that allows the creation of several virtual shell environments in a current shell. That is, you can perform different tasks by creating several separate terminal instances in one terminal at the same time while interrupting a work session does not affect the performance of other sessions and terminal instances.
This tool plays an important role in improving the management of Linux VPS. If you are interested in knowing more about Screen in Linux, then we will introduce you to what Screen is and how it works, and we will even teach you how to install and use Screen in Linux. Therefore, reading this article can make you benefit from the Screen tool. Follow us to the end of the article.
Linux Screen definition
Linux Screen is a Linux terminal tool that converts the terminal environment into a multiplex environment to improve the management of Linux VPS by dividing a terminal environment into multiple virtual sessions and making it possible to run several different tasks and processes at the same time. Since the GNU project is the developer of the screen, it is known as GNU Screen in the market.
The screen allows the Linux server manager to run multiple virtual terminals (multiple windows) in one session, and when each session is terminated, other work sessions are not affected. Therefore, by using Screen, you can benefit from more advanced facilities in the terminal environment and simultaneously run, stop and save different work sessions without interfering with each other’s performance. One of the great advantages of Screen for Linux server administrators is that it provides the possibility to save changes in sessions and at any time you can continue from where you left off the last time.
Now that you are fully familiar with ScreenLinux, it’s time to use this wonderful Linux feature to perform tasks and improve your performance.
Prerequisite for installing and using Screen in Linux
- Linux VPS running any Linux distribution
- Accessing Linux VPS with Sudo privileges and via SSH
- Entering the terminal by pressing the Ctrl+Alt+t/Ctrl+Alt+F2 buttons
Installing and using Screen in Linux
As you know, Linux has a large family and some Linux distributions may have benefited from the Screen utility by default; For this reason, it is better to first make sure that the Linux operating system you are running supports the Screen tool by default or not.
Step 1: Accessing the Linux VPS
Therefore, you must first connect to the Linux server through the SSH command and enter the command line environment:
ssh your-user@serverStep 2: Checking if Screen is pre-installed on the Linux operating system
Then check if the Screen package is already installed in the Linux operating system by running the following command in the command line:
screen –versionOutput
Screen version 4.08.00 (GNU) 06- Feb-18The above output is for the condition that in a Linux distribution, the Screen tool is pre-installed because in the output you can see the version of the current Screen package in the Linux operating system. But if you don’t get an output similar to the output above, that means your Linux operating system does not have the Screen feature, so you need to install it on your operating system. Installing the Screen tool on Linux operating systems is not complicated, we will continue to teach you, don’t worry.
Step 3: Installing the screen on different Linux operating systems
The instructions for installing the Screen tool may not be the same on all different Linux operating systems, in this tutorial we will explain the installation of Screen on common and popular Linux operating systems.
-
Installing Screen on Debian, Ubuntu, Linux Mint, and their derivatives
By running the following command, you can use Screen on major Linux operating systems such as Ubuntu, Debian, Linux Mint, and other distributions that are based on these Linux operating systems(We have already introduced you to these widely used Linux operating systems):
sudo apt install screen-
Installing Screen on CentOS, Alma Linux, Rocky Linux, Fedora
To install and use Screen on RedHat derivatives, CentOS, Alma Linux, Fedora, and Rocky Linux (To learn more about popular Linux operating systems, you can read our articles in the Knowledge section of the Opera VPS website), run the following command:
sudo yum install screen-
Installing Screen on Manjaro
Run the following command to install Screen on Manjaro:
sudo pacman -Sy screen-
Installing Screen on Gentoo
You can install Screen on Gentoo by typing the following command:
sudo emerge -a sys-apps/screen-
Installing Screen on Arch Linux
Using the following command, you can install Screen on the Arch Linux operating system; Arch Linux is one of the wonderful Linux operating systems that we have already introduced you to its wonderful world:
sudo pacman -S screen-
Installing Screen on OpenSUSE
If you want to install Screen on OpenSUSE, enter the following command:
sudo zypper install screen-
Installing a screen in Linux without Sudo permission
If your user account does not have sudo privileges, you must have root privileges to install Screen on a Linux operating system:
yum install screenBy executing the commands that we have taught, you can easily use the wonderful features of Screen in popular and practical Linux operating systems and install Screen on your Linux operating system.
Running Screen in Linux
So far in the article, you have successfully installed the Screen package on your Linux operating system, now it’s time to use the screen features for better performance and run Screen and start a screen session. To launch Screen, you must enter the following command in the command line:
ScreenIn the output of the command that it receives for the initial setup of the screen, there is a licensing agreement that you must press the Space button to continue the steps.
On the new screen, you are asked to press the Space button again to create a new screen session.
As a result, you enter an environment that is similar to the Linux terminal environment.
UsingCtrl + a along with other keys which are the most common Screen keystrokes, you can manage Screen shells.
Enter the following command to access a list of Screen commands and shortcuts:
Ctrl+a ?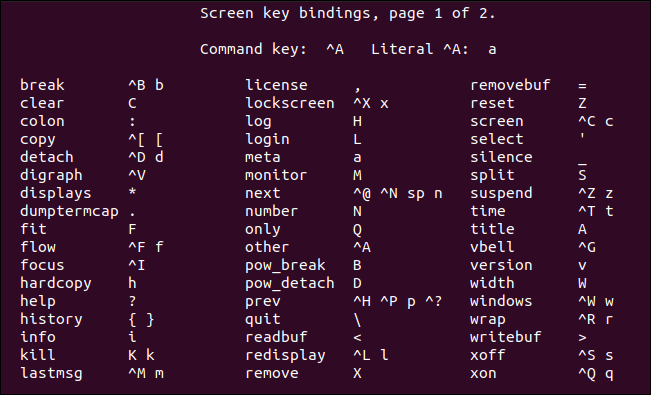
This command guides you on how to use Screen. In addition to the above command, the following command can also be used as a guide:
screen-helpThe output of this command also provides shortcut keys and special parameters for different purposes using Screen. To exit the help page, press Enter or Spacebar.
How to manage sessions in Screen Linux
By starting a session in Screen, you can choose between two windows, one that may cover several windows. The Screen environment is the same as the terminal environment where you can use certain commands and parameters for different purposes.
We have compiled a list of common Screen commands and shortcuts in this section so that you can use them to get better performance from Screen and better manage Screen windows in Linux.
- Ctrl+a c: Creates a new window with Shell.
- Ctrl+a“: providing a list of all running windows.
- Ctrl+a 0: Select window number 0. (select window numbered by number)
- Ctrl+a A: Specifies a new name for the window.
- Ctrl+a S: horizontal division of the running window into two areas. (the current window is placed on top)
- Ctrl+a l: vertical division of the running window into two areas.(the current window is placed on the left side)
- Ctrl+a tab: Changes focus from input target to other parts of the screen.
- Ctrl+a Ctrl+a: to move between the running window and the window you opened earlier.
- Ctrl + a n: Switches to the next window.
- Ctrl + a p: Switches to the previous window.
- Ctrl + a Q: exits from all windows except the running window.
- Ctrl + a X: Locks the current window.
- Ctrl + a M: monitors a specific window for output.
- Ctrl + a H: creating a log of the session.
Note: The uppercase and lowercase letters of the shortcut keys are important during the execution of the commands. Also, remember that these commands are executed in Screen to multiplex the terminal and their main syntax is in the following format:
Ctrl+* *Naming sessions
the naming of sessions on screen plays an effective role in improving the management, identification, and tracking of sessions. Therefore, define a descriptive name for each running session in Screen.
To create and name the session in Screen, the main command is in the following format:
screen -S session_nameNote: It is better to use descriptive attributes to name sessions so that they are easier to identify.
Detaching and Resuming Linux Screen
Another feature of Screen is to Detaching windows and leave them in the background so that server administrators can easily access the desired window. Use the following key to Detach from the screen and exit the screen session:
Ctrl+a dBy executing the above command, even though the program is running, the screen session is exited on the screen and the desired process is left from the interface. In other words, a window is minimized in the graphical operating system.
To resume a screen session or rejoin a screen session, enter the following parameter:
screen -rIf you use multiple screen instances, you must also access the session ID to specify the session you want to reconnect to by the session ID. To enter the desired current session ID, you can access a list of running screen sessions and detached screen sessions using the following command:
screen -lsOutput
There are screens on:

2898.upgrade        (06.03.2022.  17:28:20)  (Attached)

2750.pts-0. Opera   (06.03.2022.  17:27:10)  (Attached)
By executing the above command, you can retrieve the session ID and version in a list and rejoin the desired session.
For example, to restore the screen session, 2898. upgrade, enter the following command:
screen -r 2898.upgrade Screen customization
Like other software in Linux, Screen uses a configuration file. The /etc/screenrc directory in Linux contains the system-wide configuration file. The ~/.screenrc directory contains the user configuration file.
To edit, you need to read the file. So enter the following command:
sudo nano /etc/screenrcIn the output, you can change the settings by removing the (#) sign from the beginning of the lines.
By running the following command, you can change the default screen according to your needs:
. screenrc file.Locking and setting passwords to the screen
To lock the screen, use the following parameter:
Ctrl + a xBy default, you need to enter the Linux password to unlock the screen.
To improve session security, you can set a password for each screen session and enter a specific password each time you connect to the session. Use the following command to create a password-protected screen:
password your_passwordTo connect to the session for which you have set a password, you must enter your Screen password in addition to the Linux password.
Checking the manual page
In addition to the help command, the following command will guide you more on how to use Screen:
man screenFAQ
How to find out that Screen is installed on our Linux operating system?
By running the following command:
screen-versionCheck if Screen is installed on your Linux operating system. If the version of the Screen package is displayed in the output, make sure to install Screen on your operating system. Also by pressing Ctrl+a and then Ctrl+t, you can Check if you are in the Screen session. The display of the hostname and time indicates that you are in the screen session.
Conclusion
Screen in Linux provides useful functionality in managing projects; through special keys and Screen commands, you can customize the Screen terminal environment. also you can Run multiple Screen windows in one window and easily switch between sessions and start and save and resume multiple sessions without affecting each other.
In this article, we taught how to install Screen in various popular Linux operating systems and provide practical information on how to use Screen for various purposes.
We hope that with the training that we provided, you will be able to master how to use the screen. If you encounter any questions or problems in any part of our training, please let us know in the comments section so that we can respond.
Thank you for reading our article.