Install SSL Certificate on Windows Server
Install SSL Certificate on Windows Server secures data by encrypting connections between the server and users. It involves generating a certificate signing request, obtaining a certificate from a trusted authority, installing it via IIS Manager, and binding it to your website for secure HTTPS access.
🤖AI Overview:
Install SSL Certificate on Windows Server to secure data by encrypting the connection between the web server and users. This process protects sensitive information and enhances website credibility by displaying HTTPS and a lock symbol. Installing SSL on Windows Server involves generating a certificate request, installing the certificate, binding it to the website, and confirming the setup for secure online communication.
Is it necessary to install an SSL certificate?
By encrypting the connection between the user’s browser and the web server, the SSL certificate guarantees the security of the data and the validity of the online presence. Therefore, the main reason why Windows server users equip their Windows servers with an SSL certificate is to protect privacy and important data such as credit card numbers, confidential data, personal information, and login credentials. On the other hand, an SSL certificate gives credibility to websites and gives users confidence that the connection is secure by displaying the lock symbol and “https://” prefix in the website URL.
Since gaining credibility and trust is important for online businesses and services, installing an SSL certificate for online service websites creates a valuable advantage.
In addition to giving credibility to the website, you should also pay attention to SEO factors to increase the number of visits to your business website and gain your brand’s reputation. Like users, Google considers websites with SSL certificates to be more reliable and considers the presence of HTTPS in the website URL as one of the critical factors for ranking. Therefore, having an SSL certificate improves your website’s visibility in search engine results.
The main advantage that an SSL certificate creates is the improvement of security. The Internet carries risks such as the possibility of Data Interception by malicious agents, man-in-the-middle (MITM) attacks to intercept the communication between the web server and the user’s browser, etc., which SSL certificate prevents these dangers by improving security and implementing security measures. SSL certificate increases the security of login pages and authentication processes and minimizes the risk of password and account credit theft. On the other hand, online stores and e-commerce websites that have an SSL certificate are more reliable for users and make users sure that they have protected financial transactions.
As a result, using an SSL certificate is an essential step to secure data, protect privacy, and gain trust among your website visitors and the credibility of your online presence.
Prerequisite for installing SSL certificate on Windows Server
- Windows VPS
- Receiving a valid SSL certificate from a trusted Certificate Authority (CA)
- Downloading and accessing the SSL certificate file (.crt or .pem) to identify the issuing CA by the devices connected to your server
- Accessing to the private key file (.key file). Especially if you have generated the CSR by free generating tools, access to the private key on the server is necessary.
Instructions for installing an SSL on Windows Server
Considering the prerequisites for installing an SSL certificate on Windows Server, you are now ready to follow the steps to install an SSL certificate on Windows Server and use the benefits of SSL certificates. After you have received the SSL certificate from the CA via email or your Account Dashboard, follow the steps below to install the SSL certificate on Windows Server:
1. Generate a Certificate Signing Request (CSR)
This step is for users who have not created a CSR before. Errors during SSL certificate installation, such as “Cannot find the certificate request associated with this certificate file” or “A certificate request must be completed on the computer where it was created,” indicate the necessity of generating a CSR. The Internet Information Services (IIS) Manager makes it easy to generate a CSR. Here are the measures to take:
- Access the Windows server through a remote desktop.
- Go to the Start > Control Panel > Administrative Tools > launch Internet Information Services (IIS) Manager
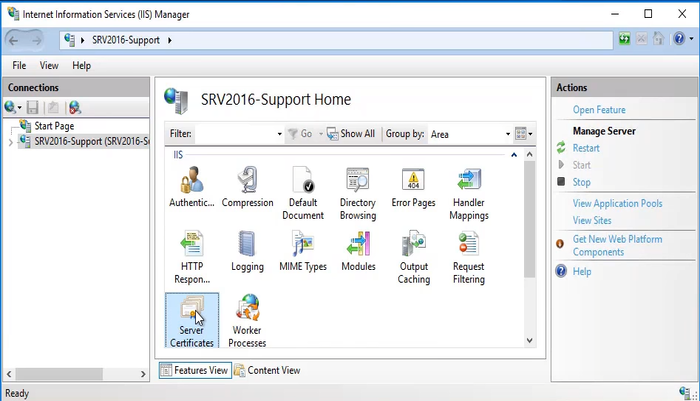
- From the Connections panel, click on the “server node” option.
- Open “Server Certificates” in the Center panel by double-clicking.
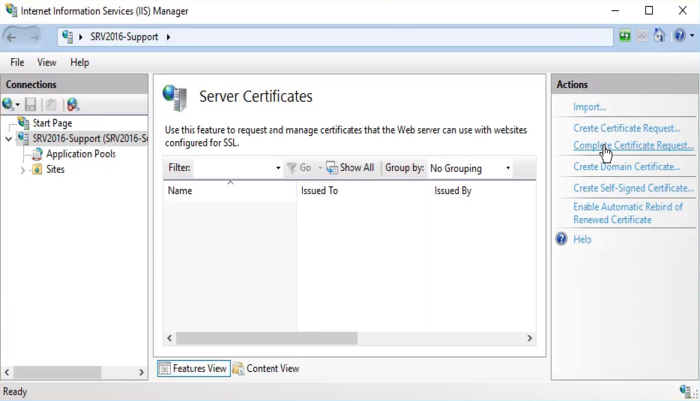
- Select “Create Certificate Request” on the right side of the Actions panel.
- Just fill in the blanks with correct information as directed by the wizard..
- Finally, save the CSR in a file.
2. Installing SSL Certificate on Windows server
To set up your SSL certificate, please proceed as described below:
- Connect to a Windows server.
- Go to the Start > Control Panel > Administrative Tools > open IIS Manager
- In the Connections menu on the left pane, select the server name on which you intend to install the SSL certificate. If you expand the Server name menu and the Site folder, you will enter the management panel of your website. By clicking on SSL settings, you will not see any changes in its settings because SSL certificates are not yet available on your website.
- Return to the main server and select “Server Certificates” in the center menu.
- In the “Server Certificates” section of the “Actions” menu on the right side of the page, click on the “Complete Certificate Request” option.
- In the Complete Certificate Request wizard, click “…” to select the Server Certificate file you have already saved.
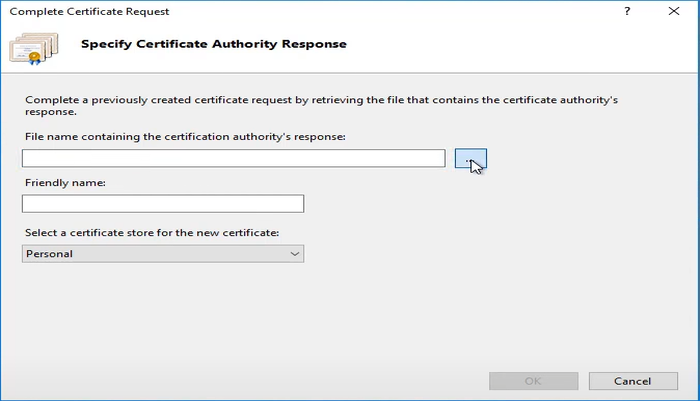

- To identify your file, select a Friendly name for the certificate. (You can choose the certificate’s CA name and expiration date.)
- Click “OK” to install the certificate.
3. Bind the Certificate to a Website
After installing the SSL certificate and naming it, when you go back to the HTTP site and go to SSL settings, you still don’t see any changes in the settings, and you may be wondering why no changes have been made and the certificate has not been added to your website. This is because you need to change the binding for this website because this website is currently binded to HTTP port 80, so we need to assign or bind the SSL certificate to the website. For this purpose, follow the steps below:
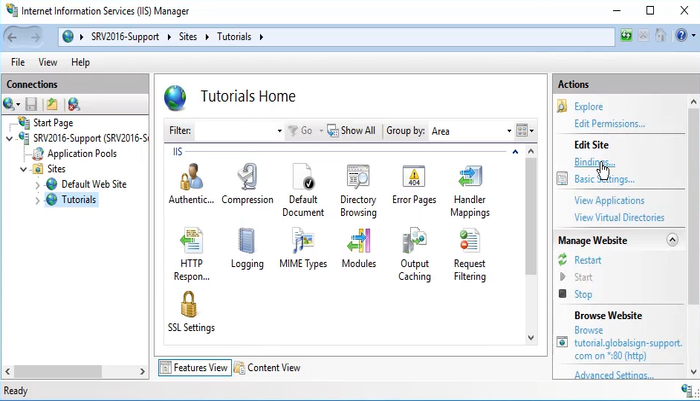
- Expand the server name in the “Connections” menu, and then expand the sites folder and select the site you want to secure with SSL.
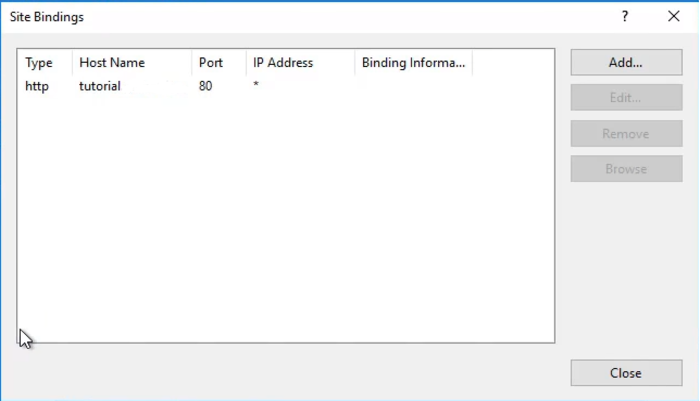
- Select “Bindings” in the Actions menu on the right panel.
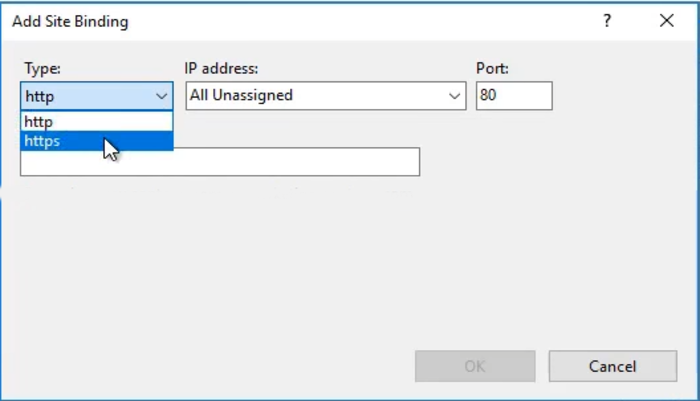
- In Site Bindings, click the “Add” button to add a new binding. (If you have already created a site binding, click on edit and add SSL.)
- In the Add Site Bindings window, select the type “https” and the SSL certificate you installed. If necessary, configure the IP address and port. If you have multiple IP addresses, choose the appropriate IP address and enter port 443 for the port section. Of course, if another port is set to listen to SSL traffic, you must enter the corresponding port.
- Click OK to save the binding.
4. Confirm SSL Installation
Launch your favorite web browser and search for your website’s URL using https:// (e.g. https://yourdomain.tld) to test and verify your SSL installation. If you do not receive a warning in the browser and can access your site’s information, it means that the SSL certificate is working correctly.
Note: If you get a warning, you need to restart the server before checking for the changes to take effect.
You should feel proud of yourself because you completed the installation of an SSL Certificate on Windows Server.
We recommend that you extend the expiration date of the SSL certificate before the SSL certificate expires or request an automatic renewal from the CA. To avoid problems, make a backup copy of the SSL certificate and private key. Also, to improve security, update Windows Server and SSL libraries regularly.
What to do if the certificate is not installed successfully?
If you are unable to install and configure the SSL certificate successfully, you can follow the steps to install the certificate manually:
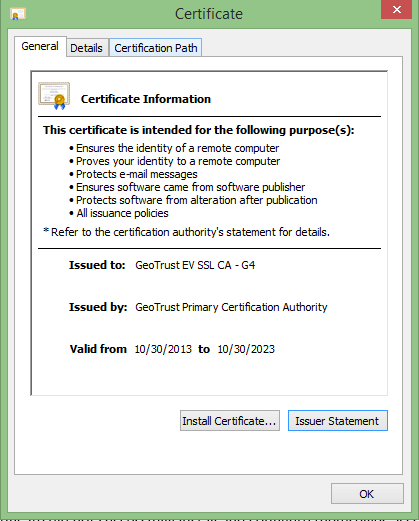
- Open the previous certificate that you saved on the desktop by double-clicking on it.
- In the Certificate window, click on “Install Certificate” in the “General” tab and then hit the “Next” option.
- Select “Place all certificates in the following store” in the Certificate Import wizard and click “Browse.”

- Make sure “show physical stores” is selected.
- Open the Intermediate Certification Authorities folder.
- Select “Local Computer” and click OK.
- Restart the Windows server.
Conclusion
To install SSL certificate on Windows Server effectively, business owners must follow a structured approach: generate a CSR, procure a valid SSL certificate from a trusted CA, install the certificate on the server, and bind it to the appropriate website in IIS.
Successfully implementing SSL enhances website security, protects sensitive user information, and builds customer trust. Moreover, SSL certificates contribute to improved search engine rankings, which are critical to growing online visibility and credibility.
By adhering to the outlined procedures and recommended best practices, businesses can establish a secure and trustworthy web presence, safeguarding both their data and customer confidence.
Maintaining timely updates and monitoring SSL status further ensures ongoing protection against emerging security threats.
FAQ
2. What prerequisites are needed before installing an SSL certificate on Windows Server?
You need a Windows VPS, a valid SSL certificate issued by a trusted Certificate Authority, access to the SSL certificate file, and the private key file generated with your Certificate Signing Request (CSR).
3. How do I generate a Certificate Signing Request (CSR) on Windows Server?
Using the Internet Information Services (IIS) Manager, open the Server Certificates section, select Create Certificate Request, then fill the required information in the wizard. Save the generated CSR file for submission to the Certificate Authority.
4. What are the main steps to install an SSL certificate on Windows Server?
First, generate or obtain your SSL certificate and private key. Then, open IIS Manager, go to Server Certificates, select Complete Certificate Request, upload your certificate file, assign a friendly name, and click OK. Finally, bind the certificate to your website's HTTPS binding.
5. How do I bind an installed SSL certificate to my website in Windows Server?
In IIS Manager, expand the Sites folder, select your website, click Bindings, add or edit the binding to select HTTPS as the type, assign port 443, and choose the installed SSL certificate. Save the changes to activate SSL on your website.
6. How can I verify that the SSL certificate is correctly installed on my Windows Server?
Open a web browser and visit your website with the "https:// prefix". If there are no browser warnings and you see a lock icon, your SSL installation is successful. Restart the server if warnings persist after installation.
7. What should I do if the SSL certificate fails to install correctly?
You can manually install it by opening the certificate file on your server, selecting Install Certificate, placing it in the Intermediate Certification Authorities store, then restarting the server to apply changes.
8. How does installing an SSL certificate on Windows Server impact my website's SEO?
Google and other search engines prioritize secure websites with HTTPS in their ranking algorithms. Installing an SSL certificate improves your search engine visibility and attracts more visitors, positively impacting your business growth.
9. How often should I renew my SSL certificate on Windows Server?
Renew your SSL certificate before its expiration date to maintain continuous security. Many Certificate Authorities offer automatic renewal options. It is also advisable to back up your SSL certificate and private key regularly.
10. What ongoing maintenance is recommended for SSL certificates on Windows Server?
Regularly update your Windows Server and SSL libraries to enhance security, monitor certificate validity to avoid expiration, and ensure backups of certificates and keys to prevent service interruptions.
Why are some of the screen-shots from ancient XP machines?
The steps are the same in all versions of Windows Server, they do not differ from each other.