Download and Install Windows 11 for Business Owners
Download and Install Windows 11 by visiting the Microsoft website, confirming your system meets the requirements, and following the on-screen instructions to complete the installation process.
🤖AI Overview:
Download and Install Windows 11 is the process of getting the latest operating system from Microsoft onto your computer. The intent is to upgrade your device so you can use new features and improved security. To download and install Windows 11, you need a compatible PC and a stable internet connection. This ensures a smooth upgrade to the newest version of Windows.
Why Install or Upgrade to Windows 11?
With Windows 11, Microsoft has realized Windows should be a powerful desktop operating system. From improved multi-window multitasking and better support for multiple monitors to PC gaming improvements and a Store featuring traditional Win32 desktop apps, Microsoft is embracing the reality of the PC and making it better.
Speed improvements have come from web browsing in Edge, signing in with Windows Hello, and waking from sleep. Windows updates are 40% smaller and more efficient, and they occur in the background. More efficient energy use means longer battery life. Windows 11 also includes some good security hardening features, and It’s full of other smart changes. There’s plenty of innovation in Windows 11 and it has a new look. Widgets, Snap Layouts, Updated Default Apps, Multiple Desktops, and a better App Store are designed for Windows 11. Cortana is being removed from the PC setup experience, something that will no doubt please many system administrators.
Satisfied enough? Let’s get started to Download and Install Windows 11 in the easiest and fastest way.
Prerequisites to Install Windows 11
To let this tutorial works correctly, provide a stable internet connection and the options below on the PC that you plan to download and install Windows 11.
- System: A Server running Windows VPS.
- RAM: 4 GB
- Storage: 64 GB
- Display: A display 9 inches or larger, with a resolution of 720p or higher.
- Graphics Card: DirectX 12 or later with a WDDM 2.0 driver.
- CPU: a 1 GHz or faster dual-core or higher processor on a compatible 64-bit processor or System on a Chip.
- TPM: Trusted Platform Module (TPM) version 2.0.
Also, you are recommended to check for compatibility on PC Health Check app to confirm your device meets the minimum system requirements to download and install Windows 11.
Fastest Method to Download and Install Windows 11
This tutorial covers Installing Windows 11 using a USB drive with at least 8 GB of storage space. This option is used to download the media creation tool to make a bootable USB. Before you begin, you need a license to install Windows 11 or have a Windows 10 device that qualifies for an upgrade to Windows 11.
Note: Throughout setup, any files on the USB drive will be deleted. Verify that the USB drive doesn’t contain any crucial files. If you have any important files, back up your USB drive.
Now, if you’re all set, and you provided all system requirements on the device you want to install Windows 11 on it, let’s go through the steps of this guide to have Windows 11 installed on your system. You are recommended to save any work and back up your PC before you start to Download and Install Windows 11.
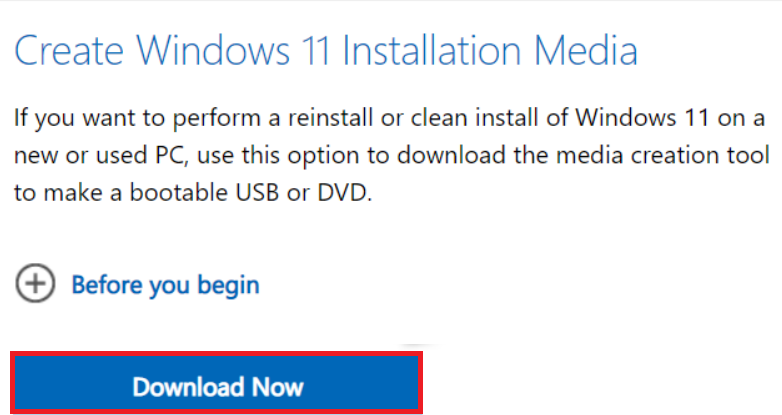
Step 1. Create Windows 11 Installation Media
To prepare your Windows 11 installation files, put the USB drive you want to use to create a bootable USB drive into your Windows computer. On Microsoft’s official Windows 11 download page, click ”Download Now” and continue.
When the download is complete, run the software. The applicable notices and license terms window will open first. After carefully reading the conditions, click “Accept” in the bottom-right corner of the window to confirm your agreement.
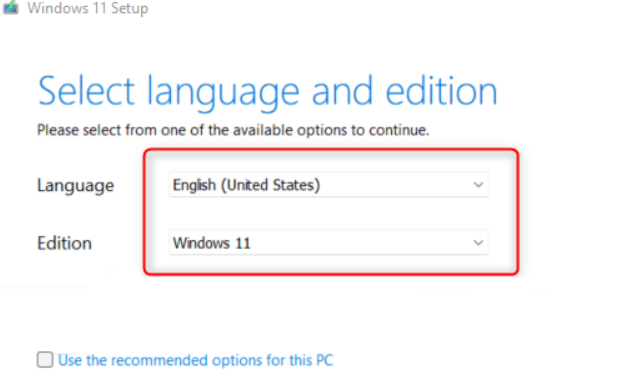
Step 2. Select Language and Edition
When you complete the previous step, a notice explaining that Windows is getting a few items ready will appear along with the loading icon. Then, you’ll reach the Select Language and Edition screen after a brief delay. Here, you may only select Windows 11 as an edition. If you want, you may also choose a different language.
Step 3. Choose Which Media to Use
Once the below screen is displayed, you need to select your desired media. As we mentioned, we explain the USB drive method in this tutorial. So, select “USB Flash Drive” and then click “Next” to continue. The USB you are using must have at least 8 GB of available storage space.
 Once you selected the USB flash drive you want to use, click ‘’Next’’. The procedure of downloading will start. Although the duration varies, be ready to wait for a while. When the download is finished, click the “Finish” button, carefully take the USB drive out of the computer, and then put it in the machine you wish to install Windows 11 on it.
Step 4. Install Windows 11
Now that you have successfully downloaded Windows 11 on your USB, you are ready to install Windows 11 from the USB flash drive. After inserting the USB drive with the installation files into the target PC, you must modify the boot order to force the computer to load the operating system from a different location than its hard drive. As you know, we want Windows to load the operating system from the USB disk in this instance. For this to function, you must open the boot menu when your computer starts up. Press the corresponding key during computer boot-up to access the BIOS or UEFI controls. Your computer will reboot from the USB drive (instead of the hard drive) once you choose it from the boot menu. It will then prompt you to start setting up the installation media by pressing any key.
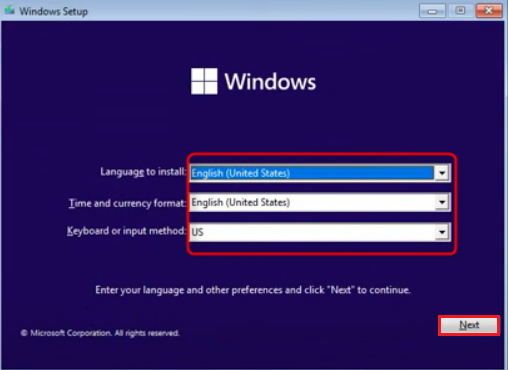
You’re now ready to set up your computer with Windows 11. First, you’ll need to choose the language to install, the time and currency format, and the keyboard or input method. To change one of the preset options, click the down arrow and select an option from the drop-down menu. However, you’ll rarely need to change anything here.
When the below screen is displayed, click ‘’Next’’ and continue.
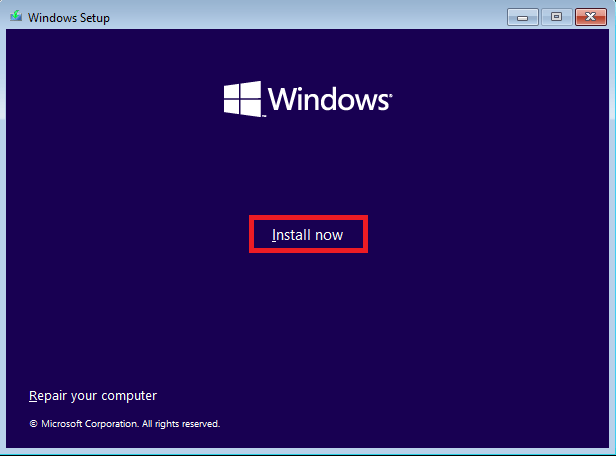
On the below screen, click ‘’Install now’’ and move on.
Step 5. Activate Windows 11
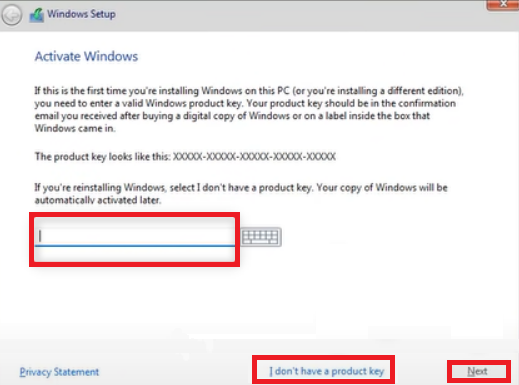
The Windows Setup screen will appear once Windows notifies you that setup is begun. You activate your version of Windows from this screen. Enter your product key in the text box if you have one. If not, select “I Don’t Have a Product Key” at the bottom of the window to operate a restricted version of Windows. The product key can be used later to unlock everything if you select the latter option.
Click “Next” to proceed if you already input your product key.
Step 6. Select your Preferred OS
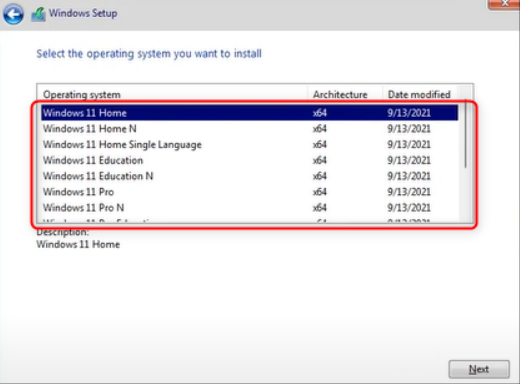
Choose the Windows 11 version you want to install on the following screen. Make sure to choose the right version if you already have a product key because they are only compatible with the corresponding version. pick your version and then pick “Next.”
Step 7. Accept Windows 11 License Terms
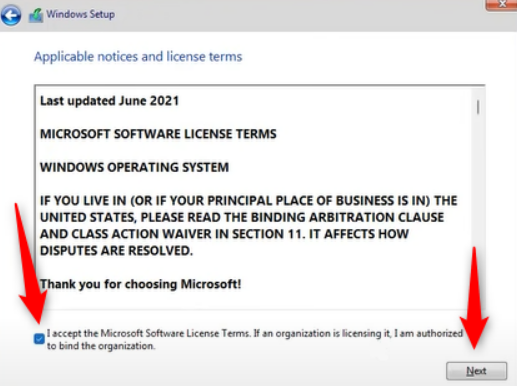
On the following screen, check the box to accept the licensing terms. To continue, click “Next“.
Step 8. Select Installation Type
On the below screen, if you choose to upgrade, Windows will be installed along with your existing files, programs, and settings. Since we’re performing a fresh install, we’ll choose “Custom: Install Windows Only (Advanced)“.

Step 9. Locate the Installation
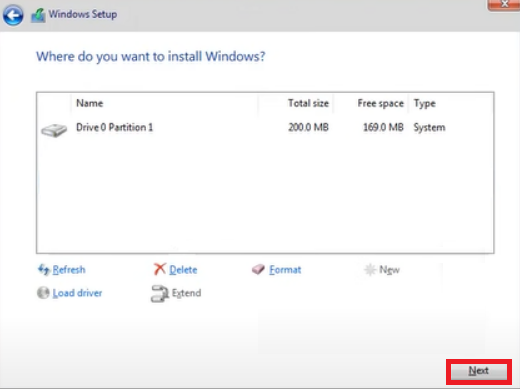
Choose the location where Windows will be installed. Depending on how recent your hard disk is, it can display the phrase “Drive 0 Unallocated Space.” The name of your drive will indicate whether you’ve partitioned it.
After choosing the drive, select “Next.”
The Windows files will now start to install via the Wizard. This procedure can take some time and varies in length from computer to computer. Your computer will reboot after finishing.
Congratulations! You successfully completed Download and Install Windows 11 on your PC. Enjoy it.
How to Check Windows 10 is Ready to Upgrade to Windows 11?
If you consider upgrading from Windows 10, you are recommended to wait until you are notified. To check if the upgrade is ready for your device or not, follow the below path and install it yourself:
Start > Settings > Update & Security > Windows Update > Check for updates.
If you see that Update is ready, do not hesitate to do this since Windows 11 includes reliability, performance, and security improvements.
Conclusion
In this article, you learned How to Download and Install Windows 11. We tried to present the fastest and easiest way to Install Windows 10. After using Windows 10 for a while, Windows 11 may feel a little disorienting at first, especially the Start menu. For example, the UI is fairly different, but understanding how everything works is quick. So, you need to spend some time getting to know Windows 11 to feel comfortable with using it. Good news for gamers is that gaming gets a boost in Windows 11.
For business owners, it is best practice to schedule the download and install process during periods with minimal activity. Inform team members in advance to reduce disruption. Always keep your device connected to a reliable power source and network throughout the process.
FAQ
2. How can I check if my computer is eligible for a Windows 11 upgrade?
You can use the official PC Health Check tool from Microsoft to verify if your device meets the necessary requirements for Windows 11. Ensure all system components are compliant to avoid installation issues.
3. What is the official process to download and install Windows 11 for business owners?
Business owners can download Windows 11 through the official Microsoft website or by using Windows Update on eligible devices. It is recommended to back up all important data before proceeding with the installation.
4. Can I perform a clean installation of Windows 11 and what are the benefits?
Yes, you can perform a clean installation of Windows 11 by creating a bootable USB drive with the Windows 11 installation media. A clean installation can help improve system performance and reduce compatibility issues.
5. Are there licensing considerations when installing Windows 11 in a business environment?
For business use, ensure each device has a valid Windows 11 Pro or Enterprise license. Consult with your Microsoft licensing provider to confirm compliance and avoid legal issues.
6. How can I protect my business data during the Windows 11 installation process?
It is essential to back up all business-critical data before installing Windows 11. Use approved IT backup solutions and verify the integrity of your backups to prevent data loss.
7. What support options are available if I encounter issues when trying to download and install Windows 11?
Microsoft provides official support for Windows 11 installations. Business owners may also benefit from dedicated IT support through their Microsoft partner or system integrator for advanced troubleshooting and technical assistance.
8. Are my current business applications compatible with Windows 11?
Most modern business applications are compatible with Windows 11. However, it is important to verify application compatibility with the vendors before upgrading to prevent disruptions in business operations.
9. How often will Windows 11 receive updates and how should businesses manage them?
Windows 11 will receive regular security and feature updates. Businesses should use centralized management solutions such as Windows Update for Business or Microsoft Endpoint Manager to control and schedule update deployments efficiently.
10. What are the main advantages of upgrading to Windows 11 for business owners?
Upgrading to Windows 11 offers enhanced security features, improved productivity tools, better system performance, and support for the latest hardware innovations, all of which are valuable for a secure and efficient business environment.