Install Windows Server 2008 and 2008 R2 Easily
Install Windows Server 2008 and 2008 R2 by booting from installation media, selecting the edition, accepting terms, partitioning the disk, and configuring initial settings for network and security.
🤖AI Overview:
Installing Windows Server 2008 and 2008 R2 involves a systematic setup process including selecting the version, partitioning disk space, copying files, and configuring essential settings such as administrator credentials and network options. These versions reached end of support in 2020, so upgrading or using Azure Extended Security Updates is recommended.
Does it Make Sense to Install Windows Server 2008 and 2008 R2 in 2023?
Since January 14, 2020, the Windows Server 2008 and Windows Server 2008 R2 operating systems reached the end of their support cycle (EOS), it is a good question to ask whether it is logical to install Windows Server 2008 and 2008 r2 or not. Because users did not receive free security updates on-premises, security updates, free support options, and online technical content updates from the EOS date.
What is the Solution?
To utilize Windows Server 2008 or 2008 R2 goods and services ought to switch to Microsoft Azure to benefit from three more years of Critical and Important security updates without paying any additional fees. Also, you must upgrade when you are ready. Users are recommended to update to the most recent version before the deadline for environments other than Azure. Customers who are unable to upgrade before the end of support can purchase Extended Security Updates to protect server workloads until they do so some limits apply.
Before the support end dates, we advise you to switch to Azure or update to the most recent product versions. This enables you to benefit from the most recent product advancements and guarantees that Microsoft will continue to support you.
Eventually, if you still have enough reasons to install Windows Server 2008 and 2008 R2, consider the below requirements and move on to the steps of the installation in the following of this article.
Prerequisites to Install Windows Server 2008 and 2008 R2
If you prefer to install Windows Server 2008 and 2008 R2 on the Server, provide the below requirements:
Server: Purchasing a Dedicated Server; Cheap and payable Servers with cryptocurrencies on OperaVPS are Recommended.
Processor: At least 1 GHz (for x86 processors) or 1.4 GHz (for x64 processors); 2 GHz is Recommended and faster.
RAM: At least 512 MB; 2 GB or more is Recommended.
Disk Space: At least 10 GB; 40 GB or more is Recommended.
Display: Super VGA (800 * 600); Higher resolution monitor is Recommended.
Mood: At least a Smile; Coffee is Recommended.
Pre-installation Note: If you are upgrading from Windows Server 2008 to Windows Server 2008 r2, and you had installed your Windows Server 2008 on a 32-bit server, you need to upgrade your hardware to 64-bit before upgrading to Server 2008 R2. But, if you just want to install R2, you will be able to do this from scratch or run an upgrade. You can choose between the two because they are both available.
Golden Note: If you would like to have a server with pre-installed Windows Server 2008/2008r2, skip all the installation steps and refer to the end of this guide to read how you can achieve a ready server!
Basic Installation of Windows Server 2008 and Windows Server 2008 R2
Installation and setting up Windows Server 2008 and Windows Server 2008 R2 are both multi-stage processes. After asking you for some basic data, Setup will copy files and restart the machine. The menu for Initial Configuration Tasks is presented at the end of setup, allowing you to customize your server to meet your unique requirements.
Before you install Windows Server 2008 and 2008 R2, follow the below steps to prepare for the installation:
- Disconnect UPS devices.
- Back up your servers.
- Disable your virus protection software.
- Run the Windows Memory Diagnostic tool.
- Provide mass storage drivers.
- Be aware that Windows Firewall is on by default.
- Prepare your Active Directory environment with Windows Server 2008/2008 R2 updates.
If you’re all set, let’s go through the steps of this tutorial. The process of installation is the same for Windows Server 2008 & Windows Server 2008 R2. Here, we are working on Windows Server 2008.
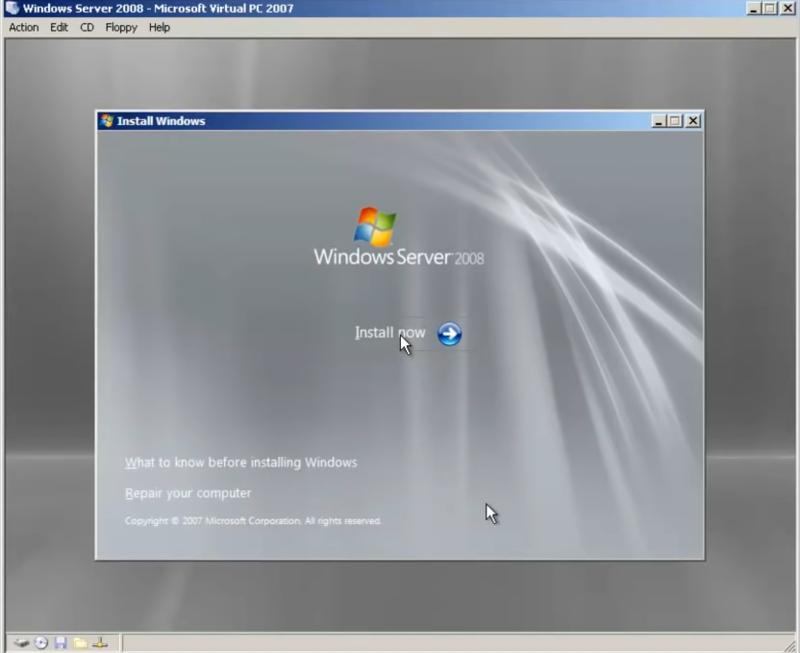
Step 1. Prepare to Install
Boot your server to let the files and drives be loaded. On the language and preferences screen (Currency & Time format and also keyboard Type), choose your preferred options and click ”Next”.
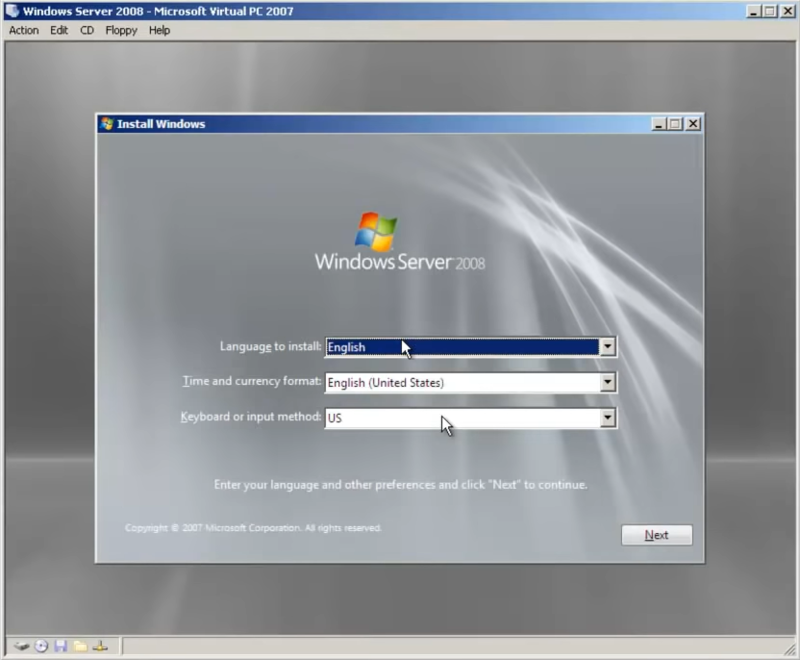
Click on ”Install Now”.
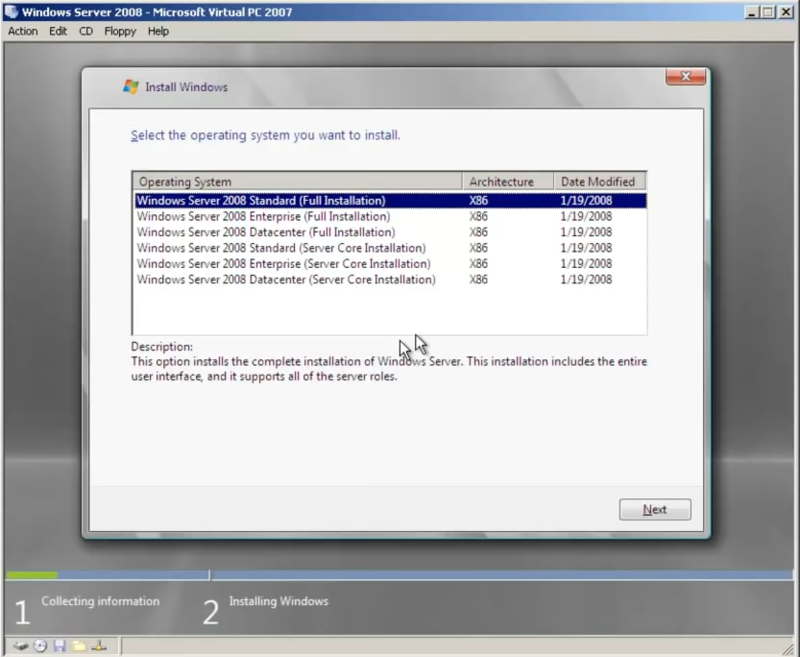
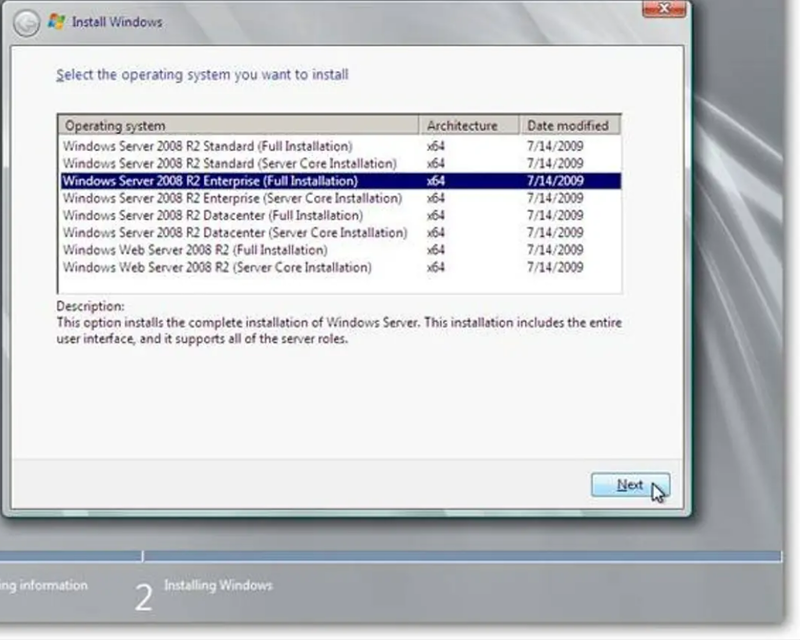
Step 2. Operating System Selection
As we mentioned, Windows Server 2008 and 2008 R2 are available in different editions. So, choose your considered version depending on your license and the purpose of your server to install on it.
On Windows Server 2008:
On Windows Server 2008 R2:
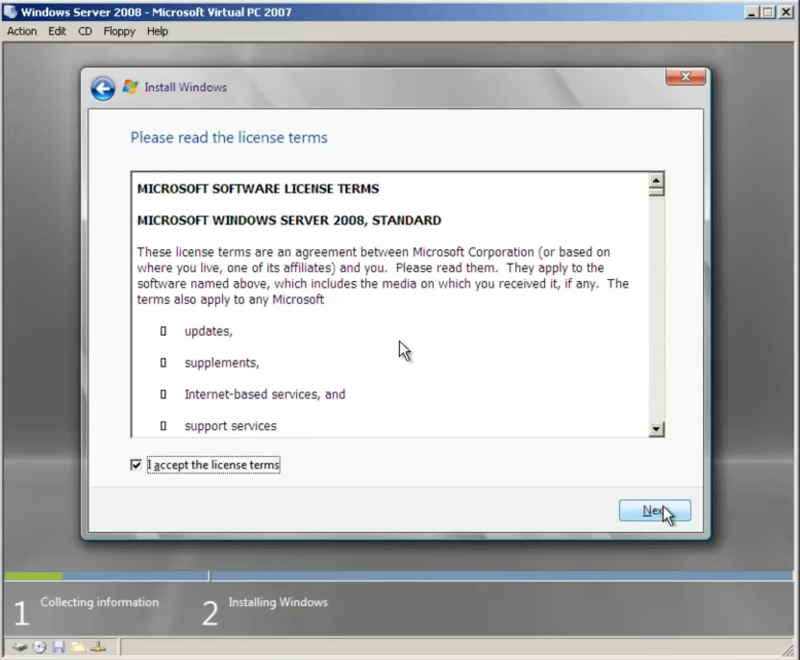
Step 3. License Agreement
After reading the standard End User License Agreement, check on I Accept the license terms and then click on Next.
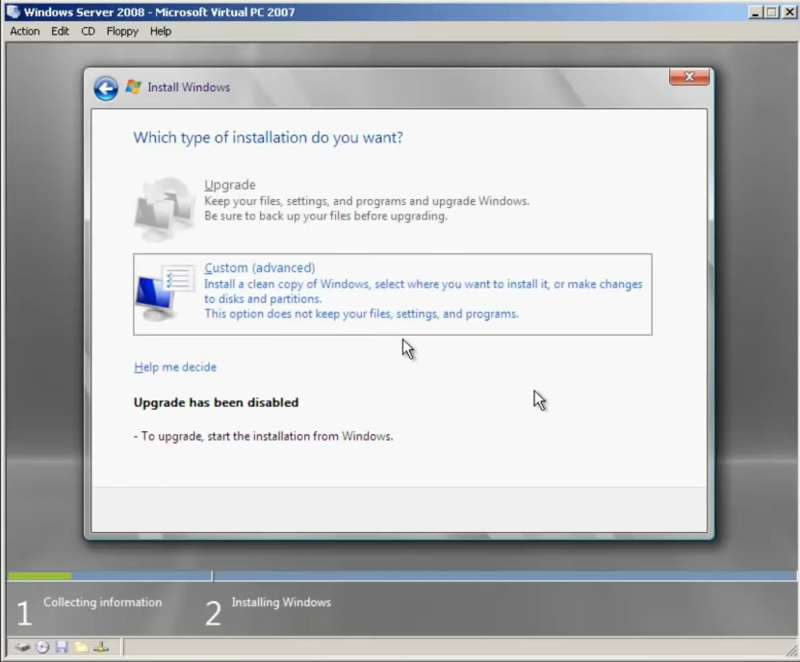
Step 4. Choose the Type of Installation [Advanced or Upgrade]
We assume you are doing a base install of Windows Server 2008 and 2008 R2 (Install a fresh copy). So, choose the Custom (Advanced) option. Obviously, if you want to upgrade, you must choose the upgrade option.
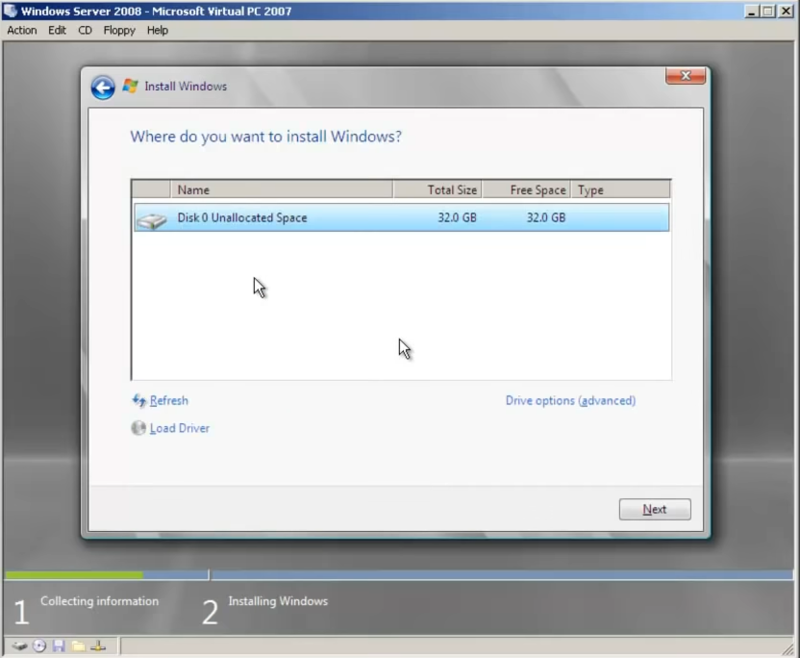
Step 5. Allocate Space for Windows Server
If you are installing the server on a regular IDE hard disk, click to select the 32 GB blank disk. usually Disk 0, and click Next. Select disk choices (advanced) if you want to partition the available disk space or reformat a drive.
Step 6. Installing Windows Server
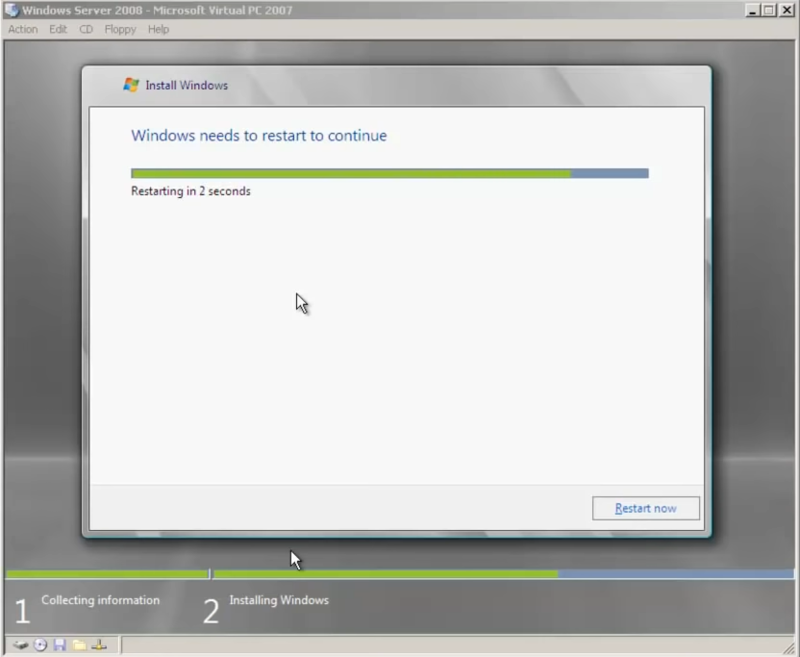
All are ready to begin the installation. Depending on your Server machine, the installation, and reboot will take a while.
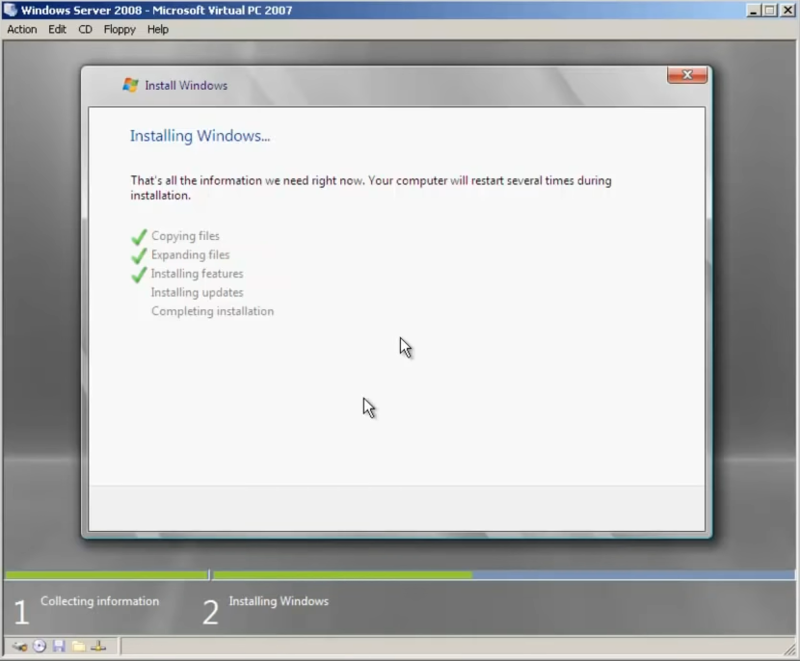
When the initial phase of copying the file is complete, the server will immediately restart.
Step 7. Change Password
After the installation is complete, you are prompted to change your password before attempting to log in.
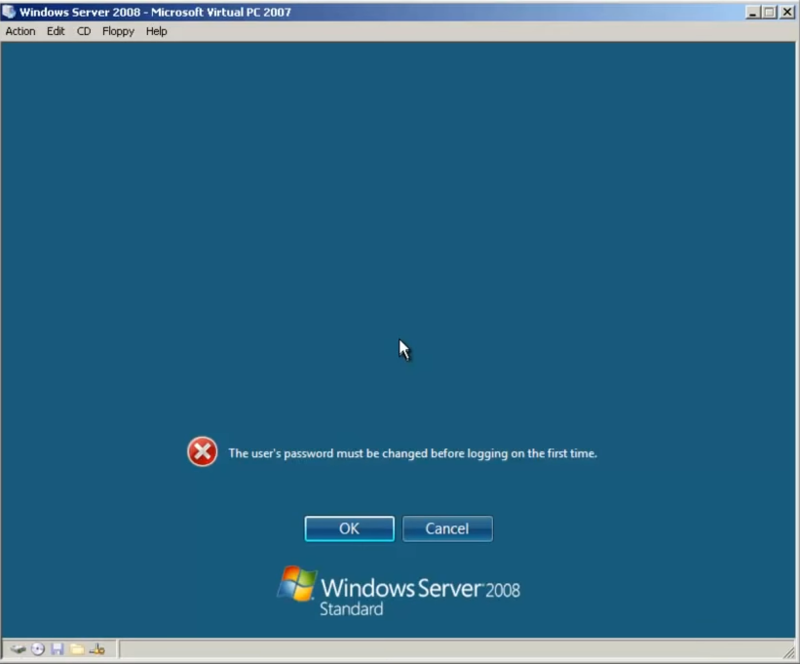
As you know, you are recommended to choose a strong password and write it down somewhere safe to not force reinstalling Windows Server again.
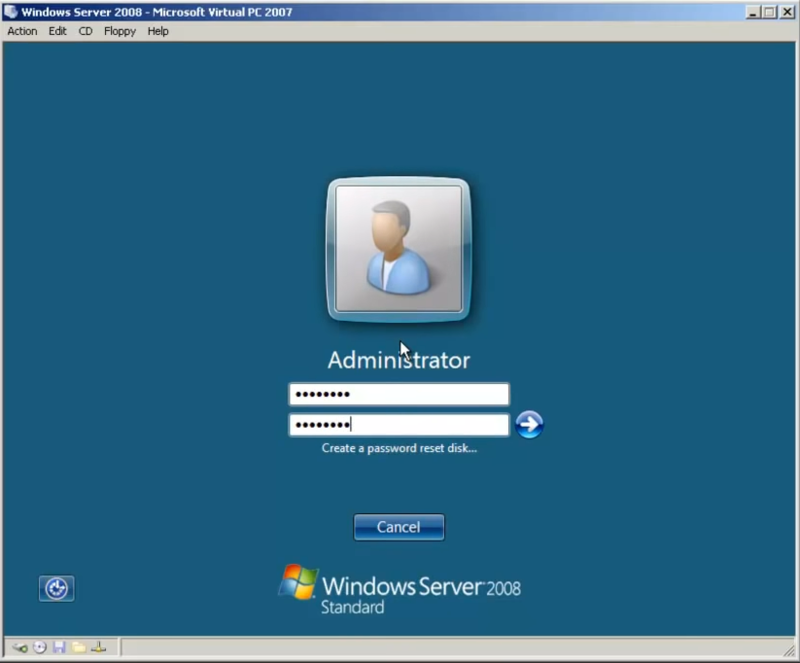
Let the setup finish to view your desktop.

Step 8. Configure Windows Server
As soon as you log on, the Initial Configuration Tasks window appears. You might also use the Command Prompt to navigate to this page by typing Oobe.exe.
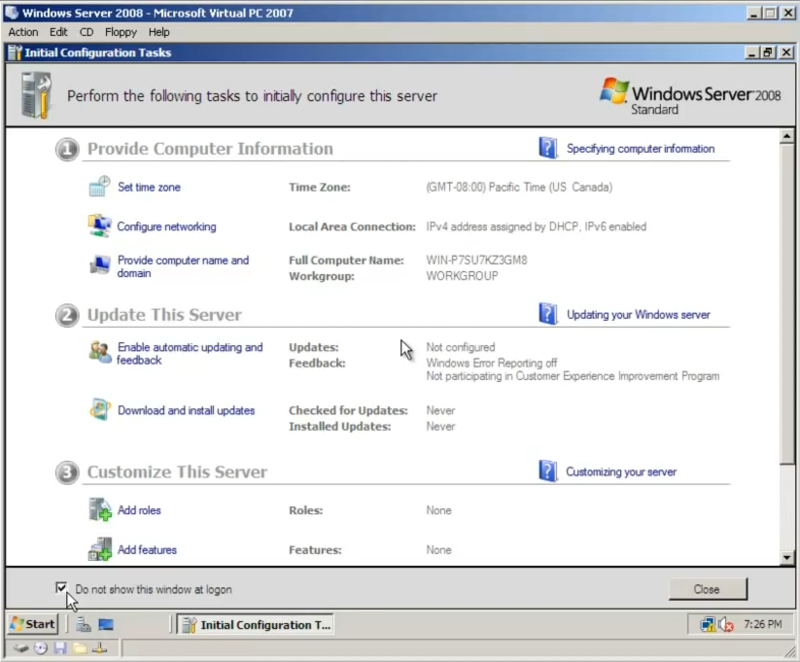
Now, you can adjust the time zone to let the date and time correct then. To Configure Networking, set one up right away because a Domain Controller must be the first server installed in a network and because they need a static IP. Double-click Local Area Connection, then select Properties from the information box that appears.
Finally, in the Networking box, select Internet Protocol Version 4, then click Properties. Enter the settings for your particular server and network IP addresses after changing the radial button to “Use the following IP address.” Click OK to save those adjustments after you’re done.
Install Windows Server 2008 and 2008 R2 Automatically
As you know, a Dedicated server is a requirement for installing Windows Server. Since the support team of your provider does not install Windows Server 2008, you need to use virtual machines such as esxi or kvm. if you use any virtualization software, take a snapshot of the final point, as you haven’t yet set any roles or functions (Directory or Certificate Services) for the server.
Installing Windows Server on a PC also requires a virtual machine which seems difficult for many users. So, what is the OperaVPS team’s suggestion? You can easily buy Windows VPS with a pre-installed Windows Server 2008 & Windows Server 2008 R2 to not have to do all the required steps of installation and manage the long process of installation.
Conclusion
To install Windows Server 2008 and 2008 R2 efficiently, one must prepare the hardware and environment thoroughly, follow the step-by-step installation process correctly, and implement post-installation configurations focused on security, stability, and business requirements. Regular maintenance such as updates and backups sustains server performance and security over time.
Though these operating systems are no longer supported fully by Microsoft, they continue to serve important roles in certain business networks. Understanding their installation and management ensures your organization can maintain a functional, secure server infrastructure while preparing for future migration or upgrades to newer platforms.
This detailed approach provides business owners with the clarity and confidence required to manage Windows Server 2008 and 2008 R2 installations effectively. Following these guidelines will help establish a robust server foundation tailored to your enterprise needs.
FAQ
2. What are the minimum hardware requirements for Windows Server 2008 and 2008 R2?
Minimum requirements include a 1 GHz processor (32-bit) or 1.4 GHz (64-bit), 512 MB RAM, and 10 GB disk space. However, for better performance, at least 2 GB RAM and 40 GB disk space are recommended.
3. Which editions are available for installation?
Windows Server 2008 and 2008 R2 come in Standard, Enterprise, Datacenter, and Web Server editions. Choose based on your server role and licensing.
4. How do I perform a clean install of Windows Server 2008 or 2008 R2?
Boot from installation media, select language and region, click Install Now, accept license terms, choose Custom installation, partition the disk, and follow the prompts to complete setup.
5. Can I upgrade from Windows Server 2008 to 2008 R2?
An upgrade can be done only on a 64-bit system. If your current server is 32-bit, a fresh installation and hardware upgrade are required.
6. How do I configure network settings post-installation?
Use Initial Configuration Tasks to set the time zone and assign a static IP address under Local Area Connection properties using IPv4 settings.
7. Are there alternatives to manual installation?
Yes, you can opt for Windows VPS hosting with Windows Server 2008 or 2008 R2 pre-installed, though modern alternatives are recommended due to end of support.
8. What security options exist after end of official support?
Extended Security Updates ended in January 2023; remaining options include upgrading to newer systems or migrating workloads to cloud platforms offering supported Windows Servers.
9. What preparation should be done before installation?
Backup existing data, disable antivirus temporarily, run memory diagnostics, disconnect UPS devices, and prepare necessary drivers beforehand.
10. Is it still viable to run Windows Server 2008 or 2008 R2 in a business environment?
Running these systems without support poses security risks. It is highly advisable to upgrade to newer supported Windows Server versions or use cloud services for improved security and support.