How to Record Your Screen on Windows
Screen recording on Windows is essential for capturing tutorials, and presentations, and has become an indispensable tool for professionals, gamers, educators, and everyday users alike.
It’s also widely used for software demonstrations by developers and tech support teams to walk users through new features or troubleshooting processes.
Windows 10 and 11 offer versatile built-in tools and third-party options to record the screen with or without audio.
Here is the Shortcut for Quick Recording:
Press Windows + Alt + R to start and stop the recording instantly for fast access.
You can customize this shortcut in Settings > Gaming > Xbox Game Bar to streamline how you record screen on Windows.
In the following, you will learn a detailed guide to using different methods for screen recording on Windows 10 and 11.
Using Xbox Game Bar to Record Your Screen on Windows
The Xbox Game Bar feature is built into Windows 10 and Windows 11 offering a hassle-free way to capture what’s happening on your screen.
Whether you’re recording for professional purposes or personal use, the Game Bar provides easy controls to capture everything with or without audio.
If you’re using a Windows VPS for recording, check out how to enable sound to enhance your recordings.
This feature makes it easy to screen record on Windows without needing extra software.
Here’s a step-by-step guide on how to use it:
Step 1: Launch the Xbox Game Bar
First, press Windows + G to open the Game Bar. You can also launch it from the Start menu by searching for “Xbox Game Bar.”
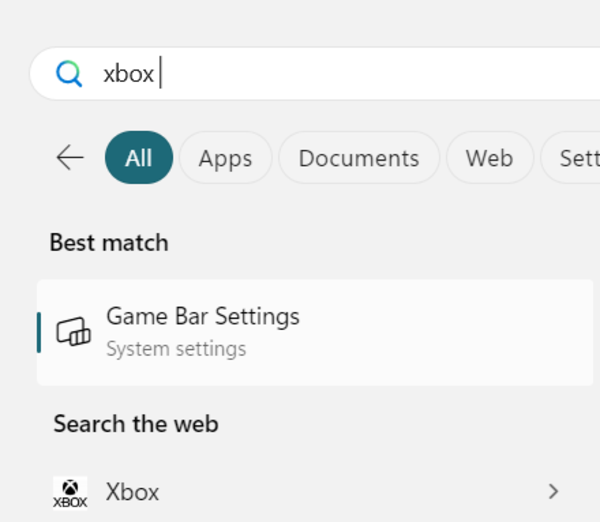
Note: If it doesn’t appear, ensure it’s enabled by navigating to Settings > Gaming > Xbox Game Bar.
Step 2: Open the Capture Widget
In the Game Bar overlay, find the Capture window to start recording.
If you don’t see it, click the Widget menu and select Capture from the list. This widget provides all the controls to record your screen on Windows 10 or Windows 11.
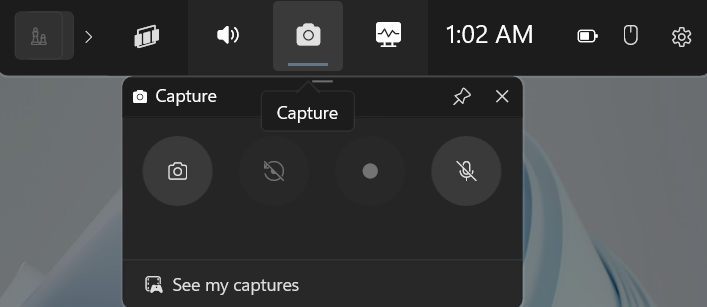
The Capture widget has four main controls:
- Screenshot: Captures a snapshot of the screen.
- Record last 30 seconds: Saves the previous 30 seconds of activity.
- Start recording: Click this to begin recording the active window.
- Turn on mic while recording: Toggle this if you need to capture audio from your microphone while you record your screen on Windows 10 and Windows 11.
Step 3: Start Recording
To start the screen recording, click the Start Recording button. You’ll see a small toolbar showing the duration of the recording.
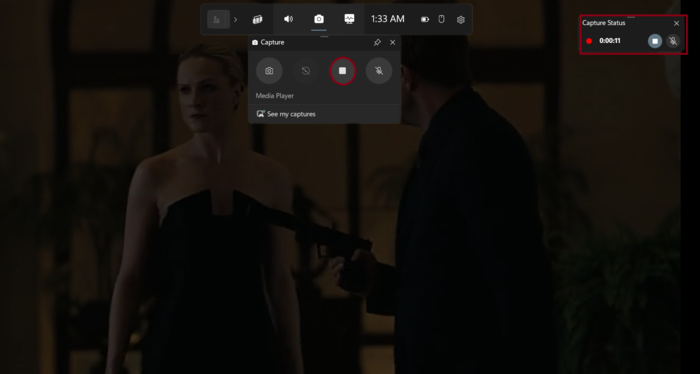
You can also enable or disable the microphone during recording for narration.
Step 4: Stop Recording and View Your Captures
Once finished, click the Stop button. Go to the See My Captures option in the Game Bar to view the recording. The recording will be stored in C:\Users\YourName\Videos\Captures by default.
Using Clipchamp to Record Screen on Windows [Third-party Application]
Clipchamp is a versatile option that allows you to capture both screen and audio, along with webcam footage.
Here’s a step-by-step guide to help you get started:
Step 1: Install Clipchamp
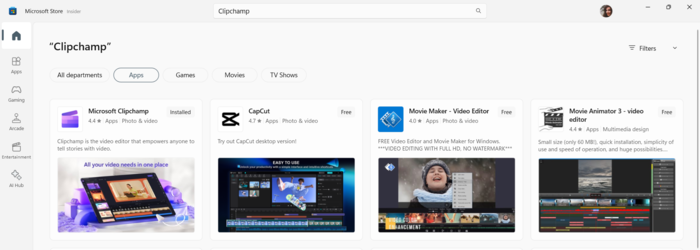
To begin, open the Microsoft Store from your Start menu and search for “Clipchamp.”
Click Get and follow the installation instructions. This free app is a powerful tool for anyone needing to record your screen on Windows 10 or Windows 11.
Step 2: Create a New Project
Once Clipchamp is installed, launch the app. After signing in with your Microsoft account, you’ll be prompted to create a new video.
Step 3: Access Recording Options
In the left-hand panel, click Record & create, marked by a video camera icon. This menu lets you choose how you want to record your screen on Windows 11.
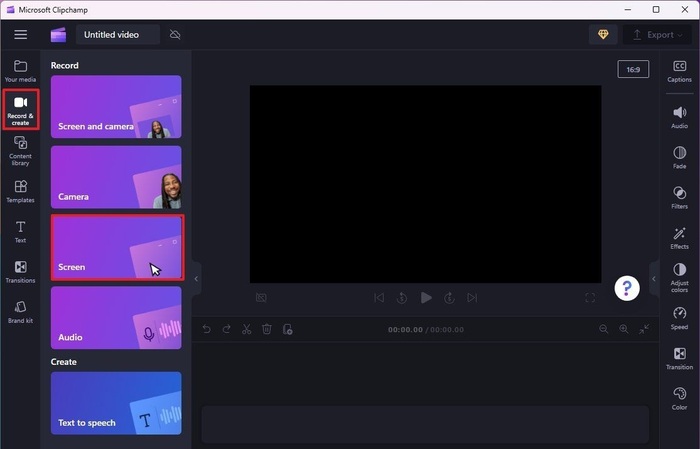
Click Create a new video from the right-hand panel. If you’re a first-time user, scroll to Your videos and click Create your first video here.
Step 4: Choose Your Recording Type
Clipchamp provides several recording options:
- Screen & Camera: Record both your screen and webcam footage.
- Just Screen: Only record the screen.
- Just Camera: Capture video from your webcam.
- Just Audio: Record only your voice.
Selecting the screen recording option still allows you to include audio through an external microphone or your computer’s built-in mic.
Step 5: Enable Microphone and Camera Access
When prompted, permit Clipchamp to access your microphone and camera if you intend to include audio or webcam footage.
This is essential for a complete screen capture experience.
Step 6: Start Your Screen Recording
Click the red Record button. A new window will appear, allowing you to select the content you want to capture.
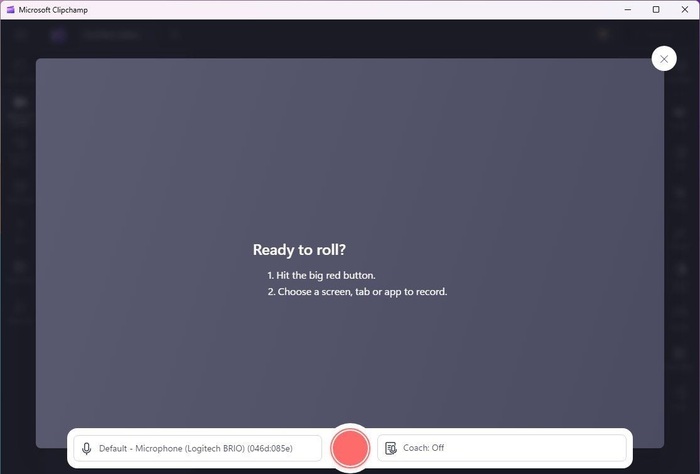
Choose Entire Screen if you wish to record your screen on Windows 10 completely, or pick a specific window or browser tab.
Toggle the option ”Also share system audio” for recordings that include sound.
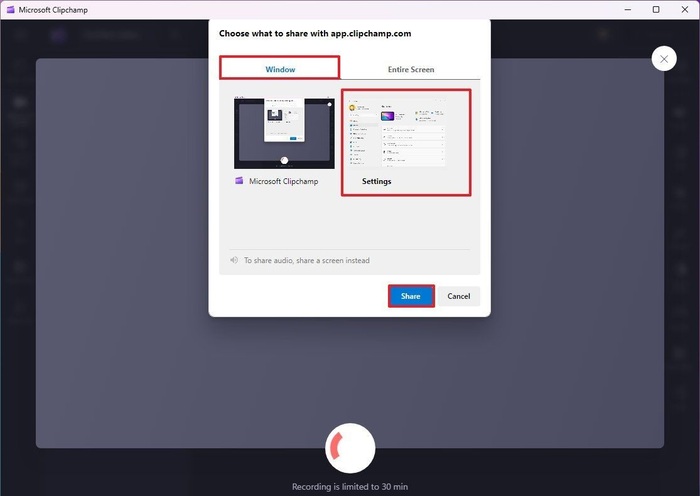
Step 7: Share and Begin Recording
Click Share to start your screen recording. Clipchamp allows you to record up to 30 minutes per session.
If you need a longer video, you can record multiple segments and merge them later using Clipchamp’s editing features.
Step 8: Stop Recording and Review
When you’re done, click Stop sharing. You can watch the recording to ensure it meets your expectations.

If not, click Retake recording to try again. If satisfied, click Save and edit to move forward.

Step 9: Edit Your Recording
Clipchamp offers robust editing tools. You can add text, transitions, and other enhancements to your video.
When finished, click Export, choose the video quality, and save the file with the considered quality to your desired location on your computer.
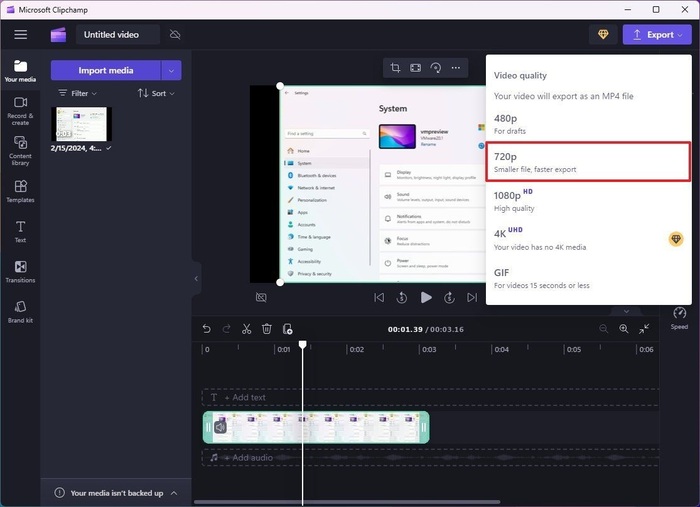
Step 10: Combine Multiple Recordings (If Necessary)
For longer recordings, simply repeat the process to create additional videos.
You can drag and drop these recordings onto the timeline within Clipchamp to combine them into a single, seamless video.
Using Snipping Tool to Record Screen on Windows [Third-party Application]
Snipping Tool is not just for screenshots; it also lets you screen record on Windows with audio. Here’s how you can use it to capture your screen effortlessly:
Step 1: Open the Snipping Tool
Search for the Snipping Tool via the Start menu and open it.
Step 2: Start Recording
Click the Record button, followed by New, and select the part of the screen you want to capture.
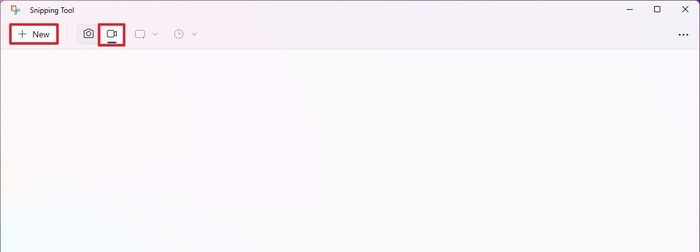
Step 3: Configure Audio
For screen recording with audio, choose your microphone from the Microphone menu. If you prefer to record silently, you can mute the system or microphone.

Step 4: Begin Recording
Hit Start and proceed with the activities you want to capture.
Step 5: Stop and Save
Once finished, click Stop.

Preview the recording by pressing Play or discard it if needed. Save your final recording by selecting a location and hitting Save again.
That’s it! now, you’re ready to share your screen recording with others, easily captured with the Snipping Tool.
Third-Party Screen Recording Alternatives for Windows
While Xbox Game Bar and Clipchamp are great built-in options, several third-party applications offer advanced features for users seeking more flexibility or customization in screen recording.
Here are three notable alternatives:
| Tool | Features | Pros | Ideal For |
|---|---|---|---|
| OBS Studio | Studio Free, open-source, supports high-definition recording, and live streaming with no time limits or watermarks. Allows multiple video source inputs (screens, webcams, apps). | Advanced customization, highly versatile for recording or live streaming, professional-grade tool. | Gamers, content creators, professionals. |
| Snagit | Premium tool for screen recording and screenshot capture, includes a powerful editor for annotations and modifications. | Easy to use, offers robust editing features for quick modifications, high-quality output. | Professionals, educators. |
| ShareX | Free, open-source, supports region-specific recording, GIF creation, and post-processing tools. Unlimited recording with no watermarks. | Lightweight, highly customizable, supports multiple capture methods. | Users looking for simple but flexible tools. |
This table concisely explains the key features, benefits, and best-use cases for each alternative, helping users choose the right third-party tool for their screen recording needs.
Why is my Xbox Game Bar not opening?
If you can’t open the Xbox Game Bar by pressing Windows + G, check your system settings. Go to Settings > Gaming > Xbox Game Bar and ensure it is turned on.
If the problem persists, consider restarting your computer or updating your Windows to the latest version, as some updates may disable the Game Bar.
How to screen record on Windows without external software?
Both Windows 10 and Windows 11 come with the Xbox Game Bar pre-installed. Simply press Windows + G to access the recording tools.
This built-in feature eliminates the need to install any third-party software for basic screen recording on Windows.
Where are my screen recordings saved?
By default, recordings made with the Xbox Game Bar are saved in C:\Users\YourName\Videos\Captures.
You can change this location if needed by manually moving the files to another directory or adjusting your system’s save settings.
How to fix low-quality recordings on Windows 10?
To fix this, navigate to Settings > Gaming > Captures and adjust the resolution or frame rate for a better-quality recording.
For even higher-quality videos, consider using Clipchamp, which offers customization options like 1080p output.
How long can I screen record on Windows 11 using Clipchamp?
Clipchamp allows you to record up to 30 minutes per session for free.
If you need longer recordings, you can record multiple clips and use the built-in editor to combine them into a single video. This makes Clipchamp a flexible option for screen recording with audio.
How do I record only a specific window or part of my screen?
With both the Xbox Game Bar and Clipchamp, you can choose to record either the full screen or a specific window.
In Xbox Game Bar, ensure that the desired window is active before you start recording.
In Clipchamp, after selecting the “Screen & Camera” or “Screen Only” option, you’ll be prompted to select the window or tab you want to record.
Why is my microphone not recording sound?
If your microphone isn’t capturing sound during a screen recording on Windows, first check whether the mic is enabled in the Xbox Game Bar.
Go to the Capture settings and ensure the microphone toggle is switched on. Additionally, verify that your microphone is selected as the default input device in your system’s sound settings.
How to edit my screen recordings on Windows?
To edit screen recordings on Windows, Clipchamp offers an intuitive editing interface. After finishing a recording, you can add text, transitions, and effects to your video.
You can also trim unwanted sections or merge multiple clips into one. After editing, save your project by exporting it to the desired resolution.
How to screen record games on Windows 10 with sound?
To record games with audio, use the Xbox Game Bar by pressing Windows + G while in-game.
In the Capture widget, ensure that the microphone is enabled to capture both in-game audio and commentary.
You can also set the recording to capture the last 30 seconds of gameplay to ensure you don’t miss important moments.
How to record my screen with system audio on Windows?
Both the Xbox Game Bar and Clipchamp allow you to capture system audio along with your screen recording.
In the Xbox Game Bar, check the “Also share system audio” option, and in Clipchamp, toggle the same option during setup.
How to screen record a remote desktop session?
To record a remote desktop session on Windows 10 or 11, you can use the Xbox Game Bar just like you would with a local desktop. Press Windows + G to open the Game Bar, and start recording while the remote session is active.
For better performance, make sure your network connection is stable, as slow connections can impact recording quality.
Conclusion
Screen recording on Windows is a valuable tool for enhancing communication, learning, and content creation. It enables users to produce tutorials, capture gameplay, and share important information easily.
This article discusses various methods, including built-in features like Xbox Game Bar, Clipchamp, and Snipping Tool, which allow for tailored recordings.
By maximizing these tools, users can save time and ensure high-quality content creation. Professionals often rely on software like OBS Studio or Snagit for remote work, training, and complex task explanations.
Additionally, configuring sound on VPS and using RDP servers can enhance productivity for remote work.