Windows DISM Command for Repairing Corrupt Files
The Windows DISM Command scans and repairs corrupt Windows system files to maintain system stability. It restores health using commands like “dism”, “online”, “cleanup-image”, and “restorehealth”.
🤖AI Overview:
The Windows DISM Command is a built-in Windows tool designed to scan for and repair corrupted system files and images. It improves system integrity, cleans up outdated updates, and enhances overall operating system performance. Use it with administrative rights on supported Windows versions for optimal results.
You can use dism /online /cleanup-image /scanhealth command to scan for issues,
dism /online /cleanup-image /restorehealth for repairs corruption,
sfc /scannow (verifies system files), dism /online /cleanup-image /startcomponentcleanup to clean up outdated updates,
and dism /image:C:\mount /cleanup-image /checkhealth for checking offline image health.
A Windows VPS provides a reliable environment to run the DISM command for repairing and maintaining system file integrity.
Step 1: Open Command Prompt as Administrator
Let’s go through this guide to fix corrupted system files using DISM.
First, ensure you run it as an administrator, have a stable internet connection, sufficient disk space, and a compatible, updated Windows version.
Press Windows + X, then select Command Prompt (Admin) or Windows PowerShell (Admin) from the menu.
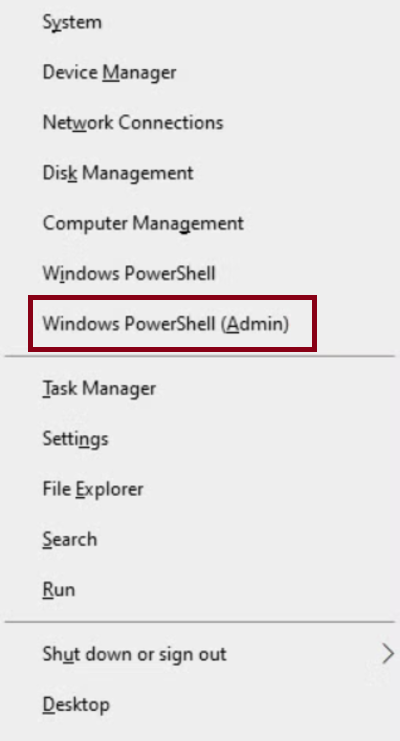
Once the command prompt is open with administrative rights, you can begin using the Windows DISM commands to repair your Windows system.
Step 2: Run the DISM Scan Command
To identify any existing issues before proceeding with repairs, run the Windows dism command to scan your system for any corruption within the Windows image:
dism /online /cleanup-image /scanhealth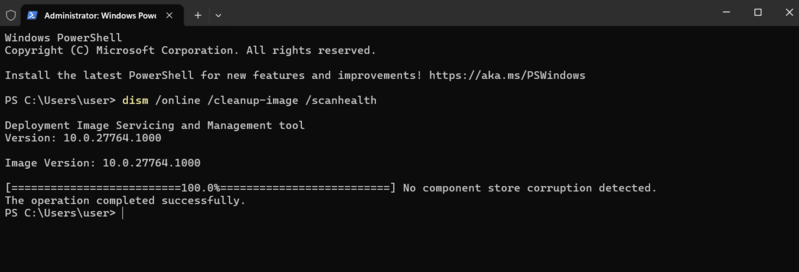
After running the command, you will see a progress bar indicating the status of the scan. It will take a few minutes, depending on your system’s health.
Tip: The dism scan command won’t make any changes; it will only inform you of potential issues in your system’s image.
Step 3: Run the DISM Restorehealth Command
Once you have scanned for errors, you are ready to repair any found corruption using the dism restorehealth command which is the actual repair tool that fixes corrupted system files and Windows images.
dism /online /cleanup-image /restorehealth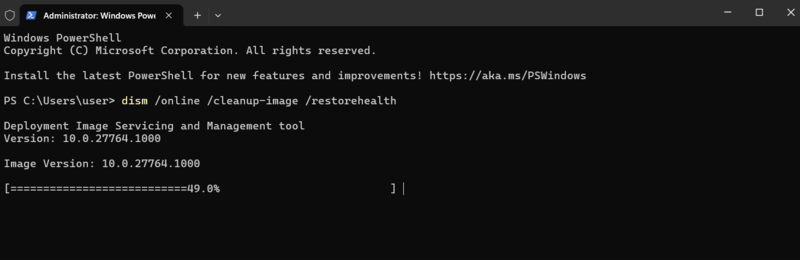
Depending on the configuration, the dism restore health command will check for corruption and automatically attempt to repair the image using files from Windows Update or a local source.
Tip: This process can take some time. Let the command complete fully to ensure your system is fixed. If it fails, you can try using an alternate source, like a Windows installation media.
Step 4: Check and Repair System Files Using SFC
After repairing your Windows image with the dism restore health command, you should run the SFC (System File Checker) to ensure no corrupted system files remain.
Run the command below to scan for and repair any missing or corrupted system files on your machine:
sfc /scannow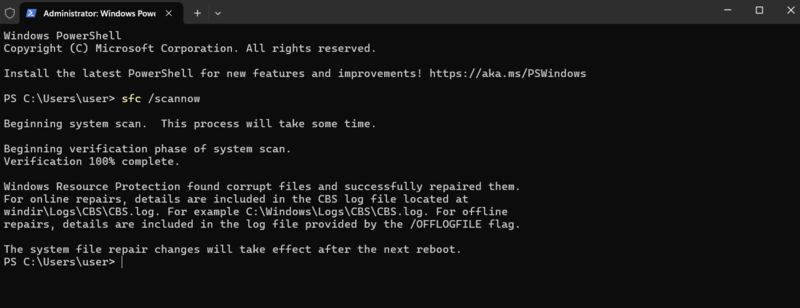
SFC will perform a scan, and if it finds any issues, it will fix them automatically. This is an essential step for ensuring your system is fully healthy.
Tip: If SFC finds errors that it can’t fix, it will recommend running the DISM repair command again for further fixes.
Step 5: Troubleshoot Common DISM Errors [If Occurs]
Sometimes the Windows DISM command might run into errors or fail to repair the system image.
Here are some common problems and their solutions:
Error 87
Error 87 occurs if the Windows dism command syntax is incorrect. The proper syntax for repair is dism /online /cleanup-image /restorehealth.
To troubleshoot this error, double-check the syntax and make sure you are using the correct flags.
The Source Files Could Not Be Found
This error happens when DISM cannot locate the files it needs to repair your system.
To troubleshoot this error, you can specify a different source path (like a Windows installation disk or ISO) by adding the /source flag:
dism /online /cleanup-image /restorehealth /source:C:\RepairSource\WindowsStep 6: Restart Your Computer
Once the DISM restorehealth command and SFC have completed their repairs, restart your computer to apply the changes. This step helps finalize the repair process.
After restarting, check if the issues persist. If so, repeat the steps or consider using advanced recovery tools.
3 Use Cases and Solutions for DISM
In addition to repairing corrupted files, the Windows DISM command can be used in other situations:
Using DISM to Clean Up and Free Space
The dism cleanup command removes unnecessary files and updates, helping you reclaim disk space.
dism /online /cleanup-image /startcomponentcleanupThe above command removes superseded versions of Windows updates, which can help improve system performance and free up space.
Restoring the Windows Image Using a Different Source
If the dism restore health command fails to repair using Windows Update, you can specify a local or network source to restore the image.
To run the below command, ensure the source contains the necessary files for your version of Windows:
dism /online /cleanup-image /restorehealth /source:D:\RepairSource\WindowsChecking the Health of a Windows Deployment Image
You can use DISM to check and repair a deployment image without needing to run it on a live system:
dism /image:C:\mount /cleanup-image /checkhealthConclusion
The Windows DISM Command is a powerful and versatile tool essential for business owners and IT personnel managing Windows systems.
Mastery of its commands improves system reliability through effective maintenance, imaging, and repair capabilities.
Employing DISM in your IT operations can preserve system integrity, reduce the frequency of disruptive renewals, and support scalable deployment strategies.
By following recommended best practices and understanding the command’s full potential, businesses can achieve smoother Windows management and enhanced operational continuity.
For additional ways to enhance your system’s performance, consider reading our article on 10 Tricks to Speed Up Windows.
FAQ
2. How do I run the Windows DISM Command?
Open Command Prompt as an administrator and use commands such as "dism", "online", "cleanup-image", and "scanhealth" to scan and "dism", "online", "cleanup-image", and "restorehealth" to repair.
3. What common errors occur with DISM and how can they be fixed?
Errors like syntax mistakes or missing source files can arise. Fix them by verifying command accuracy and specifying a correct source path if needed.
4. Can DISM improve system performance?
Yes, commands like "dism", "online", "cleanup-image", and "startcomponentcleanup" remove outdated updates and free disk space, improving performance.
5. How does DISM relate to the System File Checker?
After DISM repairs, running "sfc", or "scannow" fixes remaining corrupt files to ensure full system health.
6. What prerequisites are needed to use DISM?
Run with administrative privileges, have an internet connection for source files, sufficient disk space, and an updated Windows version.
7. Can DISM repair offline Windows images?
Yes, by specifying the image path with commands like "dism", "image:C:\mount /cleanup-image", and "checkhealth".
8. What should I do after DISM repairs?
Restart your PC to apply changes and verify system stability.
9. How does DISM support business continuity?
It reduces system downtime by scanning for corruption, repairing images, and cleaning unnecessary files.
10. Can I use alternative repair sources with DISM?
Yes, specify other sources such as a Windows installation media using the "/source" option.