RDP Server Is Not Connecting – 20 Fixes You Should Try
RDP server is not connecting errors occur when remote access fails due to network issues, misconfigurations, or blocked ports. Many users face this common concern and wonder how to identify and fix the root cause without relying solely on support teams. Nowadays, many users buy RDP because of RDP’s valuable advantages and benefit from its advantages in their organizations.
This article provides a clear, step-by-step guide to diagnose and resolve common RDP connection problems, including firewall settings, port conflicts, service failures, and SSL certificate mismatches. Whether you’re facing a simple login error or a more complex connectivity issue, you’ll find practical solutions and tips to restore access.
Explore the full guide to troubleshoot confidently and reconnect to your RDP server with clarity.
⚠️ Requirement:
Consider that you can inform the issue to the RDP provider or the Windows VPS provider, and they should be able to resolve the issue. But if you want to check the issue yourself, you should have Console Access or VNC Access.
You can find this access in your client area control panel, but if you don’t have it, you should ask your provider to create it for you.
✍️ Note:
When you open the console, first check that the Windows can boot up or not; that may be the main reason why your RDP is not connecting.
Common Errors When RDP Is Not Working
- An internal error has occurred
This often happens due to temporary issues. Restarting the server usually resolves the problem. - The remote desktop cannot connect to the remote computer for one of these reasons
This message means the issue could be related to:- Network connection
- RDP settings
- Firewall or port restrictions
To fix it, follow steps 1 to 6 in the troubleshooting guide above.
- The logon attempt failed
This error shows up when the username or password is incorrect. Double-check your login details and try again. - Remote Desktop Services is currently busy
The RDP server may be at full capacity and cannot accept new connections. Wait a few moments or contact your provider. - CredSSP encryption oracle remediation
This happens due to mismatched security updates between the server and the client. Make sure both systems are fully updated. - The remote session was disconnected because there are no Remote Desktop License Servers available
This means the licensing service is not configured or is unreachable. This usually requires action from the server administrator or provider. - You must be granted the Allow log on through Remote Desktop Services right
Your user account may not have permission to use RDP. You or your administrator should check the Group Policy settings.
In the next section, we will begin by reviewing the most frequent and basic causes of connection problems. These include cases where the RDP is simply turned off or when there is a network issue preventing communication. Both are easy to check and often help users identify the problem quickly. Let’s start with those.
1. The RDP Is Powered Off!
This can be the first and simple issue why your RDP is not connecting. It is simple, but I’ve seen that it happens many times. So before all, check that your virtual machine is not powered off.
2. The RDP Is Disconnected Because Of Network Issue
This is the most common issue why your RDP is not connecting. To figure out if this is the issue, log in to your RDP and ping 8.8.8.8 to find out if your network configurations are correct or not.
To ping 8.8.8.8, open Run Windows by pressing the Windows Key + R simultaneously. Then type CMD in the run windows and press enter. Or, instead of this, you can find CMD in the Windows search bar.
Once the CMD is open, type the below command and press enter.
ping -t 8.8.8.8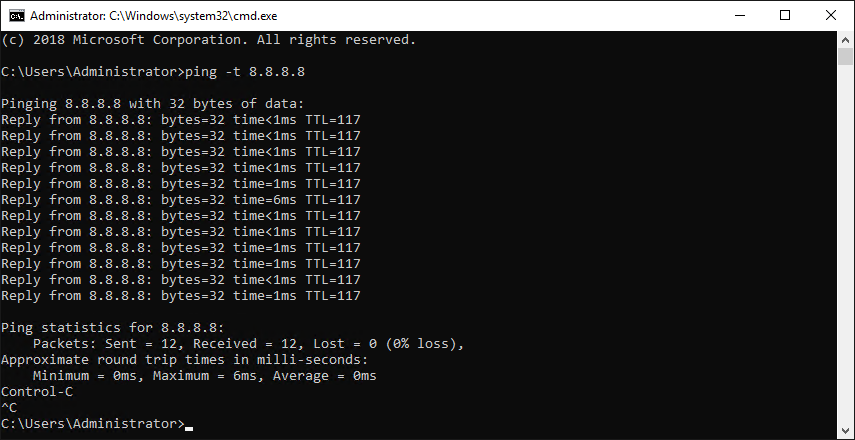
In the above command, -t parameter allows the system to ping until we cancel it, and if you don’t use it, pinging will stop after 4 times automatically, and 8.8.8.8 is Google’s DNS Server IP.
💡 Tip:
If you press the ctrl + c buttons simultaneously, the pinging will stop, and you will see the ping result.
If you see a replying ping to 8.8.8.8, the issue is not the network, and you can pass to the next step, but if you see a time out, you should inform your RDP server provider to check the issue.
3. The Remote Setting Is Not Allowing The Connections
A remote setting is where you choose that RDP connections are allowed in your server or not. In this section, we check that it is allowed to accept the RDP connections or not.
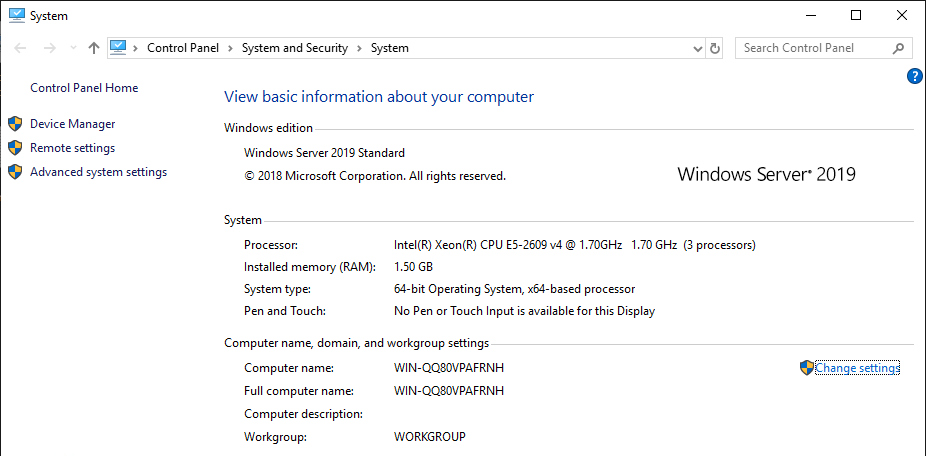
To open the remote setting, press the Windows Key + Pause Break button simultaneously.
If that didn’t work for you, you could open it through Run. Open the run section by pressing the Windows Key + R, type the below command, and press enter.
control /name Microsoft.System💡 Tip:
In Windows 10, you can open the system setting by right clicking on This PC and choosing properties.
On the new windows opens, choose Remote Setting in the left panel. You will see that another window opens. In this section, the remote setting should be on the option “Allow remote connections to this computer or not.” If it is not, choose it and press enter.
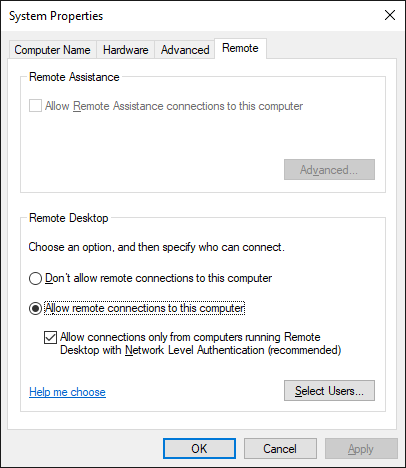
Now recheck your RDP connection. If still it is not resolved, go to the next step.
4. Remote Desktop Service Is Stopped
Windows has a service for each of its packages, and you can manage them through the service manager. If the remote desktop service (RDS) is disabled, you will lose your connection to the server.
To open services, press the Windows Key + R and type the below command, and press enter.
services.mscA new window will appear; Search for the “Remote Desktop Service” in this window. If its status is running, so this is not the issue. But if you don’t see the status as running, double click on it, choose the startup type as automatic, click on start and while it is started, choose OK.
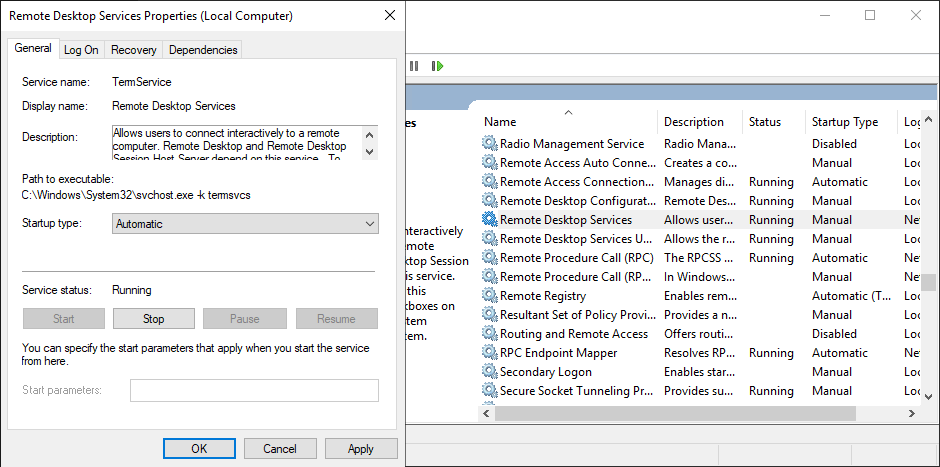
Now check your RDP connection. If still it is not resolved, you will have to check the next step.
5. Firewall Has Blocked RDP Connection
A firewall can easily block your connection to the RDP server. This happens because of the configurations that we make on the firewall.
Inside the firewall, you can block or unblock remote TCP connection, or also you can whitelist or blacklisted IPs to have remote access to your server.
To check if the issue is the firewall or not, first, deactivate it and check the connection. Open the RUN section by simultaneously pressing the Windows Key + R and type the below command.
firewall.cplA new window will appear; from the left panel, choose “Turn Windows Defender Firewall on or off.” Now turn off both private and public network firewalls.
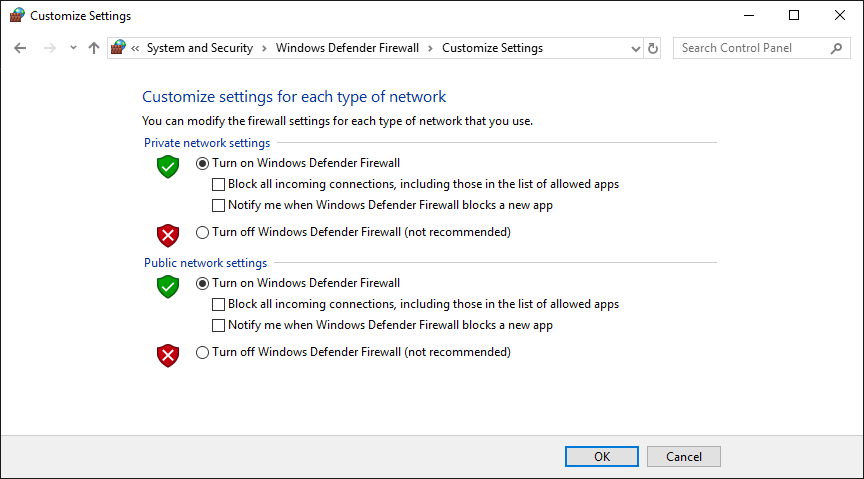
Check the connection to your RDP again. If you could connect to the RDP or your Windows VPS by turning off the firewall, so maybe the remote TCP connection is not enabled on your firewall.
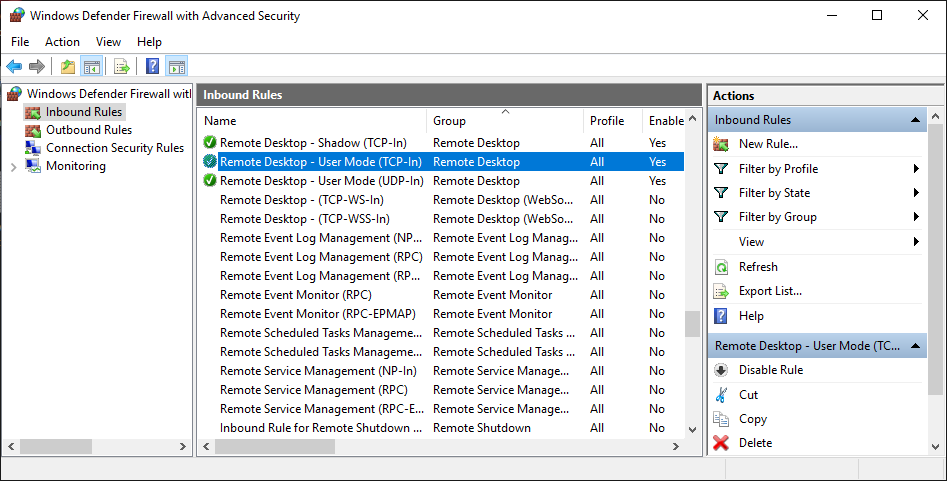
To enable remote TCP connection, enable the firewall again and choose the “Advanced Setting” in the left panel.
Find “Remote Desktop – User Mode (TCP-In)” in the new windows that appears, choose it, and enable it from the right panel by choosing Enable Rule.
6. RDP Default Port Has Been Changed
The remote desktop port is 3389 by default. Changing this port is one of the actions RDP owners take to increase the security after they buy RDP. Also, some RDP providers change it before providing the RDP to the clients.
If the RDP port has been changed, you should put it behind the IP when connecting to the server. The format of the IP that enters in the remote desktop connection should be like this.
Your Server's IP Address:Port Number --------> 54.254.85.100:55549Now, if you’ve not changed it but forgot it, ask the RDP provider to tell you, but if you’ve changed it by yourself, you can find or change it through the registry setting.
To enter the registry, type the below command in Run Window.
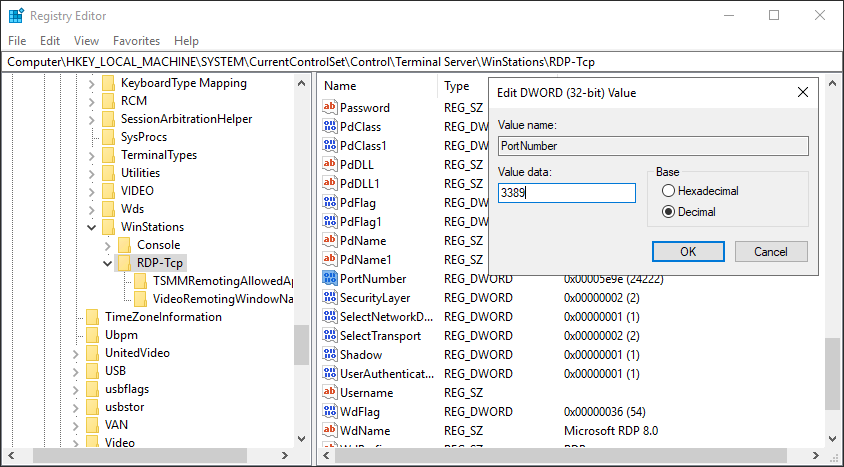
regeditOnce it is opened, go to the below path.
HKEY_LOCAL_MACHINE\System\CurrentControlSet\Control\Terminal Server\WinStations\RDP-Tcp
Find the PortNumber option and open it. Put the base as a Decimal, and you will see the port number.
✍️ Note:
When you change the RDP port, you should add the new port number to the firewall to allow the connections. To do this, you can refer to our article as open a port on windows vps firewall.
7. Problems caused by SSL certificate
Users typically use SSL and VDI products that support SSH secure socket layer to establish safe and encrypted communication with VDI sessions outside the network. The use and verification of SSL security certificates are a requirement for communication through SSL. SSL security certificates, along with the advantages it offers, create problems in remote desktop connection.
This problem occurs when client computers do not trust the certificate authority. In addition to the correct configuration of the remote desktop connection, organizations should purchase security certificates from trusted and well known authorities and create conditions so that clients can trust internal certificates.
The best way to avoid such problems is to download a copy of the certificate authority’s root certificate and provide it to network clients in the client’s certificate store so that clients can trust the certificate authority associated with the certificate and confirm the certificate related to the server. In this situation, the problem with the RDP server not connecting will not be caused by SSL certificate problems.
Note: Make sure that the name of the certificate used by the server and the name of the server match and that the certificate is not expired. Otherwise, you will face problems in confirming the certificate.
To ensure certificate authority approval by network clients, go through the following steps:
- Enter the command prompt and run the MMC command.
- From the File menu, select Add / Remove Snap-In Command.
- After selecting the certificates from the list of snap-ins, select the Add option.
- If requested, continue by selecting Computer Account > Next.
- Then select Local Computer > Finish > Ok.
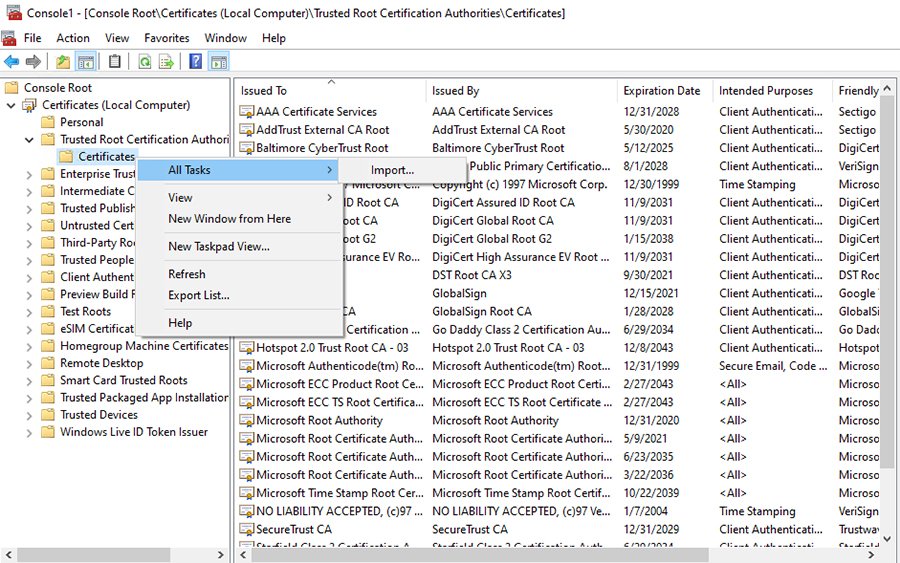
- Look for Certificates (Local Computer) \ Trusted Root Certification Authorities \ Certificates using the tree console.
- To check whether your certification authority is approved, scroll through the list of certification authorities.
- If your certification authority is not listed, right click on the Certificates container and click All Tasks > Import.
- After confirming the certification authority, enter the root certificate so the Windows operating system can trust the SSL certificate.
- To check the existence of the SSL certificate, select Certificates (Local Computer) > Personal > Import commands using the tree console.
- If there is no SSL certificate or you find it expired, right click on the Certificates container and then select All Tasks > Import commands from the shortcut menus.
Follow the steps to import the certificate.
8. Changing host IP address and DNS problems
Sometimes DNS problems cause clients not to be able to connect to RDP Server. Changing the host’s IP address by the admin causes issues for clients to connect to the host. This problem is solved when the client’s DNS resolver cache expires. Use our guide to expire the client’s DNS resolver cache:
- Press the windows key + R to see command line console.
- type CMD to access the Command Prompt window.
- Run
IPConfig /FlushDNScommand.

Some clients may benefit from the external DNS server and have problems when connecting to the host, in which case the problems will not be solved in the organization’s private network. Changing the client’s IP address settings and replacing the organization’s DNS servers with external DNS servers can solve this problem. Also, connecting to the remote system through the IP address instead of the hostname can be another way to solve the connection problem. Therefore, to properly configure the connection between the DNS server and the endpoint, follow the steps below:
- Press the windows key + R to see command line console.
- type CMD to access the Command Prompt window.
- Then run
IPConfig /allcommand. - Check the DNS server and network adapter match. If there is a mismatch, set the desired DNS server in the PC’s IP address specification or set the PC to use a DHCP server.
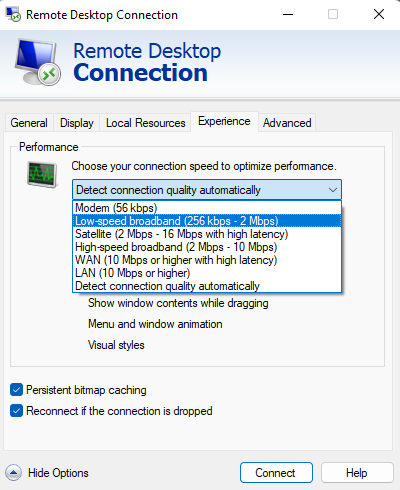
9. RDP connection interruption due to weak bandwidth support
Sometimes the bandwidth cannot support your needs in connecting to RDP sessions so the RDP Client will face communication problems. This problem appears in different ways, you may get a “Reconnecting” error, or your screen will be frozen or black.
Sometimes bandwidth can not meet your needs when connecting to RDP sessions during the session. To manage bandwidth and avoid such problems, when connecting to the RDP server, stop the applications that consume bandwidth and follow the steps below to manage bandwidth consumption:
- Run the RDC (Remote desktop connection) program.
- Select Show Option.
- Click the Experience tab and select the Low speed broadband option from its sub menu.
- Then select the Connect option.
10. Lack of sufficient capacity to connect to the RDP server
One of the reasons why the client’s connection to the RDP Server is rejected is exceeding the capacity of the infrastructure to connect to the remote desktop. If the RDP server is busy and does not have the capacity to accept a new client, to avoid reducing the performance of other existing RDP sessions, the connection of another client will be rejected, and you will encounter an error in starting the virtual remote desktop session.
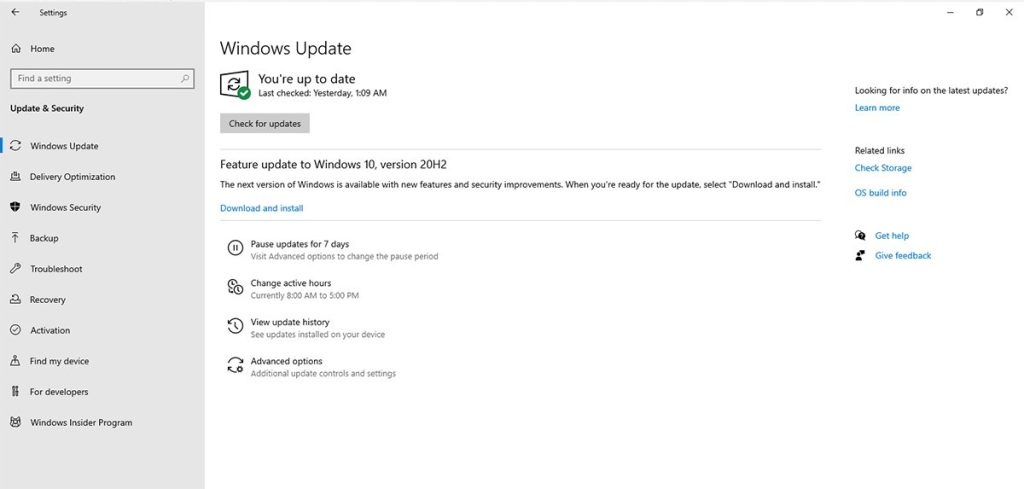
11. CredSSP problems
CredSSP or “Credential Security Support Provider Protocol,” is a security support provider which helps you send user credentials from a client computer to a Windows server to set up RDP sessions using TLS or (Transport Layer Security) as an encrypted pipe.
Microsoft has found a credssp bug in rdp, and to avoid the vulnerability, with the CredSSP update, it is necessary to update both client and server computers to run them properly. Therefore, the host computer and the client must use the updated CredSSP provider to establish an RDP connection. Otherwise, they will receive an authentication error.
To solve this problem, you need to update the versions of the operating systems of the host computer and the RDP client and make sure that they are using supported versions of Windows. So follow the steps below with this goal:
Settings > Updates & Security > Windows Update tab > Check for updates
12. Antivirus activation
Installing and activating some antivirus blocks access to the RDP server. Therefore, we recommend that if you use antivirus software on Windows, disable the antivirus and connect to the RDP Server. If your problem is solved, do not activate the antivirus. If not, try other methods to solve this problem.
13. Windows update
Sometimes, by updating the version of Windows, the newly installed files disrupt the operation of the Remote Desktop. After checking the newly installed files and troubleshooting, you can fix this problem.
14. Storing credentials and disrupting connection to RDP Server
Credential related problems are another factor in RDP connection problems. When you regularly connect to RDP Server, credentials are saved automatically. As a result, you cannot connect to another RDP server due to saving previous credentials and its problems. Solving this problem is not difficult; you can reset and delete the previously saved credentials. For this purpose, follow the steps below:
- Access the Remote Desktop by pressing the Windows key + S .
- From the start menu, find and run Remote Desktop Connection.
- Select the Show option.
- Select the Settings option from the submenu of the Advanced tab.
- Then select Delete Credentials.
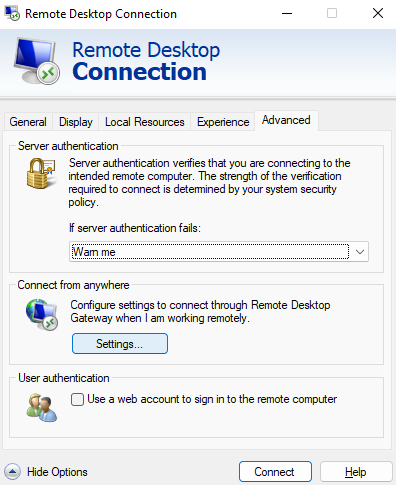
Finally, you have successfully deleted the user information to connect to another RDP Server previously saved, and you can replace the information related to the RDP Server you want. Now you can connect to the RDP server again and check if the problem persists. This method is also worth trying; sometimes, it has solved the problem of not connecting to the RDP Server.
15. Incorrect Group Policy settings
Incorrect Group Policy configuration is one reason for the failure to communicate with the RDP server. To set Group Policy correctly, follow the steps below:
- Press the Windows key + R together and enter
gpedit.mscin the Run window. - Select Computer Configuration and then Administrative Templates.
- Then click on Windows Components > Remote Desktop Services > Remote Desktop Session Host > Connections.
- Find the Allow users to connect remotely by using the Remote Desktop Services option, and if it is disabled, enable its settings or change to the Not Configured setting option.
16. Not saving the IP Address and name of the RDP Server in the host files
Experience has shown that Windows does not allow connections to hosts whose names and IP addresses do not exist in the Windows hosts file, which is a system file. So, if you have not connected to the RDP Server before and get The RDP Server Is Not Connecting error on your first connection, manually enter the IP address and name of the RDP Server you want into the contents of the host’s file in Windows. How? We will explain further:
- With administrative privileges, open the command prompt and run the cmd command.
- Type
cd C:/Windows/System32/Drivers/etcto access a list of hosts stored on your Windows system. In the displayed list, search for the IP of the RDP server you want. If you don’t find the desired RDP server IP in the list, open the Host file in Notepad. - Type notepad hosts to add the new IP to the host’s file manually.
- When you access the content of the host file, add the IP address at the end of the content of the file and save the file. Then exit the file.
Now you can check the contents of the Host file again and make sure of the changes you made. Also, connect to RDP Server to check if this method solves the problem of not connecting to the RDP server.
17. Problems in Registry settings
RDP connections may have technical problems, so fixes such as registry key optimization to set RDP connections based on RPC/HTTP connections instead of HTTP/UDP can solve the problem of failing to connect to the RDP Server.
Resetting the Registry editor to enable the RDP protocol can be a helpful solution in solving the problem of not connecting to RDP. For this purpose, follow the steps below:
- To access the Run window, simultaneously press the Windows key + R buttons.
- In the Dialog box, type Regedit and press Enter.
- In the left pane, navigate to HKEY_CURRENT_USER > Software > Microsoft > Terminal Server Client.
- Right-click in the space on the right pane and click on New > DWORD (32-bit value).
- Set the name of the new DWORD as “RDGClientTransport.”
- By double-clicking on the newly created file, select the value data setting option and set Value data to value 1. Then click OK and exit Registry Editor.
18. Network security features
One of Windows’ measures to ensure security is blocking public networks, which can be a reason for RDP connection failure. Therefore, we need to make changes to the network settings. One of the practical changes in the network settings to solve this problem is to change the connection settings from public to private. For this purpose, follow the steps below:
- Go to Control Panel and select Network and Internet.
- Select Status.
- Select the Change Connection Properties option and look for it on the right side.
- In a window that opens, activate the “Private” button by selecting it as your network profile.
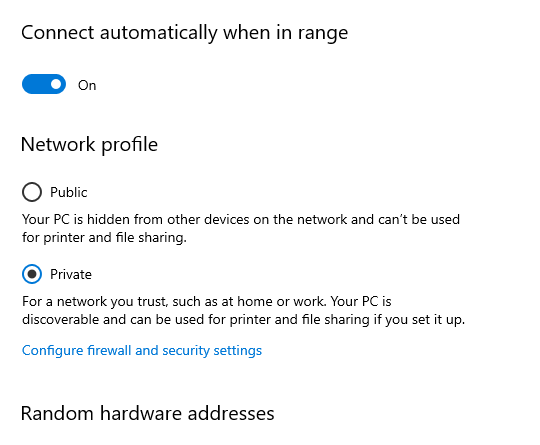
Your problem should be solved now. Reconnect to the RDP Server and check if you get The RDP Server Is Not Connecting error.
19. Connecting to a VPN
In some situations, using a VPN disrupts communication with the RDP Server. So also try this method of disconnecting the VPN when connecting to RDP. Of course, the connection problem has various reasons, including improper setup, network adapters, ports, and incorrect settings. But don’t overlook the effect of VPN on RDP connections.
20. Custom scaling is enabled
Using the custom scaling feature can cause disturbances in Remote Desktop performance. So it is better to set the scaling to default to avoid such problems. Follow the steps below to disable the custom scaling feature:
- Press the Windows key + I simultaneously to access the settings window.
- Click on the System option, and if the custom scaling feature is enabled, it will receive the message “A custom scale factor is set.”
- Select the Turnoff custom scaling option and exit the settings.
According to the reports we have received from users, this solution has solved the RDP connection issue, so give it a try.
FAQ
What are the most efficient ways to fix the RDP connection problem?
- Changing RDP settings and enabling Allow Remote Desktop connections
- Checking the RDP listener port and checking whether other programs are using the RDP port
- Checking that the RDP service is active
- Checking firewall rules about RDP connections
- Add RDP Server Ip address to host files
- Reset Remote Desktop user information
- Change in network features
- Changes in the settings of the Group Policy editor
How to check RDP connections in CMD?
To access information such as session name, user name, session status, session ID, login time, and idle time of all users who are logged in to the remote server, in the command line, a query from user /server: SERVERNAME. You can also query session /server: SERVERNAME.
What is the port for RDP?
RDP uses TCP port 3389 to communicate with remote computers.
Conclusion
The RDP connection may be disrupted because of different issues. Issues like network, system crash, remote connection port, etc.
In this article, we checked all of these items to find an answer to the question “Why Remote Desktop Is Not Connecting.” I hope you’ve found this article useful and also have found the issue of your connection.
If you’ve not found the issue, let us know, and we will help you find it.
Also, please tell us if you’ve disconnected from your Windows VPS or RDP server because of a reason that we have not discusses in this article.