Set Up SSH Key on Linux Server
SSH Key on Linux Server is a secure authentication method using a private-public key pair to enable passwordless and encrypted remote access, enhancing server security and reducing login vulnerabilities.
🤖AI Overview:
SSH Key on Linux Server enables secure and passwordless connections using cryptographic keys instead of passwords. It involves generating a private key on your local machine and uploading the corresponding public key to the server, strengthening security by preventing brute-force attacks and unauthorized access.
SSH protocol definition
Secure Shell Protect, abbreviated as SSH, is an open-source network protocol that establishes a secure, encrypted connection to a remote computer or server through a text-based user interface. After establishing a secure SSH connection, a shell session is started that allows you to issue commands to the remote server from the SSH client on your local machine. Usually, network and system administrators prefer SSH over other methods to communicate remotely to a system due to its high security. (The article What is SSH port? Provides more information about SSH ports and how they function.)
Why use SSH public key to connect to the remote server?
In public key authentication with SSH, as you know, you no longer need to enter a password to connect, and in this method, you need to create and store encryption keys on the local computer and then configure your server to recognize and accept those keys.
Most SSH clients rely on password authentication by default to access remote servers; Regardless of this fact, this access method is vulnerable to brute-force attacks and other security flaws. The use of keys in authentication, with its advantages, minimizes many risks and vulnerabilities:
- Safer against brute force attacks.
- No authentication credentials will be revealed if a hacker compromises a server secured with SSH keys.
- Automated tools and scripts can access servers without human intervention or entering a password. For example, using a configuration management tool like Ansible, you can schedule automatic and frequent updates to your servers and deploy them without human intervention.
How does SSH public key authentication work?
SSH keys are always created in pairs and stored in text files. Each key pair has two parts.
The private key is known as id_rsa and is stored on your local machine in a safe condition, so it’s essential to ensure no one else has access to it.
Caution: Never reveal your private key to anyone.
The file id rsa.pub is the standard format for a public key. To log in to a server, you must first upload your public key to that server. Sharing the public key with others does not cause any problems.
“SSH Key” means your public SSH key (id rsa.pub) of a website or service. In order to speed up the process of pushing code changes to remote repositories, you can store your SSH public key on the service’s servers, such as GitHub and Gitlab.
Secure access is possible with the help of public and private keys. However, how? The authentication system consists of the following components that are related to each other:
- Private key
- Public key
- Authentication algorithm
If you encrypt your public key, only you can decrypt it with your private key. As when you encrypt data with your private key, your public key is the only way to decrypt the data encrypted with your private key. Additionally, we provide our public key to the other device to enable secure access between servers.
Either way, SSH relies on a background algorithm to perform encryption and decryption. The process is as follows:
Signed communication: Your private keys are used to sign all outgoing messages.
Communication Verification: The public key is stored securely on your server. This public key can be used to verify the authenticity of a signed message. Signing a message makes it possible for others to read it after decryption. However, once they decode your message, your recipient can undoubtedly verify that your message came from you. A cryptographic algorithm such as Diffie-Hellman is needed to match and verify these keys.
How to Enable an SSH Connection
To establish an SSH connection, you must first ensure that the necessary client and server software are installed on the local and remote machines.
Step 1: Set SSH keys
As we explained, if you want to avoid the risk of sensitive and important information being misused by hackers, the best way to connect to a Linux server is to use SSH keys for authentication. Authenticating with SSH keys has the potential to make the login process much simpler and more secure. When used correctly, keys allow you to quickly, easily and securely access your cloud server in the cloud.
First, you need to enable the ability to log into the SSH server with a key. For this purpose, you enter the SSH environment, and in the main directory of your cloud server account, execute the following command to create a hidden folder to add SSH keys to that folder.
mkdir -p ~/.sshThen use the following command to change the directory’s permissions so that only you can access it and change the folder’s access level to 700.
chmod 700 ~/.sshBy creating this folder, you create a safe place to store SSH authentication keys. It should be noted that any user who wants to connect using SSH keys for authentication must repeat these steps in their profile because the keys are stored in the user’s home directory.
Step 2: Use Open SSH to generate SSH key on Linux server
OpenSSH is a popular open-source SSH tool, especially for Linux distributions. Open SSH, with its simple setup process, is often used to connect, and in this method, both the client computer and the terminal server must be accessible.
Note: Ubuntu OS does not come with a pre-installed SSH server.
If you are currently using a system that has Open SSH or a Linux operating system, continue the same steps with us. If you are using PuTTY, you can skip to the next section, as we will explain the steps to be done in PuTTY.
1. A new key pair can be created in the terminal by entering the following command:
ssh-keygen -t rsaIn this section, to save the keys, you specify the location and title of the file for the key generator, and for this purpose, you type a default name or a new name and press Enter.
2. Creating a passphrase for the keys upon request
This part is optional and is done to protect your private key in case of abuse. In this step, you set the desired password and press Enter, or you can skip this step without setting the password and press Enter twice to confirm.
Note: Remember that not all automation tools can decrypt private keys protected by a passphrase.
3. Copy and upload the semi-public part of the private and public keys to the cloud server
In this step, instead of user and server, enter the address and username of the server for which you have set up authentication based on SSH keys.
ssh-copy-id -i ~/.ssh/id_rsa.pub user@serverHere it is assumed that the defaults were used when storing the key pair. In that case, just replace your key name with "/.ssh/id rsa.pub" above.
To continue, please enter your SSH server password when prompted.
You can now use the key pair to authenticate with your server, although each connection still requires a passphrase.
4. Set up SSH Agent to save keys and avoid re-entering the password every time you log in (optional)
Just enter the following commands to add the SSH private key and configure the Agent.
ssh-agent $BASH
ssh-add ~/.ssh/id_rsa
When adding a key, you’ll be prompted to enter your key passphrase and specify the file name and address of the private key if you’ve renamed it or saved it somewhere other than the default location.
After that, you can use authentication keys when connecting to your cloud server, and you only need to go through the previous two steps every time your computer restarts to get past the key authentication step.
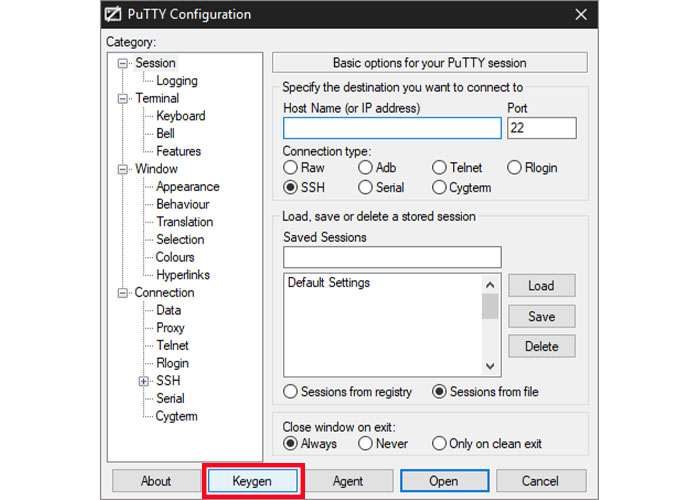
Creating key pairs using PuTTYTray
If your operating system is Windows or if you want to generate SSH key pairs using PuTTYTray, you must do it using PuTTY’s internal key generator.
If you do not have this software, The first step is to set up and install the Putty Tray program and putty program on your computer.
1. To start, click on the Keygen option at the bottom of the PuTTY Configuration window.
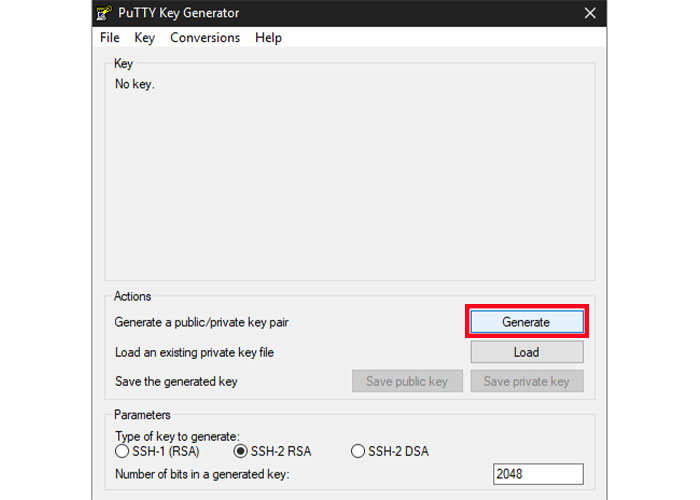
Note: In the Key Generator window, do not select SSH-1, which is an old and obsolete version, as the key type, and set SSH-2 RSA, which is widely supported by modern servers and clients.
2. To start, just select the Generate button.
3. During the next few seconds, while the process is finishing, move your mouse over the empty space in any way you like to help create randomness.
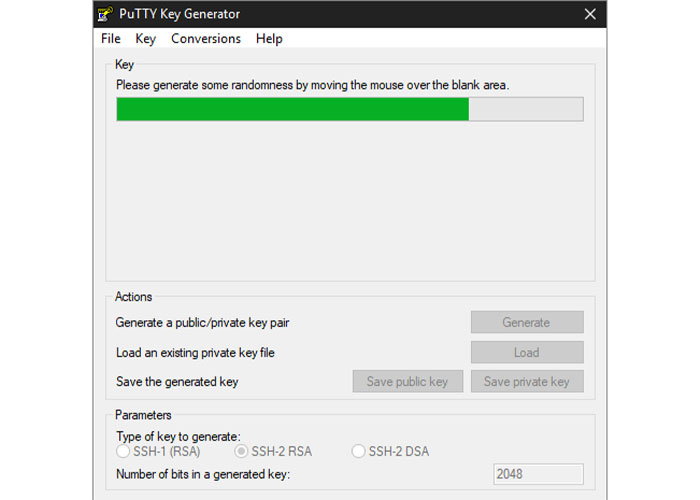
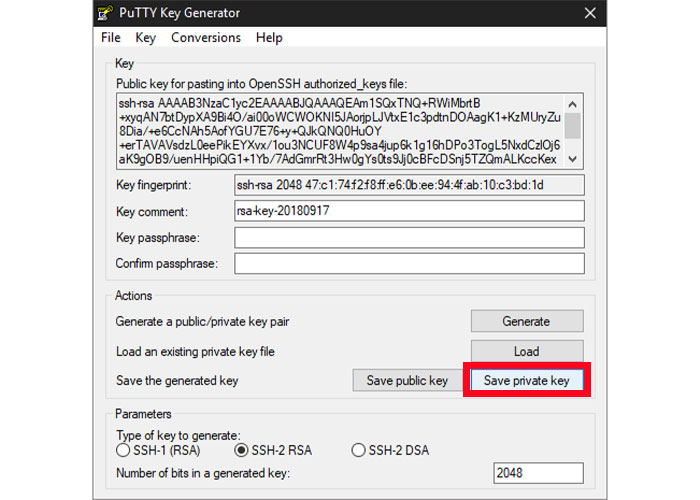
PuTTY displays the public key along with relevant information when keys are generated, making copying it simple.
4. Add an extra layer of protection by filling in the 2 blank fields with a key passphrase. In such a way, if someone else copies it, the passphrase increases the security of your key as a protective layer and does not allow unauthorized use of your key by another user. On the other hand, not all automation tools will be able to access private keys protected by a passphrase. (This step is also optional.)
5. By selecting Save private key option, save the private key in a safe and secure place. As long as your computer is password protected, it doesn’t matter where the folder is in your user directory, wherever it is, it’s safe. Ideally, you can copy the public key to the clipboard before closing the keygen, and in case you forget, you can retrieve it when you need it.
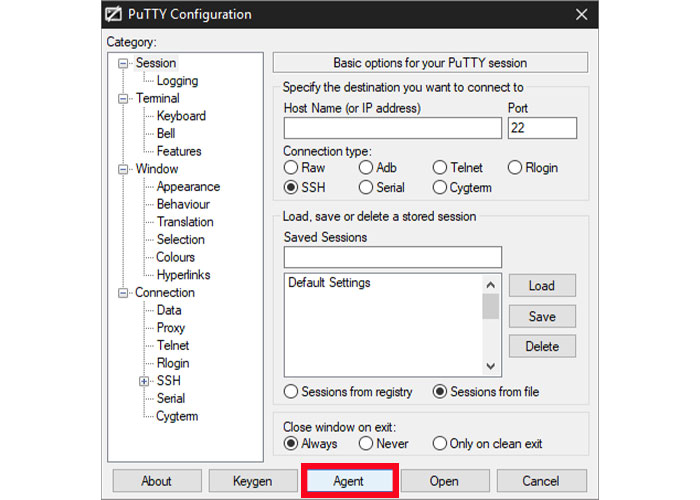
Note: After creating a new key on your computer, you must set and add it to the PuTTY key agent.
6. The key manager can be accessed through the PuTTY Configuration window by clicking on the Agent button.
7. To import a private key, open the key list, click the Add Key button, locate the key file you downloaded, and click Open.
Note: If prompted, type your key passphrase.
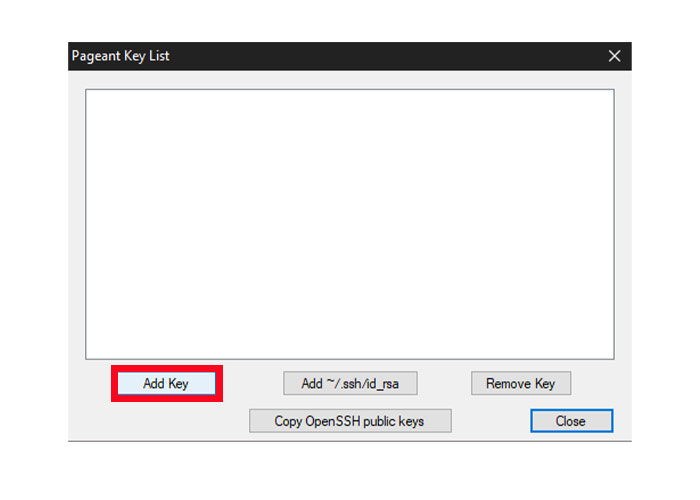
The key will now be available in your PuTTY client, but you still need to transfer its public key to the server.
8. Then connect to your cloud server via SSH and go to the SSH key directory of the server via the following command
Cd ~/.ssh/9. Start the default Open SSH file or open an existing file to find authorized_keys public keys.
sudo nano authorized_keys10. Right-click the SSH client window and then select “Paste” to import the public key. For OpenSSH to read the key, it must be entered on one line.
Important: Don’t forget to select the key type in this case, ssh-rsa. as per the example below.
ssh-rsa
AAAAB3NzaC1yc2EAAAADAQABAAABgQDEeV/UKOVqNUwmED8PO1E6wY3ITEbWx30rAgGudzTGnYI8fB176nlmIS+O01vaI4fMYwO9Chg3mzVT2+4AkTBm1sXnDdzhNNnkclipMXdmAHnRtzU9kREFZU0/yyOhorzqxWBi0LQxpjTAZawi+8ysH7PGnNlX3FUObZcmHis0oD/C7ll6DwX4WVSjh2JGcaIhbhB+sovxW5duTDqyuyKpRsbyBD0+wNjSuJFjh5MnXJqcqrEUaPRoe2wQ9k7q0K2KOXAmYYPUWrLY6N+jjYdnkyP9XWWkz6c7Qvx7m/dBfgpyJbPryWbSZ8PsvSgtDTIND/jNfwmgQjOCGgsZlmCsvRIixzh2uNmFCg75wyD6f/wdZ5gq1HPFdyLblHs46P9ClfMbWJt9APx7c1SRE+qMbdLf/5/vNGiGHr6bBXKRX70+XODl04shFQpjm1kKkG9qHkp3bOSot4Da987dRHMhAbd0d3QdS8wCg7s6NPk4qDVnR6BCxiM2vbOD1B4gWQ8= user@server
After the public key is added to the list of allowed keys, you can close the editor and save the file.
Then log back into your server with your public key to test it. With the key, you should be logged in automatically without asking for a password. If you can’t connect, ensure the SSH Agent’s private key is Unlocked and try again. ( You already know that the Putty program allows for connection to a Linux VPS. Read the article How To Connect To A Linux VPS Using Putty(SSH) if you need a comprehensive guide on using Putty to connect to a Linux VPS.)
Disable password authentication
After successfully setting up and testing SSH key authentication, disable password authentication and protect yourself from brute-force attacks when logging into your Linux server.
1. Type the following command to access the SSH configuration file.
sudo nano /etc/ssh/sshd_config2. Set password authentication to “no” to avoid clear text passwords.
PasswordAuthentication no3. Make sure public key authentication is enabled for security purposes.
PubkeyAuthentication yesThen after making the changes, save it and close the editor.
4. Restart the SSH service via the following commands to apply the changes.
sudo systemctl restart sshdIf you have followed all the steps correctly, Now you can connect to the server without needing a password by clicking on your server name. Your cloud server is one step closer to being secure now that you’ve done this. Since your server does not allow simple passwords and the RSA key is very difficult to use, any malicious attempts to connect to your server will be rejected during the authentication process.
Conclusion
SSH Key on Linux Server provides a secure, efficient, and highly recommended method to authenticate users remotely.
This guide walked you through understanding SSH keys, creating them on your client machine, properly configuring your Linux server, following best practices, and troubleshooting.
Implementing SSH key authentication significantly enhances your server security by eliminating risks associated with passwords and enabling smooth, automated secure connections.
By mastering these steps, you take a solid step toward professional Linux server administration and security.
FAQ
2. Why should I use SSH keys instead of passwords on my Linux server?
Using SSH keys is safer than passwords because they are immune to brute-force attacks, do not expose credentials during login, and allow automated, passwordless connections to your Linux server.
3. How do I generate SSH keys on a Linux server?
You can generate SSH keys on Linux by running the command 'ssh-keygen -t rsa' in the terminal. This creates a private and public key pair, which you can then upload to your server for authentication.
4. What steps are needed to set up SSH key authentication on a Linux server?
Setup involves creating the "~/.ssh directory" with proper permissions, generating SSH keys, copying the public key to the server using 'ssh-copy-id', and optionally configuring an SSH agent to manage keys.
5. How do I connect to a Linux server using SSH keys without a password?
After setting up SSH keys and uploading your public key to the server, you can connect using an SSH client. The server will authenticate your key, allowing login without typing a password unless a key passphrase is set.
6. Can I use SSH keys on Windows to connect to a Linux server?
Yes, Windows users can generate SSH keys using tools like PuTTY or PuTTYTray, then upload the public key to the Linux server to enable secure, passwordless SSH connections.
7. How do I improve security by disabling password login when using SSH keys on Linux?
Once SSH key authentication works, edit the SSH configuration file "/etc/ssh/sshd_config" to set 'PasswordAuthentication no' and 'PubkeyAuthentication yes', then restart the SSH service to prevent password logins and enhance security.
8. What should I do if my SSH key is lost or compromised?
If your SSH private key is lost or compromised, generate a new key pair, update the public key on your Linux server, and remove the old public key from the server to maintain secure access.
9. Why do I need to protect my SSH private key on Linux?
The private key is the secret part of your SSH key pair. If someone gains access to it, they can access your Linux server without a password. Protect it by storing it securely and using a passphrase if possible.
10. What is the role of the SSH agent in managing SSH keys?
The SSH agent stores your private keys in memory so you do not need to enter a passphrase every time you connect. It helps manage keys for easier and secure SSH access on your Linux server.