How to Install LOMP on Ubuntu [OpenLiteSpeed, MariaDB, PHP]
Web developers need to run a popular web server and database software, programming languages, such as OpenLiteSpeed, MariaDB, and efficient PHP programming language and so on to improve Linux server performance in hosting high-traffic sites and dynamic web applications.
LOMP stands for Linux, Open LiteSpeed, MariaDB, and PHP. LOMP stack is defined as a popular system solution for web developers and a set of open-source software that are compatible with each other and complement each other’s functions, which are installed to equip the Linux server in optimizing server performance.
You may ask, what is the usage of the softwares provided by LOMP?
We will give a brief explanation of LOMP components for your familiarity:
Linux: Linux operating system which is the most popular operating system.
OpenLite Speed: An open-source, fast, lightweight web server with efficient performance that responds to requests. Open LiteSpeed is the best option for high-traffic websites with optimal consumption of resources and efficient management of simultaneous requests.
MariaDB: is a database server that stores, manages, and organizes data. MariaDB is one of the modern and advanced databases that has replaced MySQL by providing features such as stability, scalability, and super-high speed.
PHP: It is one of the useful programming languages used to develop web applications and dynamic websites. PHP is also well compatible with Open Lite Speed web server.
Therefore, the LOMP stack is one of the practical solutions for developers who intend to equip their Linux servers. As we have previously taught how to install the popular LAMP stack on an Ubuntu Linux server, in this article, we are also going to relieve you from worrying about how to install the LOMP stack and comprehensively teach how to install LOMP on Ubuntu. If you are interested in learning how to install LOMP on Ubuntu, read this article till the end.
prerequisite
In this article, we decide to install MariaDB 10.7, PHP8.1, and OpenLite Speed 1.7 on Ubuntu 20.04. For this purpose, you should consider the minimum conditions for the installation and operation of LOMP, which are as follows:
- Ubuntu Linux VPS (preferably version 22.04)
- User account with sudo privileges
- RAM with at least 1 GB of available memory
- Setting up a strong firewall
- Access to the Linux command line
Now that you have considered the installation prerequisites, don’t waste time and proceed to install the LOMP stack, which is a very simple process.
Steps to install OpenLiteSpeed on Ubuntu
Running the Linux operating system on the server implements the L component in the LOMP stack. Another component of the LOMP pack is OpenLite Speed, in this part of the article we will teach how to install OpenLiteSpeed.
Step 1: Adding the OpenLiteSpeed repository to the Linux server
Since the OpenLite Speed repository contains its codes, Therefore, the requirement to install OpenLite Speed on an Ubuntu Linux server is to add the OpenLite Speed repository to the server by executing the following command:
sudo wget -O - http://rpms.litespeedtech.com/debian/enable_lst_debian_repo.sh | sudo bashThe previous command you ran will add the OpenLite Speed repository to the Linux server’s apt package manager resource list by running a script.
Note: If you run thesudocommand for the first time in an SSH session, you may be asked for the password of the non-root user account.
Step 2: Updating the list of Ubuntu Server packages
After downloading and installing the Open Lite Speed repository, it is time to update the cache of the package manager. Updating the Ubuntu server packages is done to apply the OpenLite Speed repository script changes, so enter the following command to update the list of Ubuntu server packages:
sudo apt update -yStep 3: Installing Openlitespeed and its dependencies
In this step, you will install Open Lite Speed and its dependencies:
sudo apt install openlitespeed -yThe-yoption is to confirm the command you have executed and confirm the password if requested.
Step 4: Startting the OpenLite Speed service
After the packages and dependencies are installed, you can start the Open Lite Speed service:
sudo systemctl start lswsStep 5: Checking the status of the Open Lite Speed service
At this step, you can make sure that the Open Lite Speed service is running correctly by executing thesystemctl statuscommand:
sudo systemctl status lswsOutput:
-
lshttpd.service - OpenLiteSpeed HTTP Server

Loaded: loaded (/etc/systemd/system/lshttpd.service; enabled; vendor preset: enabled)

<span style="color: #008000;">Active: active (running)</span> since Mon 2023-01-16 08:59:09 UTC; 2min 26s ago

Process: 32997 ExecStart=/usr/local/lsws/bin/lswsctrl start (code=exited, status=0/SUCCESS)

Main PID: 33035 (litespeed)

CGroup: /system.slice/lshttpd.service

├─33035 openlitespeed (lshttpd - main)

├─33044 openlitespeed (lscgid)

└─33073 openlitespeed (lshttpd - #01)
Seeing Active: active (running) in the output of thesystemctl statuscommand indicates that the Open Lite Speed service is active on the Ubuntu server.
Note: You can enable and disable the automatic execution of the OpenLiteSpeed service using thesystemctlcommand.
Finally, you succeeded in installing the Open Lite Speed web server with its default configuration on the Ubuntu server, but you may not be able to access its web-based management graphical interface due to the traffic blocking of the websites’ ports. you need to make changes to the firewall and open the ports associated with websites for users to access, to access the Open Lite Speed management panel.
Access to the Open Lite Speed web-based management interface
The Open Lite Speed web server provides a management panel based on a graphical user interface and a sample website, where users can manage reports and configure SSL, Virtual Host, and Listeners through the management panel user interface. The Open Lite Speed sample website is well integrated with PHP and CGI scripts and offers a password-protected page and an error page.
To be able to access Open Lite Speed’s web-based management interface, you must configure your server’s firewall to allow traffic to pass through TCP to the ports required by the user interface-based management panel and ports 80,443,7080, and 8088.
To allow traffic on the listed TPC ports 80, 443, 7080, and 8088, run the following command:
sudo ufw allow 7080,80,443,8088/tcpThen make sure the changes you made in the firewall rules are applied by running the following command:
sudo ufw statusOutput:
Status: active
To                                Action      From
--                                ------      ----
OpenSSH                           ALLOW       Anywhere
80,443,7080,8088/tcp              ALLOW       Anywhere
OpenSSH (v6)                      ALLOW       Anywhere (v6)
80,443,7080,8088/tcp (v6)         ALLOW       Anywhere (v6)
To view the sample website through port 8088, run the following command:
http://your_server_ip:8088In the output of the previous command, you will see a page similar to the following image:
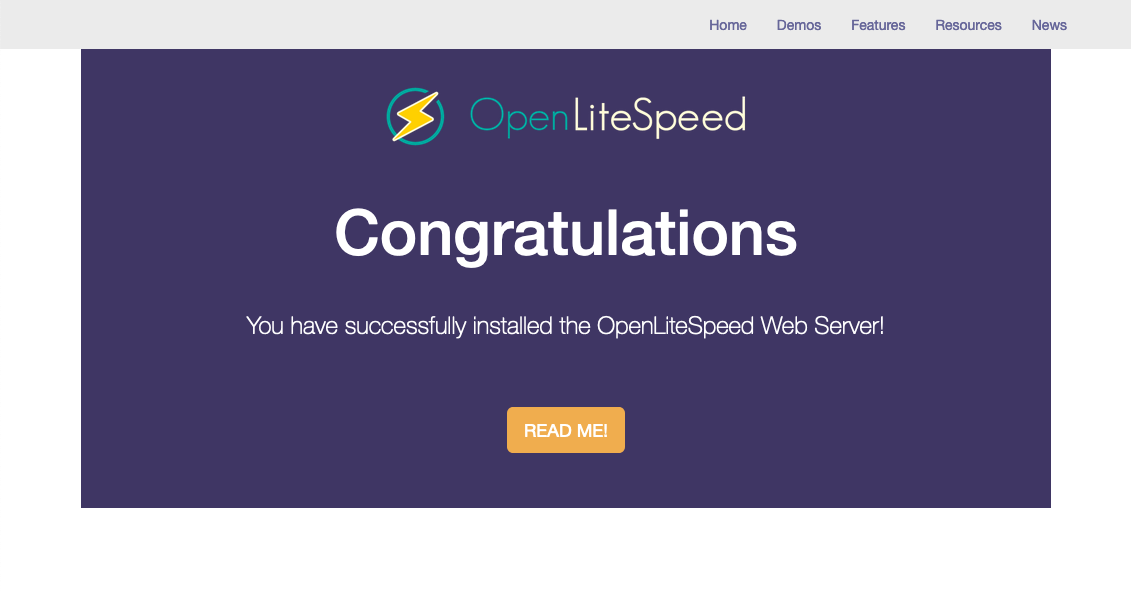
On the page you are viewing, Open Lite Speed web server capabilities are displayed.
Note that even if you do not have PHP installed, since Open Lite Speed is integrated with a version of PHP by default, you will be able to check the status of PHP running in Open Lite Speed.
In this section, you succeeded in launching Open Lite Speed on the Ubuntu server and now you can develop web applications using useful languages and frameworks.
Steps to install MariaDB on Ubuntu
In the LOMP collection, MariaDB is one of the components that is installed and set up to store, manage and retrieve website data. MariaDB is one of the most popular databases that offers advantages such as high performance and scalability.
In this part of the article, we will install MariaDB. Follow the provided instructions to set up MariaDB on the Ubuntu server.
Step 1: Installing MariaDB
Install MariaDB on the Ubuntu server by running the following command:
sudo apt install mariadb-server -yStep 2: Starting MariaDB service
After completing the MariaDB installation, it is time to start the MariaDB service:
sudo systemctl start mariadbYou can also set the MariaDB service to be activated when the server boots by running the following command:
sudo systemctl enableStep 3: Checking the status of the MariaDB service
By entering the following command, you can make sure that the MariaDB service is running correctly on Ubuntu:
sudo systemctl status mariadbIf you receive the message Active: active (running) in the output of the previous command, ensure that the MariaDB service is running correctly.
Step 4: Initial database server security settings
Now that you have MariaDB installed on Ubuntu, you can run a script to apply basic security settings to mariaDB by entering the following command:
sudo mysql_secure_installationIf you are asked for the password of the Root user, complete the steps by pressing the Enter button. Because there is no need to re-enter the root user password.
After you’ve applied the initial security setting, you’ll get the following output:
Output:
NOTE: RUNNING ALL PARTS OF THIS SCRIPT IS RECOMMENDED FOR ALL MariaDB
SERVERS IN PRODUCTION USE! PLEASE READ EACH STEP CAREFULLY!
In order to log into MariaDB to secure it, we'll need the current
password for the root user. If you've just installed MariaDB, and
you haven't set the root password yet, the password will be blank,
so you should just press enter here.
Enter current password for root (enter for none):
OK, successfully used password, moving on...
Then, in response to the “Switch to unix_socket authentication” request, press the Y button and then Enter.
MariaDB will then ask you to specify a strong password, which will be answered by the message, “Set root password?“, press the Y, and define a strong and safe password.
After re-entering the new password, press Enter.
Output:
Setting the root password ensures that nobody can log into the MariaDB
root user without the proper authorization.
Set root password? [Y/n] y
New password:
Re-enter new password:
Password updated successfully!
Reloading privilege tables..
... Success!
The next request in this regard is that you allow the Remove anonymous users. In response, press the Y button.
Output:
By default, a MariaDB installation has an anonymous user, allowing anyone
to log into MariaDB without having to have a user account created for
them.  This is intended only for testing, and to make the installation
go a bit smoother.  You should remove them before moving into a
production environment.
Remove anonymous users? [Y/n] y
... Success
The next prompt is to Disallow logging in and accessing the database as a remote root user, Same as previous prompts, Disallow root login remotely by pressing Y and then Enter.
Output:
Normally, root should only be allowed to connect from 'localhost'.  This
ensures that someone cannot guess at the root password from the network.
Disallow root login remotely? [Y/n] y
... Success!
Also, confirm the request to delete the test database and not access it by pressing the Y button:
Output:
By default, MariaDB comes with a database named 'test' that anyone can
access.  This is also intended only for testing, and should be removed
before moving into a production environment.
Remove test database and access to it? [Y/n] y
- Dropping test database...
... Success!
- Removing privileges on test database...
... Success!
Answer the last request that is presented to confirm the changes made on the server and reload the privilege tables by pressing the Y button.
Output:
Reloading the privilege tables will ensure that all changes made so far
will take effect immediately.
Reload privilege tables now? [Y/n] y
... Success!
Cleaning up...
All done!  If you've completed all of the above steps, your MariaDB
installation should now be secure.
Thanks for using MariaDB!
Congratulations, you have installed and configured MariaDB on Ubuntu Server.
Steps to install PHP on Ubuntu
Fortunately, by installing Open Lite Speed, your Ubuntu system benefits from the version of PHP provided by the Open Lite Speed web server, but it may not be the latest stable version of PHP or you may need a special version of PHP. Therefore, in this part of the article, you can install the desired version of PHP on the Ubuntu server if needed.

Step 1: Checking the version of PHP installed on the Ubuntu server
To check the version of LiteSpeed PHP packages available in Ubuntu, you can also check the information about the pre-installed version of PHP on your sample website from the Test PHP section.
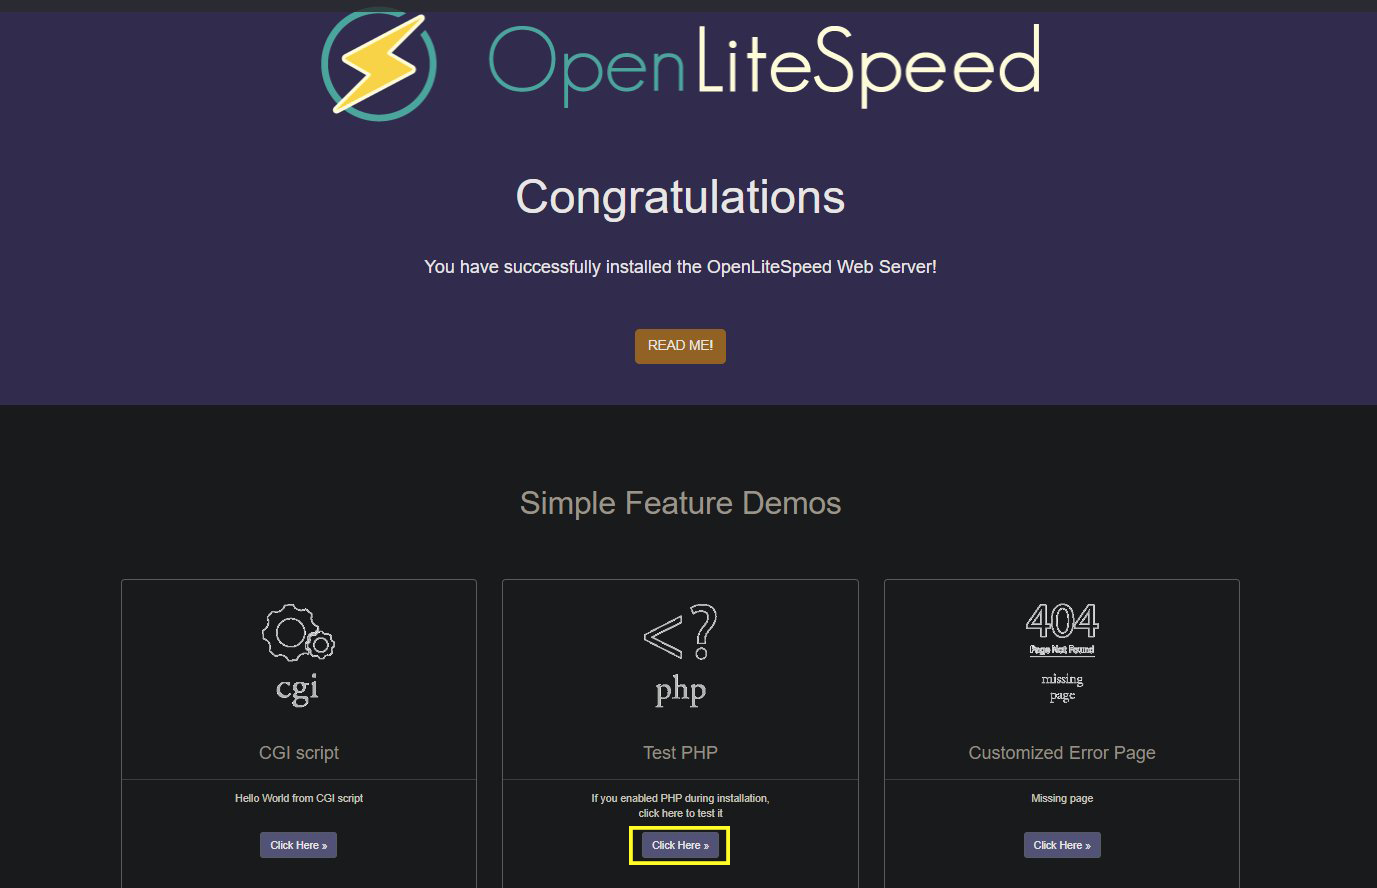
In addition to checking the running version of PHP that is installed with Open Lite Speed, you can check the compatibility and execution of the PHP programming language with Open Lite Speed through the Test PHP option.
You can also refer to the following address:
http://your_server_ip:8088/phpinfo.phpStep 2: Access available installable versions of PHP
After seeing the running version of PHP on the Ubuntu server, you can get the list of available PHP versions for installation by running the following command:
sudo apt-cache search lsphpIn the output of the previous command, different versions of PHP are presented for installation, which you can install according to your needs.
Output:
...
lsphp81 - server-side, HTML-embedded scripting language (LSAPI binary)
...
The PHP version is displayed in the output that we provided as an example, in which lsphp81 is interpreted as PHP v8.1, and also other versions can be identified using the extension of package names.
Step 3: Installing the required version of PHP
In this tutorial, we will install PHP v8.1 on Ubuntu, for this purpose enter the following command:
sudo apt install lsphp81 lsphp81-common lsphp81-mysql -yThe above command installs MySQL modules and PHP modules.
You can replace the extension of your desired version instead of 81.
Finally, you have successfully installed the desired PHP version, but there is a problem, that is, your sample website still uses the default PHP version of Open Lite Speed. because Open Lite Speed has not yet been configured to use the new version of PHP that you installed in this step. Therefore, the next section is dedicated to configuring OpenLite Speed to use the new version of PHP.
Configuring OpenLiteSpeed to use the new version of PHP
In this section, you need to configure Open Lite Speed to use the new version of PHP that you just installed.
1. First, create the administration account for the management panel of the web server graphical user interface using the following command:
sudo /usr/local/lsws/admin/misc/admpass.shIn the output of the previous command, you will be asked to set a strong and safe username and password for the administration account:
Output:
Please specify the user name of administrator.
This is the user name required to login the administration Web interface.
User name [admin]:
Please specify the administrators password.
This is the password required to login the administration Web interface.
Password:
Retype password:
Administrators username/password is updated successfully!Note: Remember the information you entered to create the admin account because it is important.
2. Enter OpenLiteSpeed GUI-based management panel on port 7080:
http://your_server_ip:70803. To log in to the management account, enter the username and password of the management account you created.
4. After logging in to the management account, select Server Configuration > the External App sections.
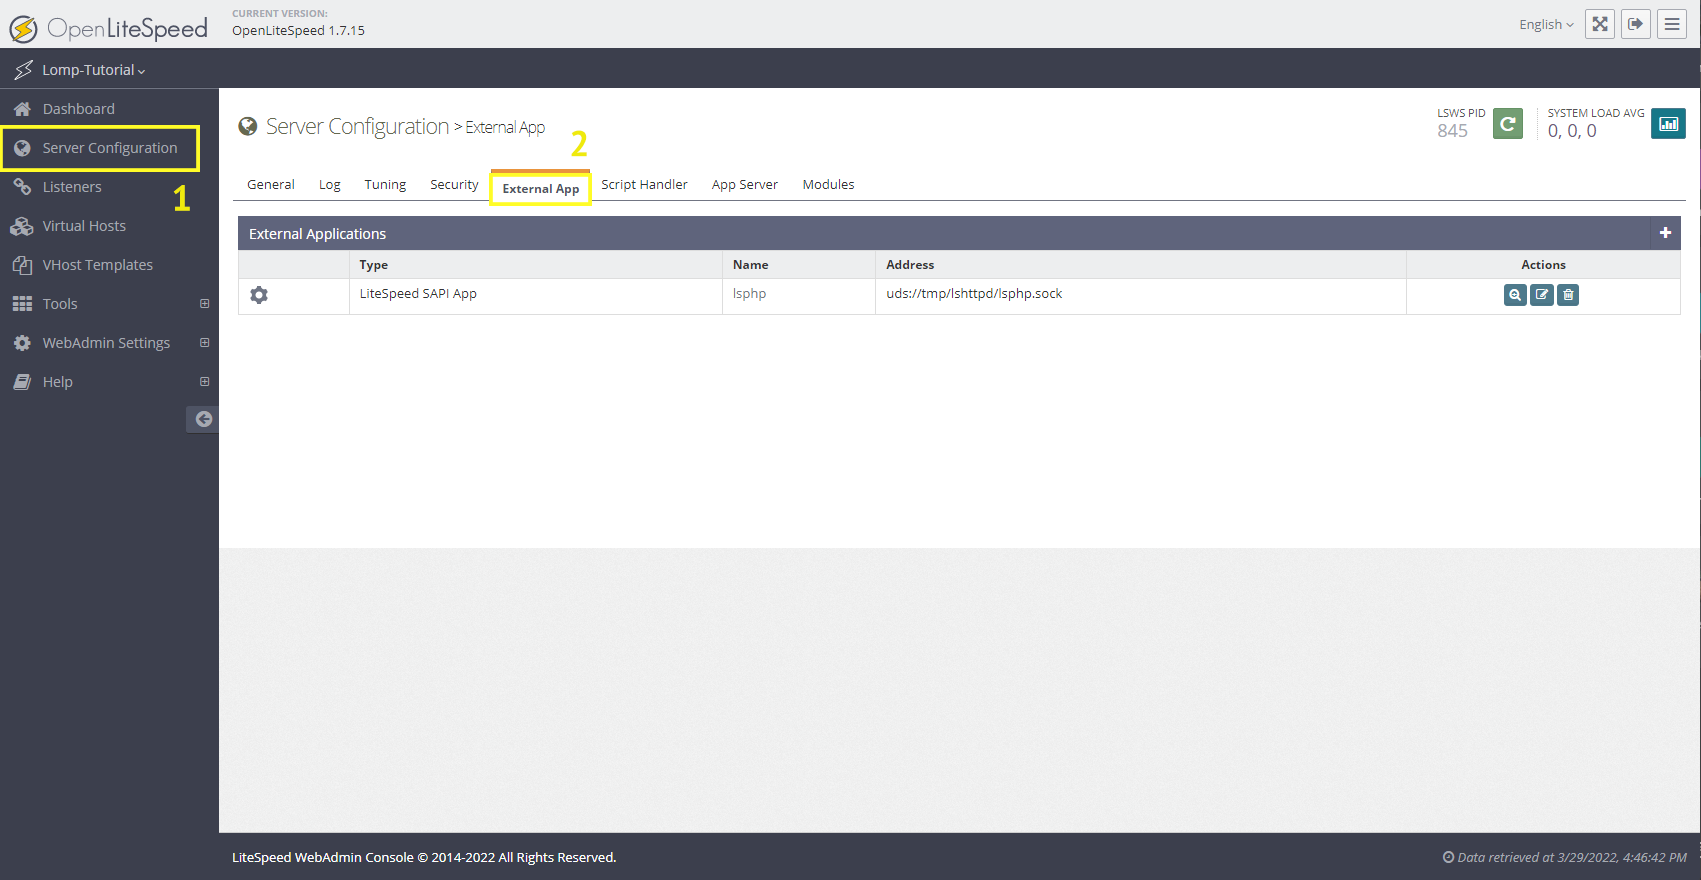
5. Then in the table you see, in the Lite Speed SAPI App row and in the Action column, select the edit option.
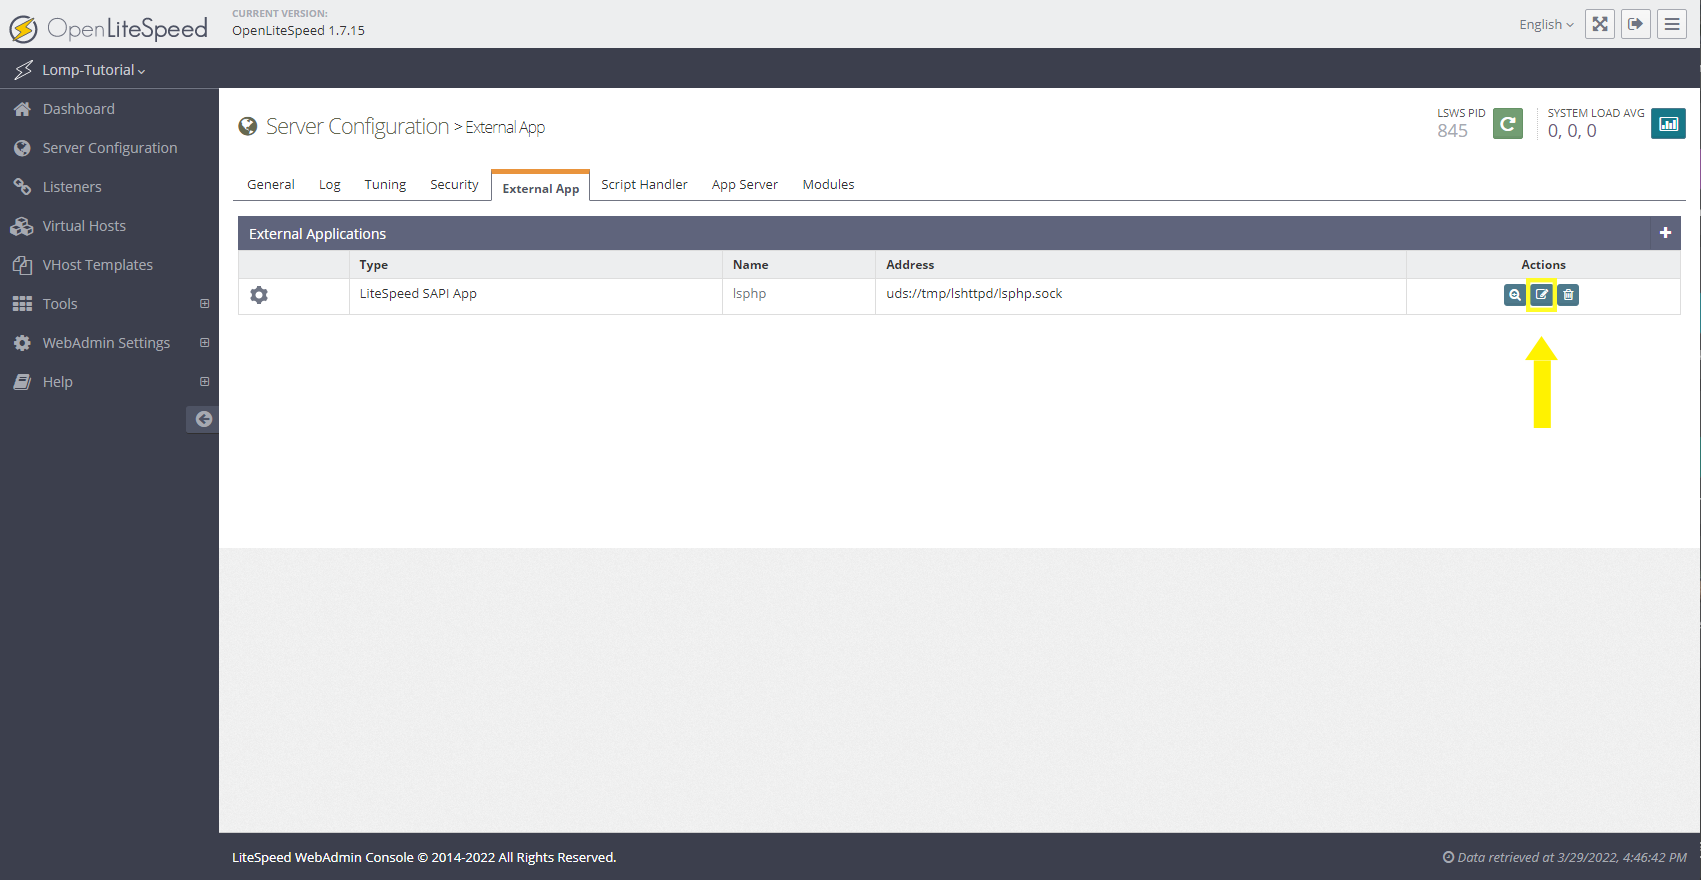
6. Then you enter a program called Isphp, scroll down to find the Command option, and select it.
7. To use OpenLite Speed from the new version of PHP, you must replace the value of lsphp81/bin/lsphp (the version of PHP that we installed in this tutorial) in the Command field.
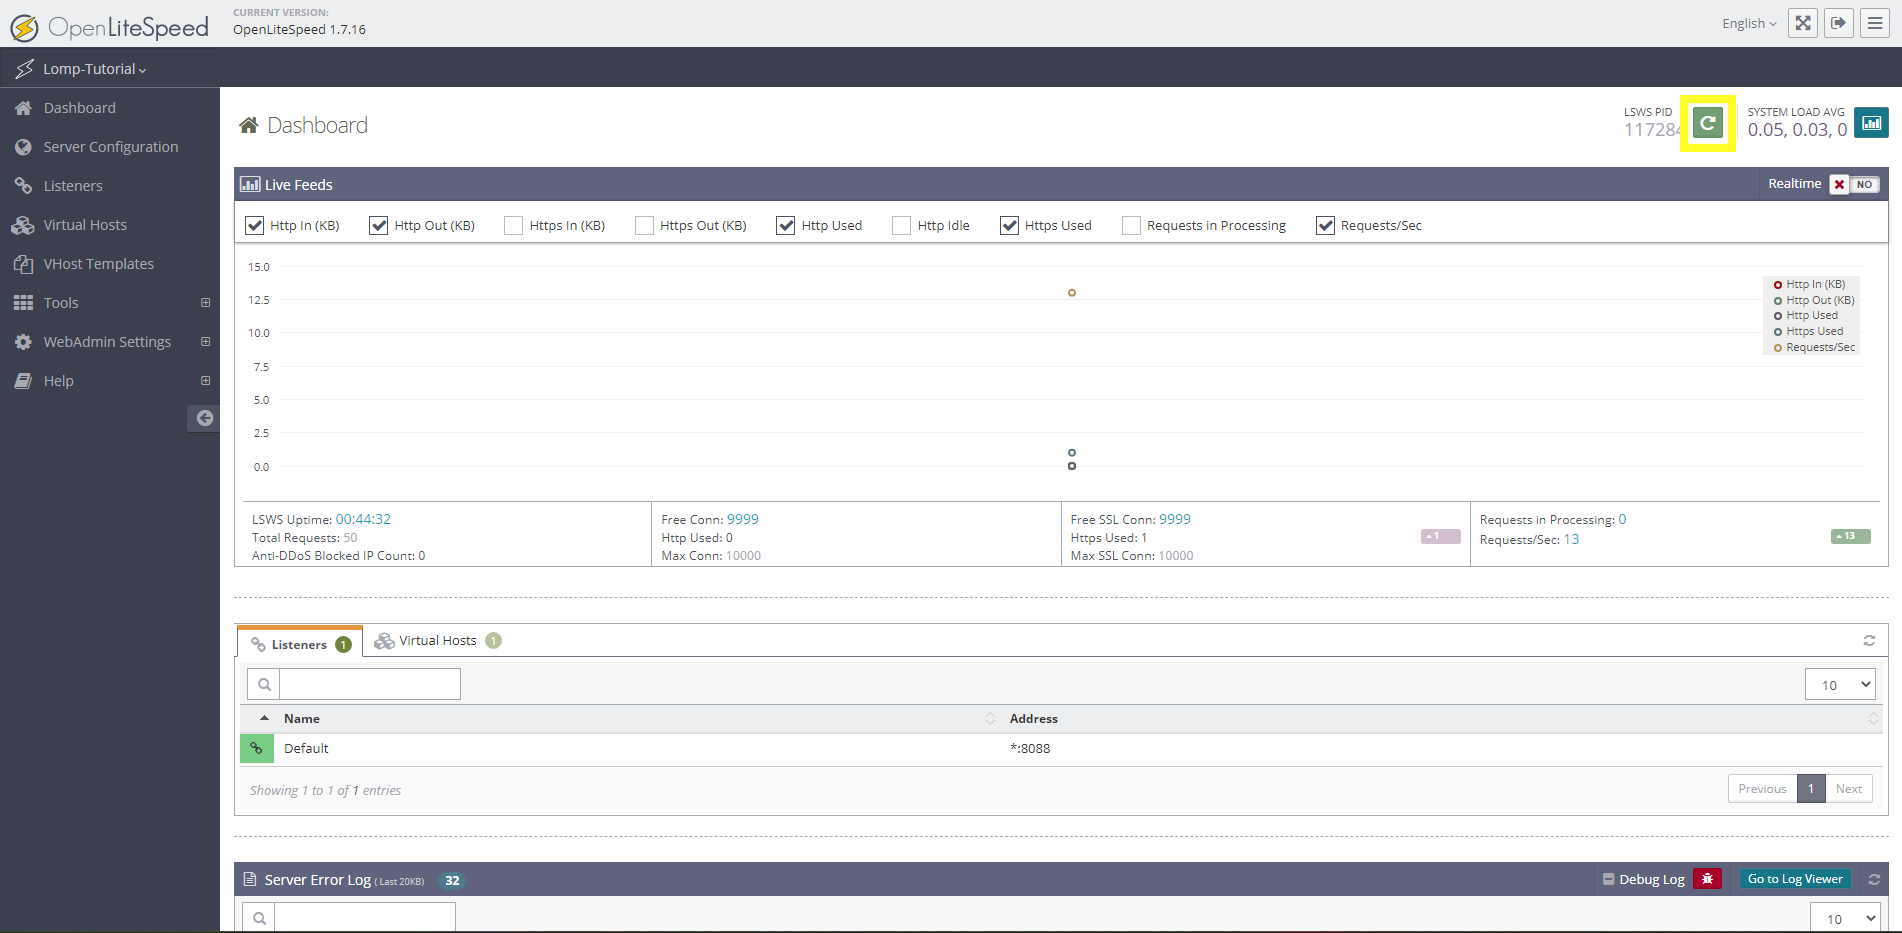
8. Go to the LiteSpeed SAPI App heading and click on the save option on the right side to apply your changes.
9. To restart OpenLite Speed, click on the green Graceful Restart button in the upper right corner of the bar.
10. Check if OpenLiteSpeed is configured to use PHP8.1. Check the info page http://your-server-ip:8088/phpinfo.php to make sure.
By viewing the PHP information page of the changes you made, you will be sure and you can run the desired programs on the Ubuntu 22.04 server.
FAQ
Why install LOMP on a Linux server?
The LOMP stack is an efficient set to improve the performance of the Linux server in hosting highly visited websites and dynamic web applications, which equips the server to improve performance in hosting complex websites by providing useful and compatible software.
Conclusion
In this tutorial, we implemented the popular LOMP stack to serve high-traffic websites on the Ubuntu server, and we set up the OpenLite Speed web server, MariaDB database, and PHP programming language with the version you need on the Ubuntu server. . By equipping the Ubuntu server with the LOMP stack, your server is now ready to run and develop applications and PHP frameworks such as WordPress, Laravel, etc.
Thank you for choosing our article to read, we hope you enjoyed our training.