sudo apt update not working
When sudo apt update not working, it usually points to broken sources, missing GPG keys, or unreachable repositories. The system fails to fetch package lists, blocking upgrades.
To fix Ubuntu update error, check source URLs, re-add keys, update DNS, or clean cache. In most cases, running sudo apt update after these steps restores normal update behavior.
When you buy Linux VPS, you gain more control over the system’s environment, which allows for easier management of software updates.
Unlike a shared system, a VPS lets you configure and troubleshoot settings without the limitations of a shared host.
Explore below tested solutions below to fix Ubuntu update error and streamline the update process.
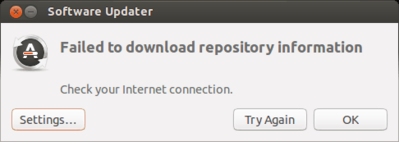
Error 1. Failed to Download Repository Information in Ubuntu
You can update Ubuntu in two ways Terminal and the GUI.
As one Ubuntu desktop user, if you are used to updating your Ubuntu system through the graphical software updater tool, you might face an error like this:
Unlike Ubuntu boot problem, which has no warning, you will be notified about updates.
Receiving the ”Updates are available” message means that you can start downloading and installing updates.
But what is the above error when you are positive your internet connection has no issues?
This is a misleading error since it usually appears even when the internet connection is stable:
- Outdated repository links
- Third-party repositories
- Incorrect repository settings
- Corrupted sources.list file
- Firewall restrictions
- Temporary server issues
- Expired GPG keys
These are the most frequent reasons for the ”Failed to Download Repository Information in Ubuntu” error.
What is the best solution to solve the ”Failed to Download Repository Information in Ubuntu” error?
When you are sure this error is not related to the internet connection, follow the steps below to fix Ubuntu Update Error:
- Open your Ubuntu terminal by pressing Ctrl+Alt+T and then run the command below:
sudo apt update- Look at the output below. The last lines will tell you about the reason for the ”Failed to Download Repository Information” error.
Error 2. Hash Sum mismatch
When apt doesn’t check the accuracy of the information downloaded from the repository, it frequently encounters the issue of a hash sum mismatch error.
The Hash Sum mismatch error is a signature-related Ubuntu update issue and appears as below:
W:Failed to fetch bzip2:/var/lib/apt/lists/partial/in.archive.ubuntu.com_ubuntu_dists_oneiric_restricted_binary-i386_Packages Hash Sum mismatch,
W:Failed to fetch bzip2:/var/lib/apt/lists/partial/in.archive.ubuntu.com_ubuntu_dists_oneiric_multiverse_binary-i386_Packages Hash Sum mismatch,
E:Some index files failed to download. They have been ignored, or old ones used instead
Fixing the Hash Sum mismatch error is easy. Refer to the solution below to learn how to solve another Ubuntu apt update error.
The problem could be caused by a mismatch in the metadata cache between the server and your machine.
To resolve the issue, execute the following commands:
sudo rm -rf /var/lib/apt/lists/*
sudo apt update
The Ubuntu Update Error must be resolved now.
Error 3. Problem With MergeList
The ‘’Problem with MergeList’’ error can also appear while you are trying to update your Ubuntu.
It usually occurs if the package lists or status file cannot be parsed or opened. So, you must fix the Ubuntu unable to update issue.
E:Encountered a section with no Package: header,
E:Problem with MergeList /var/lib/apt/lists/archive.ubuntu.com_ubuntu_dists_precise_universe_binary-i386_Packages,
E:The package lists or status file could not be parsed or opened.’
The reason of occurring this error is that the file in the/var/lib/apt/lists directory got corrupted.
There is a quick solution to fix the problem with the MergeList error. Simply run the following commands one by one to delete all the files in this directory.
When you are finished, run the update again.
sudo rm -r /var/lib/apt/lists/*
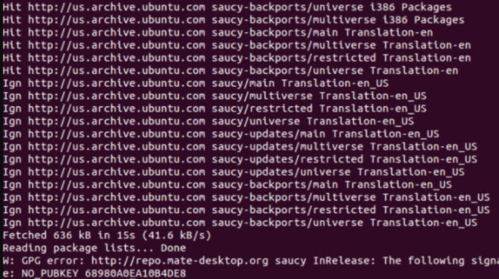
sudo apt-get clean && sudo apt-get updateError 4. GPG error: The Following Signatures Couldn’t be Verified
One of the times that the system can’t update Ubuntu is when you want to add a PPA.
It causes the GPG error: The following signatures couldn’t be verified error after running an update in the terminal.
The GPG issue should be interpreted as a caution against installing packages from unidentified sources.
It results from the system’s inability to recognize a certain GPG public key.
W: GPG error: http://repo.mate-desktop.org saucy InRelease: The following signatures couldn’t be verified because the public key is not available: NO_PUBKEY 68980A0EA10B4DE8To Fix Ubuntu Update Error, use the below technique and solve GPG error: The Following Signatures Couldn’t be Verified error.
All you have to do now is locate this public key in the system. Obtain the message’s key number.
The key in the preceding message is 68980A0EA10B4DE8.
So, use the key as follows:
sudo apt-key adv --keyserver keyserver.ubuntu.com --recv-keys 68980A0EA10B4DE8Once the key has been added, restart the update. Ubuntu apt update should be great.
Error 5. Failed to Fetch with Error 404 Not Found
When you try to add a PPA repository that isn’t accessible for your current Ubuntu version, you’ll get a 404 not found message.
It also appears when the repository information is outdated or the link is broken.
W: Failed to fetch http://ppa.launchpad.net/venerix/pkg/ubuntu/dists/raring/main/binary-i386/Packages  404  Not Found
E: Some index files failed to download. They have been ignored, or old ones used instead.
To fix Failed to fetch with Error 404 Not Found error, you just need to delete the problematic PPA from your list of repositories.
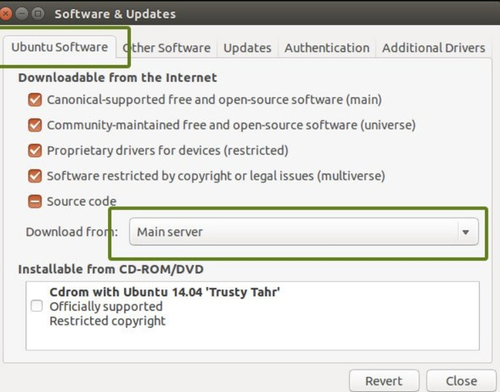
Take note of the PPA name from the error message. Go to the Software & Updates tool:

Navigate to the Other Software tab and seek for that PPA. To remove the PPA from your system, uncheck the box.
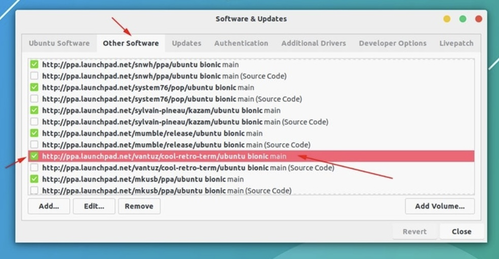
When you do that, your software list will be updated. If you re-run the update, you should no longer see the issue.
You can examine your network settings and remove any entries that point to a repository that apt doesn’t like if the issue continues.
Error 6. BADSIG error
BADSIG error is another signature-related Ubuntu update error that looks like this:
W: A error occurred during the signature verification. The repository is not updated and the previous index files will be used. GPG error: http://extras.ubuntu.com precise Release: The following signatures were invalid: BADSIG 16126D3A3E5C1192 Ubuntu Extras Archive Automatic Signing Key
W: GPG error: http://ppa.launchpad.net precise Release:
The following signatures were invalid: BADSIG 4C1CBC1B69B0E2F4 Launchpad PPA for XXXX XXXXXX
W: Failed to fetch http://extras.ubuntu.com/ubuntu/dists/precise/Release
Solving the BADSIG error is as straightforward as the other Ubuntu update errors you’ve reviewed.
This error occurs because all the repositories are signed with GPG, and for some reason, your system considers them illegitimate.
Ubuntu errors like this can typically be resolved by updating the signature keys, which may have expired or become invalid.
To fix this issue and get Ubuntu to update properly again, the easiest method is to regenerate the apt packages list along with their correct signature keys.
Follow these steps:
Run the following commands one by one to fix the can’t update Ubuntu issue caused by BADSIG:
cd /var/lib/apt
sudo mv lists oldlist
sudo mkdir -p lists/partial
sudo apt-get clean
sudo apt-get update
This will update your signature keys and should resolve the Ubuntu update error effectively.
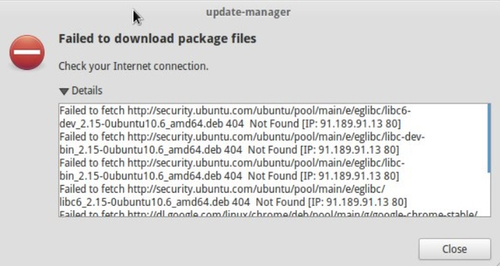
Error 7. Failed to Download Package Files Error in Ubuntu
While running an update in the terminal, you might encounter this error.
This issue arises when your Ubuntu system is unable to locate the package you’re trying to install. The server might not have synced with the main server yet.
The package could have been removed or replaced with a newer version, or both may have happened.
To fix the apt-get update error, here are some potential solutions:
- Resetting the package lists.
- Cleaning the apt-get and GPG cache and keys.
- Following the Package Manager Troubleshooting Procedure.
- Disabling any problematic repositories.
By implementing these steps, you can resolve this issue and fix the apt-get update error efficiently.
Let’s see how to Fix Ubuntu Update Error in this case:
Displaying the failed word during a process might be frustrating.
Here is the quickest solution for the error of Failed to Download Package Files Error in Ubuntu.
A newer version of the software is available in this scenario, but it has not been distributed to all mirrors.
If you do not have a mirror, simply change the software sources to the Main server.
Navigate to Software & Updates and change the download server to the Main server:
Error 8. Partial Upgrade Error
While running an update in your Ubuntu terminal, you might face a partial upgrade error.
When an unsuitable application is installed on your computer, an error occurs that prevents the upgrading process from being finished.
Before upgrading your PC, make sure all incompatible apps have been completely removed.
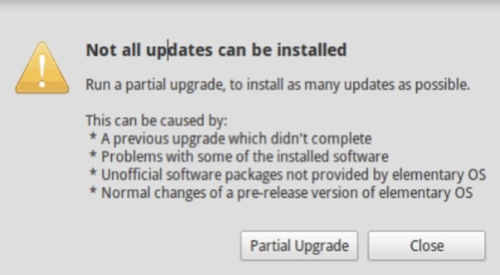
Not all updates can be installed
Run a partial upgrade, to install as many updates as possible
Let’s see the best solution for this error. To fix Ubuntu Update Error, in this case, run the following command:
sudo apt-get install -fError 9. Could not get lock /var/cache/apt/archives/lock
This issue happens when another process, such as Synaptic, Ubuntu Software Center, or another terminal, uses the apt system.
The apt system is locked and cannot be accessed by several processes at once.
E: Could not get lock /var/cache/apt/archives/lock – open (11: Resource temporarily unavailable)
E: Unable to lock directory /var/cache/apt/archives/
If this error is the exact Ubuntu Update Error that prevents you from refreshing your Ubuntu, try the below solution to eliminate it.
Check to see whether another program is utilizing apt.
It could be a command-line terminal, Software Center, Software Updater, Software & Updates, or any other software that deals with application installation and removal.
Close any other similar programs you can. Wait for a process to complete if one is in progress.
If you are unable to locate any such programs, use the following command to terminate all such ongoing processes and fix Ubuntu Update Error.
sudo killall apt apt-getHow to Fix sudo apt Update Error?
Whether you choose to use Terminal or GUI methods to update Ubuntu, users often encounter update-related errors, including download failures, even with stable internet connections.
When sudo apt-get update not working or other errors occur, it’s important to identify the root cause to apply the appropriate fix.
Now that you’re familiar with the main errors and their solutions, you are ready to learn how to fix the Ubuntu update error effectively.
1. Check Internet Connection
If you hit a sudo apt update error or see:
Error during update a problem occurred during the update. This is usually some sort of network problem. Check your network connection and retry.
Don’t ignore it. It’s not just a glitch.
Ubuntu’s package manager depends on uninterrupted access to online repositories. Even a short network drop, DNS misroute, or broken proxy config can break update communication.
Run a quick test:
ping archive.ubuntu.comIf it fails, verify you’re not behind a firewall or misconfigured VPN. For Wi-Fi, try reconnecting.
On wired networks, test your DNS setup or switch to a reliable public DNS like 8.8.8.8. Without fixing this, every apt update will fail regardless of how clean your system is.
2. Verify the sources.list File
Sometimes, the real reason behind a sudo apt update error isn’t your internet, it’s your package source configuration.
If sudo apt update not working or you simply can’t update Ubuntu, broken or outdated mirror URLs in your /etc/apt/sources.list file are likely sabotaging the process.
To fix it, open a terminal and run:
sudo nano /etc/apt/sources.listCarefully inspect the file. Remove any third-party or unofficial lines that don’t point to valid Ubuntu archives.
If unsure, comment them out by adding # at the beginning of the line.
You can also replace the list with official Ubuntu sources from Ubuntu’s mirror list.
After saving, update again:
sudo apt updateIf the sources are clean, you’ll no longer see that stubborn update failure.
3. Remove Unwanted Package Dependencies
Bloated or broken dependencies often block updates silently.
If you’re facing a sudo apt update error or wondering why sudo apt update not working on a system that looks clean, hidden leftover packages from removed apps might be corrupting the APT process.
This is a common cause when Ubuntu cannot update, yet no obvious clue appears.
To fix this cleanly, run:
sudo apt autoremoveThis command safely purges orphaned packages no longer required by any installed software. Then, double-check for broken dependencies with:
sudo apt install -fTo retry, run:
sudo apt updateA lean system clears the update path. Unnecessary packages waste more than just disk space, they interfere with your update integrity.
4. Fix Broken Dependencies
Broken dependencies are a silent culprit behind the sudo apt update error.
They interrupt package resolution, making it feel like sudo apt get update not working no matter how many times you retry.
These conflicts usually result from interrupted installs, PPAs, or mismatched versions.
To repair them, run:
sudo apt install -fThis forces APT to resolve broken links and repair unmet dependencies. It checks installed packages against available versions and re-aligns your system’s state.
Once done, re-run:
sudo apt updateIf it completes without errors, your package chain is back on track. Dependencies must be clean for the update mechanism to function properly.
5. Reboot Ubuntu
Sometimes, a simple reboot can resolve issues that prevent Ubuntu updates from running smoothly.
When you see an “Ubuntu update failed” message or encounter “a problem occurred when checking for updates Ubuntu”, it may be because pending system processes or services are conflicting with the update.
A reboot clears these processes and refreshes your system, potentially eliminating hidden errors.
To reboot, simply run:
sudo rebootAfter restarting, retry the update process.
This often resolves underlying issues caused by system services, ensuring the update check completes successfully.
6. Remove the Cached Package Lists
A corrupted package cache can lead to sudo apt update error or sudo apt update not working issues.
Cached package lists may contain outdated or incomplete data that interferes with the update process.
Clearing this cache can help resolve these problems.
To remove the cached package lists, run:
sudo rm -rf /var/lib/apt/lists/*After clearing the cache, update your package list again by running:
sudo apt updateThis refreshes your system’s repositories, ensuring the correct information is pulled during updates.
7. Clean Unnecessary Local Repositories
When ubuntu not updating occurs, it could be due to outdated or unnecessary local repositories cluttering your system. These remnants can cause conflicts during the update process.
Removing them ensures a cleaner, more efficient update flow.
To clean up these repositories, run:
sudo apt autoremove
sudo apt clean
These commands remove unused packages and clear out local repository data. Afterward, run:
sudo apt updateThis ensures your system is free from any unnecessary files, allowing it to update smoothly and resolve issues like apt update error.
8. Disable IPv6
If Ubuntu errors are preventing updates, or if Ubuntu won’t update, the problem might be related to IPv6 connectivity issues.
In some cases, repositories or network configurations struggle with IPv6, causing the Ubuntu Software Updater not working properly.
Disabling IPv6 could help resolve these update failures. To disable IPv6 on Ubuntu:
sudo nano /etc/sysctl.confAdd these lines at the end of the file:
net.ipv6.conf.all.disable_ipv6 = 1
net.ipv6.conf.default.disable_ipv6 = 1
net.ipv6.conf.lo.disable_ipv6 = 1
Save and apply the changes:
sudo sysctl -pAfter rebooting, try running sudo apt update again.
This tweak could fix the issue, allowing the Ubuntu Software Updater to work smoothly and resolve the update failure.
9. Check Disk Space
If Ubuntu errors are preventing updates, check your disk space. A full disk can cause Ubuntu won’t update issues.
To check, run:
df -hIf space is low, clean up with:
sudo apt cleanThen, try sudo apt update again to resolve the issue.
Troubleshoot Not all Updates Can be Installed in Ubuntu
If you’re still having difficulties installing all the updates in Ubuntu and you face Failed to Download Repository Information error:
- Open your Ubuntu terminal and run the command below to update the package list:
sql
sudo apt update
This will refresh the package lists and provide you with the most up-to-date information on available updates.
- Then, to upgrade installed packages, type:
sudo apt upgradeThis will update all installed packages to the most recent versions.
This command may assist in resolving any issues that were hindering the installation of specific updates.
- While broken or unmet dependencies can prevent updates from being installed, use the following command to check for broken dependencies:
css
sudo apt --fix-broken install
This command attempts to repair broken dependencies and allow pending updates to be installed.
- You may need to uninstall certain packages if they are generating conflicts or preventing updates.
- Examine error messages or logs to identify troublesome packages, then uninstall them by running the command below:
arduino
sudo apt remove <package_name>- As you know, Cached packages can disturb the update process. Run the following command to clear the package cache:
sudo apt clean- If you’re running an earlier version of Ubuntu, upgrading to the most recent stable release may help you overcome update problems.
- To upgrade the distribution, run the following command:
arduino sudo do-release-upgrade- It’s conceivable that the update source you’re utilizing has synchronization issues.
- Change your software sources to use a different mirror by accessing “Software & Updates” from the system settings and selecting a different server from the “Download from” option.
Conclusion
In this article, we addressed common causes of Ubuntu update errors and detailed effective solutions, such as fixing the apt-get update error and troubleshooting repository issues.
We also explored various methods, like checking your internet connection and verifying your sources.list file, to fix the Ubuntu update error.
For those facing persistent issues, reinstalling Ubuntu or manually downloading updates can be a viable solution.
To prevent these problems in the future, regular system maintenance, including cleaning up unnecessary packages and repositories, can help ensure a smooth Ubuntu install updates without interruption.
Why does sudo apt update'fail with Hash Sum mismatch errors?
Dear Janathan, this error indicates a problem with the package lists, possibly due to a corrupted cache or interrupted download. First, clear package lists by running the below command:
sudo rm -rf /var/lib/apt/lists/*Then, update again to check if the error is gone:sudo apt updateHow do I fix apt-get update error messages about missing GPG keys?
Dear Noah, missing GPG keys can prevent your system from verifying the authenticity of packages. First, run below command to add the missing key:
sudo apt-key adv --keyserver keyserver.ubuntu.com --recv-keys 3B4FE6ACC0B21F32then, update again to check if the GPG key error is resolved:sudo apt updatedoesn't allows the deletion of the files inside var/lib/apt/lists
You may not have administrator privileges or you may not be allowed to delete files due to compromising the proper functioning of package management. In general, deleting /var/lib/apt/lists files is dangerous. You can try other suggestion solutions.
Under "Setting new software channels" I get "Error during update A problem occurred during the update. This is usually some sort of network problem, please check your network connection and retry." What is wrong. This error is the same every time. All previous upgrades have worked just fine. !6.04 to now!
Delete the old apt lists files: /var/lib/apt/lists/ Refresh the "/etc/apt/sources.list" file, by running the following command: sudo apt-get update if it does not fix, try a different mirror: sudo nano /etc/apt/sources.list In the file content, replace the mirror URL with a different mirror URL, which is available on the Ubuntu website.