What is RDP Gateway?
As a feature in Microsoft Windows Server, the RDP Gateway provides a secure and centralized platform for users to access desktops and applications within your organization’s network remotely.
It encrypts communication and offers granular access control, enhancing security and simplifying management compared to traditional RDP access.
To set up an RDP Gateway, you’ll need to:
- Install the RDP Gateway role on a Windows Server.
- Configure user and device access permissions.
- Configure firewall rules to allow connections on designated ports.
Prerequisites to Setup RD Gateway Server in Windows Server 2022, 2019, or 2016
Provide the options below to let this tutorial work correctly and move on.
- Existing RDS deployment with:
- RDS Connection Broker role.
- RDS Licensing role.
- RDS Session Host roles.
- A Server running Windows Server.
Complete Steps to Setup RDP Gateway on Windows Server
An RDP Gateway server provides secure remote access to your RDS environment over the internet.
Let’s go through the steps of this guide to review how to Set up a Remote Desktop Services Gateway Server.
Step 1: Deploying the RD Gateway Server Role
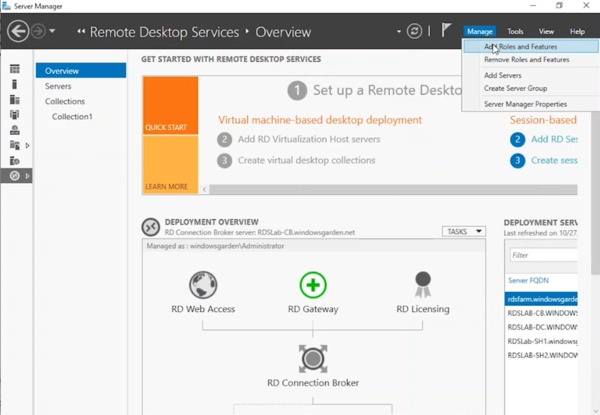
- Open Server Manager on the Windows Server computer hosting the Connection Broker role for your RDS deployment.
- Click “Manage” followed by “Add Roles and Features.”
- On the Welcome screen, click “Next.”
- Choose “Role-based or feature-based installation” and click “Next.”
- Select the target server for the RD Gateway role (e.g., “rdsfarm” in the screenshot) and click “Next.”
- Expand “Remote Desktop Services” in the Roles screen and check the box next to “Remote Desktop Gateway.”
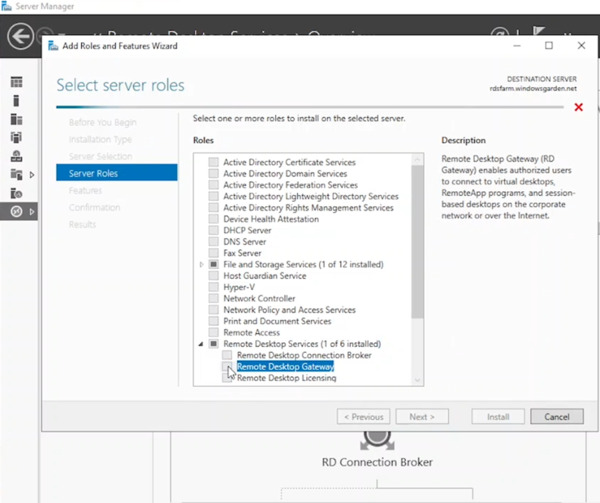
- Click “Add Features” to install the required prerequisites, then click “Next” to the confirmation screen. Finally, click “Install.”
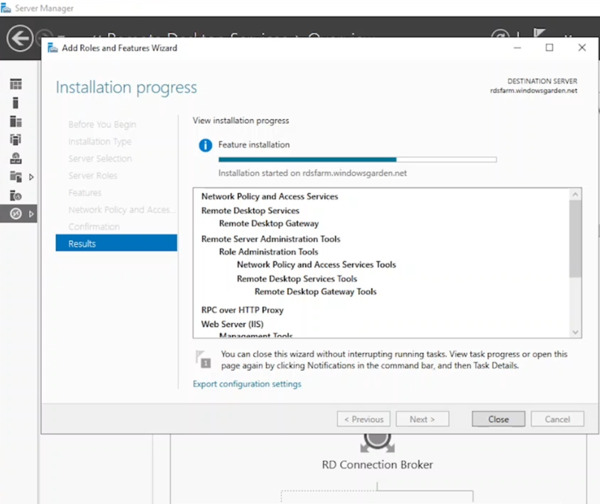
- After installation finishes, click “Close” in Server Manager.
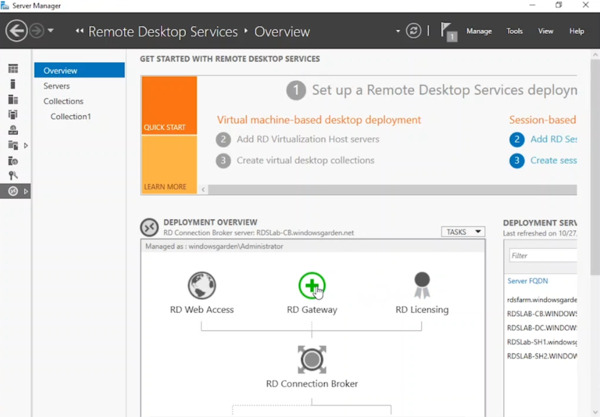
- In the Remote Desktop Services node of Server Manager (on the Connection Broker server), locate the green circle with a plus sign above “RD Gateway” and click it.
(Note: This step might need to be repeated if not automatically expanded).
- Choose the server functioning as the RD Gateway. Click “Next” to move it to the selected list.
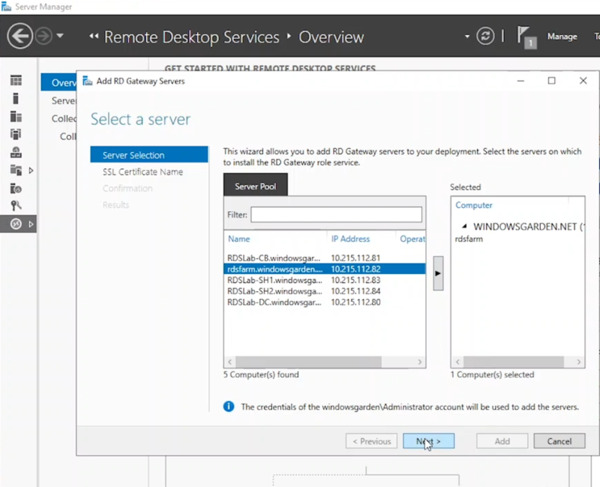
- Enter the FQDN of your RD Gateway Server. (This configures the subject name for the wizard’s self-signed certificate, not the one used in this guide). Click “Next.”

- Click “Add” to confirm adding the server to the deployment. Wait for the installation to complete and then click “Close.”
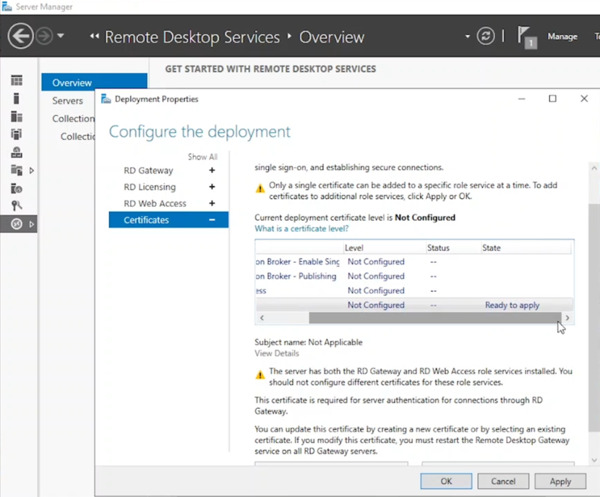
Step 2: Configuring the RD Gateway Certificate
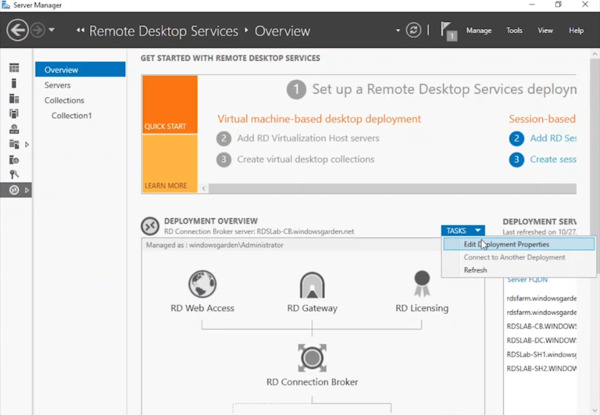
- In Server Manager, on the Connection Broker server, navigate to Deployment Overview under the Connection Broker node.
- Click Tasks, followed by Edit Deployment Properties.
- Expand the Certificates node.
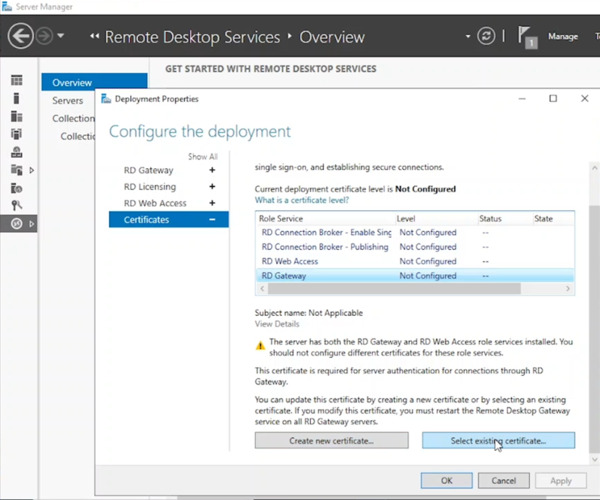
Consider below note:
For testing, a self-signed certificate can be used here. However, for a production environment, a trusted public or domain-based certificate is recommended to avoid installing it on client machines.
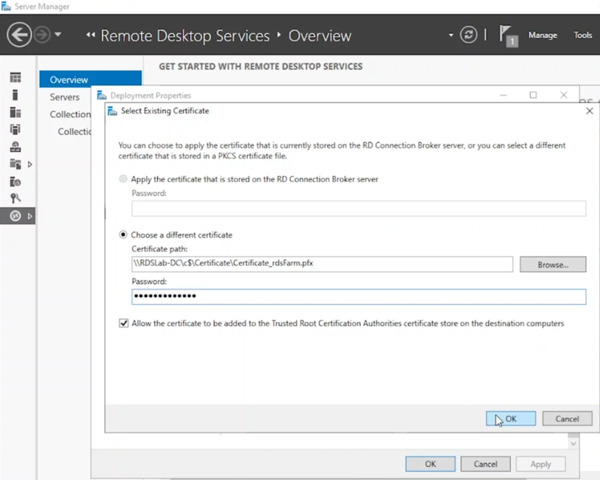
- Select “Existing certificate” and enter the certificate path (e.g., C:\ on the domain controller). Provide the password used to save the certificate.
- Check the box labeled “Allow the certificate to be added to the Trusted Root Certification Authorities certificate store on the destination computers”. Click OK to confirm.
- Verify the deployment configuration shows a “Ready to Apply” state and click Apply.
- After a short wait, the screen should display a successful operation message with the certificate marked as “Trusted“.
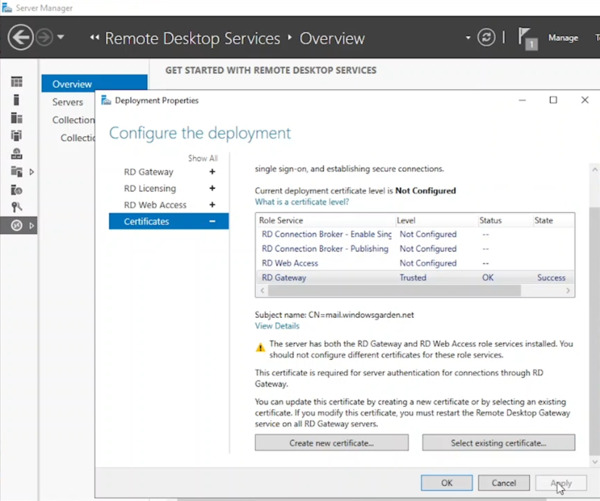
- Repeat the latest 4 steps for the RD Web Access role to use the same certificate for IIS.
- Click OK to exit the deployment configuration screen.
Step 3: Configuring Connection and Resource Authorization Policies
Before users can access your RDS environment through the RDP Gateway server, you need to define who can connect (Connection Authorization Policy) and what resources they can access (Resource Authorization Policy).
Authorization Policies are crucial for controlling user access to the RDS environment through the RD Gateway server.
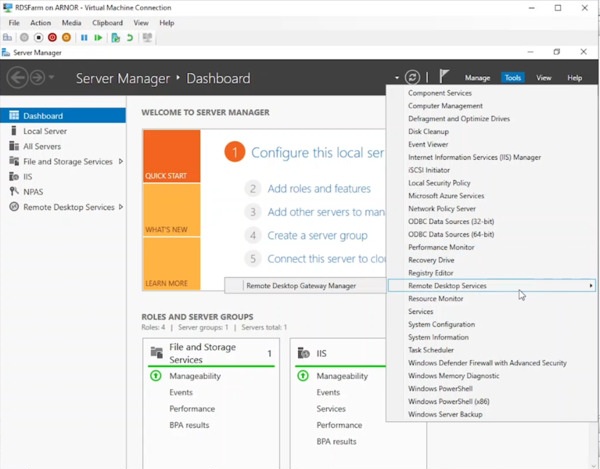
- Open Server Manager on the RD Gateway server.
- Navigate to Tools > Remote Desktop Services > Remote Desktop Gateway Manager.
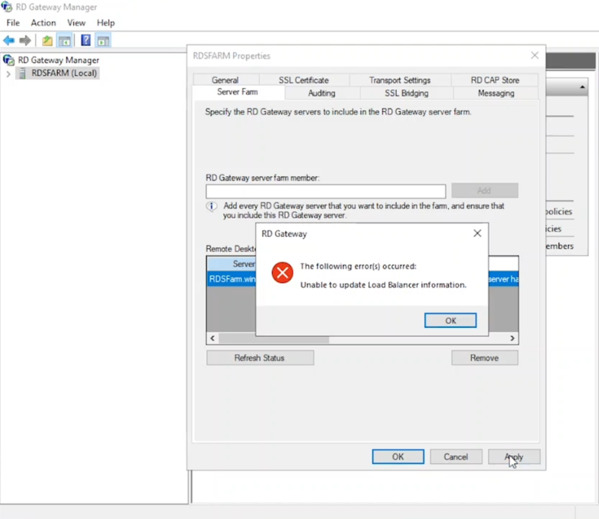
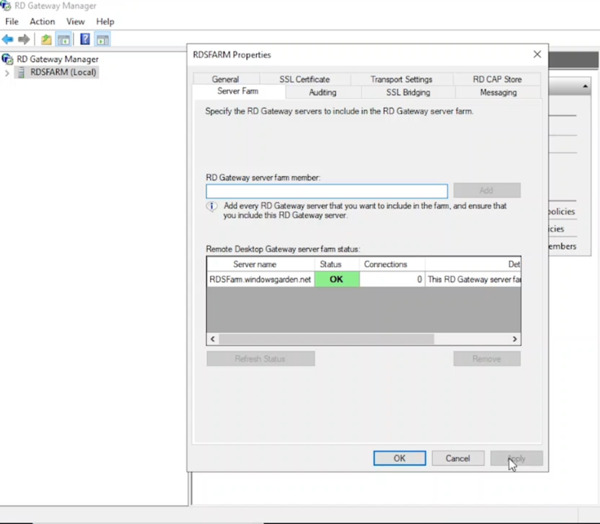
- Right-click the server name (e.g., RDSFARM) and select Properties.

- Under the Server Farm tab, add the RD Gateway server name (e.g., RDSFARM) and click Apply.
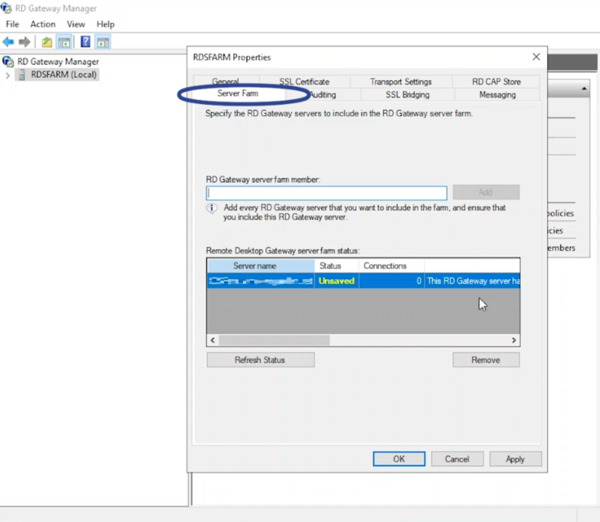
- Ignore the expected error message regarding a load balancer. Click OK and Apply again. The status should now show “OK”.
***
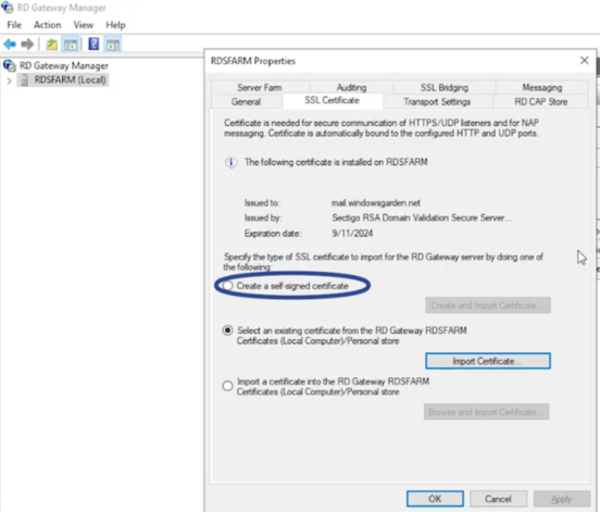
- While the RD Gateway server allows managing its own SSL certificate, it’s recommended to leverage the configuration already set up in the Connection Broker for consistency (refer to previous steps on certificate setup in the Connection Broker).
- Close the Properties window for the RD Gateway server (you can click “OK“).
- In the main RD Gateway Manager window, locate the server name and expand it to reveal its settings.
- Navigate to the Policies section within the expanded server settings.
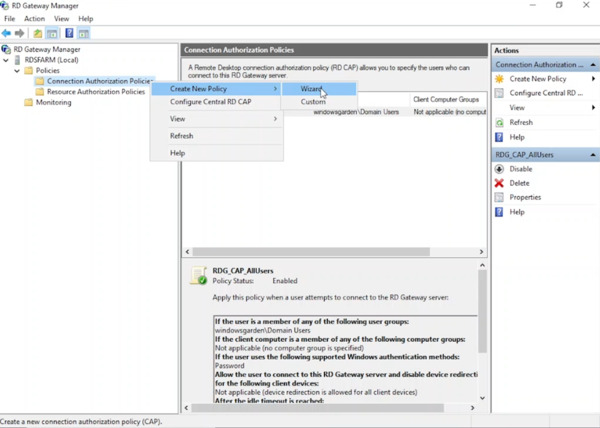
- Right-click on Connection Authorization Policies.
- From the right-click menu, choose Create New Policy.
- Select the Wizard option to initiate the policy creation process.
- Select Create an RD CAP and an RD RAP (recommended), click “Next“.
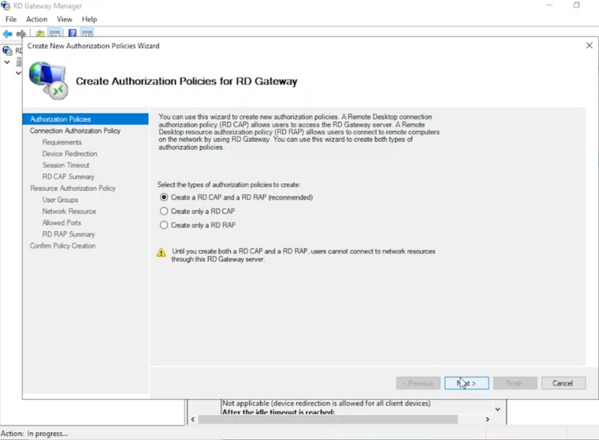
- Name your connection access policy (CAP), click “Next“.
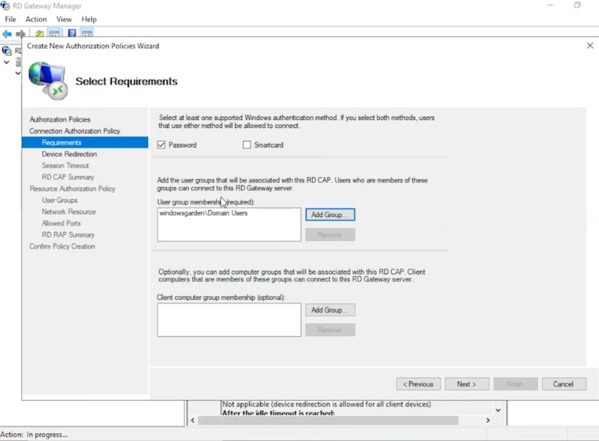
- To specify who can connect (CAP), Add Group, select authorized user group (e.g., Domain Users), click “Next“.
- Accept default settings (CAP) twice (Device Redirection & Session Timeout), review summary, click “Next” for resource access.
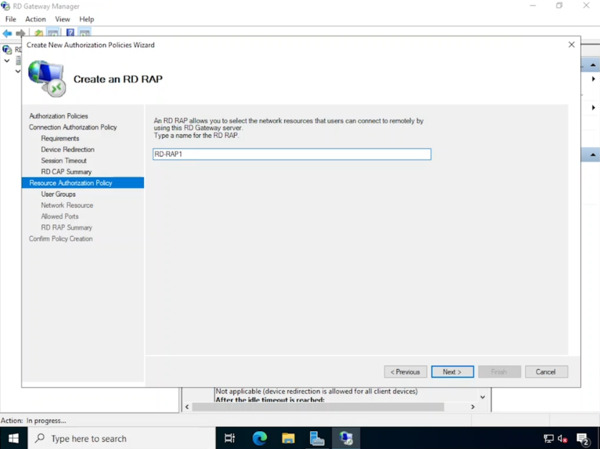
- Name your resource access policy (RAP), click “Next“.
- Keep the default user group (RAP), click “Next“.
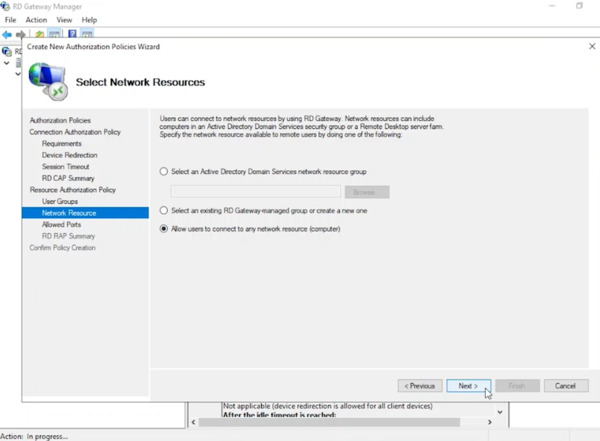
- “Within the Network Resource settings, if an Active Directory group containing the computer accounts for this RDS deployment’s Session Host servers exists, identify it. Otherwise, choose the option that allows users to connect to any network resource (computer).
- Click Next to proceed.”
- Leave the default port (3389) for communication between the RD Gateway and Session Hosts. Click Next.
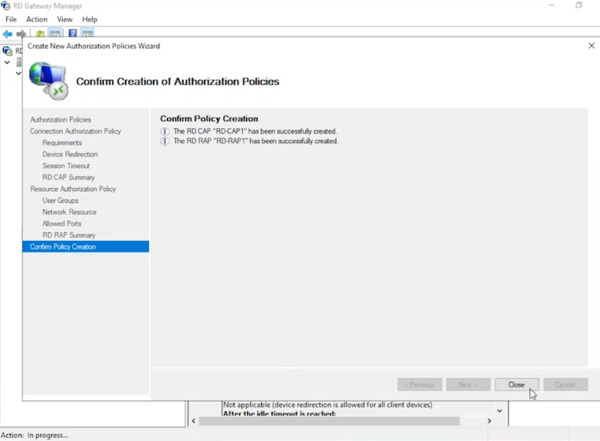
- On the summary screen, click Finish followed by Close to complete the configuration.
You’re All Done!
When you Setup RDP Gateway on your Windows Server, you will secure remote access by encrypting communication and offering centralized control
What are the Benefits of Using RDP Gateway?
RDP Gateway offers several advantages over traditional RDP access, making it a secure and efficient solution for remote access within your organization:
- Enhanced Security.
- Centralized Access Control.
- Simplified Management.
- Improved Scalability.
- Reduced Attack Surface.
- Additional Features.
What are the basic differences between traditional RDP and RDP Gateway?
Here is all about Traditional RDP vs. RDP Gateway:
| Feature | Traditional RDP | RDP Gateway |
|---|---|---|
| Security | Less secure, directly exposes RDP port (TCP 3389) | More secure, encrypts communication using HTTPS |
| Access Control | Limited control, individual access rules per machine | Centralized control, granular permissions for users and resources |
| Management | Requires managing individual connections on each machine | Simplifies administration with a single point of control |
| Scalability | Less scalable, becomes cumbersome with many users | More scalable, handles a large number of concurrent connections |
Conclusion
The RDS Gateway server, now configured, can be positioned behind the firewall for internet-facing access.
Users connecting to RDS session hosts from remote locations (home/office) over the internet will be routed through this secure gateway for initial access