How to Change SSH Port in Linux for Better Security
SSH Port is the network port used by Secure Shell to connect securely to remote servers, usually port 22. You can change the SSH port by editing the sshd_config file and updating firewall rules, which helps improve server security.
To change the default SSH port in Linux Ubuntu, Debian, and CentOS, the below steps are required mainly:
- Executing
sudo nano /etc/ssh/sshd_configcommand to open SSH configuration file. - Find the
#Port 22to uncomment it and change the number to your considered port number. - Apply the changes you have made by restarting the SSH service. Use
ssh -p New Port Number user@hostto do this.
🤖AI Overview:
SSH Port is the network port used by the SSH service to allow secure remote connections, typically port 22 by default. Changing the default SSH port can improve security by reducing the risk of automated attacks on port 22. On Linux systems, this is done by editing the SSH configuration file and specifying a new port number, followed by updating firewall settings to allow traffic on the new port.
Notes You Should know before Changing Linux SSH Port
- It is better to specify a 4 or 5 digit port. Also, remember to use a free SSH port.
- If a firewall is used in the data center network, make sure to inform the data center of the desired port to open it.
- Be sure to write down the port you want to allocate to SSH.
- Be careful to change the SSH port as any mistake may cause you to have trouble accessing the server.
- If you do not use SELinux, you should disable it to prevent any issues with the function of your server.
Prerequisites to Change SSH Port on Linux
To let this tutorial work correctly, provide the options below and move on.
- A Server running Linux VPS.
- A non-root user with
sudoprivileges. - SSH client/Terminal Window.
How to Change SSH Port in Linux Ubuntu, Debian, and CentOS
Regardless of using Ubuntu, Debian, or CentOS, you can use the below steps and change the SSH Port in Linux.
Step 1: Open the /etc/ssh/sshd_config File
Use nano or your favorite text editor to open the /etc/ssh/sshd_config configuration file:
$ sudo nano /etc/ssh/sshd_config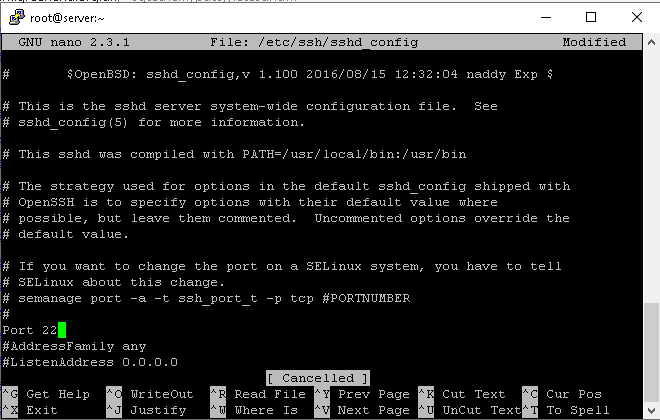
Step 2: Find the line containing “Port 22”
Find the line marked #Port 22. This line must be uncommented and the number must be changed to the port number you prefer.
For example, to change the port number to 14252, act like this:
From:
#Port 22

To:
Port 14252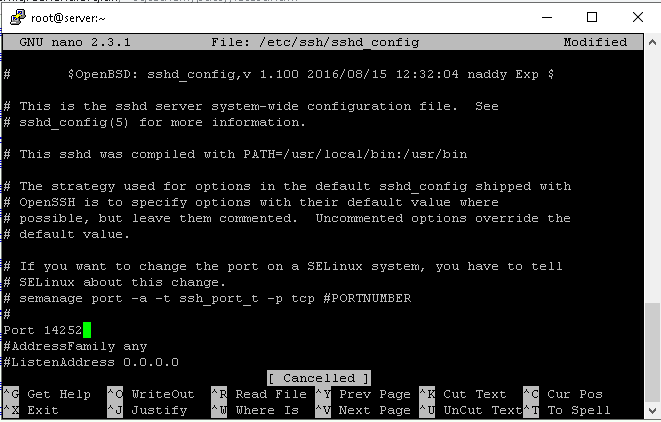
Step 3: Save and Exit
Save the changes you have made and exit by running the command below:
$ sudo systemctl restart sshdRun the command below to access the SSH server, specifying the port number you prefer:
ssh user@ip_address_of_server -p 14252On Debian, type:
service ssh restartOnce the server is ready, you can easily connect to the server through Putty and the new port number should be used instead of port 22.
This time you are more secure than the last connection.
Step 4: Test Your New Port
You can attempt SSH on the new port to confirm everything is operational.
Use the following command to tell the client to use a different port than the default 22:
$ ssh -p 14252 user@localhostOptional: To verify SSH is listening on the new port, run:
ss -tnlp | grep sshIf everything is working well, you are ready to start a new SSH session on your new chosen port.
Step 5: Allow traffic to the new port [On Ubuntu]
Ubuntu is pre-installed with the UFW firewall.
Use the following command to allow traffic to the new port if you are using UFW firewall.
$ sudo ufw allow 14252/tcpStep 6: Add the new Port to your Firewall [On CentOS]
Although UFW is not used by CentOS by default, if you do have it installed, be sure to run the following UFW command.
By default, CentOS employs firewalld and SELinux.
It will be necessary to create an exception to permit SSH access on the recently set port:
Run the command below to check whether SELinux is enabled or not:
# sestatusTo add a new port number for SSH, you can use the semanage tool:
# semanage port -a -t ssh_port_t -p tcp 14252Then, in firewalld’s configured zone (“public” by default), add the new port:
# firewall-cmd --zone=public --add-port=14252/tcp --permanent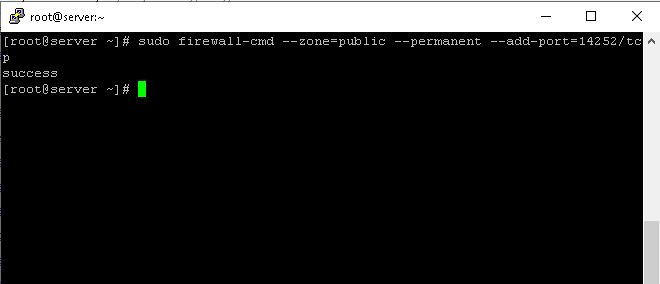
Finally, run the command below to complete the changes:
# firewall-cmd --reloadAdditional Notes:
- Since Ubuntu is based on Debian, other Debian-based systems, such as Linux Mint, can also use the same procedures.
- Fedora and other Linux distributions can use its instructions because CentOS is based on Red Hat.
Conclusion
You can easily change the SSH port through the “sshd_config” file.
The SSH Port is fundamental for secure remote server management. While the default port is 22, changing it to a custom number helps enhance security by reducing exposure to automated attacks.
Proper configuration involves editing the sshd_config file, adjusting firewall rules, and testing new settings carefully.
Combining SSH port changes with strong authentication and firewall management creates a more secure environment.
For beginners, understanding and managing the SSH Port is a valuable skill to protect your Linux servers effectively.
FAQ
2. Why should I consider changing the default SSH port 22?
Changing the default SSH port helps reduce unauthorized access attempts and security risks as many hackers target port 22 by default.
3. How do I change the SSH port on Linux Ubuntu or Debian?
Edit the "/etc/ssh/sshd_config" file by uncommenting and modifying the Port directive, then restart the SSH service to apply the new port.
4. What precautions should I take before changing the SSH port?
Use a 4 or 5 digit unused port number, inform your data center if necessary, update firewall rules, and ensure you note the new port to avoid losing access.
5. How can I allow traffic to the new SSH port on Ubuntu and CentOS firewalls?
For Ubuntu with UFW, use 'sudo ufw allow [newport]/tcp'. On CentOS with firewalld, add port rules via 'firewall-cmd' and update SELinux settings if enabled.
6. How do I connect to an SSH server using a custom port?
Use the SSH command with the -p option specifying the new port, like 'ssh -p [newport] user@server_ip'.
7. How can I confirm SSH is listening on my new port?
Run commands like 'ss -tnlp | grep ssh' to verify the SSH daemon listens on the updated port successfully.
8. Does changing the SSH port affect SELinux?
Yes, if SELinux is enabled, you need to add the new SSH port to SELinux policies using the semanage tool to prevent connection issues.
9. Can the same method to change SSH port be used on both Ubuntu and CentOS?
Yes, although some steps for firewall and SELinux differ, the SSH port change process through sshd_config is the same across these distributions.
10. What should I do if I lose access after changing the SSH port?
Check firewall settings, ensure SSH service is running on the new port, and verify SELinux configuration. If needed, access the server via console to revert changes.