Setup L2TP/IPsec VPN Client Easily
Setup L2TP/IPsec VPN Client involves configuring your device to connect securely to a VPN server using Layer 2 Tunneling Protocol and IPsec encryption. This setup requires VPN server details and device network settings configuration.
General steps to set up an L2TP/IPsec VPN client on Windows, Linux, Mac, Android, and iOS are as follows:
- Buy an L2TP VPN subscription or purchase VPS running Linux, Windows, or Mikrotik to configure an L2TP VPN.
- Ensure you have VPN server information ( including the IP address or hostname of the VPN server, username and password, pre-shared key, and encryption settings).
- Navigate to your device’s network settings to add a VPN connection.
- Configure the VPN connection. (input VPN server address and Authentication > set L2TP/IPsec for VPN type >…).
- Save the configuration.
- Connect to the VPN server.
🤖AI Overview:
Setup L2TP/IPsec VPN Client enables secure VPN connections by combining Layer 2 Tunneling Protocol with IPsec encryption for encrypted data transmission. This configuration supports major operating systems and protects privacy while providing remote network access.
How to configure l2tp/IPsec VPN client in Linux?
Fortunately, L2TP is compatible with various Linux distributions, including Debian, Ubuntu, CentOS, Fedora, and others. Consider its prerequisites before setting up the L2TP/IPsec VPN client on Linux.
Prerequisites:
- Install L2TP/IPsec Client Software, including NetworkManager, Strongswan, and xl2tpd, Package Manager to handle L2TP and IPsec protocols.
- Have root access or sudo privileges for installing and configuring VPN software and modifying network settings.
- Meet the minimum hardware requirements.
- Access to L2TP VPN Server Details.
1. Setting up Linux L2TP/IPsec VPN connection via GUI (easiest method)
1. Open Terminal and install necessary packages in various Linux distributions using platform-specific package managers:
Debian/Ubuntu (18.04 and newer):
sudo add-apt-repository ppa:nm-l2tp/network-manager-l2tp
sudo apt-get update
sudo apt-get install network-manager-l2tp network-manager-l2tp-gnome
Previous commands are run to install the NetworkManager-l2tp VPN plugin on Ubuntu via PPA, which lets you use NetworkManager’s graphical user interface to handle L2TP and L2TP/IPsec.
RHEL/CentOS and Fedora:
dnf install xl2tpd
dnf install NetworkManager-l2tp
dnf install NetworkManager-l2tp-gnome
OR
yum install xl2tpd
yum install NetworkManager-l2tp
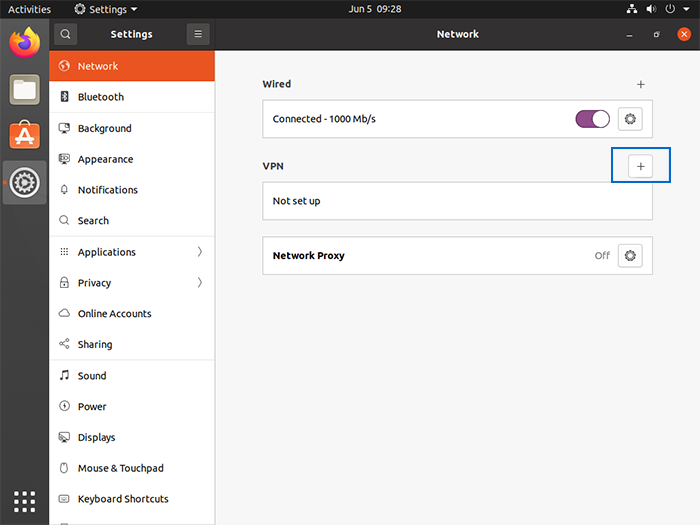
yum install NetworkManager-l2tp-gnome2. Open the Network Manager interface from the system tray.
3. Click on “network settings.”
4. Go to “VPN Connections” and then “Configure VPN…” and press the “+” icon to add a new VPN connection.
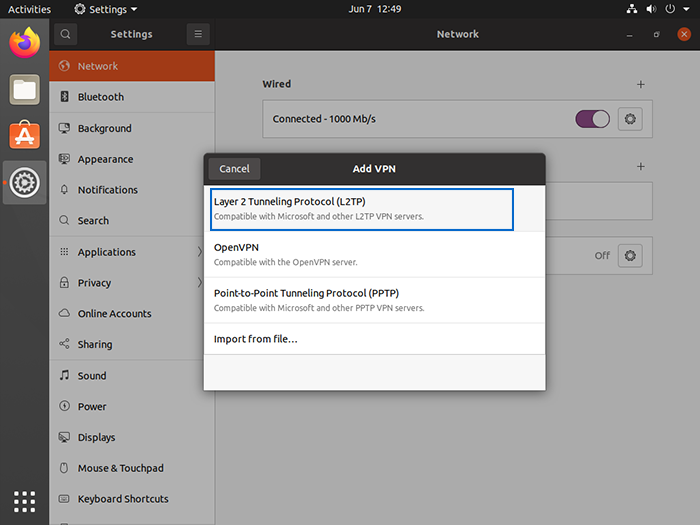
5. Set “Layer 2 Tunneling Protocol (L2TP)” as the VPN connection type from pop-up windows.
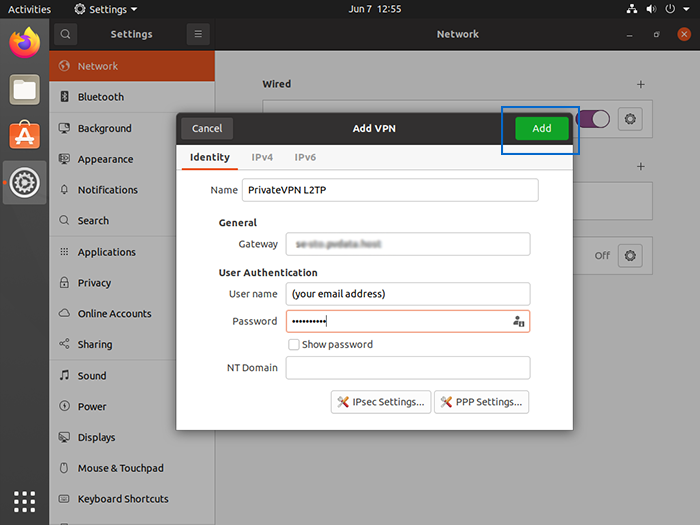
6. Give your VPN connection a recognizable in the “Name” field.
7. Enter VPN connection information (gateway IP address, username, password, etc.)
8. To save a password only for this user, right-click “?” in the password field and choose that option.
9. Skip the NT Domain field.
10. Click ” IPsec settings” to enter pre-shared key
11. Enable “IPsec tunnel to L2TP host” by checking the checkbox.
12. Skip the Gateway ID field without edit.
13. Enter your VPN Pre-shared key.
14. Expand the advanced option and configure the encryption settings (usually IKEv2 or 3DES-SHA1) following your provider’s instructions.
15. Click “OK“.
16. Click the “Add” button to save the VPN configuration.
17. Turn the toggle button on to start the VPN.

To verify the correctness of the VPN configuration, check your device’s public IP address in a browser. If your public IP address is replaced with the VPN server’s IP address, you can ensure the VPN is working properly.
Note: The instructions are the same for all Linux distributions.
2. Configuring Linux L2TP/IPsec VPN client via Command Line (Advanced method)
Although NetworkManager facilitates connecting to L2TP/IPsec VPN, for optimal customization and advanced features, you can use separate packages such as strongswan and xl2tpd.
Follow the steps to connect to the L2TP/IPSec VPN client on Linux distributions with Root privileges:
1. Install the relevant packages on your specific distribution (if they are not already installed):
Debian/Ubuntu:
apt-get update
apt-get install strongswan xl2tpd net-toolsCentOS:
yum install epel-release
yum --enablerepo=epel install strongswan xl2tpd net-toolsFedora:
yum install strongswan xl2tpd net-tools2. Create your VPN variables based on actual values in the following template:
VPN_SERVER_IP='your_vpn_server_ip'
VPN_IPSEC_PSK='your_ipsec_pre_shared_key'
VPN_USER='your_vpn_username'
VPN_PASSWORD='your_vpn_password'
3. Edit the ipsec.conf file for Create StrongSwan configuration:
sudo nano /etc/ipsec.conf4. Paste the following template and replace the placeholders with your VPN server’s details:
conn myvpn   # Connection name
  auto=add
  keyexchange=ikev1    # Use IKEv2 protocol (more secure)
  authby=secret    # Authentication method (PSK)
  type=transport
  left=%defaultroute
  leftprotoport=17/1701
  rightprotoport=17/1701
  right=$VPN_SERVER_IP
  ike=aes128-sha1-modp2048   # Phase 1 encryption and hash algorithms
  esp=aes128-sha1  # Phase 2 encryption and hash algorithms
5. Save the file and exit nano.
6. Create StrongSwan new secrects file:
sudo nano /etc/ipsec.secrets7. Add the following line according to your actual values:
L2TP-PSK %any : PSK "%your_psk"8. save the file and exit Nano.
9. Make sure that the secrets file has limited access:
sudo chmod 600 /etc/ipsec.secretsThis process For CentOS and Fedora as follows:
mv /etc/strongswan/ipsec.conf /etc/strongswan/ipsec.conf.old 2>/dev/null
mv /etc/strongswan/ipsec.secrets /etc/strongswan/ipsec.secrets.old 2>/dev/null
ln -s /etc/ipsec.conf /etc/strongswan/ipsec.conf
ln -s /etc/ipsec.secrets /etc/strongswan/ipsec.secrets
10. Edit the xl2tpd.conf file to configure xl2tpd:
sudo nano /etc/xl2tpd/xl2tpd.conf11. Make sure the following lines are adjusted:
lns = $VPN_SERVER_IP
ppp debug = yes
pppoptfile = /etc/ppp/options.l2tpd.client
length bit = yes
EOF
cat > /etc/ppp/options.l2tpd.client <<EOF
ipcp-accept-local
ipcp-accept-remote
refuse-eap
require-chap
noccp
noauth
mtu 1280
mru 1280
noipdefault
defaultroute
usepeerdns
connect-delay 5000
name "$VPN_USER"
password "$VPN_PASSWORD"
EOF
chmod 600 /etc/ppp/options.l2tpd.client
12. Setting up the Linux VPN client will be completed by creating the xl2tpd control file:
mkdir -p /var/run/xl2tpd13. Restart the VPN service:
service strongswan restart
# For Ubuntu 20.04, if strongswan service not found
ipsec restart
service xl2tpd restart
14. Start the VPN Connection:
- IPsec connection:
Ubuntu /Debian:
ipsec up myvpnCentOS / Fedora:
strongswan up myvpn- L2TP connection:
echo "c myvpn" > /var/run/xl2tpd/l2tp-control15. To confirm the VPN tunnel is established and reachable, run the ifconfig command, and you should get a new interface ppp0 in the output.
16. Run ip route to check the default route.
17. In the output of the previous command, write down the gateway IP value of the default via the X.X.X.X… line, replace it in the following commands, and eliminate the VPN server’s public IP from the new default route:
route add YOUR_VPN_SERVER_PUBLIC_IP gw X.X.X.X #use actual value18. If you setup the VPN client on the remote server, eliminate your local PC’s public IP from the new default route:
route add YOUR_LOCAL_PC_PUBLIC_IP gw X.X.X.X19. To redirect traffic via the VPN server, create a new default route:
route add default dev ppp020. Verify the correct routing of your traffic through the VPN by getting Your VPN Server IP in the output of the below command:
wget -qO- http://ipv4.icanhazip.com; echoNote: Repeating the above steps for each VPN connection is necessary.
How to disconnect L2TP/IPsec VPN connection in Linux?
Debian/Ubuntu:
echo "d myvpn" > /var/run/xl2tpd/l2tp-controlipsec down myvpnCentOS/Fedora:
echo "d myvpn" > /var/run/xl2tpd/l2tp-control
strongswan down myvpn
Important tips for configuring Linux l2tp/IPsec VPN client
- Replace your VPN server’s information in the l2tp/IPsec VPN client configuration instructions.
- Set firewall rules to allow VPN traffic ( allow UDP ports 500 and 4500 for IPsec and L2TP traffic).
- Configure DNS settings during VPN connection for correct resolution.
- Additional server certificate configuration is required for XAuth authentication.
- For optimal VPN connection and route management, use Netplan or firewall settings.
- Configure network-based VPN settings according to your network requirements and configurations.
How to check VPN on the command line?
1. Run the vpncli.exe command in the Linux terminal to ensure the VPN is connected.
2. To verify that the VPN is active, you can also run the ifconfig command in the Linux terminal; if the “tune device” includes an IP address from the private network, you can ensure the VPN is active.
3. Further, see whether the private IP address of the VPN server can be ping-tested.
Does Linux have a built-in VPN?
No, Linux does not come with a built-in VPN client. Nevertheless, it is compatible with various VPN protocols, such as L2TP/IPsec, OpenVPN, and PPTP.
How to connect to L2TP/IPsec VPN on Windows?
However, there are some considerations to consider before configuring a Windows L2TP/IPsec VPN client.
Prerequisites:
- Gather VPN server details from the VPN provider, including server address or hostname, pre-shared key (PSK), username/password, encryption, and authentication options.
- Checking Windows version compatibility with L2TP/IPsec VPN and using Windows 7 and later (Windows 7, Windows 8, Windows 10, and Windows 11).
Setting up the L2TP/IPsec VPN connection on Windows 10 & 11:
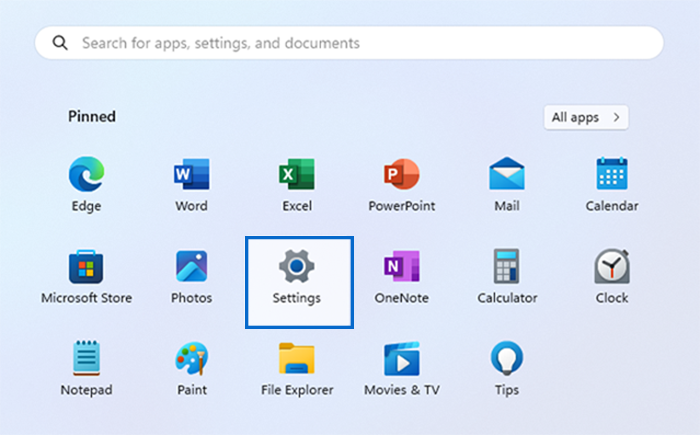
1. Expand the “Start” menu from the taskbar and click “Settings” (or press Windows key + I)
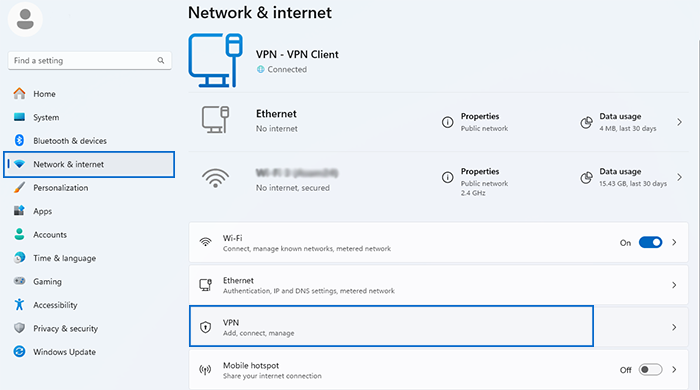
2. Open VPN settings:
- Select “Network & Internet” > “VPN” (from the left-hand menu) > “Add a VPN connection” (Windows 10/11)
- Click on the “Start” icon and search for “VPN settings” (Windows 7/8)

3. Configure VPN connection based on your VPN server details:
- Select “Windows (built-in)” as VPN Provider.
- Enter a descriptive name for your VPN connection.
- Enter your VPN server address. (provided by your VPN provider).
- Set “Layer 2 Tunneling Protocol with IPSec (L2TP/IPsec)” as the VPN type.
- Enter the pre-shared key (provided by your VPN provider).
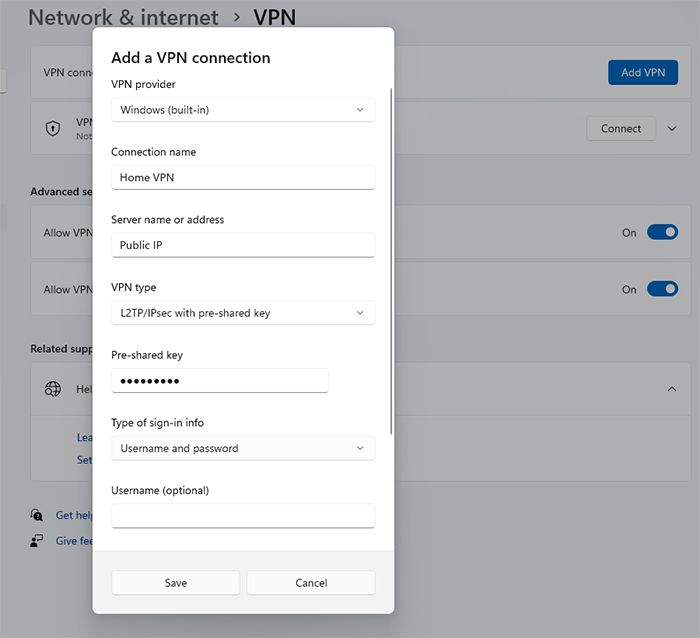
- Enter your VPN account credentials (Username and password)
- Mark the box “Remember my sign-in info” to save your username and password (Optionally)

4. Choose the Authentication method according to the Instructions specified by your provider (usually “Microsoft CHAP Version 2” (MS-CHAP v2))
5. To finish setting up the VPN client, click “Save.”
6. To connect to the VPN, return to “Network & Internet settings” and Click “VPN” > connection you created > “Connect.”
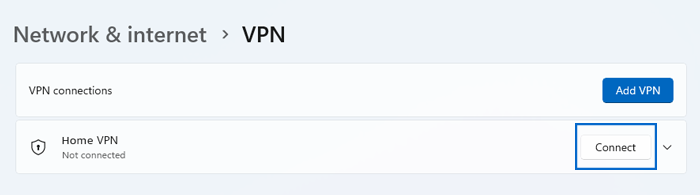
7. Enter Your VPN Credentials if prompted. ( username and password)
After setting up and connecting the L2TP/IPsec VPN on Windows successfully, the VPN connection status should show connected.
Why can’t Windows connect to L2TP VPN?
- Incorrect VPN settings(server address, username, password, or encryption type)
- Incompatibility of L2TP protocol with Windows version
- Operating system issue such as bug or outdated drivers.
- Blocking L2TP/IPsec requiring ports(UDP 500, 1701) by firewall.
- VPN server misconfiguration or server down.
Does Windows 10 support L2TP VPN?
Yes, currently, Windows 10 supports L2TP/IPSec service and also works well with this service by providing a Native VPN client.
How do I change my L2TP port in Windows?
Unfortunately, you cannot directly change the source and destination ports in the Windows L2TP client configuration because it involves server-side configuration.
To change the source port, you can use the src-nat rule, which cannot change the destination port of the traffic.
How to Setup L2TP/IPsec VPN Client on macOS?
To start setting up an L2TP/IPsec VPN client on macOS, first ensure you meet the minimum requirements.
Prerequisite:
Ensure access to L2TP/IPsec service details, including server address/name, username, password, and pre-shared key (PSK).
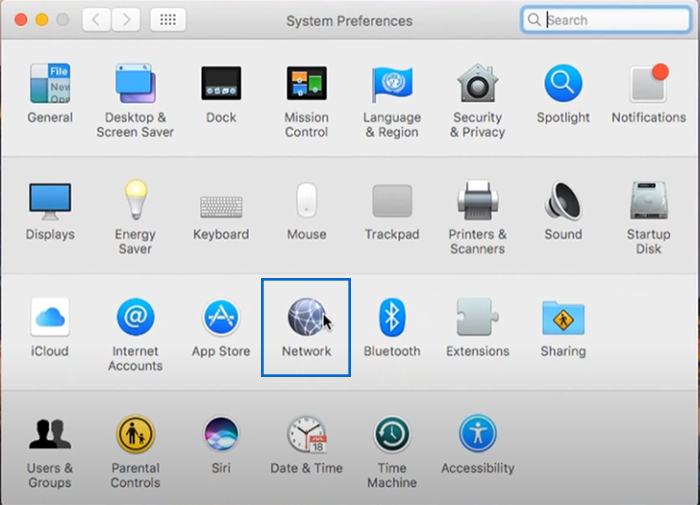
1. Open “System Preferences” from the Apple menu in the top-left corner of your screen.
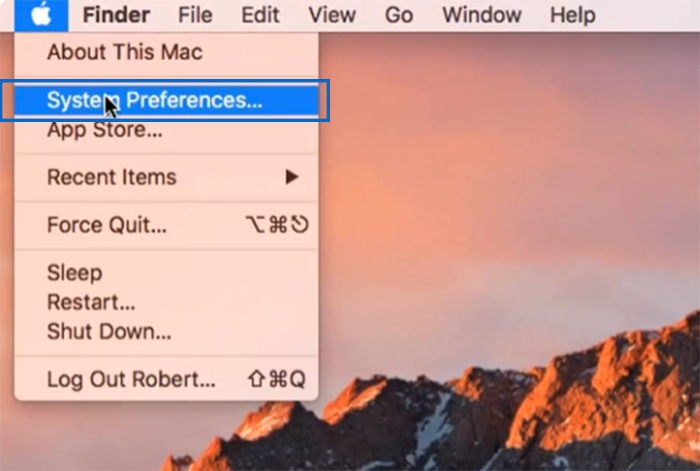
2. Select “Network.”
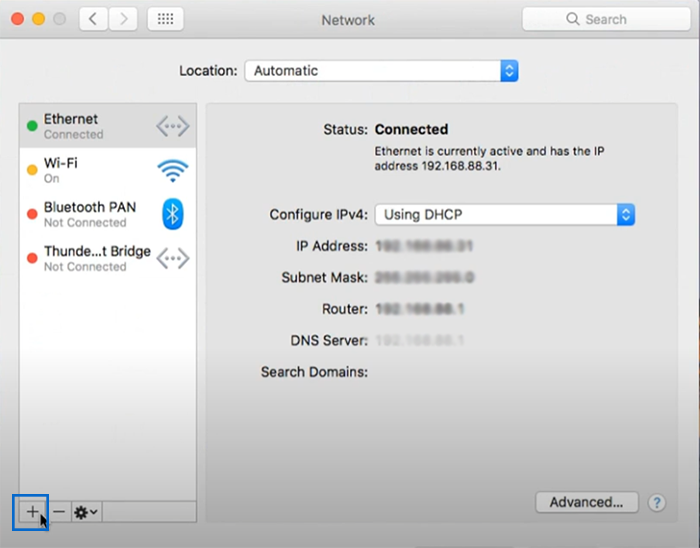
3. Click on ‘+‘ button in the bottom left corner to create new VPN connection.
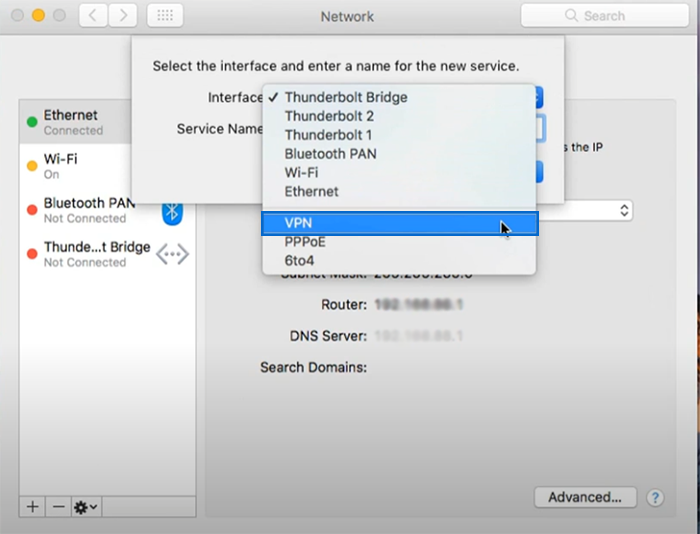
4. Choose “VPN” in the interface that appears.
5. Select “L2TP over IPSec” as the VPN Type.
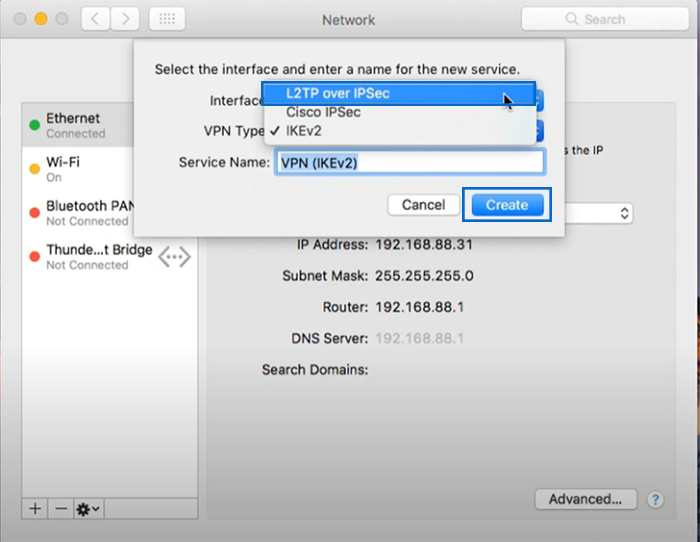
6. Click the “Create” button.
7. Enter VPN details:
- Set name for your VPN connection.
- Type Your VPN server IP address or hostname you want to connect.
- Enter your VPN account name. ( your VPN username)
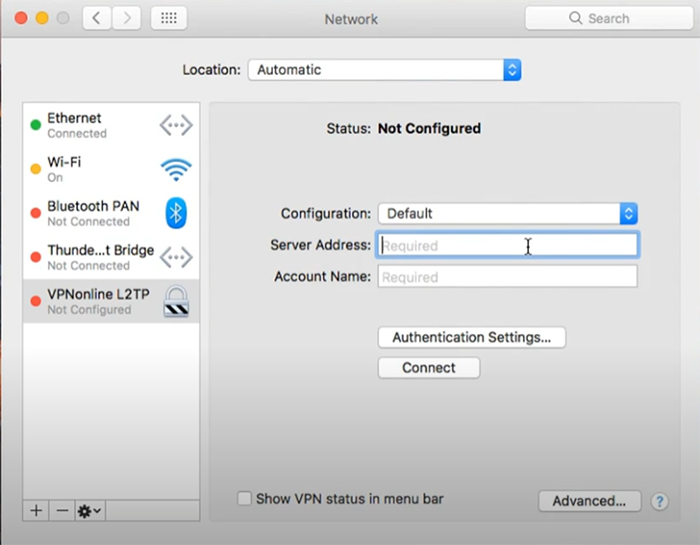
- Click the “Authentication Settings” button and type your VPN password.
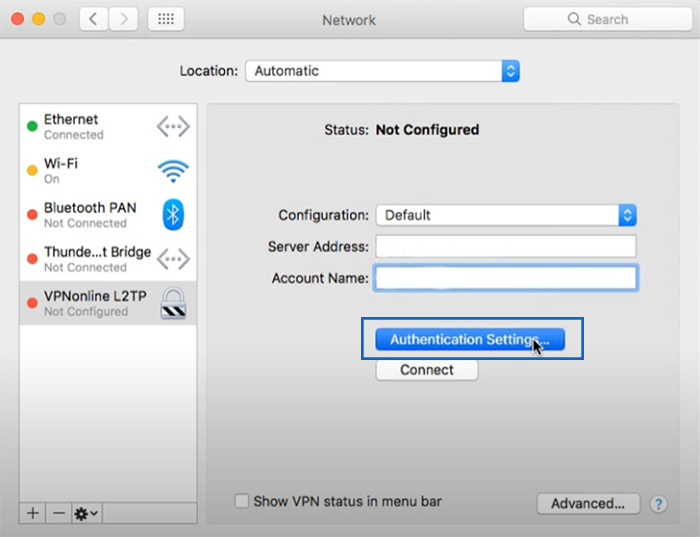
- Select “Shared Secret” In the “Remote” section and enter the pre-shared key (PSK).
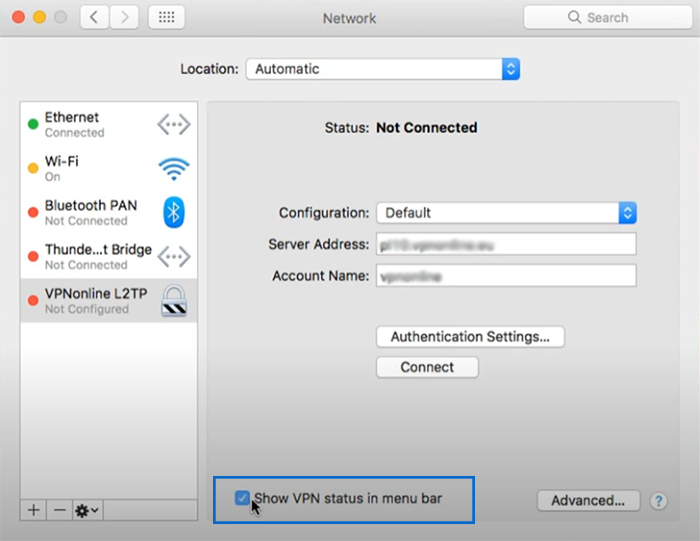
8. Check the box for “Show VPN status in the menu bar” if you want to get access to VPN controls quickly.
9. To adjust additional options (such as route VPN traffic and DNS settings), click on the “Advanced” button. (Optional)
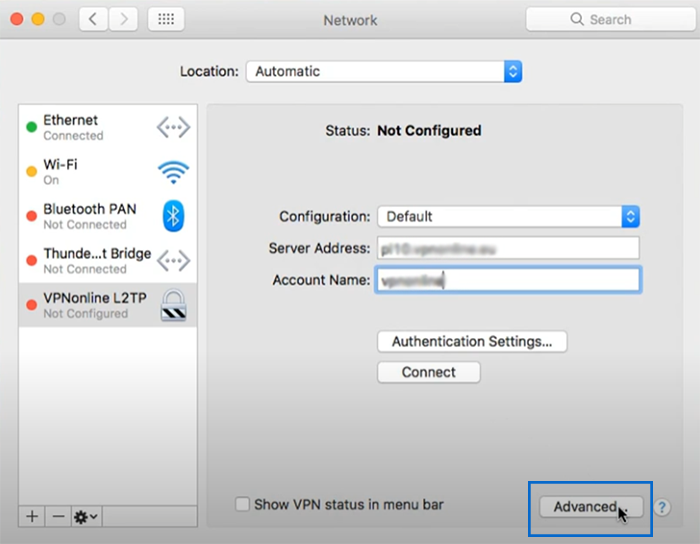
10. To save your changes in “advanced” section, click on OK.
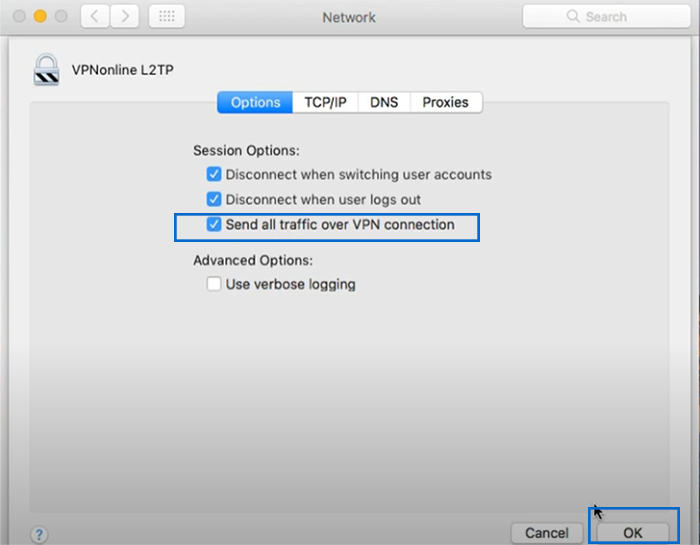
11. Click “Apply” to finalize the macOS VPN client setup.
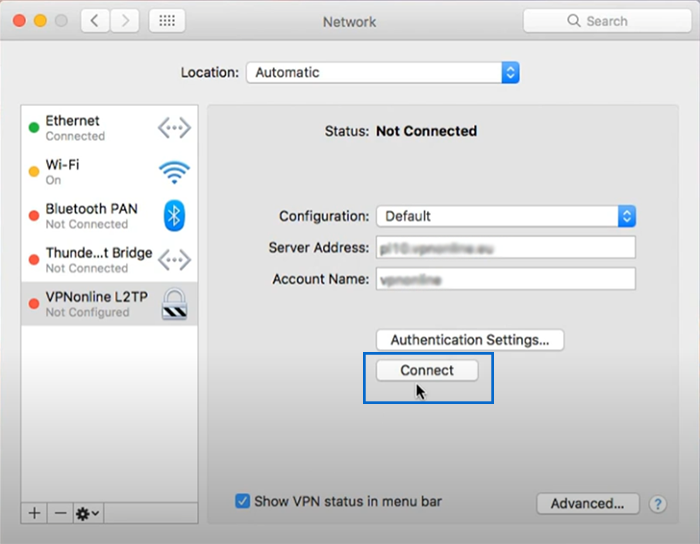
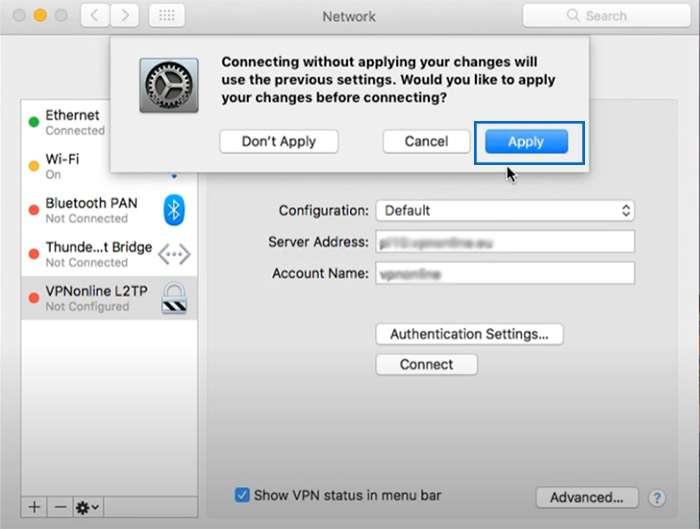
12. Select the VPN icon from the menu bar at the top of your screen, click on the VPN connection you created, and finally, to establish a VPN connection, click the “Connect” button.
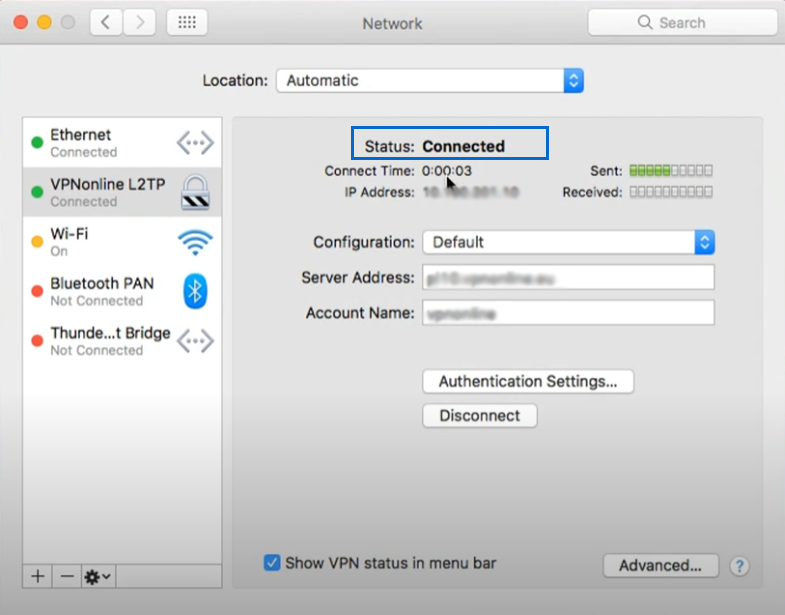
That’s it. You have configured the macOS L2TP/IPsec VPN client successfully, and now you should be connected to the L2TP/IPsec VPN.
Note: you can manage VPN connections through the “Network” section from the System Preferences menu.
How can I disconnect the L2TP/IPSec VPN on macOS?
Choose the VPN icon from the menu bar and click the “Disconnect” button.
How to configure L2TP/IPsec VPN client on iOS?
Fortunately, Apple devices support native VPN clients, making setting up L2TP/IPsec on Apple devices very simple.
Prerequisites:
Gather essential information about the VPN server, including server address or hostname, username and password for VPN authentication, and pre-shared key (PSK) from your VPN provider. Then, proceed as follows:
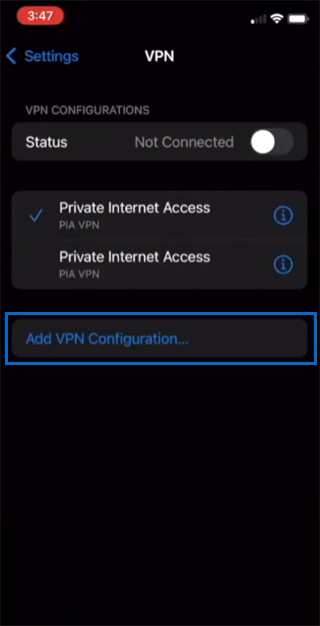
1. Open “Settings” on your iOS device (iPhone or iPad).
2. Navigate to “General“> “VPN“.
3. Tap on “Add VPN Configuration…”
4. Choose “L2TP” from the menu as the VPN type. ( if the “L2TP/IPsec” option is available directly, you can select it.)
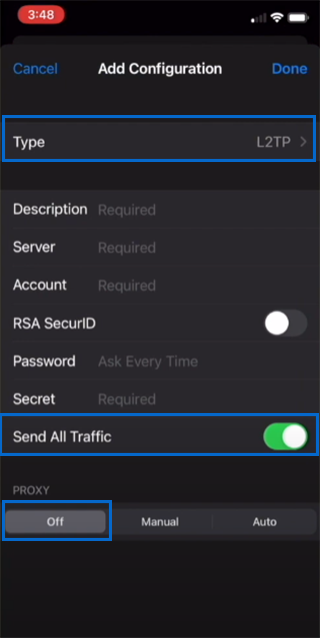
5. Type Description for the VPN connection.(provide a name for your VPN connection)
6. Paste the server address or hostname you get from the VPN provider in the “server” field.
7. Enter the “VPN username” in the “Account” field.
8. Enter your “VPN password” in the “Password” field.
9. Paste the “pre-shared key” provided by your VPN provider in the “Secret” field.
10. Setup requires RSA SecurID for VPN configuration. ( If needed )
11. Enable the “Send All Traffic” option by setting it to on.
12. Disable “Proxy” by setting it to off.
13. Tap on “Done” or “Save” to save the configuration after entering all the required details.
14. To connect to the VPN, find the name of the VPN connection you just created under VPN settings, and toggle the switch next to the VPN to connect. (VPN username and password may be prompted again.)
15. The VPN icon in the status bar at the top of your device’s screen indicates that you have connected to a VPN.
Note: You may need additional settings in VPN configuration, such as shared secret, certificate authentication, or specific encryption algorithms according to the VPN provider’s requirements.
Note: Turn “On Demand VPN” on in your VPN settings to enable automatic connection for accessing a specific network quickly.
Congratulations, you have set up your L2TP/IPsec VPN connection on iOS devices, and you should now be able to connect to the L2TP/IPsec VPN and browse the internet with peace of mind.
How to Setup L2TP/IPsec VPN on Android?
Setting up an L2TP/IPsec VPN client on Android is similar to iOS, but some steps differ.
Prerequisites:
Ensure access to the necessary information for configuring L2TP/IPsec VPN.
In older versions of Android, due to the lack of built-in L2TP/IPsec support, you may need to download a third-party VPN app that supports L2TP/IPsec protocols.
Configuring your Android for L2TP/IPsec VPN (Built-in Android VPN) :
1. Open the “Settings” app on your Android device (Android 7.0 and above).
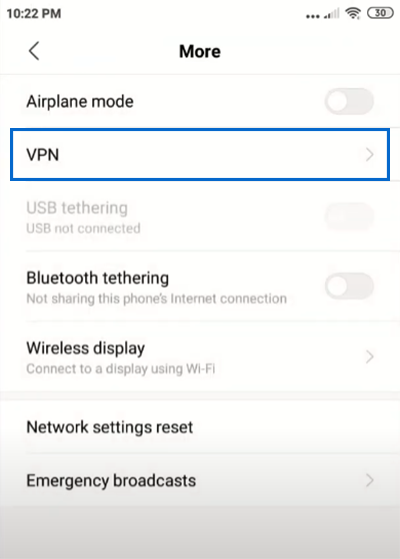
2. Go to “Network & Internet” directly or under the “Connections” or “Wireless & Networks” section.
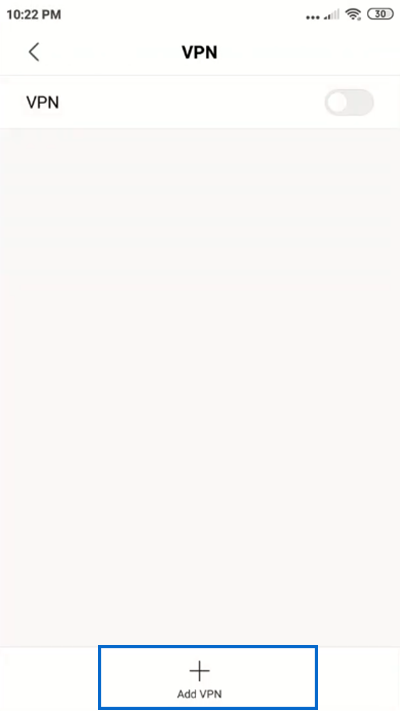
3. Tap on “VPN” or “VPN settings.”
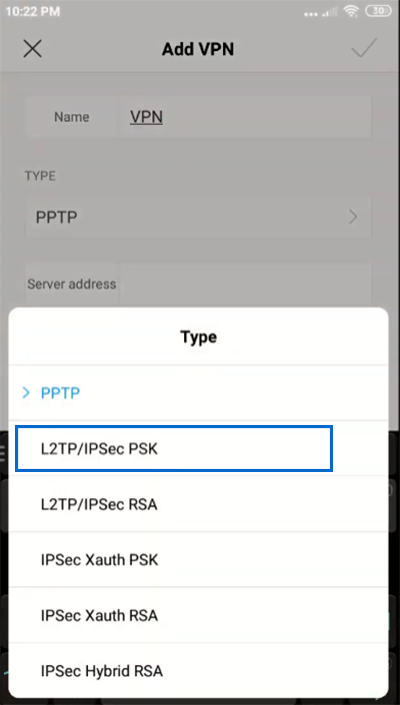
4. Tap on the “+” button or “Add VPN.”
5. Set “L2TP/IPsec PSK” for VPN type.
6. Enter VPN details:
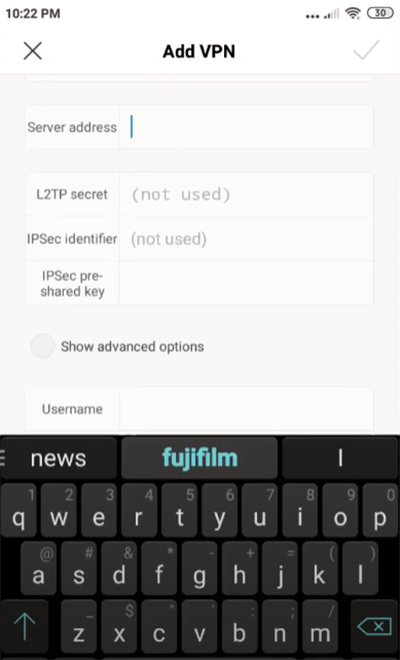
- Name: choose a name for a VPN connection.
- Server address: paste IP address or domain name of the VPN server
- L2TP username: type your VPN username.
- L2TP password: enter your VPN password.
- IPsec pre-shared key: Paste the pre-shared key provided by your VPN provider.
- IPSec identifier: enter the IPSec identifier referring to your VPN provider. (if needed.)
7. After entering all required details, tap “Save” and “OK” to save the VPN configuration.
8. To connect to the L2TP/IPsec VPN, select the VPN profile you created under the VPN connections and tap on the “Connect” button. (VPN username and password may be prompted again.)


9. By displaying the VPN or key icon in the status bar of your screen, you can verify the VPN connection.
That’s it! You have successfully set up L2TP/IPsec VPN in Android, and the VPN connection should now be active on your Android device when browsing the internet so that it keeps you safe in the public network.
What ports are needed for L2TP VPN?
Standard configuration(L2TP with IPsec) needs UDP 500, UDP 1701, UDP 4500, and ESP IP Protocol 50.
If you configured L2TP VPN without IPsec, only UDP port 1701 is used.
Do all VPNs use IPsec?
Not all VPNs necessarily use IPsec; SSL/TLS is also common for VPN functionality.
However, IPsec is one of the most commonly used VPN protocols for encryption and secure connections.
Is L2TP outdated?
No, but it is less common due to security concerns.
Is L2TP IPsec VPN secure?
L2TP alone cannot be introduced as a secure protocol because it is used to transmit data over a private channel but does not encrypt internet traffic; therefore, it is vulnerable to hacking or tracking.
When L2TP is paired with IPsec, it becomes a secure and reliable VPN protocol because L2TP handles the data routing, and the responsibility for encrypting the data lies with the IPsec protocol.
What can we do After setting up an L2TP VPN?
After setting up the L2TP VPN client, your internet traffic is encrypted against tracking by insecure networks, increasing your privacy.
Additionally, remote access to private networks such as work networks and specific resources becomes secure, and your online activities become untraceable.
You can also use L2TP VPN to bypass geographical restrictions to access blocked content in your region.
Conclusion
This guide covered how to setup L2TP/IPsec VPN clients across popular operating systems, the importance of each configuration step, and security best practices.
Setting up your L2TP/IPsec VPN client correctly ensures secure, private internet access and safe remote network connections.
Follow the detailed instructions appropriate for your device to achieve a successful and stable VPN connection.
FAQ
2. What are the prerequisites needed before setting up an L2TP/IPsec VPN client?
You need a VPN server or subscription, server details (address, credentials, pre-shared key), a compatible device, and sometimes VPN client software like NetworkManager on Linux.
3. How do I setup L2TP/IPsec VPN client on Linux?
Install necessary packages like strongSwan and xl2tpd. Configure VPN via GUI tools like NetworkManager or manually with config files, inputting correct server details, and start VPN services.
4. Why might Windows fail to connect to an L2TP/IPsec VPN?
Common issues include incorrect VPN settings, firewall blocking required UDP ports 500, 1701, and 4500, outdated network drivers, or VPN server problems.
5. What ports must be open for L2TP/IPsec VPN to function?
Open UDP ports 500, 1701, and 4500, and enable the ESP protocol (IP protocol 50) to allow VPN traffic.
6. Is L2TP/IPsec VPN secure?
Yes, when combined with IPsec, it provides strong encryption and secure tunneling, protecting data privacy.
7. Can I change the default L2TP port on Windows?
No, port changes must be made on the VPN server or network devices; Windows client does not support changing L2TP ports.
8. How do I disconnect L2TP/IPsec VPN on macOS and Linux?
On macOS, disconnect via the VPN menu icon. On Linux, use NetworkManager or command-line tools like xl2tpd control and ipsec down commands.
9. Does Windows 10 support L2TP/IPsec VPN natively?
Yes, Windows 10 has built-in support and allows configuration through network settings.
10. What benefits do I get from setting up an L2TP/IPsec VPN client?
It encrypts internet traffic for privacy, enables secure remote network access, bypasses geo-restrictions, and protects data on public networks.