How to Add Additional IPv4 and IPv6 to Linux VPS
Most Linux servers have a public IP address allowing remote connections.
Adding additional IPv4 and IPv6 serves various purposes, such as:
- Hosting multiple websites or services.
- Loading balancing, and high availability.
- Adopting IPv6 to future-proof your online presence.
To add additional IPv4 and IPv6 to Linux VPS, first, you need to have purchased Linux VPS to be able to order IPs through your VPS provider’s control panel.
The extra IP addresses must be added manually to the network interfaces since DHCP cannot be used to automatically add them to VPS.
So, the final step is to configure the network settings to manage new IP addresses.
Steps to Configure IP Addresses in Linux VPS
The process of Adding additional IPv4 and IPv6 addresses involves obtaining the IPs from your VPS provider’s control panel and configuring your network settings.
This typically involves steps like logging into the control panel, requesting additional IPs, and then updating your Linux system’s network configuration file.
There are two main steps to finish this process:
Step 1: Obtain the Additional Addresses
This depends on your setup. If you’re using a cloud provider or VPS hosting, you’ll likely need to order them through their control panel.
For a local network, you might need to configure your router to assign additional addresses through DHCP or manually assign static IPs within a valid range.
To order an IPv4 and add an IPv6 address, follow the below path:
- Log in to your Linux VPS Control Panel using your account credentials.
- Select ‘Manage‘ from the upper right corner, then select ‘Network information‘.
- A summary of your IP addresses is displayed to you. To order extra IP addresses, click “Request IPv4 addresses.”
- In the same path as above, after clicking “Request IPv4 addresses”, click ”Add new IPv6 address” to add an IPv6 address.
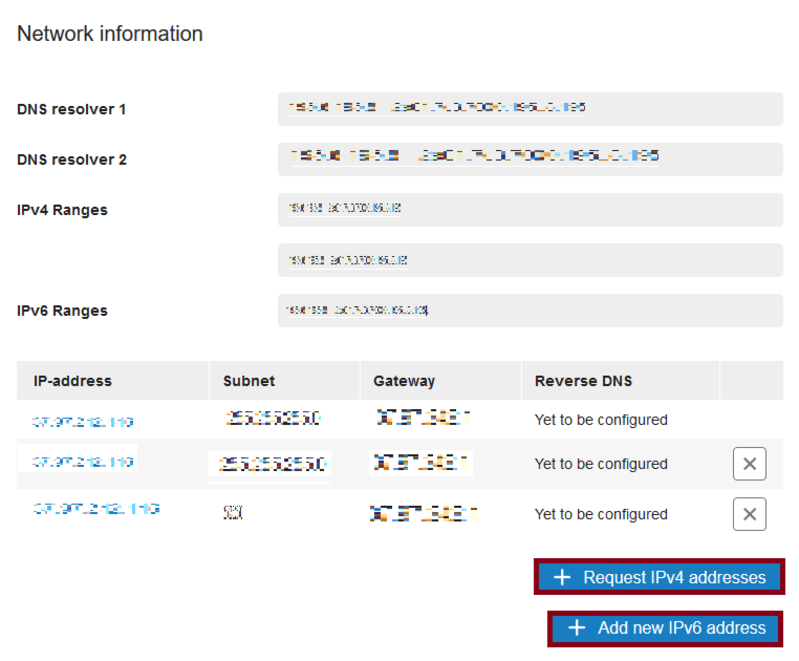
Note: If you send emails from your VPS using this IP address, after adding the IPv6 address, make sure you have set up your reverse DNS.
Step 2: Configure Extra IPv4 or IPv6 Addresses on Linux VPS
Once you have the additional addresses, you need to configure your Linux system to recognize and use them. The specific steps depend on your Linux distribution.
Here, we explain the way you can add an IPv4 address and an IPv6 address in Ubuntu 22.04.
Follow the below path to configure the Network Interface on Ubuntu 22.04:
- Connect to the VPS via the Ubuntu VPS console or SSH.
- Run the command below to view the current network interfaces:
ip a- Open the network configuration file to add the extra IPv4 and IPv6 addresses in the network interfaces:
sudo nano /etc/netplan/01-netcfg.yaml- Add the following values to the file (For IPV4)
ethernets:
      ens3:
        dhcp4: no
        dhcp6: yes
        addresses:
          - Your primary IPv4 and IPv6 addresses with the range /24 addition
          - Your primary IPv4 and IPv6 addresses with the range /24 addition
        routes:
        - to: default
          via: Your primary IP
Note: Do not enter additional gateways for secondary IPs.
For IPv6, add:
   ethernets:
      ens3:
        dhcp4: yes
        dhcp6: no
        addresses:
          - Your primary IPv6 address with the range /48 addition
          - Your primary IPv6 address with the range /48 addition
        routes:
          - to: default
via: Your primary IPv6 address.- Save the changes and exit.
- Now, you are ready to use the new IP address. To do this, run:
sudo netplan apply- Again, by running the
ip acommand, you can check the newly added IPv4 and IPv6 addresses. - If you do not see the new configuration, you must check if a file exists called 01-network-manager-all.yaml in /etc/netplan/. To do this, type:
ls /etc/netplan/- If yes, use the command below to rename the file:
sudo mv /etc/netplan/01-network-manager-all.yaml /etc/netplan/01-network-manager-all-yaml.backupYou must see the correct configuration by running the sudo netplan apply and ls /etc/netplan/ commands.
When and Why Add Additional IPv4 and IPv6 to Linux VPS
Imagine your Linux VPS as a bustling apartment building. By default, it has one main address for everyone.
But what if you want to rent out additional units? That’s where extra IP addresses come in, acting like unique door numbers for each new tenant.
Here’s why you might want to add more “door numbers” to your VPS:
Multiple Websites or Businesses:
Running separate websites or online stores? Assigning individual IP addresses to each gives them their own “shopfront” online, improving security and allowing you to manage them independently.
Scaling Up and Sharing Resources:
Need to handle more traffic or want to host a game server? Adding IPs lets you distribute the workload across multiple “apartments” within your VPS, boosting performance and reliability.
With IPv4 addresses becoming scarce, IPv6 offers a future-proof solution with a vast number of unique addresses, ensuring your virtual building has room for all its potential tenants.
Additional Notes:
- Keep in mind to back up your network configuration files before making changes.
- Make sure the additional IP addresses are valid and within a usable range for your network.
- You might need to adjust firewall rules to allow incoming traffic on the new addresses.
How IPv4 and IPv6 are different?
IPv4, the current standard, faces an exhaustion problem due to its limited 32-bit address space.
IPv6, the next-generation protocol, offers a significantly larger 128-bit address space, ensuring an almost limitless pool of unique identifiers for future internet growth.
How do I obtain additional IP addresses?
This depends on your setup. Typically, you’ll order them through your VPS provider’s control panel.
How do I configure the additional IP addresses on my Linux VPS?
The process varies depending on your Linux distribution:
- Identifying your network interface.
- Editing the network configuration file (e.g., netplan config file in Ubuntu).
- Adding entries for the new IP addresses.
- Saving the changes and restarting the network service.
Are there any risks involved in adding additional IP addresses?
There are minimal risks if done correctly.
However, it’s important to:
- Back up your network configuration files before making changes.
- Ensure the additional IP addresses are valid and within a usable range for your network.
- Adjust firewall rules to allow incoming traffic on the new addresses.
What if I encounter problems Configuring the IP addresses?
If you have chosen OperaVPS as your VPS provider, you can contact us 24/7 to receive support resources or documentation.
You can also search online forums or communities for troubleshooting guides specific to your Linux distribution.
Conclusion
Similar to adding extra units in an apartment building, assigning additional IPv4 and IPv6 addresses to your Linux VPS allows you to host multiple websites or services independently.
By obtaining these IPs through your VPS provider’s control panel and configuring your network settings (steps provided for Ubuntu 22.04), you can distribute the workload for better performance and leverage the vastness of IPv6 for future scalability.
Remember to back up configurations and adjust firewall rules for the new addresses.